Copyright © 2004 The Shuttleworth Foundation
Unless otherwise expressly stated, all original material of whatever nature created by the contributors of the Learn Linux community, is licensed under the Creative Commons license Attribution-ShareAlike 2.0.
What follows is a copy of the "human-readable summary" of this document. The Legal Code (full license) may be read here.
You are free:
to copy, distribute, display, and perform the work
to make derivative works
to make commercial use of the work
Under the following conditions:
 Attribution. You must give the original author credit.
 Share Alike. If you alter, transform, or build upon this
work, you may distribute the resulting work only under a license identical to this one.
Share Alike. If you alter, transform, or build upon this
work, you may distribute the resulting work only under a license identical to this one.
For any reuse or distribution, you must make clear to others the license terms of this work.
Any of these conditions can be waived if you get permission from the copyright holder.
Your fair use and other rights are in no way affected by the above.
This is a human-readable summary of the Legal Code (the full license).
2005-01-25 19:34:32
| Revision History | |
|---|---|
| Revision 0.0.1 | 01/NOV/2004 |
| Initial version | |
Table of Contents
- 1. Network Administration Fundamentals
- Introducing the TCP/IP Model
- The OSI Model
- Relating the TCP and OSI Models
- Overview of how the TCP/IP Model Works
- A deeper look at the TCP protocol layers
- Network Layer and Understanding IP addressing
- Choosing the Class of network that you will use
- Why use sub-netting
- Summary - TCP/IP Stack
- Transferring information across the Internet
- Test the network with Ping
- Creating and using the ARP table
- Explaining routers
- Briefly on LAN 's and WAN's
- How to put an IP address onto your network card
- Packets, frames, bytes, octets and datagrams
- The network interfaces that you'll see if you run ifconfig -a
- Setting up multiple cards in one machine
- Logical and physical networks
- Plumbing a device
- Routing and using the "netstat" command
- Wrap-up
- 2. Client/Server Technology
- 3. Network Architecture
- 4. IP Address Allocation
- 5. Basic Network Configuration
- 6. Electronic Mail
- 7. Domain Naming System
- 8. SAMBA
- 9. Basic network troubleshooting
- 10. Basics of network security
- 11. Network, System and Service Security
- 12. Network File System (NFS)
- 13. Remote access
- 14. Connecting remotely to the X Window System
- 15. Connecting to an ISP
- A. Practical lab
- Index
List of Figures
- 1.1. The OSI Model
List of Tables
Table of Contents
- Introducing the TCP/IP Model
- The OSI Model
- Relating the TCP and OSI Models
- Overview of how the TCP/IP Model Works
- A deeper look at the TCP protocol layers
- Network Layer and Understanding IP addressing
- Choosing the Class of network that you will use
- Why use sub-netting
- Summary - TCP/IP Stack
- Transferring information across the Internet
- Test the network with Ping
- Creating and using the ARP table
- Explaining routers
- Briefly on LAN 's and WAN's
- How to put an IP address onto your network card
- Packets, frames, bytes, octets and datagrams
- The network interfaces that you'll see if you run ifconfig -a
- Setting up multiple cards in one machine
- Logical and physical networks
- Plumbing a device
- Routing and using the "netstat" command
- Wrap-up
The course we doing now is really the Foundation for TCP/IP and Network administration, and essentially before we can network administration a box, (a Linux machine) we need to understand more about TCP/IP.
The entire Internet is based upon the TCP/IP protocol.
In fact TCP/IP was developed on Unix many years ago and was the fundamental building block when building the Linux networking environment.
TCP/IP stands for Transmission Control Protocol /Internet Protocol.
IP is broken up into two protocols:
TCP (Transfer Control Protocol)
UDP (User Datagram Protocol)
Essentially the IP protocol is the main protocol for transferring information across the Internet.
So before we explore how TCP/IP works, let have a look at the underlying structure of how it is supposed to work.
If we look at the TCP and the IP protocol, it is essentially built up of a stack, think of it as a stack of books, each representing a different layer (5 layers in all).
At the lowest level we have a physical Layer - often the physical layer will be Ethernet, fast Ethernet, gigabit Ethernet, it might be a Token Ring, Fiber Data Distributed Interface (FDDI) amongst many possibilities.
Essentially what that boils down to, is the cabling, the network cards, the switches, the routers what do they talk at a physical layer?
Are they gigabit devices, Ethernet devices or Token Ring devices?
This level would consist of the device driver and network interface card and is responsible for forming the packets and then transmitting them across the physical media.
This layer is referred to as the Media Access Control Layer, the Link Layer or Layer-2.
The MAC layer is responsible for the MAC address of a network card. This is a 12 byte address, commonly the hardware address of the interface card. The MAC address on my only interface card is: 00:01:03:8C:FB:01. Since any two machines can only talk between one another at the MAC level, they each need to know each other's MAC addresses in order to communicate.
The destination address of the packets are checked at this level when the correct destination is reached, the Ethernet header is stripped from the packet and it is passed to the Network layer of that system.
The network layer is responsible for IP addressing in the network. In fact, the network layer is critical to so many aspects of communication and it is where IP gets its name - the Internet Protocol. IP addresses denote the logical network as well as the address of each device on the network.
This layer has the capability of handling two protocols, the first is Transmission Control Protocol and the second is User Datagram Protocol (TCP and UDP).
TCP is responsible for breaking up the message into packets and reassembling the message at the other end. Resending anything that is lost and making sure that the message is put back together from the packets in the correct order.
UDP is designed for applications that do not require the packets to be in any specific order. UDP is therefore termed a connection-less protocol.
At this level the server provides the requested service for the client. For example, the client requests a login into the server, so the client requests a remote login and the server provides the service with the remote login daemon. The service that is provided is the login service.
Table 1.1. TCP/IP Protocols and some of the related services
| Layer | Services |
|---|---|
| Application Layer | e.g. ftp (transfer files), telnet, smtp (simple message transfer protocol), NFS |
| Transport Layer | TCP and UDP |
| Network Layer | IP |
| MAC Layer | Network device e.g. /dev/ and MAC address |
| Physical Layer | e.g. Ethernet, Token Ring, SLIP |
There are two models that we are going to look at. One is the TCP/IP model, the other is the OSI Model (Open System Interconnect). The OSI model has a total of seven layers while we have only 5 layers in the TCP/IP model. Why do we discuss the OSI model now rather than before TCP/IP- The TCP/IP model was being used in practice well before the OSI model was devised. Thus, while there are similarities in the models, TCP/IP is the model that is used.
These layers (in both the OSI and the TCP/IP models) are identical up to the Network layer. In OSI the MAC layer is the called the Link Control Layer, also called the Data Link Layer.
From layer three onwards the two models are not quite the same, primarily because the TCP/IP model was created long before the OSI model.
We are going to look at the OSI model, and then see how it relates to the TCP/IP model.
The Transport Layer is responsible for how datagrams or packets are transported from one PC to another.
Above that we have the Session Layer. What is the Session Layer used for?
If we needed to record session information, what happens to the information between key-strokes. For example, if you started off a Secure shell session between two PC's the session layer is responsible for keeping that session alive between key-strokes.
On top of the Session Layer we have the Presentation Layer, which provides the standard look and feel that is presented to the final layer, the Application Layer.
So if you are writing an application like telnet or SSH (Secure Shell) or ftp (file transfer protocol), the presentation layer is used to present the application with a standard look and feel, what they call a API, Application Program Interface.
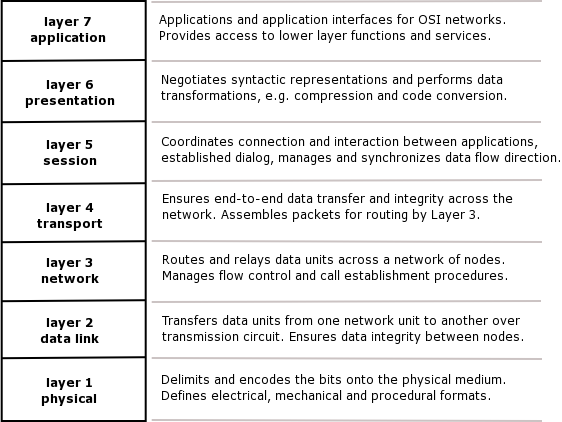
To re-cap, in TCP/IP we only have five layers, above the Network layer we have a Transport layer and above the Transport layer we have an Application layer.
So in fact we are missing the Session and Presentation layers, completely from the IP model, yet that is not critical as IP works none the less.
You will hear a lot about the OSI model and networking, but the de facto standard is the IP model. So we will have the OSI model in the back of our minds but we are going to concentrate on the TCP/IP model.
So lets have an Overview of how this layered structure (protocol) works.
We would potentially have two or more machines and lets assume for now, that they are connected via an Ethernet network.
If this were Token Ring it would look different, but we need not be concerned about that because at this time Ethernet has replaced almost all other physical layers.
There is still legacy support (including with Linux) for the other physical layers.
We have machine A and machine B connected by a NIC (a Network Interface Card) and cables, they could also be connected to a switch.[1]
In the following example or explanation we intend to transfer a file from Machine A to Machine B.
Machine A
We start a FTP client and we are trying to connect to a FTP server on Machine B.[2]
So what happens when the client requested an ftp service from the FTP Server?
Well the Client sends a packet of data e.g. a request for a file
The packet is then sent down to the transport layer, which puts on the relevant header information and does a Cyclic Redundancy Check (CRC).
The packet is then sent to the Network layer, which adds information to the header and does a CRC.
Then to the MAC layer, which puts on some more header and CRC information.
That packet is then transmitted across the physical network to machine B (we will discuss how this actually happens later).
Machine B
From the physical layer, the request is sent to the MAC Layer and the MAC information and CRC is stripped and the packet is sent up a layer
The next layer strips of the Network information and its CRC and sends the packet up a layer.
The Transport layer does the relevant checks and then strips the packet of its header and CRC and finally passes it on to the Application Layer, which in this case is the FTP server.
The idea behind the layer approach, is that every layer is independent of the next layer, and one could potentially strip out a layer, and put in another layer in its place and still achieve the same results.
Please realize that this process is transparent to the user (the user does not know that all of this is actually happening) but in fact because of this layered approach it happens transparently.
The MAC layer controls the MAC address, and every Network Card must have a unique MAC address else there will be conflicts.
Routers, Switches and NIC's have MAC addresses.
A MAC address is a 12 digit Hexadecimal number for example: 00-a0-B3-F5-A6-FF. The first of the three sets of digits dictates who the supplier of the card is.
Every manufacturer of Network components receives a unique MAC address prefix used to identify their type of cards.
One way you can see your MAC address one your workstation is to use the ifconfig command ifconfig -a | grep HWaddr.
If you have three network cards in your workstation, you should end up with three MAC addresses.
For the moment we will skip the Network Layer, we will come back to it, since it is obviously is a critical layer.
Now I want to talk briefly about the transport layer. In IP terms there are two types of transport TCP (Transfer Control Protocol) and UDP (User Datagram Protocol)
- TCP
TCP, is a Connection orientated protocol, and this means that a connection once set up remains set up for duration of communication.
For example, Telnet, FTP and SSH are connection oriented applications. Between workstation A and workstation B a channel of communication is set up.
A real world example of a connection orientated protocol is a telephone conversation where the telephone rings you pick it up, you do a bit of handshaking with the person on the other side, as soon as the handshaking is done ( in other words Hello how are you? ) the real conversation starts. When one persons says goodbye, the connection is terminated.
Usually there is a lot more overhead and interaction involved in a Connection Orientated Protocol. Think of the phone call, you have to dial the number, wait for an answer, you have to say hello, the other person says hello so there is a lot of to-ing and fro-ing while the connection is being set up.
That contrasts with UDP where the one workstation just puts the packet on the network and is not concerned whether or not the packet reaches its destination.
- UDP
UDP is a Connectionless protocol.
An example of this would be a DNS update. Here the datagram is put on the network and no error checking is done to see whether it arrived at a destination or not.
Another example of a Connectionless Protocol is an SMS. You can send a SMS via your cellphone, but your phone has no responsibility to see that the message gets delivered, the message is just sent. Even the reply message sent by the Service center to your phone is connectionless. There is no acknowledgment that the message has been received, and in that way it is a little more unreliable. However, smaller packet sizes and lack of handshaking ensure that it is quick and efficient.
A further example would be an SNMP trap - a Simple Network Management Protocol trap. This is used when, for example a switch or a router 's power supply is lost. The device will send a message (an SNMP-trap) to say that is going down, whether the message is received or not does not matter to the device sending it.
So UDP and TCP are the two different transport methods used, and they are used for different things, Telnet for example uses TCP, SSH uses TCP but DNS Update uses UDP.
Let 's move on to the Application Layer, essentially every application is based upon either the TCP or UDP Protocol. Telnet for example is based upon a connection orientated protocol - TCP protocol, while DNS updates as we mentioned, use a connectionless protocol or UDP.
Some applications can use one or the other of these protocols, but for the most part if we take an application like FTP, the FTP client will use the TCP protocol, because it needs to set up a connection between the Source and the destination. The requirements of the application dictate the protocol that will be used.
When we discuss the Network Layer we also need to understand and discuss the IP addresses, or Internet Protocol addresses.
We have talked about MAC addresses and now we have yet another address. In talking about these two addresses, we will see the difference between the MAC layer and the Network Layer.
| MAC layer | Network Layer | |
| Address | 00:01:03:8C:FB:01 | 192.168.0.21 |
| Address type | Physical address | Logical address |
| Layer | Present at layer 2 of the IP model | Present at layer 3 of the IP model |
| Uniqueness | All MAC addresses should be unique on a single network | All IP addresses should be unique on a single network. |
| Assignment | Manufacturer assigns the MAC address in the factory | Network administrator assigns the IP address. |
The Network layer identifier is not decided by a manufacturer, it is usually decided by the Network Administrator, and the identifier does not look like the MAC address layer, as it has four sets of digits 1.2.3.4 (separated by full-stops) a typical IP address would be 192.168.14.1
There are two versions of IP the TCP/IP protocol: IP version 4 and IP version 6. IP version 6 is much more complicated than IP version 4 and is much newer. We will be working with IP version 4 which is the address format of the four digits separated by full-stops.
If two devices want to talk to each other they each would need a unique IP address to deliver information.
If we look at the model network we used before, and set the IP addresses as follows:
Workstation A	196.6.23.14
Workstation B	196.6.23.17
|
These addresses uniquely identify the workstations.
Let 's look at the IP address in more detail, it is split into two sections, the first part is the Network part of the address, and the second part is the host part.
We are going to delve a bit deeper into how this IP number is made up in order to understand these different classes.
Each number is made up of 8 bits. If we use the IP address above, then we have 4 numbers, each number comprising 8 bits - giving us a total of 32 bits that make up the IP address. If we make all the bits 1 (binary), that number would be 255 (11111111), but making it 00000011, the number would be 3.
Now if we changed these bits, and made one of them a zero that would be 128 - 01111111 A byte of data has a "most significant bit" (MSB) (left-hand bit in the examples above) and a "least significant bit" (LSB) (the right-hand bit in the examples above) and I am going to work with the MSB as always being on the left hand side.
Our bit configuration for 196 is 11000100 that is 128 + 64 + 4 = 196
On the Internet we have three classes of IP addresses, class A, class B and Class C.
There are different classes of address groups - a class C group would include any IP address that starts with 110, (where the MSB is 110). This would mean that 11000000 is a class C address - this address works out to be 192.
If we take the address 196.6.23.14, this would also be a class C address because the first three bits are 110.
Right now do not worry about what comes after the first three bits, we are not really interested in them now to determine the class of the address.
Class C IP addresses would occur in the range of 192 to where the MSB is all 1 's - 11100000 (224). So class C addresses are in the range:
192 - 223
|
For a class B address the first two significant bits must be 10 (this is in binary not the decimal ten). If we took an address of 10000000 which would be 128, this would be a class B address.
Using an IP address of 132, would that be a class C or Class B address- Well 132 = 128 + 4. The number 132 translated into binary would be 100000100 and this matches our criteria of the first two bits being 10 - a class B address.
Class B IP addresses would occur in the range of 128 to where the MSB is 10111111 (191).
If I gave you an IP address 141.15.23.64 would that be a class B or a Class C address- Well it falls in the range 128 to 191 meaning that the MSB of the IP address must be 10 and if we change 141 to a binary number we would see that the MSB of it is 10. So it must be a class B address.
If I gave you an address of 206.15.23.10 would that be a class B or a class C address. Again it falls in the range of 192 and 223 so it must be a class C address.
Finally an address of 191.15.23.10 falls in the range of 128 to 191 so it would be a class B address. (191 is inclusive) So that is a class B addresses. Finally we look at class A addresses.
Class B addresses are in the range:
128 - 191
|
Class A addresses is quite simple, it says the MSB must be a zero so it means the range is from 0 (where all the bits are zero) to 128 (where all the bits are one). So as long as the first bit is zero, you have a Class A address. Realistically it is from 1 to 127 (inclusive).
An IP address 141.15.23.64 would that be a class B or a Class C address? It falls in the range 128 to 191 so that means the MSB of the IP address must be 10 and if we change 141 to a binary number we would see that the MSB of it is 10, this is a class B address.
If I gave you an address of 206.15.23.10 would that be a class B or a class C address, well it falls in the range of 192 and 224 so it must be a class C address.
If I gave you an address of 191.15.23.10 it falls in the range of 128 to 191 so it would be a class B address. (191 is inclusive) So that is class B addresses.
If I gave you an IP address of 18.23.15.10 you could tell me immediately it is a class A address since it falls between 1 and 128. Transform 18 to binary would be: 00010010, which satisfies the Class A rule, the MSB is 0. Which means it is a Class A address
So we have looked at the Most Significant Bits, but what about the rest?. Well we can translate these too. Using the address 196.6.23.14 we would end up with a bit as follows:
11000100 . 00000110 . 00010111 . 00001110
|
Right so, if we look at this address, we see that it begins with 110 meaning that it is a class C address, and a Class C address generally has the first 24 bits as the network portion and the remaining 8 bits as the host portion. In other words the first three bytes is the Network portion, and the remaining bytes are the Host portion.
The Network portion essentially uses the first three bytes (obviously this has to do with the subnet mask, but we'll talk about this shortly). Therefore, from our original IP, the network portion would be 196.6.23 and the host on this network would be host 14.
Now if you take a look at this, you will immediately see that we could only have up to 256 hosts on this network, why is that? It is because the host bits can range from where they are all zero's (00000000) to where they are all 1's (11111111).
A couple of things to note here. Because of a legacy the address 0 and address 255 are out of bounds. We can't use them for host addresses. These are called the broadcast addresses. This means that out of the possible 256 hosts on the network 196.6.23 we actually only have a total of 254 addresses that can be assigned to hosts.
That is fair enough, but what if you want to have more than 254 hosts on this network?
If you look at a Class A network address for example, it is defined by the first 2 bits of the first byte. The first byte makes up the network portion of the address, while the remaining 3 bytes make up the hosts portion of the address. With this in mind, an IP address of 10.20.30.40 would have the host 20.30.40 on the network 10.
If I gave you an IP address of 152.111.16.10, using our rules, 152 falls into the B class. The B class has the first two sets of bytes in the network portion and the remaining two sets of bytes in the host portion. With this IP address, this would be a host 16.10 on a network 152.111
In Class A the MSB has to be 0 which means the address ranges form 1 to 127 in the first byte, and also where the first byte represents the Network portion, and the remaining three bytes represents the Host on the network. Now if we look at that we can see that on a Class A Network you can only have 128 Networks but you can have a huge number of hosts on every network, how many? You can have a total of 224 hosts on 128 Networks.
In Class B the MSB must be 10 and the range from 128 to 191 and here the first two bytes represent the network and the remaining two bytes represent the Host. In class B we will have 216 Networks and each of those networks can have 216 hosts.
In Class C the first three bits of the MSB is 110 which means the range is from 192 to 224 and for that the first three bytes are the network portion, and the remaining byte is the host portion. And on class C you can have 224 Networks and 28 hosts per network.
Since we are only working with a total of 4 bytes, as the number of hosts increases, the number of networks decrease and visa versa
20 years ago any one of these options would have given most companies enough addresses to work with, but that of course was before the Internet took off.
Now every machine that connects to the Internet needs an IP address. This was do-able 12 years ago but now that more and more devices are Internet ready, and with the growth of Linux and embedded Linux devices, we will see more and more Intelligent devices such as:
Cell phones that connect via GPRS must have an IP address.
Already they are advertising a fridge that connects to the Internet, later on there will be stoves, dishwashers, toasters etc. that will connect to the Internet and each of these devices will need a unique IP address.
A lot of people are now building "Intelligent houses" where the intercom is connected to the network, where the network accommodates a lot of CCTV cameras or the sprinkler system, and each of these would need an IP address.
As you can see very quickly we will exhaust the number of available IP addresses.
There are a couple of ways that they (InterNIC or IANA - the authorities who hand out valid IP addresses) decided to solve this problem as they couldn't go on handing networks in the class B range, because there were not enough network addresses to go around. So what they did is to come up with a means of sub-netting a range if Internet addresses: sub-netting is a means of chopping up an IP range. In essence, sub-netting involves moving the host and network bits and in this way making the ranges change accordingly.
Without understanding sub-netting you will never be able to tell which network a particular host is on.
I made the assumption a couple of minutes ago, that on a class B network half of the bits make up the network portion and the other half of the bits make up the host portion. That is assumed that a netmask of 255.255.0.0 is used.
Let 's take a further look at the Netmask - the above netmask translates to:
11111111. 11111111. 00000000. 00000000 |
Now what we are going to do is to add the bits from the subnet mask to the bits from the original address. If you do not know about adding bits together, I would suggest you go look at the Shell Scripting Course.
Adding 1 and 1 together will give you a "1", anything else would equal "0". Let 's look at an example:
11000100. 00000110. 00010111. 00001110  (196.6.23.14)
11111111. 11111111. 00000000. 00000000  (255.255.0.0)
----------------------------------------------------------
11000100. 00000110. 00000000. 00000000    (and result)
|
All the bits that were "1" in the network portion seem to just "drop through" as ones in the result, and what we end up with is 196.6.0.0
This shows us immediately that the first two bytes are the network portion and the last two bytes are the host portion.
We have a host 23.14 on network 196.6, applying the mask tells us what our network is.
Now, you might say, that is fine and dandy, but how does that help us?
If I gave you the address 196.6.15.3 is that on the same network as 196.6.23.14?
The answer has to be yes.
If we mask 196.6.15.3 with 255.255.0.0 we end up with the network of 196.6 so this particular IP address is on the same network as 196.6.23.14.
If I gave you 196.7.15.3 would that be on the same network as 196.6.15.3?
Clearly not, because when you ADD this with the subnetmask, you would get the network of 196.7 and the host 15.3 on network 196.6 which is not the same as the host 15.3 on the network 196.7.
OK, fair enough what happens when instead of applying a mask of 255.255.0.0 I apply a mask of 255.255.252.0?
Well now things become more interesting, because what I am doing is stealing two bits from the network and giving them to the host, and this means I am reducing the number of networks and increasing the number of hosts available.
What is 255.255.252.0 in binary? It is:
11111111. 11111111. 11111100. 00000000 (255.255.252.0)
|
Remember that I have given you the same IP address of 196.6.23.14 but this time I have given you a netmask of 255.255.252.0. Lets have a look at the result.
11000100. 00000110. 00010111. 00001110 (196.6.23.14)
11111111. 11111111. 11111100. 00000000 (255.255.252.0)
--------------------------------------------------------
11000100. 00000110. 00010100. 00000000  (result of AND) (196.6.20.0)
|
This works out to be 196.6.20.0, so now our network is 196.6.20 and our hosts can range from those where all the host bits are 0, to those where all the host bits are 1.
Therefore the hosts range from host 0 on network 196.6.20. to host 255 on network 192.6.23. Now, the hosts 196.6.21.145 is on the same network as host 196.6.23.9. Given the fact that every IP address is made up of an IP address plus a Netmask, we then should not ever talk about one without talking about the other.
If I gave you the IP address of 162.15.45.155 I will almost invariably give you a netmask of 255.255.0.0, if I want to be correct, because this is a standard Class B network address and this is the standard Class B Netmask.
Again If I gave you the address 14.186.99.203 then I would almost invariably give you a Netmask of 255.0.0.0 because this is the standard Netmask for Class A networks.
Lastly if I gave you the address 206.19.193.254 then I would give you a Netmask of 255.255.255.0 since this is the standard Class C Netmask.
Type:
ifconfig eth0 [enter]
|
If you have assigned that IP address to the particular NIC you would see the IP address and a Netmask, and the one should never be mentioned without the other, because the Netmask determines which network this particular address is on. It determines what the network and the host parts are.
We will talk more about networks later on, when we talk about routing.
So if we return to our five layer stack, you have the physical layer at the bottom followed by the MAC, the network (commonly called the IP), the transport which is usually connection orientated (TCP) or connectionless (UDP) and finally the application layer.
We have now had a look at the IP layer and note that every single device on the Internet needs a unique IP address in order to communicate with the other device(s).
Having now understood IP and the fact that everything needs an IP address. We can now talk briefly about how information is transferred over the Internet.
What happens when workstation A wants to talk to workstation B?
They have the following IP addresses: Workstation A is 196.6.23.14 and Workstation B is 196.6.23.24
Workstation A does is a broadcast. In other words it broadcasts to every other machine on the Network, with what is called an ARP (Address Resolution Protocol).
It does an ARP and basically what that is, is a broadcast over the network, saying "I want the IP address of Workstation B, but before it can get it 's IP address I need to know what the MAC Address of workstation B"
So by workstation A doing a ARP request, it forces all the workstations on the Network to respond by giving up their MAC addresses. All the workstations on the network respond to this request and Workstation A builds an ARP table.
An ARP table will hold all the MAC addresses and hopefully all the IP addresses of everybody on the network.
Testing whether two hosts on a network are alive and can see one another is a fundamental network test. This is done using the Packet Internet Groper command (ping).
Ping 's job is to send an echo request and await an echo reply from the remote host. Thus, two workstations A and B, on the same network can both send and receive echo packets. If workstation A sends an echo to workstation B but does not get a reply, it could mean the remote hosts (workstation B) did not receive the request. Pinging is so fundamental to the troubleshooting of networks that we need a whole section to discuss it. That section appears later. Now however, we can use ping to broadcast to each workstation in order to fill up our arp table. Remember that each time a broadcast request is transmitted over the network, all hosts on the local network will respond to the broadcast. The overall result is that each workstation will have a complete list of hosts on their local network.
ping -b 196.6.255.255 [enter]
|
You have to be root to use this command.
Note that we ping the broadcast address. If you are not using this IP address range, use ifconfig to determine what your broadcast address is.
What this does is to ping every workstation, and every workstation that replies will have to reply with its MAC and IP address. Once you have run this command you can type:
arp -a [enter]
|
This would show all the information in the ARP table.
Once Workstation A has built up an arp table including the information of what workstation B 's MAC address is as well as workstation B 's IP address, Workstation A can start to communicate with Workstation B. They may need to communicate over a connection-orientated protocol like TCP (for something like the 'telnet' application) or perhaps using a connectionless protocol like UDP for DNS updates.
ARP is really a UDP based service, because it does a broadcast by sending out a packet on the network expecting devices to reply. ARP is not interested if the workstations on the network receive the packets. If you Sniff your network (we will talk about that later) you will see these ARP requests being sent out continually by hosts on your network.
The explanation above assumes that everybody is on the same network. We know this is not the case, so we also need to establish the concept of the differences between layer two and layer three networks.
Essentially at Layer Two workstations are only communication at MAC address level. Therefore, while two machines are physically connected to the same local area network (LAN) they can communicate.
Now what happens is that networks were designed to connect computers together, in the simplest case we started off with a network and put some machines on the network.
These machines were able to communicate with each other without any interference, but what happened next is that we found that we had a need for a second network. It might be on another floor in the same building or in another building. The machines on the second network could talk to one another however they could not talk to machines on the original network.
Routers were developed to deal with this problem. Their job is to route packets via different networks. You could think of the router as a traffic policeman on a busy intersection. When you come along road A and you want to go to road C the traffic police(wo)man will direct you down road C. She (traffic police(wo)man) stands in the middle and when she sees you coming along with a big sign on your windscreen saying you want to go to road C, she immediately stops other traffic and directs you to your destination. Routers do a similar job - only with packets rather than cars.
Now what happens here is that Workstation A wants to talk to Workstation E and these are on completely separate networks - not directly connected to one another. An example might be doing an ftp to ftp.is.co.za . In all probability, your host will not be directly connected to the hosts ftp.is.co.za.
Workstation A looks for workstation E in it 's routing table, hoping to find a host-address entry for this hosts. However this host is not in workstation A 's routing table.
Next the routing table is examined for a match of networks with the destination network. Clearly, if there is an entry here for this network, it would mean that the network would be directly connected.
But alas, there is no entry, so the network containing workstation E is not directly connected. Finally, the routing table is consulted for a default gateway. In this case, the default gateway indicates a host on your directly connected network that acts as the "go-between". When all else fails, your packets are sent to the default gateway. Of course, your host may not know the MAC address of the gateway and will thus have to send an ARP broadcast to locate the MAC address of the default gateway.
Now when we talk about a network, we are not talking about the MAC layer, we are talking about the Network Layer or the IP Layer.
You may have a 196.6.23.x network (netmask: 255.255.255.0) as well as a 147.63.15.x network (netmask: 255.255.0.0).
Now these are two completely separate networks, one is class B the other Class C, and the router is able to route packets between the class B network of 147 and the Class C network of 196. The router 's job is to direct packets.
Now you can imagine if everybody pulled out a loud hailer and started broadcasting it would become a pretty noisy place quite quickly. How do we stop that? Well in networking terms there are not a lot of ways we can stop that.
There needs to be a way to stop these broadcasts from passing from one network to the next. The way that this happens is to force the router to block all broadcasts. So if the router hears a broadcast coming through, it will immediately drop that packet and not allow the transmission of the packet across to the other network.
You can imagine that it would become very noisy if every time somebody sent out a broadcast it was allowed to be transmitted to all networks. How often in the real world does somebody pull out a loud hailer? Well generally at election time when they want to gather some support.
In networking terms computers broadcasts every couple of seconds, they start shouting about who they are and who else is on the network etc. Etc. As you can imagine, this will cause a lot of traffic on the network for no apparent reason. So routers restrict the broadcast domain to the local network.
Broadcasts can only happen on the MAC layer and any broadcast that tries to go across the router will be dropped. One of the things you may want to broadcast across a router (and you can configure a router to allow certain broadcasts) is DHCP (Dynamic Host Control Protocol). However, we will talk about this later.
To summarize routers are responsible for routing Internet Protocol traffic at the Network Layer, from one Network to another. This contrasts with switches or bridges, where bridges work on the MAC layer, and thus have no way to restrict broadcasts.
If a workstation on Network One starts broadcasting, the workstations on network two will be able to receive and respond to the request. Bridged and switched networks are termed "flat" networks and there is little barrier from hosts connected on one switch to another.
OK so we have Routers that allow networks to be connected, and we have switches that create flat networks where you cannot create separate networks on a switch.
We will configure our Linux boxes later on to act as routers. This is an area that Linux has gained acceptance, where you are using your Linux Box to become a router between yourself and the Internet.
If you have three PC 's but just one modem Linux allows modem sharing and has done so since 1993. Windows now also allows modem sharing (ICS) which essentially allows the system to act as a router.
A LAN is a Local Area Network and a WAN is a Wide Area Network.
These barriers seem to be crumbling as we speak. Traditionally LAN's were restricted to a building. A typical example of this is a building that has a number of floors all connected together. The way these floors are connected is via a router in the basement. Thus, each floor has a link to the basement where a large router connects the floors together.
Essentially even though these different networks are routed they are still considered to be Local Area Networks, because they are limited to a building. The minute you go from a single building to connecting two buildings, (you may have a wireless link between the two buildings) you are creating a Wide Area Network between these two buildings.
WAN 's are generally considered to be those networks running over low bandwidth expensive links. Consider the price per packet of transmitting data over a WAN, it would be significantly higher than that of a LAN.
If you look at the speed you get over a WAN versus that of a LAN, you will see that a LAN will be significantly faster than a WAN - although this gap seems to be closing too.
Currently, for example, on a WAN over a wireless network you can currently get up to 54 megabits per second. Whereas on a LAN you can get up to a 1000 megabits per second.
In this Networking course we will look mostly at LAN's. With one exception: connecting the Linux system to an ISP. The minute you connect your Linux system to an ISP you create a WAN.
With our basic knowledge of TCP/IP we now need to put an IP address/netmask pair onto our network interface card.
Presuming we have 2 workstations; on Workstation A we are going to put an IP address of 192.168.0.1 and on Workstation B an IP address of 192.168.0.2
The subnetmask is going to be a standard Class C subnetmask (255.255.255.0).
What that means is that both these workstations are on the same network (you can do the calculations yourself).
Now the question is - how do you configure your IP address?
Unlike other operating systems you can configure a lot of your Linux operating system on the fly (you will probably have come across that as you worked through these courses), but configuring on the fly has some advantages and some distinct disadvantages.
One of the advantages of being able to configure Linux on the fly is that you can change things without having to go through reboot process and that makes it quick and easy, cheap and dirty. The problem is that if you configure on the fly you can often end up with a system that works fine until its rebooted at which point things aren't the way you think you set them up.
We could, for instance run "ifconfig eth0 192.168.0.1 netmask 255.255.255.0" which would configure our Ethernet 0 interface.
![[Note]](../images/admon/note.png) | Note |
|---|---|
If a netmask other than the default one for this class is used, the ifconfig command MUST specify the broadcast address too. For example if we choose a subnet mask of 255.255.252.0, then we should specify the ifconfig command as follows:[3] | |
ifconfig eth0 192.168.0.1 netmask 255.255.252.0 broadcast 192.168.3.255
|
Run "info" on ifconfig to learn more about this command.
Basically the ifconfig command sets an IP address onto your Ethernet 0 interface.
Once that Ethernet 0 interface has an IP address run "ifconfig eth0" and you should see the following:
The hardware address and that is the MAC address as we discussed earlier in the course.
An IP address and that should be 192.168.0.1
As part of the command netmask, which as we stipulated above is standard Class C netmask
A broadcast address. We stated earlier that the broadcast address is where all the host bits are 0 or 1 and if we look at our broadcast address now we should get 192.168.0.255.
And finally we should see some stats on packets transmitted and received.
In your test network you are going to have to configure, one IP address per workstation, and in the example just done we have already configured Workstation A.
On Workstation B you are going to run a similar command, but instead of 192.168.0.1 it is going to be 192.168.0.2. Testing the set-up with ping
The first thing you're going to want to do now is see if these two machines respond to one another, and the best way of doing that, is to use the packet Internet groper or the ping command
Assuming that you are sitting at Workstation A you might want to ping 192.168.0.2, which is Workstation B.
You may need to understand a little bit about the ping command in order to understand what you are testing. When you ping something it sends a 64 byte packet (echo request) to the other machine that you are setting up, in our case, Workstation B. As soon as Workstation B receives the packet, it replies with an echo reply by sending a 64 byte packet back to workstation A.
When we do a ping we are sending a packet called an ICMP packet, and that stands for an Internet Control Message Protocol.
The ICMP originates from within the network layer.
Look at our two machines and the network layer and the MAC layer. The packet originates at the network layer it proceeds down the stack as we have seen, onto the physical network and then reaches its destination and moves up the protocol stack but it does not go all the way up to the application layer it only goes to the ICMP layer - which is a sub-layer within the network layer.
When the packet is received by Workstation B it is then sent back to Workstation A in the same manner through the stack.
To repeat the process: When you ping something you send a 64 byte packet, a 64 byte ICMP packet from the network layer to the MAC layer, to the physical layer which then goes to Workstation B. The packet then goes up from the physical layer to the MAC layer, from the MAC layer to the network layer and when the network layer receives this package, the packet, it replies.
Ping is a good way of testing whether you get connectivity between two workstations but unfortunately it is not necessarily an end to end service indicator. The reason for this is that an ICMP packet never reaches the application layer, so although you can ping two machines it doesn't mean to say that you can send email between those two machines.
At some higher layer (perhaps at the transport layer or the application layer) the protocol could actually break down and therefore there is no end-to-end connectivity from an application perspective.
So ping is useful and you can use it for a lot of different tests but not necessarily an end-to-end service test and in modern computer terms this is really what people are interested in.
OK, so, once you've got your machines connected and you can see them and you can ping between one workstation and another, you should see that you get a reply for every packet that is sent. We will investigate the ping command in a little more detail shortly, because it is certainly your first port of call when trying to fix problems on a network.
You will hear, in your walk through this world of networking and TCP/IP people referring to packets and frames, octets and datagrams. What is what? In the strictest sense packets and frames are different and datagrams are different again. However, many people refer to these interchangeably. Let 's clear up the definitions here.
When a unit of data, beginning at the application layer (top layer) is transmitted to lower layers, headers and trailers are appended to it. Once the unit of data reaches the IP layer and source and destination IP addresses are added to it, it then is known as an IP datagram. The unit of data, feeling a little bloated from having all this extra baggage is then sent to the link layer where source and destination MAC addresses are perpended to it. Now it is called a frame - and more accurately an Ethernet frame (if the physical layer is Ethernet). To be precise, the unit of data passed between the IP layer and the network interface card is really a packet of data. Thus, a packet can be an entire IP datagram or perhaps a fragment of an IP datagram.
UDP units of data, being connectionless (and thus not really too concerned whether the receiver actually got the data or not) are also referred to as datagrams.
This leaves octets. Octets are units of 8 bits (also know as bytes). Thus the maximum size of a frame in Ethernet is 1513 octets or 1513 bytes. Any larger and the frame must be split or fragmented. As you might expect, fragmentation causes delay so it is good to keep all your frames below the MTU size.
ifconfig -a
|
You would see a minimum of two interfaces, we expect we are going to see Ethernet 0 because we have just configured an IP address on it. Additionally, we will see an Internet address called "lo" and this is the loop back interface. Every network device be it a switch, router, server or a hub, will always have a loop back device associated with it.
And this loop back device will always have the address 127.0.0.1.
Now when we were doing the IP addressing we said that the
Class A networks could range between 1 and 127.
Class B networks could range between 128 and 191.
Class C networks could range between 192 and 224.
Here we have an address 127.0.0.1 - clearly this is an Class A address.
Your loop back interface can never have any other IP address than 127.0.0.1, which means if you are setting up a network it would not make sense to allocate to Ethernet 0 a 127.0.0.1 address because on every network one must have unique IP addresses.
So allocating an IP address of 127.0.0.1 to Ethernet 0 will conflict with the loop back address, which has also got the address of 127.0.0.1.
IP address of hosts on the same network must be unique.
Having said that there is a technique called network address translation or NAT. NAT allows us to translate from one IP address to another, but now is not the time to discuss that.
You can have multiple network cards in any UNIX system and that includes Linux so one would not necessarily need to have one network interface per machine.
One could quite simply set up a network where you have two interface cards per workstation, then you can assign different IP addresses to these different interface cards.
In the notes I have also assigned IP addresses 172.16.5.1 to Workstation A and 172.16.5.2 to Workstation B.
Even though these two workstations are physically connected to same switch or hub and the physical network may be single network but the logical network is a completely separate issue.
On one logical network we have 172.16.5 as our network, and the other logical network is 192.168.0.
We have a logical network and physical network and it is important to distinguish between the two, even though share the same physical hub, they logically are on completely separate networks
These two machines, or these two logical networks would be incapable of talking to one another and we would need to put a router between them in order to get them to talk to one another.
The final thing that we are going to look at doing with the ifconfig command is what is known as plumbing a device.
Plumbing a device or plumbing a network means putting two IP addresses on one link.
In a sense what this looks like is, that on an interface you can have 192.168.0.1 on eth0 and on eth0:0 you can also have 172.16.5.1.
This would allow us to have a single Linux machine to act as a gateway between two different networks. If we draw this out logically we will have networks 192.168.0 and 172.16.5, and in the middle we will have our Linux machine. This will allow us to connect two completely separate networks and force our Linux machine to be the router.
If we take this to our logical next step, when you set up your Linux machine at home and you connect your modem to it you are essentially doing exactly the same thing; turning your Linux machine into a router. The internal eth0, (your Ethernet card) might have an IP address of 10.0.0 5 and your ISP, Internet Service Provider, might give you a separate IP address of 196.6.25.15, and the only way you can communicate between other hosts internally on your LAN and the Internet, is by forcing your Linux box to be a router.
How many times can we plumb an interface?
Well certainly more than you are going to need to, but I think the maximum limit is 255.
Linux can quite easily be used as a router, equally it can be used as a packet shaper or as a means of creating virtual LAN's or VLAN's, but this is beyond the scope of this course.
To plumb your device, you may run the command:
ifconfig eth0 192.168.0.1 netmask 255.255.255.0
ifconfig eth0:1 172.16.5.1 netmask 255.255.255.0
|
These commands would plumb the interface. Notice that the eth0:1 gives the interface the second IP address. Using any number in place of the '1' would also work.
In order to understand routing on our host we are going to need to use the netstat command.
netstat can do all sorts of things, but probably the most useful thing is the -r option and that will show us the routing tables.
If you run the netstat -r command, after you have plumbed your interface, you should see at least the following:
linux:~ # ifconfig eth0:1 172.16.5.112 netmask 255.255.255.0
linux:~ # netstat -r
Kernel IP routing table
Destination     Gateway         Genmask         Flags   MSS Window  irtt Iface
172.16.5.0      *               255.255.255.0   U         0 0          0 eth0
192.168.1.0     *               255.255.255.0   U         0 0          0 eth0
default         192.168.1.1     0.0.0.0         UG        0 0          0 eth0
linux:~ #
|
You should see a table and in your destination you should see 192.168.0.0 which would be the network. The gateway would be 0.0.0.0 the mask would be whatever the mask was set to, in this case a Class C mask, the flag will indicate a "U" to show that the network is up and the iface should indicate eth0
You should see an entry for the 172.16.5 network and finally if you've got a default gateway set you should see an entry called 0.0.0.0 (or whatever your gateway was set to).
The difference in this line is that your destination will be 0.0.0.0 which indicates the default gateway.
Remember that the default gateway is the place we send network traffic in the event that we don't know where else to send it.
The default gateway is currently up (indicated by the 'U' flag) but the flag also indicates a 'G' which shows that it is a gateway and the interface is eth0. Our routing table tells us where and how to route information around the network.
Now we know how to look at our routing table, we will also need to know how to add routes to it. Most importantly, we will need to add a default route to our host. Again, like configuring the IP address on-the-fly we can configure the default gateway on-the-fly too using the route command:
route add default gw 192.168.1.1 netmask 255.255.255.0
|
Consult your routing table again to verify that this is indeed the default gateway now. Not only can we add the default gateway, we can also add networks that we may know about. Assume for a minute that there is another network 10.121.20.x to which we can gain access, but not directly. In other words, we have a host through which we route in order to gain access to this network. Assume too that this hosts is on our local network, with the IP address 192.168.1.100. Now we can add a route to our network to indicate to our frames (or packets) how to get to hosts on this network (10.121.20.x). We could do this as follows:
route add -net 10.121.16.0 netmask 255.255.248.0 gw 172.16.1.1 metric 1
|
Note here we need to provide the route with the correct network address for the netmask that we are supplying [head back to your ipcalc program to verify this]. The gw (gateway) indicates the host that will accept frames on behalf of this network and the metric indicates how many hops we will need to do prior to getting on this network.
So much for on-the-fly configuration. Setting up your networks and especially your default gateway on your hosts permanently, you need to edit a file. On RedHat Linux (and Fedora) you will need to edit the /etc/sysconfig/network-scripts/ifcfg-eth0 and add the word GATEWAY=<your default gateway>. On Debian, this is configured in the interfaces file in /etc/ and on SuSE it is configured using YaST.
The there are a couple of things we need to wrap up when talking about networks
CIDR (pronounced cider), or Classless Internet Domain Routing is another way of expressing our network subnet pair, network netmask pair.
We may have an IP address 192.168.16.65 with a class C network 255.255.255.0 or we could express this as 192.168.16.65/255.255.255.0..... this is quite a mouthful.
CIDR is just another way of expressing the same thing.
You can express the IP address/subnetmask combination as 192.168.15.65/24.
What does 24 mean? It means 3 sets of 8 bits (24 bits on total) where each bit in the byte is a '1'. So if we were using a 10 network 10.25.48.132 and we used "/8" at the end that would tell us we are using a class A network using a class A subnetmask 255.0.0.0
CIDR is just a very easy way of expressing this.
What I want to look at is troubleshooting your network. We do not know enough about networking to be complete gurus but we need to be able to at least troubleshoot any problems that we may have.
We have seen already that we can use the ping command. Now ping tells us more that a device was able to receive and reply to packets sent. It also tells us about reachability. Reachability is one of those criteria or stats that people want to know about their network - can this device be reached on the network.
The second thing it tells us is about delay or latency.
If you look at the right hand column of the ping command you'll notice that it tells us the delay in the packets reaching their destination and returning (usually in milliseconds).
So if you run the command ping -c 10 192.168.0.2 supposing that you are sitting at 192.168.0.1 or Workstation A. There will be 10 icmp requests sent out and hopefully 10 icmp replies returned.
So a ping will send out (by default) 64 byte packets from Workstation A which would be received by Workstation B. Workstation B would then reply with 64 byte packets and that process would be timed which will indicate the latency.
The third thing you will see that ping provides is a sequence number. A sequence number indicates the sequence that the packets were received in.
As an example, what you can try is:
ping -c 100 192.168.0.2
|
this will send 100 pings instead of just 5 pings.
After hitting enter unplug network cable for 5 seconds or 10 seconds then plug in again. The sequence numbers will start off at 1 and they will increase until such time as you unplug the cable. Let 's say you waited 10 seconds the sequence would get to 10 (at which point you unplugged the cable), you waited say 10 seconds then you plugged it back in. You should see the sequence continue at 20.
This example assumes that ping is sending an echo request every second which is the default frequency request, so you'll see that the sequence indicates that after 10 seconds there were some packets that were lost. How many? About 20.
Finally ping gives you a summary of the response from the remote host. This summary usually appears right at the bottom where it tells you things like your RTT, which is your round trip time, the maximum and the minimum time, the average and the standard deviation as well as telling you about the packet loss.
Now because this is happening at the network layer it would be nice to see what happening one layer below that, at the MAC layer. For this we can use the arp command.
You can do an info on arp to see what options you have.
If you do an arp -a this will show you the full arp table.
If you don't see the MAC address of the workstation that you are trying to ping in arp table then will never be able to ping that MAC address.
In fact, Linux has another nifty command called arping. Arping is used when you get an IP address using DHCP.
So arp will tell us what happens at MAC layer and ping will tell us what happens at network layer and we can use these to troubleshoot our network.
[1] We will talk about Routers and Switches later on.
[2] If you recall your System Administration course, you will remember that almost all everything on Linux/Unix is Client/Server based.
[3] Linux has a nifty program: ipcalc. It allows you to quickly display broadcast addresses, network addresses of other useful information.
Table of Contents
Let 's understand client server technology in networking - why do we have client server technology and what it is?
Essentially in a Unix or Linux environment we'll have a server that will serve applications and client(s) that use the applications or services from the server.
This type of technology enhances performance, where the server can execute some of the processes almost on behalf of the client. The server generally will have more resources at its disposal than the client does, for example, more memory and perhaps more hard disk space. Therefore it makes sense that the server does some of the required processing along with the client, and thereby there are now two processors dealing with a part of that application - we'll come to come examples shortly.
The next reason why client server technology is exceptionally well supported in the Unix/Linux environment is because of scalability.
scalability is a crucial factor because as our networks grow in size, increasing the number of available work-stations, we will need some means of scaling our architecture to handle an increased volume of traffic, perhaps an increased number of clients. So from a scalability perspective, if we put 10 clients on a network and we put 1000 clients on a network, there will be a significant performance difference.
Client server technology allows us to scale these networks up to relatively large client networking farms.
The idea behind client server is that the shared responsibility can be shuffled around, for example, we could choose to run certain applications on specific clients and other applications on other clients.
Let us use X11, the X Windows system in Linux, as a typical example of client server flexibility. We have an X11 service running on the server and running on the client we have the client applications such as X Clock or XI.
We could also choose to run XI on one client and not on another client.
Interoperability is a key factor of why client server technology is so good.
An example of the good use of interoperability is that you may have had a DEC server, a Dec VAX for example, running X 11, the X Windows system. On the client side you have a Unix machine and so the X-server, because it was a standard protocol, could offer it 's services to the Unix workstation.
Another example would be a font server, where we have one or more font servers in the network. Even if the font servers ran on a Dec VAX or on Solaris or an HP Unix machine, X font clients will have access to service. So a Unix or Linux machine would be able to use the font service offered by a VAX machine.
The final reason for the advantages of interoperability I am going to mention here is "central control".
Central control is something that is familiar to those people that were working with Main Frame computers, and in a way it is ‘funny' how IT fashion is coming back on itself as now we have client server technology and this allows us to have central control of, for example, what applications to serve to and what services to serve on a network.
A classic example of client server technology is the Citrix windows client and server technology that we'll see being implemented for Windows clients in a lot of networks today.
So how is this central control implemented?
Well, I think the best way to describe this is to give some more examples.
Sometimes in client server the client and the server reside on the same machine, an example of this is X11, X Windows system, implemented in Linux. In the X Windows system, we would have an X 11 server on top of the Operating System and on top of that we would have client applications.
The client application might be X Clock or say K-Astroids or TUX-Racer. These applications are essentially our client and beneath our client we are running a server.
X is a particularly interesting one because in order to run KAstroid or TuxRacer or X-Clock, we are forced to have a server provide those services. It 's the responsibility of the server to talk to the video card, for example, to explain to the video card how to display a penguin racing down a ice slope
What makes this even more interesting is the fact that because every Unix or Linux system that you are running a GUI on you are going to have an associated X server running.
There is no reason why you couldn't display these aforementioned clients on the server. So in this case we have a machine that's offering itself as the client and we have another machine offering its X11 server as the server. Clearly we could swap those around the crossover line, for example we could run X Clock on machine B but use the services offered by machine A, X 11 server, to display the clock.
Lets have a look at a simpler example with FTP (File Transfer Protocol), in this case we might have access to Internet Solutions that has a repository of all the Linux ISO images that we want to download.
How do we do that?
Well, let us say that on our client 's side we have a client application called GFTP (Gnome File Transfer Protocol) ftp server. This GFTP server is the client and Internet Solutions ftp server, is the server.
We use our client 's to contact the server and this happens on different machines, unless you are running your own ftp server to ftp files from yourself to yourself, which really would make no sense.
This example demonstrates using http or web-based services as client servers.
On the server side we might have an Apache or IIS running as a server and on the client 's side we would have our browser, as in the Firebird, Gallion or Internet Explorer.
In that scenario, we would have an http server, usually running Apache and on the client 's side we would have a browser. Not all processing is done on a server, the server sends a web page and the browser, on receiving that web page, interprets it and displays it in a presentable form.
How is client server technology implemented?
It 's implemented using a tool called RPC (Remote Procedure Call) and it 's well outside the scope of this course.
RPC gives the ability to essentially call an application from another machine remotely.
In programming terms you have an application program interface (API) and the client is able to, in many instances, actually call procedures from the remote machine.
Table of Contents
We now have an understanding of TCP/IP and should have an understanding of client server technology. Let 's now consider how networks actually fit together?
In this chapter we will look at technology and terms such as switches, routers and hubs, Internet, Intranet and LAN 's and WAN's.
Two fundamental concepts in networking are the difference between the logical and the physical network. In covering these two concepts, we'll use an example as follows:
We have a hub or a switch and five workstations and a server connected. Physically, each one of these machines can see one another. In other words they are on the same physical network. If you were to draw that in terms of a wire, they are all plugged into the same physical PC wire.
Because of the structure of Internet Protocol (IP) and because of the fact that we can have different networks, we could take one set of machines on network A, 192.168.0.x and another set of machines of network B, 172.16.4.x.
That means that the two sets of machines are connected physically.
When machines are connected to the same networking backbone (wire), yet are on separate networks, these networks are termed Logical networks. For example you could have 5 machines with the address range on 192.168.0.x and 5 other machines on the address range 172.16.10.x. Although they are connected to the same backbone, they are on separate Logical Networks.
This physical network layout is that they are all connected. The logical network layout is that they are separated because they are on separate IP networks.
In fact workstations, on the 192.168.0 network will be unable to talk in any way to workstations that are on the 172.16.4 network.
How you connect up the network physically, depends on the physical structure of your network. There are a number of different physical structures, for example, Token Ring, FDDI, ATM and Ethernet.
Token Ring networking is quite old and outdated although it 's still used in some IBM sites (it was a IBM developed physical network).
There 's FDDI, which is a Fiber Data Distributed Interface network, and this used to be the fastest network available, running faster than Ethernet and Token Ring. Again it is old technology. There 's ATM (Asynchronous Transfer Mode), which was touted to be the next revolution in networking, never quite materialized in the LAN but did in the WAN.
If we just look at the different topology and we're just going to consider Ethernet and Token Ring at this time.
Token Ring network can be thought of as a ring of machines connected to each other. Each machine has an opportunity to pick up the Token, almost like a baton in a relay race. What would happen is that a machine would pick up the Token and would get allocated a time period with that Token. Once their time is up they will have to put the Token back onto the wire for the next machine to pick up. Only the machine which has the token may send data at that time.
Token Ring as a topology is a far superior topology to Ethernet, the joy about Token Ring, is if you broadcast, there should be very little shouting on the network.
Token Ring however, has taken a back seat and it 's not implemented any longer - for a number of reasons, mostly because of slow micro data as it could only ever run between 4 Mbs and 16 Mbs.
It was also a very much more complex and expensive technology than Ethernet is.
So Token Ring died and people adopted Ethernet as their topology of choice.
Ethernet was or is what 's called a contention-based network. In other words, every machine on the network shares the same piece of wire. Ethernet is just a topology where "he who shouts the loudest gets to be heard".
Ethernet comes in a whole range of flavors. Ethernet, in its Vanilla flavor, or in the original flavor, ran at 10Mbs.
| Note |
|---|---|
I'm not going to go into exactly how fast that is but you can compare this to a modem that will generally dial up to your ISP at 56Kbps and you can see that 10 Mbs and 56 Kbps is a significant step up in how fast the Internet runs as opposed to a modem. | |
Development continues on Ethernet with technology called fast Ethernet. Fast Ethernet ran at 10 times the speed of normal Ethernet and this certainly looked like it was going to be the fastest technology around (say 100Mbs).
Now there 's Giga bits Ethernet, which runs at 1000 Mbs, 10 times faster than fast Ethernet and certainly this seems to be the technology that corporate companies are implementing around their networks (currently).
I said Ethernet was a contention-based technology and in fact, it's called CSMA/CD or Carrier Sense Multiple Access Collision Detection.
To break this up - Carrier Sense means essentially - I put my ear say to the wire and if I don't sense that there 's anybody transmitting at the time, I jump on the wire, a bit like a railway line. If I don't hear a train coming I hop on the wire and off I go.
Multiple Accesses means there could be another train there, just around the corner that I haven't managed to hear or see. So multiple people access this railway line at the same time and, of course we're going to get a collision. As soon as there is a collision, there 's a ripple effect down the railway line.
Everybody that 's listening to the railway line hears this collision and we all back off for a random amount of time. When we sense the coast is clear, we hop back on the railway line and off we go.
So you can see that it 's not exactly the most efficient way of communicating but it does work and it 's simple.
With this CSMA/CD we have what 's known as the MTU (Maximum Transmission Unit).
To continue our previous analogy with the train, the MTU is how long the train can be.
There 's a maximum size that our train can be when we stick it on the railway line. The maximum length a train could be in Ethernet is 1500 bytes and that 's the maximum transmission unit.
If you run the ifconfig command on the command line (logged in as root), you'll see there'll be an entry there called MTU in capital letters and that will be set to 1500 which is the standard size of a Ethernet train.
Now we've seen from the TCP/IP stack, that at the bottom there, we'll have a physical layer and this is what we are now referring to as Ethernet.
| Note |
|---|---|
Of course if you have Token Ring then the physical layer will be Token Ring. | |
Above that, we have Media Access Control layer, the MAC layer and in fact any 2 servers or workstations, can only talk to one another via the MAC address. They should be using the same physical connection. (Not strictly true but we'll cover that just now.)
In other words, 2 workstations or a server workstation or 2 clients want to talk to one another, they can only talk to one another using their MAC address.
You can use the "ifconfig" command to determine what the MAC address of your NICs are.
You cannot talk between two machines if they contain the same MAC address. It would be like the postman trying to deliver mail to No. 21 in the same street where 2 houses, 3 houses have the same No. 21. Clearly the postman's not going to know which one to deliver to.
Every Network Interface Card on the network needs a unique MAC address and these are supplied by the manufacturers of the NIC.
The MAC address is broken down into 2 by 6 byte numbers. The first set of 6 bytes is the manufacturer 's identifier and the remaining 6 bytes is the unique identifier given to this particular network interface card by that manufacturer. There are hundred of manufacturers of network interface devices around the world.
To find a out the MAC address on the workstation you are on you can type:
ifconfig eth0
eth0      Link encap:Ethernet  HWaddr 00:00:86:3C:A3:0A
              inet addr:192.168.2.233  Bcast:192.168.2.255  Mask:255.255.255.0
              inet6 addr: fe80::200:86ff:fe3c:a30a/64 Scope:Link
              UP BROADCAST NOTRAILERS RUNNING MULTICAST  MTU:1500  Metric:1
              RX packets:13655 errors:0 dropped:0 overruns:0 frame:0
              TX packets:5502 errors:0 dropped:0 overruns:0 carrier:0
              collisions:6 txqueuelen:1000
              RX bytes:7570021 (7.2 Mb)  TX bytes:632146 (617.3 Kb)
          Interrupt:3 Base address:0x300
|
The MAC address is the hexadecimal number after HWaddr. As in: HWaddr 00:00:86:3C:A3:0A
In our CSMA/CD model we used a couple of terms that we need to define further and the first term is to "BROADCAST packets".
Broadcasts are really exactly what the name implies. It 's a broadcast - for example, KFM Radio is broadcast radio, it doesn't know who is receiving the signal but the radio station still broadcasts the signal. If you turn your radio on, you hear it. If you turn it off, you don't.
Broadcast packets are similar in that a workstation, server or network interface card will broadcast to every workstation on that network, and part of the Ethernet 's job is that if it hears a broadcast, it must hear that broadcast.
The next concept is the concept of "UNICAST".
UNICAST 's are packets where one workstation is talking directly to another. If you are going to have a conversation on the telephone, you're having the UNICAST conversation. Well, provided it's not a conference call.
You're having a UNICAST conversation because you are talking directly to the person on the opposite side.
The final term we used is "MULTICAST".
That would be the equivalent to a conference call as mentioned above where there are a number of recipients who are tuned into that conversation.
Essentially, the distinction between these is the fact that Broadcasts are very noisy, in other words, when I start broadcasting, I hold the loud hailer up and I start calling the odds. Nobody has got any opportunity to talk back to me.
When I have a UNICAST or MULTICAST conversation, it 's a conversation, I'm talking to a client(s), and the client(s) is talking to me.
The same happens on a network and let 's look at a couple of examples.
UNICAST 's are where we secure a shell or ftp into a particular client or server - we are then having a one on one conversation on that server.
BROADCAST 's on the other hand, might be things like DHCP (Dynamic Host Configuration Protocol), ARP and BOOTP. With DHCP for example, the client needs an IP address and it broadcasts a request to the network saying, "Please, I need and IP address, somebody help me." It 's up the server to respond. Broadcasted messages are heard by all workstations. Although everybody receives the broadcast, only the DHCP server actually responds.
Broadcast services are noisy. That is, the more broadcast services you have on your network, the less opportunity you have of talking in a UNICAST manner - between client and client, client and server or server and server.
So Broadcast 's aren't desirable to have on your network in large volumes. You will need to use them, but it 's important to realize that broadcasting on the network is far from optimal. A candidate that is particularly prone to generating large volumes of broadcast traffic is the process of master browser selection in a Windows network.
Let 's look at ARP (Address Resolution Protocol) on the Internet.
We know that two workstations or a server and workstation, can only talk via their MAC address, which is layer two in the TCP stack.
How do we find out what the MAC address is?
Workstation A wants to talk to workstation B - workstation A puts an ARP request onto the wire, which happens to be broadcast. Essentially what it 's saying is - Who has workstation B 's MAC address? Of course, because it's a broadcast, every workstation on the network hears it. Does everybody respond? Well what happens is that C hears that A is looking for the MAC address of workstation B. C knows that it is not workstation B and therefore does not respond to the broadcast. The broadcast, the ARP request, goes out to every workstation but the only workstation that will reply is Workstation B with an ARP reply.
In other words: Workstation A says "Who has the MAC address of workstation B" and although all the workstations hear the question, only B replies and says "I've got the MAC address of workstation B and this is what it is..." So the ARP reply sends back the MAC address to workstation A and each of these machines start building an ARP table.
ARP is the Address Resolution Protocol and its job is to match MAC address to IP address and obviously vice versa - to match IP addresses to MAC addresses.
In workstation A 's ARP table, we have stored the information on workstation B and it 's MAC address. If workstation A talks to workstation C, we'll have the same information for workstation C stored on the ARP table.
Workstation B replied to workstation A and therefore will have stored the relevant information. If workstation B also talked to workstation D recently, it will have workstation D 's IP address and MAC address stored in the ARP table.
arp -a
|
Run "arp - a" which will report on all the information it has stored on the ARP table during the usage of the network for that workstation.
The ARP table is a dynamic system table, it is built-up at the time of communicating with the different workstations. After a period of time, if workstation A no longer speaks to workstation B the system will age out the entry in the ARP table.
Now lets complete the circle of logic: If after the entry for workstation B has been aged of the ARP table on workstation A, and once again workstation A again wants to talk to workstation B? Workstation A will once again put out ARP request to broadcast by saying, "Who has the MAC address of workstation B" And again, B will reply saying, "I have it and here it is." Again the information will be stored back into the ARP table of workstation A. Doing arp with the '-an' options will enable you to see all the machines that you've communicated with prior to the aging period being reached.
In some versions of the Linux operating system there 's a command called arping. arping is a MAC based ping program, which has the job to determine whether the IP address for a particular MAC address is already being used on the network.
Unicast services such as ssh, telnet and ftp do not use broadcast mechanisms to communicate. As a result they are less noisy and more efficient on the network.
Up to now we've been talking about Ethernet and I've made reference to the fact that Ethernet is a LAN.
A LAN is a Local Area Network. Local is generally referred to a network contained within a building or an office or a campus.
Examples:
You might have a LAN for example on a University campus or between office blocks in an office park.
A big corporate perhaps like Anglo American, would generally have a LAN that might span several buildings.
To set up a LAN -relatively speaking- is cheap. If you want to put an extra couple of network points or an extra couple of devices on the network, it 's not very expensive to do that.
Using a similar example, a Wide Area Network is a network that connects campuses.
What I'm going to do is write down some short descriptions of what a WAN is:
1. A WAN is generally slow. If we compare that to a LAN, we said that Ethernet could run up to 1000 Mbs, currently, certainly in South Africa, the fastest WAN is 155 Mbs, so you can see in a LAN we can talk up to 1000 Mbs whereas in a WAN, at the moment, currently, today in South Africa, we can only take, literally a 10th of the speed.
2. WAN's are expensive. If we look at the path of telecommunications, we need to connect two offices, one in Pretoria and one in Johannesburg together - it 's an expensive operation even for a slow line.
One of the differences between a WAN (Wide Area Network) and a LAN (Local Area Network) is the set-up cost. WAN generally are to connect remote offices and when we talk about remote offices we generally refer to the remote offices as those that are outside the campus. For example, if we have an office in Pretoria and we have an office in Cape Town, these are remote offices. There is no chance that we can connect the LAN between Cape Town and Pretoria. In a LAN we connect local offices whereas in a WAN we can connect remote offices.
How do WAN 's work?
Well, a WAN does not use Ethernet, a WAN is something slightly different
The first option is to use analogue lines, and in this scenario, we usually have an analogue modem, pretty much like a modem that you would dial up to your ISP with.
The difference between an analogue modem and a dial-up modem is that an analogue modem doesn't dial. On the other side we would have an analogue modem as well, so we have a local client and a remote client and between the two, we have a telephone company (Telkom SA) supplied piece of copper cabling.
How the internal service of this supplied copper cabling works is again out of the scope of this course but really what this means is that we can now connect a local office to a remote office.
There are disadvantages to analogue modems,
They are slow, well, I said WAN 's in general were slow. If these are slow, they must be much slower than normal modems. (at the moment you can get up to 4 Mbs across an analogue connection).
The other disadvantages are of analogue lines are that this piece of copper is not guaranteed. What that means, is that every time there is rain or static or exceptionally dry conditions, there might be problems on this piece of copper line.
Telephone companies usually don't guarantee any degree of service across an analogue line.
Some advantages could be that they are cheap - they're much cheaper than any other communication mechanisms with the exception of possibly using wireless, so they still in fairly high demand locally in South Africa and there are still quite a number of installations of analogue circuits.
The next means of connecting a remote and a local server together, that we are going to discuss is by a digital wire, and again this would be supplied by your local telephone company.
A digital wire can run much faster because it 's a digital signal that 's being transmitted which means there is no conversion between an analogue signal and a digital.
Think of a modem, when you dial up to the Internet you hear the buzzing, crackling and wheezing of the modem while it 's converting your digital bits coming out of the PC into analogue sound and sending them across a piece of wire - analogue frequencies.
In digital mode, with a digital line, there is no conversion happening, which means it 's much faster. Currently the flow of digital line you can get in South Africa is 32 Kbps.
What happens on both the local and remote side is that there is a Network Terminating Unit, what they call an NTU.
An NTU is equivalent to a modem. An NTU 's job is to provide an interface that we can connect our devises.
In this scenario, we are transmitting digital data down this line rather than analogue data. The disadvantage with digital is that it's expensive. In South Africa, it 's significantly more expensive, in the order of ten times as expensive to install a digital line than it is to install an analogue line. In South Africa we refer to digital lines as DIGINET.
Overseas they run T1 and E1 lines, where T1 is 1.5Mbps and E1 is 3.4Mbps and if you compare that to our current offering of DIGINET in South Africa, it is actually the bottom of the range with a speed of 32Kbps.
So overseas you can buy T1 and E1 line which are significantly faster than anything yet available in South Africa. Yet although you can buy fast lines they are significantly more expensive.
The latest technology is ADSL, which is Asynchronous Digital Scriber Line this is a digital line, so we get the digital connection between the two but the Asynchronous Transfer means that the download speed can happen anywhere between 8 and 15Mbps.
The upload speed is restricted to between approx 256k and 2Mbps (this will depend on your Telecom provider) but it is Asynchronous Transfer, which means it doesn't send/receive these things at the same speed. ADSL is only now being rolled out in South Africa.
The next type of WAN that we get is one that uses dial-up lines.
This is a common way of connecting to the Internet and in this mechanism we have a PC connected to a modem, which can dial-up from time to time make a connection to a modem at the ISP which is in turn connected to a LAN. By dialing up, we are extending the LAN.
The other dial-up that is on offer is a digital line: ISDN (Integrated Services Digital Network). ISDN offers a dial-up digital line instead of a dial-up analogue line. It uses a technology where it offers three lines at the same time.
1.a B channel
2.another B channel
3.a D channel.
The D channel is the data channel - it 's the channel used to communicate between the ISDN equipment and it 's not available for us to communicate on but runs at 16Kbps.
Each B channel can run at 64 Kbps.
So in fact, with ISDN we've got a maximum of 128Kbps of bandwidth when we use both B channels. The advantage of ISDN for example is that it can either use both B channels and get 128Kbps or we can use a single B channel (64Kbps) reserving the remaining B channel for telephone or fax communication, while simultaneously being attached to the network.
The two B channels and a D channel offer us more flexibility and the dial-up is a digital rather than analogue.
The advantage of ISDN apart from the fact that you've got higher speed is also the connection time. The time to connect with an ISDN service is often less than 4 seconds. In other words, from the time that you dial to your ISP, until the time that you are actually connected and can start surfing the Web is less than 4 seconds.
In my set up, it takes close to 1 second to connect as opposed to an analogue modem which could take up to 30 seconds to connect.
Wi-Fi is technology for connecting clients remotely and is the fastest growing technology offered by all the major players in this market. Wi-Fi or 802.11g is wireless connectivity offering to connect between 11 and 56Mbps and even higher. The advantage of wireless technology is it 's lack of the need of physical wire/copper or Fiber to connect to the client.
In the past we've had a modem in some form, connected by a physical piece of wire to another modem, the wire is now gone and we will have a dish or an antenna talking to another antenna.
Another means of connecting is Asynchronous Transfer Mode (ATM) and this certainly offers the fastest Wide Area Connection available today. Speeds start at 155Mbps and running to approx 622Mbps, although with recent technology, we can expect speeds to be significantly higher.
If you take that and you compare that to our LAN running at 1000Mbps, 622Mbps is only running 40% slower than what our Ethernet is running.
So clearly this is where WAN 's are moving. Higher bandwidth is demanded and this can only be delivered by these types of technology at speeds high enough to satisfy the need for bandwidth. In South Africa the Telecoms company uses a combination of microwave and ATM technology to deliver service between Johannesburg, Durban and Cape Town, the three main centers. This technology can carry voice, video and data at great enough speeds to ensure some quality of service.
Let 's now look at the various components that are used in a LAN and in a WAN.
In the old days the LAN comprised mostly of devices called hubs or a concentrator in other words.
A hub or a concentrator was a way of concentrating network connections in a single point. We said that hub 's ran at 10Mbps and essentially if you put 10 machines into a wire that was running a 10Mbps you would see that every machine could probably only transmit at 1Mbps even if they were transmitting at their maximum.
This statement is not strictly true of course, because Ethernet is CSMA/CD, so there would be a back-off process and two machines would communicate with one another, ultimately using up their 10Mbps standard.
Hubs were shared, they were slow, they were not optimal, primarily because you had a certain number of devices that you plugged in and the performance of Ethernet would degrade to such an extent that it was preferable not to even work on the network. That was in the bad old days!
Hubs then gave way to switches, the difference between a hub and a switch is that it when workstations started communicating with one another, they would essentially form a direct connection and even though other devices were connected these two workstations would talk directly to one another.
They would create a virtual connection between the two devices that were communicating with each other.
Once the conversation was complete that connection would be broken and then if a machine wanted to talk with a different workstation it would again create a virtual connection.
So you can see that at different times, different workstations could communicate with one another without interfering with each other's traffic, because there 's a virtual connection being established.
This set up really became a point connection, it was switched. What would happen is as soon as the packets arrived, they would switch to a correct port and they would leave on the correct port without interfering with anybody else 's traffic.
As opposed to hubs, switches were much faster, there was less contention but they were also much more expensive.
Now if you relate this to our TCP/IP model you will notice that a hub really operated only at the physical layer. It had no intelligence to know which port a particular PC was on. It had no intelligence to understand how to move packets between port A and port G. Switches on the other hand are able to switch packages between one port and another based on who is connected to that port.
Switches actually offer a switching service where it builds up a table similar to our ARP table, with port number and MAC address.
So switches are much more intelligent, they can communicate at the MAC layer, they are faster, they are able to switch packets, there is less contention and as a result one gets a much better through-put.
On the downside a switch is more expensive than a hub.
In our networks today there are very few hubs left as most organizations use switches. They are available as 10Mbps, 100Mbps or gigabit switches and you pay accordingly.
A Switch creates a virtual bridge between point A and point G and the packets flowing across this bridge are only destined for point G.
In the hub scenario, the packets were delivered to all workstations on the network.
Clearly that could be a problem in terms of contention, in terms of speed, in terms of efficiency. So because hubs are shared, every time a connection is made, it had to contend with everybody else wanting to make a connection.
With switches, it 's like a bridge, where only one person is able to cross the bridge at a time.
On a network we could have a switch with a whole bunch of workstations attached to this switch. These workstations can happily communicate with one another because they are on the same logical and physical network.
There arises a problem, because a switched network is what we refer to as a flat network, in other words, in order for these machines to communicate they must all reside on the same logical network. If they don't they can't communicate.
An example of the same logical network is: where the address is 192.168.0.X, and each workstation would be a item within that address, such as workstation 1, another might be workstation 15 and yet another might be workstation 212.
They are on the same logical network, and the same physical network and they communicate with no problem.
If we attached a second switch and put all these workstations on the 192.168.0.X network, again as examples assuming that we have a workstation 2, workstation 46, and workstation 89.
Now the two would be on the same logical network and you can see that this is a fairly flat network. As long as they are on the same network they can communicate.
What happens if I changed this and said that the additional workstations were on the 172.16.4.X network? We would now have 2 logically different networks.
If we relate this to our TCP/IP model, remember at the bottom we have the physical layer and that 's Ethernet. One layer up where switching happens we have MAC addresses. Only after that is the 3rd layers where we have network addressing, which in our case is IP.
Notice that a switch doesn't operate at the network layer- it cannot operate at the network layer. Its maximum reach up the network is to the MAC layer. Clearly we've got a problem, because we now want to communicate between one network and another network and that means that switches are inadequate, they can't solve the problem.
Remember that if you look inside and you look at the switching table all it 's got is a MAC address and a port number. All it can tell you is that MAC address "X" is at port number 6 or 7 of 15 or 24 etcetera.
So in the make up of the LAN, we need something more. Switches don't cut it because they can only talk on a network that 's on the same logical network - they can't talk across networks.
So what do we do?
Well, we use a Router. Earlier technology included routers and gateways.
The difference was that gateways were responsible for transferring between one protocol and another protocol.
For example, there is a protocol called SNA, which is used, mostly by banks in their Auto Teller machines because of design elements. It 's very efficient on Wide Area Network. The bank would run TCP/IP internally but they would need to communicate with their Auto Bank Teller machines by SNA and they would need a gateway to convert between the SNA protocol and the TCP/IP protocol.
So gateways are generally referred to as a translation mechanism between one protocol and another protocol. They are still very much in use today but the distinction isn't quite as clear as it used to be.
A router really has a similar job but its job is not to communicate from one protocol to another protocol, its job is to connect from one network to another network.
Let 's look again at our example above where we had two networks, one where the workstations fell into the 192.168.0.X network, and a second switch with workstations that fell into the 172.16.4.X network.
These are completely different networks, both physically and logically and in order to connect these networks we need a router, the router is going to convert between one network and another network.
On the one arm of the router is the 192.168.00.X network and on the other arm of the router is the 172.16.4.X network.
For most companies they would have a LAN, which would be connected to a router connected to a digital line (usually), then connected to an NTU on the side of the ISP connected to yet another router and then connected to ISP Ethernet.
In looking at our TCP/IP stack, on the LAN we would be operating at a MAC layer and on the network we would be operating at layer 3, the network layer.
In our simple scenario we have a switched network, where we have a router to convert between the networks. Routers operate at yet another higher level on the TCP/IP stack, they operate at the IP (Network) layer and so they are able to distinguish between physical networks and logical networks.
The router builds up a table of IP addresses and the port number that the requests for service have been detected on, so if the workstations on the 172.16.4.X network are communicating with one another. They equally communicate with the router and on port 1 of the router we have the IP addresses for all these workstations and we have as well the MAC addresses for all those workstations.
For port 2, we have the IP addresses and the MAC addresses of the workstations that fall into the 192.16.8.00.X network and again, like these working switches, these are dynamic tables so what happens when Joe switches off his PC in the 172.16.4.X network, well, his IP and MAC are eventually aged out from the routing table, on the router.
To review the scenario: we have network A, which is the 172.16.5.x network, and network B, which is the 192.168.0.x network. In order to connect these networks we use a router.
Although we've shown network A and network B on separate physical networks, there is no reason why we couldn't combine these into one physical network. For that we are going to use a switch, we would place the workstations onto the switch and 4 of the workstations we might put on the network 172.16.4.X and 4 of the workstations we might put onto the network 192.16.8.00.X. Now they are on the same physical network.
Now how do we connect between logical network A and logical network B?
Well, we will connect via a router we would put the router into the network on to the switch and its job would be to convert between one logical network and another.
A router serves the job of translating between one network and another.
A Linux box can be used as a router. In fact on every Linux box you have a routing table.
A routing table tells us a number of things such as what IP addresses are attached and what ports are on the router. It also tells us whether the port is up or not.
In order to see a routing table you can type the "netstat -rn" command and that will show you your routing table.
| Note |
|---|---|
The -n option has to do with network translation and we'll talk about network translation shortly. | |
By using the Linux machine as a router you would theoretically have to have at least 2 networks on the same network card.
On the network interface card you would plug in B, 192.16.8.0.X network and would give it a host address of lets call it ONE. (192.16.8.0.1)
Then plug in network A, which is 172.16.4.X and you give it a host address of ONE (172.16.4.1) as well.
How can that router have 2 host addresses on ONE? Well, because this host address resides on that network, network A and this host address resides on network B, network 192.16.8.0.X.
In fact if we looked at the full IP address of the interface on network A it would be 172.16.4.1 and if we look at the full IP address on network B it would be 192.168.0.1.
Linux is quite clever because what it allows you to do is to plumb the interface and plumbing the interface is really a way of attaching multiple IP addresses to the same physical network card.
In order to do that type in the following command:
ifconfig eth0 192.168.0.1 netmask 255.255.255.0
|
and that would give you your first interface on network B an IP address.
Then type in:
ifconfig eth0:0
|
and that would be the first logical interface on the same physical network 172.16.4.1 netmask 255.255.255.0.
This would give you a single network card connected to your switch, on the one side would be network 172.16.4.1 and on the other side it would be 192.16.8.0.1.
So this workstation would send its packet to the router and the router would act essentially as a go-between sending the packet to the client on the network.
Similarly when the packet returns or a reply was sent, the workstation on network A would send it back to the router and the router's responsibility would be to send it on to the correct destination.
So in this the router is acting as the go-between between the two networks. It 's essentially routing packets.
Our example consists of a very simple network but if we were to take a more complex example, you would really see the effect of routing on a network.
For this example, I'm going to draw a typical scenario of a small business connecting to the Internet. Equipment wise we have a switch and attached to that switch is all the workstations in that small business.
The small business is called ACME Widget Manufacturing Company and they manufacture ACME widgets. The client whether Microsoft, Linux or other, connects to a switch. They have a server and the client applications would be requesting services from the server. They have a router to the NTU (Network Terminating Unit) which attach's via Wide Area Link to yet another NTU which attach's to a router and to the ISP, which would in turn attach to 3 or 4 other routers which themselves might attach to NTU.
The ISP, in this case, is a nice stable one, lots of redundancies, so they have a link that goes to New York, they have second link that goes to London, and they have another link that goes to their Johannesburg office and another link that goes to Durban.
If Fred decides to get http://www.google.com (lets not worry for the moment how that translates), that translates to an IP address at 207.46.31.19 for example.
Fred lives on the network, 196.6.14.X and he happens to be host 32.
So what happens is, he says, I need to go to this address, how do I go?
Well, the address doesn't happen to be anywhere on my network so I'll go to my router and this process of going to the router is going to see a default gateway and every host on the network should have a default gateway.
If the network does not know where to send a packet, it will be forwarded to a the default gateway.
In our example with Fred, the packets leave his workstation and route to the switch (acts at layer 2), but because the switch doesn't know anything about this IP address it then switches the packets directly through the router.
The router in turn cannot find the relevant IP address but my default gateway says the ISP, well, in fact, my default gateway is the ISP address. Now here we have a network, 196.6.14 - this is also a network. And this network might be 10.0.0.2 - so this router says, well, if you don't know where to send this packet, send it to 10.0.0.2, which is that port on the router. The router gets the packet and says, OK, I don't know where to send that but what I'm going to do is, I've got my default gateway set up so that if I don't know what to do with the packet, I'm going to send it via New York. And so Fred 's packet goes from his workstation to the router connecting him to his company, across this Wide Area Network to a router within the ISP which in turn has its own default gateway saying if I don't know where to send this packet, I must send it via New York. And so it sends the packet out and off it goes.
At each point along the way, the router records this transaction, so when Google responds, the packet returns. It could essentially return via London but it is destined for the ISP 's router and when it is received by an ISP router, ISP says, OK, I know where to send that, I must send it across the Wide Area link, I must send it to the router, this router gets the packet and says I must send it back to Fred 's workstation. And so the process of sending packets around the Internet is really a process of routers actually knowing which route to take. If I asked you to travel from point A to point B, you would probably pull out a map, you would look at the directions on the map and you would choose a route and you would follow that route. Perhaps going to locate location B, you would follow one route and returning from location B you would follow another - is that feasible? Of course it is! At the end of the day, all it 's requiring is that I've told you to get to point B " you started at A, selected a route and off you've gone. If I say, which route did you select"
You might say, well, the route with the least number of traffic lights on it. That 's my default route, that 's my default means of getting from A to B and that, in a sense, would be default gateway. SO the process of talking between networks, you can see we've got at least 3 networks we're talking and possibly even more. Here's one, the 196.6.14 network, here 's the 2nd one, the 10.0.0 network. In this 10.0.0 network we only have 2 hosts - 1 and 2. In fact there 's no other hosts on that network, only 2 hosts. The 3rd network we have might be that and there might be a 4th and a 5th and a 6th. How many networks, that doesn't really matter as long as our packet knows how to get from A to B and how does it know that? Because the router knows how to route that packet through the network.
The final issue we want to talk about is broadcast domain.
Domains are an issue you are going to hear about, a term you are going to hear over and again in a number of different contexts.
In this context that we are talking about, a domain, a broadcast domain is the region that a broadcast on a network is heard.
Just because we have a switched network doesn't mean to say that we don't do broadcasts. For example, ARP is a broadcast and DHCP is a broadcast.
If you do a arp -p, that 's a broadcast. As said before, what happens with a broadcast is that every workstation hears the broadcast, and they respond to the request.
However what happens in our scenario above: Imagine if every broadcast that was put onto the Internet or on to the network was heard by every single machine on the Internet- clearly we would end up with a quite congested network.
So, a broadcast domain is the area that broadcasts are received, and broadcasts are restricted by routers.
In other words, if the router receives a broadcast it is dropped. This is what we call the broadcast domain, where the domain is the extent to which broadcasts are heard on the Internet or on the network.
In our scenario at ACME Widget Company, we have a router connecting to an ISP 's router, connecting to a server and clients.
When client A broadcasts on the network that 's an ARP request which is a broadcast and because it 's a broadcast everybody is obliged to listen whether you're a router or a server of a workstation, you are obliged to listen.
Because the router restricts the broadcast the extent to which the broadcast will be heard is restricted to that network.
In other words, the router to the Internet will not up-broadcast or will not relay that broadcast message and that is called a broadcast domain.
Sometimes there can be problems on your network where for example, you might have two networks connected by a router. In network A you have a DHCP server and network B you have no DHCP server, you want to offer DHCP IP addresses from network A to network B.
DHCP is a broadcast, router at that point of A entering into the router restricts it. So no DHCP request will ever be answered on the B network.
There are ways around these problems but that 's essentially a broadcast domain and because Linux can be a fully-fledged router, it can handle all these jobs without a problem.
Table of Contents
In Linux you need to set your IP address before you can communicate with anything on the network.
There are three ways of setting IP addresses in Linux.
The first way is to set it statically and this obviously means that your network address will be set after rebooting the machine.
The second means is to set your address on-the-fly. This means that, while the operating system is running, the IP address will be set. However, if one were to reboot the machine, this on-the-fly configuration will be removed and your network interface card will no longer have the IP address you set on-the-fly.
Finally, we can leave our IP address unset and rely on DHCP to provide us an IP address. DHCP, which stands for Dynamic Host Configuration Protocol is a protocol that was designed to issue, reclaim and administer IP addresses in large and small networks. DHCP will issue IP addresses from a pool of addresses ensuring that there is a lease time on the address. When that lease expires, the client will ask for another IP address. Thus, your IP address may not be fixed but will vary from time to time. In general, this is a very handy means of assigning IP addresses and the most useful means of keeping track of them.
Within statically assigned addresses we can allow our address to be assigned by a DHCP server, which stands for Dynamic Host Configuration Protocol server. In this case the DHCP server assigns addresses (dynamically). The other way of setting a static address is choosing an address and setting it in a system file so that it doesn't change until the system is rebooted.
What I'm going to do is show you how to set the IP address statically. Setting the IP address statically can be done using a file (in which case the IP address will remain across a reboot) or on-the-fly (in which case the IP address will revert to what is was initially after a reboot). I'm going to show you an on-the-fly set-up using the ifconfig command.
Ifconfig has a whole host of options to it, in Ethernet you need to tell it what Internet address to assign, this works right across all the distributions of Linux.
If we have the Ethernet card 0 with the IP address of 192.168.0.1 then we need to give it a netmask of 255.255.255.0. Once that 's set, if you do an 'ifconfig eth0' (this time without the IP address) you'll see that your IP address has changed and it 's now 192.168.0.1.
It might be worth just having a look at what other information shows up in that ifconfig eth0. We've seen earlier that your hardware address HWADDR shows up and that 's that 12 byte number, 00:01:03:8C:FB:01 (on my computer) number that indicates your MAC address.
It also shows you that the encapsulation later 1 protocol we're using in Ethernet. It shows up our INET address, which is the one we've just assigned. And the broadcast address.
Now from our earlier discussion on IP, our broadcast address is the address where the host portion is all 1 's or 0's. In this case our broadcast address is 192.168.0.255 and there 's the host portion - that is 1. If we take our IP address and we add this with our mask it shows us what network this host is on - in fact we use a standard class C network mask we know that the network with device is on is the 192.168.0 network. Then the next line we see "UP", indicating that this network is currently up.
We could for example run the "ifconfig eth0 -down" command and that would shut the network down and switch our network off.
Of course if we then did an "ifconfig eth0 up" the IP address that we set dynamically on-the-fly would be gone and we would have to run through the ifconfig command sequence again. There 's a whole bunch of other information there - broadcasts (in other words, this card is capable of broadcasting). It is also capable of multi-casting and there is the MTU ( Maximum Transmission Unit), and we saw earlier in the course that the MTU is 1500 bytes. The maximum units in size that Ethernet can carry. There is also a METRIC. A metric is now how many hops we need to get to the correct IP address (network) and in fact the metric here is 1.
Finally there 's information such as the number of received packets, number of errors, overruns, frame, number of transmitted packets, collisions, transmits and receipts of bytes.
All this information is important - without one of the tools working you can't run the network. For example if you get the interrupt incorrect, your network interface card cannot be seen by the operating system.
We talked earlier about plumbing the network card and in this section we can do this on the fly.
Plumbing network card points to two different IP addresses or two different networks on the same network interface card.
In this case, eth0 interface is at the IP address 192.168.0.1 we could say, well eth0:1 must have the address 172.16.4.1.
This actually is using the Linux box as though it were a router, on the one side we've got one IP address and on the other side we've got another IP address.
How do we do that?
Do an ifconfig eth0, that is 192.168.0.1 netmask 255.255.255.0. If we do an ifconfig after plumbing the device, ( i.e. On eth0:1) it will set that to 172.16.4.1 with a netmask 255.255.255.0.
So, that 's the way of plumbing network interface cards. Again, because it 's on the fly if we shut our interface down, then both eth0 and eth0:1 IP addresses would be lost.
Well, often we have one physical network and we want to separate that into two logical networks, we don't have an expensive system router so that 's the way to do it - you must plumb the card.
You'll know that from the discussions thus far that there are now two completely separate networks with a bridge in the middle.
So far, we've done a whole lot of changes on-the-fly. We can also set these things statically so that after a re-boot the machine configuration stays the way it was set up. For this you need to look at a file called /etc/network/interfaces
In order to have the IP address stored in a file, in other words, we don't want to get it from DHCP and we don't want to have to configure it every time with an ifconfig command - we will need to edit a file.
The file in Debian is /etc/network/interfaces, and if we look at the interfaces in the file, it will have entries as shown below (or similar):
# /etc/network/interfaces -- configuration file for ifup(8), ifdown(8)

# The loopback interface
auto lo eth0
iface lo inet loopback

#mapping eth0
#       map WORK work-eth0

iface eth0 inet static
        address 192.168.10.1
        netmask 255.255.255.0
        gateway address 192.168.10.1
|
| Note |
|---|---|
This file is not in this location in SuSE (in SuSE, most things are changed through the tool YaST). In RedHat we need to edit a file called "/etc/sysconfig/network-scripts/ifcfg-eth0" | |
"iface eth0 inet static" will set the interface Ethernet0 and make it static and we could say here that the address is 192.168.0.1 netmask 255.255.255.0.
Once you set it statically you can say "ifdown eth0" and "ifup eth0" and that will re-start the network card for you whilst still having the same address. An interface will come up every time to use the same IP address.
I am going to change my system files as above.
As soon as I do that my Ethernet interface comes up and I should be able to see the rest of the network.
The danger of configuring network interfaces on-the-fly is that one might configure them and forget that you haven't make it permanent and only days or weeks later when the server 's been deleted, you find out that it was an on-the-fly configuration at which point you need to go and fix it.
Dynamic addressing is different. Dynamic addressing purely comes from the DHCP server.
DHCP server stands for Dynamic Host Configuration Protocol.
It 's job is to provide DHCP clients with IP addresses and other relevant information, for example, to provide the default gateway, the IP address, the DNS resolver and a hostname etcetera.
The DHCP server is able to offer IP addresses, to re-claim IP addresses and even to expire IP addresses.
There is a protocol called BOOTP, which is the protocol used to boot X workstations and other types of devices. Its job is to offer up an image for the workstation to boot.
Now DHCP and BOOTP are very similar protocols. They both offer similar services and in fact DHCP can service BOOTP requests.
The only difference is that BOOTP servers can't re-claim or expire IP's.
This means that DHCP has become the standard in dynamics of controlling of IP addresses.
Essentially, DHCP was developed to alleviate the problems that arose when assigning static IP addresses throughout a really large network. (If you have 5 hosts, it 's not a problem but if you've got 5000 hosts, it could be a problem and you might re-assign IP addresses and duplicate IP addresses and so on.)
A DHCP server listens for requests.
When you switch your workstation on, the workstation sends out a broadcast message requesting a DHCP server.
If you have more than one DHCP server on the network, the first one to respond is the one that services this request.
The DHCP server hears the broadcast and responds with an IP address and the other information that we can give the client.
When the broadcast is put on the network the DHCP server updates its ARP table, responds to the client who also updates its ARP table. The client is offered an address, which it accepts. There is a lead time on that address and when the lead time has expired the server will force the client to get a new IP address and the whole broadcast process happens again.
One of the problems with DHCP is that, if the DHCP server is enclosed by routers on either side then this becomes the broadcast domain and the broadcast domain restricts DHCP requests to this subnetwork. This implies that clients wishing to obtain DHCP requests on the opposite side of the routers will not be capable of receiving them.
If another server on the network were to request a DHCP address it would only progress as far as the router at which point it would stop.
Well, if this is a Linux machine, there are some parameters in "sysctl" (System control) that would allow you to forward DHCP requests.
The exact parameter that one needs to specify is in "net/ipv4/conf/eth0/boot_relay", I've only got one Internet address, and you'll see if you do a "sysctl -a | grep bootp" that this parameter is currently set at zero:
debian:~# sysctl -a | grep bootp
net/ipv4/conf/eth0/bootp_relay = 0
net/ipv4/conf/lo/bootp_relay = 0
net/ipv4/conf/default/bootp_relay = 0
net/ipv4/conf/all/bootp_relay = 0
|
When we run the following command:
debian:~# echo "1" >/proc/sys/net/ipv4/conf/eth0/bootp_relay
|
The Linux router will now be able to forward BOOTP requests, where before it stopped them, it will now forward them to the DHCP server and the DHCP server will respond.
The following screen shot is the result of running the "sysctl -a | grep bootp" command after running the "echo "1" >/proc/sys/net/ipv4/conf/eth0/bootp_relay" command.
debian:~# sysctl -a | grep bootp
net/ipv4/conf/eth0/bootp_relay = 1
net/ipv4/conf/lo/bootp_relay = 0
net/ipv4/conf/default/bootp_relay = 0
net/ipv4/conf/all/bootp_relay = 0
|
The process that we've just undergone where we've echoed "1" into the boot_relay field is a dynamic process, it 's an on-the-fly configuration.
To set that field permanently you should edit the file called "etc/sysctrl.conf".
I encourage you to go and read the man pages on sysctrl.conf with "man sysctrl 5" and reading that section will show you how to set up BOOTP relay.
On the client machine we need an application to request the DHCP service from the server. There are a couple of options, "dhclient" is one and "pump" is another.
The workings of DHCP client and pump are not that critical to understand in order to use them.
What is more important is how to set up your address to become statically or dynamically applied each time you restart your network.
In order to use DHCP to find an IP address every time you restart your interface you need to go back to your etc/network/interfaces file. In there you would put an "iface eth0 inet DHCP" which would cause your network to come up every time with a DHCP server provided valid IP address.
/etc/network/interfaces -- configuration file for ifup(8), ifdown(8)

# The loopback interface
auto lo eth0
iface lo inet loopback

#mapping eth0
#       map WORK work-eth0

iface eth0 inet DHCP
        address 192.168.10.144
        netmask 255.255.255.0
        gateway address 192.168.10.1
|
When working with client/server technology, a DHCP server is inter-operable, so even if your DHCP server happens to be a Windows NT server and your client happens to be a Linux client, you will still get an IP address.
The server and the client are operating independently. As long as they stick to the same protocol, we will be able to get an IP address.
This interoperability is shown in that Linux is inter-operable with other alternatives, the DHCP servers could be a Solaris machine or any other type of Unix.
Table of Contents
This chapter details the process of basic network configuration. Linux has the ability to alter networking information on the fly and in almost all cases, no reboot is necessary. If you're brave enough, you can also delve into the /proc file system that will allow you to change various settings on the fly too- but I'm running away from myself. While this is a boon for many people familiar with other operating systems, it can also be a problem. Often, a system administrator wishing to make the changes quickly may well make them dynamically, forgetting however to make them permanent by modifying the relevant files. On a system reboot, the old settings return to haunt you. So a little word of warning - ensure your dynamic changes are made permanent by updating the files.
Network card addresses can be assigned using the ifconfig command. This commands has the ability to bring a network interface card up, take it down and reconfigure it. Let 's start by examining your current network settings.
ifconfig -a
|
You will notice that at least one network connection is present on your system - the "lo" interface. This is the loopback interface and is common to all systems connected to a network. The loopback interface is a virtual interface and never goes down. It 's primary function is to allow the functioning of the TCP/IP stack on the OS without the presence of a network card.
The IP address assigned to the loopback address (lo) is 127.0.0.1 - a class A address. Try to do an echo test to the loopback interface using the ping command:
ping 127.0.0.1
|
You should get a response. Since this is a virtual interface, you have had to do nothing to ensure that it is up. Of course, just because the loopback interface is up does not mean you can begin talking to others on your local network. For that you need a real network card.
If you do not see an interface called "eth0", it probably means you have not loaded the drivers for your network card. If this is the case, you will need to determine what type of network card (and chip set) you have. It is out of the scope of the course to go into the details here. Instead check our Donald Beckers site - he did most of the coding of network drivers for Linux (http://www.scyld.com/network).
Once you have and interface, you can type:
ifconfig eth0
|
This will show you the Ethernet device 0 - the first network interface card. My output shows:
eth0      Link encap:Ethernet  HWaddr 00:01:03:8C:FB:01
          inet addr:172.16.1.2  Bcast:172.16.1.255  Mask:255.255.255.0
          UP BROADCAST RUNNING MULTICAST  MTU:1500  Metric:1
          RX packets:4537 errors:0 dropped:0 overruns:0 frame:0
          TX packets:4824 errors:0 dropped:0 overruns:0 carrier:0
          collisions:0 txqueuelen:100
          RX bytes:1822888 (1.7 Mb)  TX bytes:370681 (361.9 Kb)
          Interrupt:10 Base address:0xe800
|
From this I can see the following:
the IP address on this card is 172.16.1.2 (inet addr)
the broadcast address 172.16.1.255 (Bcast),
the subnet mask, 255.255.255.0 (Mask),
the interface is up (UP and RUNNING),
it is a broadcast interface (BROADCAST), other technologies like token ring were not broadcast devices,
the maximum transmission unit (MTU) of 1500 bytes. This is the maximum for Ethernet, token ring has a higher MTU,
the number of hops to get to this interface (METRIC),
the number of packets transmitted (TX packets),
the number of packets received (RX packets),
the number of received and transmitted bytes ({RX,TX} bytes,
and finally, the interrupt consumed by this device as well as the base address.
The ifconfig command can be used for more than simply showing your network interface card information. It is also the tool you use to bring a network card up (make it active on the network), or to take it down (deactivate it). To activate and deactivate your network card you can:
ifconfig eth0 [up|down]
|
Additionally, you can change the network address on the fly as we discussed earlier. So here is the general syntax for the ifconfig command:
SYNTAX:
ifconfig interface [aftype] options | address ...
|
The options earlier were up or down, but ifconfig can additionally take an address:
ifconfig eth0 10.0.0.1
|
In the absence of other options such as "netmask" or "promisc", the interface is brought up with the address 10.0.0.1 and the standard class A subnet mask for the 10 network namely 255.0.0.0
Adding the word "netmask" allows us to define a network mask for this interface:
ifconfig eth0 10.0.0.1 netmask 255.255.255.0
|
Some of the less well-known things you can do with this command is change your hardware (MAC) address. Try this:
ifconfig eth0 down
ifconfig eth0 hw ether BA:D1:da:d1:20:04
ifconfig eth0 up
ifconfig eth0
|
Bingo, you've changed your hardware (MAC) address. (Bad Dad 2004!)
I've referred to dangers of setting these setting your IP address on-the-fly versus setting it statically. We will focus now on configuring the interface statically - in other words, through a reboot but not relying on a protocol such as DHCP to issue us an IP address.
As with everything in Linux, networking configuration is stored in a file. This time, it 's in /etc/network/interfaces. Typical entries will look as follows:
iface eth0	inet static
		address 192.168.0.10
		netmask 255.255.255.0
		gateway 192.168.0.1
|
This will configure the interface to the IP address 192.168.0.10, with the default gateway being 192.168.0.1 (we'll talk about the default gateway shortly). Assuming you had two interface cards in your hosts, the first using a static address and the second using a DHCP address, you could have two separate entries in the interfaces file as follows:
iface eth0	inet static
		address 192.168.0.10
		netmask 255.255.255.0
		gateway 192.168.0.1
iface eth1 inet DHCP
|
Once you have set your IP address statically, it is always a good idea to test it out by forcing a network restart. In Debian, this is done using the ifup and ifdown scripts. These can be used by issuing them on the command line:
ifdown eth0; ifup eth0
|
This will stop and restart out interface. Naturally we would need to do this for every interface we have, so presumably we could get smart (or lazy) and write a loop that could do this for us:
    for i in `seq 0 1`
do
    ifdown eth$i;ifup eth$1
done
|
In fact Debian is a lot smarter than either of the commercial Linux distributions. If you use Debian you do not need to create a for loop like this one to restart your Network interfaces, but there is not time to delve into this here (for more information on magic network configuration, visit http://www.debian.org/doc/manuals/reference/ch-gateway.en.html#s-net-magic-reconf )
| Note |
|---|---|
if you don't understand this for-loop, hang in there and do the Shell Scripting course. | |
| Note | ||
|---|---|---|---|
In both RedHat and SuSE, the commands to stop and restart daemons/services differ. In RedHat, you would issue the command:
SuSE, you would run:
| |||
At this point, our network interface is up and able to transmit and receive packets over the network. One of the ways of testing this is by getting a friend to "ping" your interface, assuming they are on the same network as you. Another means of testing the interface is by you "pinging" someone else on your network. I'll assume for now there is another host on your network with the IP address 192.168.0.45. Ping the host using:
ping 192.168.0.45
|
As long as you get a response from the host you are pinging, your network interface is up and A1 OK. We'll spend some time later in the course discussing ping as well as other tools that are invaluable in solving some network related problems.
| Note | |
|---|---|---|
What response SHOULD you be getting back if everything is fine? I have included some output below from pinging my default gateway (172.16.1.1) on my network in my office:
As you can see from the second-last line, 5 packets were transmitted and 5 packets were received, so there was no packet loss. We'll discuss troubleshooting your network in much more detail later in this course. | ||
The final thing to deal with in this chapter is the default gateway. So, what 's the default gateway? This is the default route out of your network. Still do not understand? I know, now I'm not talking about routes! Well the concept of a route is actually quite simple. If I were to ask you which exit you would use when leaving the stadium after a scintillating cricket match, you would probably reply that you would leave by the exit closest to your seat. So, this would be the default gate on your way home - your default gate way. With IP packets, it is no different. The route (or path) they will follow to leave your network will go through a particular host - the default gateway. In other words, if the host you are trying to talk to (for email, web or other service) does not reside on your local network, your packets will be channeled (routed) to the default gateway.
Setting the default gateway is done using the "route" command. Without going into all the options of the route command, we could add a default route using the command:
route add default gw 192.168.0.1
|
Consult the route(8) manual pages for additional options. In this case, I'm adding the route to the gateway (or host) 192.168.0.1. It is the responsibility of this host to ensure that the packet is routed out of your network.
Again this is a dynamic setting, so we need to make it static using some configuration file. From our earlier discussions on configuration of the default gateway automatically, you simply have to add the gateway to the interfaces file (in /etc/network) in the form described above. On restarting the network interface, your default gateway is set, even across reboots. Once the default gateway is set, a simple stop an restart of the network interface will enable this.
| Note |
|---|---|
while stopping and restarting the interface is not essential since the same can be accomplished using the route command, you may well wish to restart the interface to ensure that all your dynamic settings have been written to files which will ensure things are honkey-dorey even after a reboot. | |
In the early days of networks, IP addresses were manually assigned to individual hosts. This meant the network administrator had to visit individual hosts, assigning them unique IP addresses. This is fine if you are working in a small contained environment. However, as networks grew, controlling IP addresses became more and more unmanageable. Enter DHCP. Prior to DHCP, UNIX administrators used a protocol called the boot protocol (or bootp for short). This did not solve the problem of dynamically assigning IP address, but it was the forerunner to DHCP and is inter-operable with DHCP in environments which still require bootp.
Host IP addresses can be assigned from a central place, lowering support costs when a new machine is installed or replaced.
It solves the problem of duplicate IP addresses. IP addresses on a network MUST ALWAYS be unique.
It solves major problems in the event of IP reshuffles.
| Note |
|---|---|
In the early days of the Internet, people applied to the InterNIC for a legal IP address class. Often they were granted it, and promptly used it around their organizations. Later, when InterNIC realized there was a shortage of IP addresses due to the exponential growth of the Internet, they had to put some mechanisms in place to stem the tide of the use of class A, B and C addresses. One of the ways to do this was to ask organizations to move to "illegal" addresses within their organizations and return blocks of legal IP addresses back to InterNIC. This obviously required many organizations to go through an IP address reshuffle - a time consuming and costly process. DHCP helped to solve some of these problems. | |
In this part of the course, we merely configure the client, however, in the Advanced Networking Course, there is a more extensive coverage of configuring the DHCP server.
DHCP is a broadcast service. By this I mean that the client will broadcast a DHCP request and wait for an answer. Assuming there is a server that is listening for DHCP requests, it will reply. In general, if there is more than one DHCP server, the first to answer the DHCP request will supply the IP address to the client - which of course might not be quite what you want. DHCP can also supply other parameters to the client including the default gateway, the DNS server, the length of time the client is allowed to retain this address, and, if required, a boot image for the client.
In conclusion, configuration of the client is as simple as we've seen earlier in the notes. Simply supplying the relevant parameter to the /etc/network/interfaces will dynamically obtain the IP address. Client configuration occurs using one of three pieces of software, namely, pump, dhcp-client (of dhclient), or dhcpcd. In it 's default form, the client works properly in it 's unconfigured state, however these programs have a configuration file that allows tweaking of the system.
Table of Contents
Email is one of the most popular applications on the Internet today. In fact, in many situations, it has become critical to the functioning of a business and is tightly integrated into almost every business process - probably with the exception of making a cup of Java.
Despite this, many system administrators don't understand how email works and it is often a hit-and-miss affair when attempting to solve email related problems.
In this chapter, I hope to de-mystify email, and help you come to a better understanding of the acronyms and terminology - and of course assist in setting up you email client on your workstation.
The first and most important aspect of email is to understand that it is, once again, a client-server model. Servers act in much the same way as the post office distribution centers, while the client acts like the postman on his bicycle (and the letter box on your gate).
In most organizations there will be one or more distribution service centers, while each person will have a client on their desktop that they will use to read and respond to email's that have been distributed to the client by their server.
In electronic mail terms, this is known as the mail transport agent (the server) and the mail user agent (the client) - or MTA and MUA for short. To distinguish these is important because many people become confused, exchanging these terms in their excitement of talking about email.
Typical MTA 's are:
Microsoft Exchange,
Novell 's Groupwise,
Sendmail,
EXIM
Qmail
|
While typical MUA 's are:
Microsoft 's Outlook and Outlook Express,
Open source alternatives like Ximian 's Evolution, Mutt and Netscape Mail.
|
The process of exchanging email is based upon a number of different protocols, but at the heart of electronic email is the simple mail transport protocol (SMTP).
This protocol is based upon the connection-orientated TCP protocol and is certainly the most widely used email transport in the Internet today. When an email is sent between MTA's, SMTP is the protocol that these email servers "speak". SMTP is situated at the top of the TCP/IP stack - pretty much on top of TCP.
We will spend some time later conducting a conversation with an SMTP server. For now though, we have a little more groundwork to cover.
When I send a mail to joe@mailprompt.co.za, my MUA delivers the email to my local SMTP server.
The SMTP server (let 's call it smtp.QEDux.co.za) resolves the IP address of the mail server for mailprompt.co.za and attempts to contact that server on port 25 - which is the default SMTP port.
| Note |
|---|---|
The SMTP server is able to resolve the IP address for the mailprompt.co.za mailer using a special DNS record - the MX record in the DNS server for mailprompt.co.za. Although this point is out of the scope of this course, it is at least nice to know how one SMTP server is able to just "know" who the mail server is on the other side. In the DNS elective course you will learn how to use "dig" command to determine IP addresses for specific URL's, including how to use the MX records to determine the IP addresses of MTA's. | |
Once my SMTP server has made contact with mail.mailprompt.co.za (I'll assume this is the name of the mailprompt.co.za email server), it will begin transmitting the message to the remote side.
Only once the email has been completely and successfully sent, will the local MTA (my side) delete this email from the list of email's to be sent. Once deleted, my mailer marks this email as "delivered" while the receiving SMTP server has the responsibility of ensuring the mail is delivered to the recipient.
(Delivery is a topic that is dealt with later in this module.)
Since this is essentially a point-to-point service, it is highly unlikely that email can get lost en-route. Obviously mail does sometimes get mislaid, which proves that even with this "fail-safe" mechanism, snags can still plague it.
So, what does the 'conversation' between the two mail servers look like? I have included a sample conversation below.
Simply put, there are a number of commands a SMTP server understands. In this session, the commands HELO, MAIL FROM, RCPT TO, DATA and "." are all SMTP commands:
telnet smtp.uninetwork.co.za 25
Trying 168.210.56.254...
Connected to smtp.uninetwork.co.za.
Escape character is '^]'.
220 mail.uninetwork.co.za ESMTP
HELO QEDux.co.za
250 mail.uninetwork.co.za
MAIL FROM: hamish@QEDux.co.za
250 OK
RCPT TO: andrexxxxxxx@richemont.com
250 OK
DATA
354 go ahead
This is a test email Andre,
Please discard
Cheers
Hamish
.
250 OK 1079988036 qp 12140
|
Here I have simulated a simple conversation. You can do the same on your mail server, and you should achieve a similar result.
This same conversation happens for each piece of email routed through the Internet.
This brings us onto the subject of open relays. In the past, SMTP servers were open in that they permitted anybody, whether internally or externally, to send email through them. This made life easier for users since they could simply send email using any SMTP server.
That all changed with the rise of the scourge of the Internet " SPAM![4]
The definition of spam is that it is unsolicited email - pretty much the equivalent of junk mail in your post box.
People abusing the use of the Internet generate Spam in large volumes. They will often use an SMTP server that is "open" to the public to relay their messages to multiple recipients - hence the term "open relay". When they do this, the recipients will receive email's from the spammer without a request for such email.
There are problems with spam.
Firstly, it clogs up valuable bandwidth with meaningless rubbish.
Secondly, and probably more detrimental to the "open relay", is the fact that this relay ends up being added to a "blacklist" of servers. Therefore, any "valid" email sent from the open relay, will be bounced by the recipient who will be protecting themselves from spammers. The fact that your email's are valid since they originate from people within your organization is immaterial - as far as the recipient mail server is concerned, you are one of the spammers. It can take anywhere between 24 and 72 hours (and sometimes even longer) to get your mail server removed from the blacklist. During this time however, any valid email's sent by your mail server will be rejected (bounced) back to your mail server. This can be frustrating and cause a loss of productivity, but will be a real source of embarrassment to the system administrator!
Finally, spam is just plain irritating.
Having spent some time discussing how we send email, we now need to look at how we, the client, receive the email that has been sent to us. Mail retrieval is slightly more complex than sending mail purely because there are many different choices a system administrator has when allowing clients to receive email - or when fetching email herself. In effect there are three broad categories:
You are a user on the host that is also the SMTP server,
you are a user on another hosts on the same Intranet as the SMTP server,
you (probably) have very little in common with the SMTP server (perhaps the SMTP server is maintained and belongs to your ISP). However, since you are a client of the ISP, they host your email.
We'll look at each of these in turn:
| Note |
|---|---|
I am not discussing how MS Exchange works as firstly I am not qualified to do so, and secondly these courses have nothing to do with Microsoft products. | |
When the email is delivered from the sending mail server, it has to be stored somewhere while time elapses until you, the user decides to retrieve it.
In general, most email servers store your email locally in a file or files on their hard disk drives.
Assuming then you are the client that will be reading your email, and you already have a login to the mail server, your email client will merely need to look inside the file(s) or inside the directory that stores the files.
There is another whole issue of what mailbox type you are using to store email, but we'll leave that until the advanced networking course where we actually configure a mail server.
For both Category 2 and 3, we will want to implement a retrieval protocol. Categories 2 and 3 are similar in many respects, but differ in the fact that in Category 3, you, the client have little to do with the organization offering the service.
A typical office environment (as is prevalent in many large corporate companies) is that describing Category 2, while a user that dials into their ISP to retrieve their email would be an example of Category 3. Of course these are not mutually exclusive, and one could implement both Categories in an environment.
In the case of Category 2, we do not want to log onto a separate machine in order to read our email.
Let 's make it a little more concrete. In the case of a large corporate, they may require that all their clients keep all email on a central server for the purposes of security, backups and the ability to roam around the office.
For this there is a protocol called the Internet Message Access Protocol or IMAP. IMAP is used in this scenario (office environment) since it encourages email to be stored on the server rather than an individual workstation client.
Thus, IMAP is a central point of storage of the email. Naturally, given this type of system, the system administrator will need to make the necessary arrangements to have the email backed up and will need to provide a good level of service delivery. You will not believe how fast users will moan if their email is not available.
The other method of email retrieval is that offered by the majority of ISP's.
ISP 's generally don't want to store your email permanently (perhaps they have limited storage capacity for all their clients to store email). As such, they are happy to store (for a very limited time) the email that arrives at their mail servers addressed to you, but as soon as you dial in to collect it, they expect you to take it away with you. They are usually not responsible for your mail once it is accessed by you (contrast with this, a corporate client who stored the email of everyone in the organization on a central email server).
Thus, in the ISP scenario, it makes little sense for the ISP to implement IMAP, since this implies our email will be stored in a central repository at the ISP - pretty pointless when you need to read something off-line.
Additionally, if the ISP has implemented IMAP, then when we do go online, all the messages will need to be downloaded to the client (in fact only the headers are downloaded with IMAP, the message body remains on the server until such time as it is accessed). This is a costly process in both time (you will be waiting for the email to download) and money (you will be paying phone charges while waiting - come to think of it, no wonder Telecoms companies are so wealthy!!). In this scenario, it may be wise to have a protocol that has the ability to pop the mail off the mail server and store it locally (on your machine) - enter the Post Office Protocol version 3 (POP3).
POP3 was designed to retrieve email from a mail server in "batch" mode and save it as files on the hard disk of the client machine. This system has the advantages in terms of time and money saved, as well as the ability to read your email anywhere, any time. However, the disadvantage is that if your hard disk fails (aka crashes), you loose all your email. But of course, you are a good system administrator and you have done adequate backups!
POP3 and IMAP are often bundled together in the same package. In this way, when you install a POP3 server, you get a free IMAP servers thrown in, or of course visa-versa. Now who said Linux was not good value for money!!!! POP3 and IMAP serve different purposes and it is wise to consider carefully what is required before offering one or the other. In general, MS Exchange is a modified IMAP type service.
POP3 and IMAP serve different purposes and it is wise to consider carefully what is required before offering one or the other. (In general, MS Exchange is a modified IMAP type service.)
In much the same way as we were able to walk through a SMTP conversation, we are able to walk through a POP3 and IMAP conversation. There are a variety of POP3 and IMAP commands, and we will look at some in the trouble shooting section later in this course.
Finally, POP and IMAP are inherently insecure. They send passwords unencrypted over the wire and are therefore prone to eavesdropping and packet sniffing. One method of solving this is by means of using certificates and implementing the secure sockets layer (SSL).
Thus in addition to POP3 and IMAP, there is POP3S and IMAPS and this will be covered in the advanced networking course when you configure a POP3 and IMAP server.
In conclusion then, when setting up an email client like Ximian's Evolution or Mutt, you need to supply an outgoing mail server (the SMTP server) as well as an incoming mail server (a POP3 or IMAP server). Once that is done, you should be able to send and receive email.
It is also worth noting that, on the whole, outgoing SMTP servers do not usually require that you authenticate in order to send email, while naturally incoming POP3 and IMAP servers will require one form of authentication.
It is worth spending some time in highlighting some email problems and how to begin to solve them.
In general, there are only a handful of email problems and these are, in no order of importance:
SMTP server is not accepting connections
SMTP server is not accepting connections from your network
POP server is not accepting connections
You can not log on to the POP server,
Your IMAP server is not accepting connections,
You can not log in to the IMAP server.
Problems 1, 3 and 5 are relatively simple to check. One method is using a port scanner, while another is just to telnet to the port and check whether you get a reply.
In the case of POP3 and IMAP, you may not get a reply before you have actually attempted to log in.
With SMTP however, you should get a reply from the server as soon as you connect.
The Internet has grown uncontrollably over the past 10 years, and with that has grown the ability to communicate with people that you have never met - and often will never meet.
This has resulted in a number of fundamental security issues:
Are you who you say you are, and did this message really come from you?
How do you keep messages from being tampered with during their transmission?
How do you keep messages secret - only to be viewed by individuals for whom they are intended?
In the virtual world, I may well claim to be John Cleese. The question is how can the recipients of my email verify whether I am John Cleese or not?
A not unrelated question is how the recipient knows this message really came from you. This is where GNU Privacy Guard comes into play. GPG is an open source implementation of PGP (Pretty Good Privacy). Since PGP is proprietary and not open to public scrutiny, it cannot, and should not, be used without purchasing it. In response to not being able to use PGP without having licensing issues, GPG was developed.
Transmitting a message from one mail server to another over thousands of kilometers to places I never even knew existed, poses the problem of whether someone or something in between the source and destination has intercepted the email, modified it and sent it on to the recipient. Neither I, nor the recipient, would have any idea that the email had been modified until I received a message in reply from the receiver.
Finally, given the nature of communication today, we all require some degree of privacy and knowing that someone could intercept your email's and read them (even if they don't wish to cause any damage) is a little disconcerting. I certainly would not like everyone to have access to every letter that arrived in my post box at home. We need some means of encrypting sensitive email's.
Data encryption can be categorized broadly into:
a) the use of symmetric keys and
b) public/private key infrastructure (PKI).
Symmetric keys are similar to a lock in which all people wishing to use the lock have a copy of the same key. In this way, if two people communicate using symmetric keys, they can both encrypt and decrypt using the identical key.
A fundamental problem with this cipher (a cipher is the means of encryption) is that the symmetric key needs to be exchanged initially. If this is done by email for example, then anyone eavesdropping will be able to collect the key and all encrypted email's will be easy to decode. No good since you may as well not have encrypted in the first place.
Public keys solve this problem. These are often called asymmetric keys since the sender and the receiver hold different keys. One party has the public key, while the other has the private key.
Public/private keys are different to symmetric keys since there is no single key - the key is broken in two; a public part and a private part. In other words, you, as the holder of the private key, should distribute your public key to as many people as possible - but you guard your private key carefully.
Additionally if an unknown party has your public key they cannot compromise the integrity of your private key.
Distribution of public keys can be done by putting it on your personal web site, but may also be sent over unencrypted email.
In fact, some "real geeks" have "key" parties in which everyone brings their public keys to exchange and sign them.
We will practically create our own set of public and private keys shortly.
There are some limitations to public/private keys, the most important of which is that (en|de)cryption is expensive - time required to encrypt and decrypt is costly. Due to this overhead, there is a third form of encryption that combines public/private keys and symmetric keys.
In a hybrid form, the symmetric key is exchanged using the public/private key cipher, and once the secret symmetric key is on the recipient machine, then the decryption begins. In this way the symmetric key and public/private keys are no longer used except during the encryption and decryption.
GPG uses this hybrid cipher. In fact, hybrid ciphers have the best of both worlds. Encrypt the symmetric key using public/private key, albeit at higher cost. Send the encrypted symmetric key to the other side, then decrypt the key on the remote side and decrypt the message using the symmetric key.
Apart from symmetric keys being less costly algorithms, they are also more secure than the public/private key ciphers.[5]
To repeat for clarity and further definition: Note that each encrypted message is bundled with a symmetric key for decryption on the remote side, and since symmetric keys are exchanged for every message, the key is known as a session key.
One advantage of using public/private and symmetric keys together is that should a session key be compromised, only that particular file is compromised - future messages have a new session key. Therefore, the next file would require that the cracker begin trying to decrypt the session key from scratch.
In sum then, when encrypting email or a document, you will encrypt the session key with the recipient 's public key. They will decrypt the session key with their private key.
The explanation above deals with encrypting a document or an email. When you receive the email, you may wish to verify that it was indeed me that has sent it - in other words, you want to verify my signature. I may wish to send an email that is not encrypted, but merely signed.
In this case, although you don't need to decrypt the email, you will want to check that it was me who sent it.
Signing is slightly different to encrypting. Put differently:
"A major benefit of public key cryptography is that it provides a method for employing digital signatures. Digital signatures enable the recipient of information to verify the authenticity of the information 's origin, and also verify that the information is intact. Thus, public key digital signatures provide authentication and data integrity. A digital signature also provides non-repudiation, which means that it prevents the sender from claiming that he or she did not actually send the information." - Introduction to Cryptography
In order the achieve this signature, I would sign an email or a document with my private key.
The recipient would merely receive the signed email and check it against my public key. If they match, bingo, the email could only have originated from me.
Setting up the PKI is slow sometimes waiting from 1 to 5 minutes while an email is signed.
Clearly, we need a faster mechanism.
Here we can introduce the concept of "one-way hashing", take a document, email or a piece of text. I hash it, and this produces a "short" number. If the original document is changed (even by a single letter), the resulting hash will be a completely different number.
Let 's bring this all back to a real-world application. Suppose I have an email that is of no real value to require that it be encrypted. For example, I may be wanting to send my family an email with my intended arrival time on an international flight. I do want them to know that the email was from me, so I wish to sign it. My email client will generate a one-way hash creating a unique string from the contents of this email. This string is known as a message digest. It ensures that the recipient knows the email has not been changed since it was sent.
However, we still need to encrypt the message digest.
Why? Well if you give this just a little thought, you will realize that an eavesdropper could easily intercept this email. Change the contents and re-hash it, attaching the new hash to the email. My family would receive it, check that the hashes match (which they do since the modified document was rehashed), and would assume that the document was the one sent by me. Of course this is not so, and so our signing did not work.
If I encrypt the hash using my private key, then the receiver could use my public key decrypt the hash, rehash to original plain text email and compare the hashes. If they match, there can be no doubt that
a) the message has not changed since I sent it, and
b) it was in fact me that sent it.
I hear you ask whether the attacker (eavesdropper) couldn't just use my public key to decrypt the hash, change the document and rehash as before, and then forward the modified document to the recipient?
They could indeed do that, but signing a document involves both the hash as well as encrypting the hash.
This is the part where they (the eavesdropper) would need my private key, which of course they don't have. So, the recipient would know the email was not from me and would therefore not trust it.
Again, in summary, while encryption is done using the recipient's public key (Ed:decryption is done by the recipient, using the public key that you have sent him which corresponds to your private key CHECK), signing is done using your private key.
Let 's get down to some practical applications of keys.
GNU Privacy Guard or GPG, is the package that we will use to sign and encrypt data. Like any system, the efficacy of the system is as good as the people who manage it.
If your operating system is insecure and others can obtain your private key, then the system will break down.
If on the other hand, you never check a person 's public key - (i.e. That is really belongs to that person), then the system will break too.
So the system is as good as the people are vigilant.
We need to generate our public/private keys, and for this we will use the "apg" command.
The "gpg" utility has a number of switches, one of which is to generate the key:
gpg --gen-key
|
If you have not run this before, it will generate an error because the relevant working directories have not been created. Running the program the first time will create the directories.
You will need to run it again to begin key generation.
Now, it will ask what type of cipher you wish to use. In general, you can choose the default.
Please select what kind of key you want:
   (1) DSA and ElGamal (default)
   (2) DSA (sign only)
   (4) ElGamal (sign and encrypt)
   (5) RSA (sign only)
|
Then, choose the number of bits for the DSA key. The default should be fine here too.
Naturally, the higher the number of bits, the more difficult is will be to crack, but for now, 1024 should be OK. [6]
I suggest that you never expire your GPG key (option 0 in the menu).
Now you're ready to enter your personal details - your name, a comment and your email address. Mine would be:
Real name: hambo
Email address: hambo@QEDux.co.za
Comment: Hambo the Sambo
|
Once you're happy with these details, choose OK.
Now comes the rub. You need to enter a pass phrase. This should be enough of a phrase that it is not easily crackable. Note that this is not a password. It wants a phrase. "The cat sat on the mat" would be such a phrase ummm, perhaps that 's more of a clause (-;
All the principles of a good passwords apply to a pass phrase. Remember that you will need to type this phrase each time you wish to sign, encrypt anything.
Generation of your public and private keys begins. Read the output as its happening, as sometimes it requires that you move the mouse around to generate more random numbers.
Finally, the keys are produced and you can sit back at this point and smirk at your ingenuity! I've included my output here.
gpg: /home/hamish/.gnupg/trustdb.gpg: trustdb created
public and secret key created and signed.
key marked as ultimately trusted.

pub  1024D/A6B68161 2004-03-28 hambo (Hambo the Sambo) \
                        <hambo@QEDux.co.za>
Key fingerprint = 6CAF EBE7 1299 CB3E B293  D729 20FA \
                        26C7 A6B6 8161
sub  1024g/22CA1FAD 2004-03-28
|
| Note |
|---|---|
This is just an example. My real public key is available from my website www.QEDux.co.za | |
Now that you've generated your public/private key pair, ensure that the .gnupg directory is well and truly secured.
ls -ald .gnupg
drwx------    2 hamish   users        4096 Mar 28 14:28 .gnupg
|
Notice that only the owner (hamish) has access to this entire directory.
ls -al .gnupg
total 36
drwx------    2 hamish   users        4096 Mar 28 14:28 .
drwx------   41 hamish   users        8192 Mar 28 13:59 ..
-rw-r--r--    1 hamish   users        7793 Mar 28 13:59 options
-rw-r--r--    1 hamish   users         909 Mar 28 14:28 pubring.gpg
-rw-r--r--    1 hamish   users           0 Mar 28 14:01 pubring.gpg~
-rw-------    1 hamish   users         600 Mar 28 14:28 random_seed
-rw-------    1 hamish   users        1367 Mar 28 14:28 secring.gpg
-rw-r--r--    1 hamish   users        1240 Mar 28 14:28 trustdb.gpg
|
Here the secure (private key) is "secring.gpg". It has permissions of read and write, but only for the owner (hamish). The "pubring.gpg" (and that is not the ring for the last round either;-), is the public key.
You still need to "export" the public key so that others may download it and import it onto their keyring.
This can be done with:
gpg -a --export hambo > hambo.asc.pubkey
|
Take a look at the resulting output. This key can now be emailed to your friends, or put on your website or included in the NIS map for your site to make it available to others.
Now, since you will probably be working on a single machine when doing this and not in an environment that you can swap keys with others, you will need to create a second user on your machine and pretend that this user and yourself are swapping your keys.
Once you've exported and imported each other's keys, we can begin talking about signing each others keys. So, at this point, you need to complete the exercises.
Once you have the public key of someone else, import it using:
gpg -import hambo.asc.pubkey
|
It is no use obtaining someone 's key without first verifying that the key belongs to them.
There are many methods of doing this, but probably the easiest one (for now) is to check their fingerprint, call them up and verify it.
gpg -fingerprint hambo
gpg -fingerprint sam
|
These commands should do it. Ensure that you and Sam read your fingerprints out to one another.
If the fingerprints don't match, you can simply delete the key and begin again. If they do match, then you will want to sign their key.
That raises the last concept of this signing and encrypting section.
In an organization, you soon get to know those individuals that spread rumors. Can these people be trusted with a secret you want to share with them? There are others however that, no matter how important the secret is, they will simply never tell another soul without your permission.
So it is with public keys. Suppose I have exchanged public keys with Sam. I know Sam is a complete stickler for detail and checks and rechecks each key on his keyring before signing it. Now Mary sends me her key and this key has been signed by Sam. Sam trusts Mary ultimately (because Mary is also vigilant about her keys). Even though I don't know Mary (she happens to be a friend of Sam's), can I trust her key? Yes, because it has been signed by Sam.
Jakes on the other hand is a little less reliable. Sam has sent me Jake's key, but he's been known to sign keys without properly verifying the signatures. Can I trust signed documents from Jakes? Well, I may trust them partially, but in order to completely trust anything from Jakes, I would probably want to verify the key from another source too. If the other source verifies the signature is valid, only then can I trust it.
This process of trust is known as the web of trust. When listing a uid (a users ID) with "edit-key", there is a "trust" section that determines:
a)the level of trust you have in the person from whom you have received the key
b)the validity of the key - did you verify their fingerprint?
Examples may be:
trust m/f
|
Person XYZ is trusted marginally (m), but a full (f) verification of their fingerprint has been done.
From the gpg(1) man page, the following trusts are documented:
| - | No ownertrust assigned / not yet calculated. |
| e | Trust calculation has failed; probably due to an expired key. |
| q | Not enough information for calculation. |
| n | Never trust this key. |
| m | Marginally trusted. |
| f | Fully trusted. |
| u | Ultimately trusted. |
Signing keys is imperative since it increases the web of trust. [7]
This is a relatively involved subject and one that takes time to assimilate.
In sum then, digital signatures, hashing and public/private and symmetric keys ensure that:
1.You are who you say you are, and that this message really come from you (digital signatures)
2.You are able to keep messages from being tampered with during their transmission (hashing)
3.You are able to keep messages secret (encryption) - only to be viewed by individuals for whom they are intended
[4] Search Google for the origin of the word SPAM. You will see that these UNIX/Linux people do enjoy a good laugh
[5] The term "more secure" is a loaded one. I use this term quite glibly here, but the phrase is a point of many disputes! In essence, "more secure" relates to mathematically tested solutions and is well beyond the scope of this course.
[6] The DSA key is known as the master signing key, and EIGamal is the encryption subkey. The master signing key is responsible for making digital signatures, while the encryption subkey handles (en|de)cryption. In general, the master signing key should be valid for life, while the encryption subkey can be changed from time-to-time, but only if need be.
[7] Once you have begun distributing your public key, it becomes very difficult to change it. So, as part of this course, you will generate a public key. Ensure you keep this key with you if you have already begun to distribute it.
Table of Contents
DNS (Domain Name System) resolves the names of sites on the World Wide Web into IP addresses. Without a system like DNS we would not be able to type www.google.com into our browsers and expect to be taken to the Google Search engine's website. We would need to type http://216.239.57.99. BIND is a DNS server, it is the most widely used DNS server.
As was said in the previous section, DNS is used to resolve the names of websites into the IP addresses of the web servers on which the site is hosted. Without DNS we would have had to type the IP address of the website we wanted to visit, rather than it's Fully Qualified Domain Name.
In DNS we have a hierarchical model it's fairly critical that it doesn't fail because the entire Internet is based on DNS.
In order that this model does not fail there should be a hierarchy of master and slave DNS servers. DNS offers choices that would cause this hierarchy to form, but just to let you know that there is almost invariably more than one server in DNS.
Every ISP is required to register for any new domain they create.
In Linux we're going to need to understand where to set our names to be looked up because in fact there are at least three different places where names can be looked up on the operating system: DNS is a hierarchical system, domains are organized in a tree structure, much like that of the Linux File System. The root of the tree is represented by a full stop (.) under that the top-level domains like .com, .edu, .net, .org etcetera are ordered. Included in the list of top-level domains are the country domains, like .uk, .za, .us, .ca etcetera.
DNS uses a distributed database to resolve the IP addresses of websites. For instance the root servers can resolve the IP addresses of the top-level domains, each of the top-level domains are able to resolve the IP addresses of the DNS servers that are delegated to those domains. This delegation continues to the DNS server of the ISP or Hosting companies of particular websites.
.   Root
    |----- .org
    |----- .com
    |----- .edu
    |----- .za -- ------| ----- org ----- eg.   tsf.org.za
    |----- .us		| ----- co  ----- eg.   ananzi.co.za
    |----- .uk		| ----- ac  ----- eg.   uct.ac.za
    |----- .ca
|
The top-level domain addresses may not be purchased. Second level domains like www.google.com can be purchased.
Earlier I said that DNS is a distributed database. To understand what this means and why DNS works so well imagine a situation where one organization was responsible for all the IP addresses available on the Internet. Each time somebody purchases a domain name some person in that organization would need to add the new website's IP address and Fully Qualified Domain Name (see below) to the database. As you can imagine it would be impossible for one organization to do this seemlessly and at a low cost.
DNS works, because it is distributed. When I register a domain (www.riaan.music.choice.myisp.co.za) the company I host the website on registers the the IP address of my webserver against that domain name. If someone in Guatamala wanted to visit my website their ISP would not have my webserver's IP address, but they would have the IP address of the rootservers. These are the servers that are responsible for resolving the IP addresses of the top-level domains. So, the guy in Guatamala is trying to visit my website. His browser would send a request to his ISP, his ISP would not necessarily be able to resolve my IP address directly from my Domain name. What it would do then, is to contact the rootserver and ask it to resolve the IP address of .za domain.
When it has the IP address of the .za domain, it would ask the DNS server's of the .za domain to resolve the IP address of .co.za domain. The DNS server of the .co.za domain would be able to resolve the IP address of my.isp.co.za, which would give it the IP address of the ISP who is hosting my website. Finally it will ask my ISP to resolve the IP address of the www.riaan.music.choice.myisp.co.za which would allow the person in Guatamala to visit my site as soon as my ISP has registered the domain and the IP address of the host.
The first and certainly the oldest is our host file and that lives in /etc/hosts, and this is a very primitive name to IP address look-up mechanism.
A host file would look similar to:
riaan@debian:~> cat /etc/hosts
#
# hosts         This file describes a number of hostname-to-address
#               mappings for the TCP/IP subsystem.  It is mostly
#               used at boot time, when no name servers are running.
#               On small systems, this file can be used instead of a
#               "named" name server.
# Syntax:
#
# IP-Address  Full-Qualified-Hostname  Short-Hostname
#

127.0.0.1       localhost

# special IPv6 addresses
::1             localhost ipv6-localhost ipv6-loopback

fe00::0         ipv6-localnet

ff00::0         ipv6-mcastprefix
ff02::1         ipv6-allnodes
ff02::2         ipv6-allrouters
ff02::3         ipv6-allhosts

168.210.56.151   linux.local     debian
|
A little word of warning, if you don't put the fully qualified domain name as the first entry in the file, then when you try and access a host name on your machine, you will not get a fully qualified domain.
The first thing in your host file should be your fully qualified domain name and every other entry in your host file can be an alien. If I want my machine to also be called Hamish or Linux1, I can add it to my host file and in fact you can add any number of entries to your host file.
You are not restricted to just a single entry.
Host names can also be look up by using the NIS service (Network Information Service).
NIS's job is to have a central repository of network services. The host's file is a network service so NIS can distribute the host's file to a whole bunch of different machines on the network.
We'll talk about NIS later.
The danger of having so many places of looking hosts up is which one does it use?
Well, for that you have a file called /etc/nsswitch.conf and this file dictates how a name is looked up.
It's the Name Service Switch file and if you edit that file you'll see entries that are enabled as follows: the password for example comes from file or it might be 'compat' which means that it's compatible and it comes from file.
There are hosts, which come from file but it can also come from DNS. Networks for example, might come first from file and then from NIS and then from DNS and then from NIS+.
debian:/etc# cat nsswitch.conf
# /etc/nsswitch.conf
#
# Example configuration of GNU Name Service Switch functionality.
# If you have the `glibc-doc' and `info' packages installed, try:
# `info libc "Name Service Switch"' for information about this file.

passwd:         compat
group:          compat
shadow:         compat

hosts:          dns files
networks:       files

protocols:      db files
services:       db files
ethers:         db files
rpc:            db files

netgroup:       nis
|
This file defines the order in which hosts will be looked up, they are firstly looked up in file, in other words, in /etc/host and only after that, they will be looked up in DNS.
In fact in the example above the hosts will never be looked up because DNS would be used before the /etc/hosts file
Now if we wanted our host to first be looked up in DNS we could obviously switch the entries around.
The type of records in DNS is particularly useful when we come to troubleshooting or we have problems in searching things on the Internet or searching for etcetera.
Essentially the different types of records we get within DNS are:
an A record, an Address record is actually the IP address, 192.168.1.1. So an address record will be the record that links the name mail.QEDux.co.za to the IP address.
Then we've got an MX record. MX records are mail exchanger records.
When we discussed two MTA's talking to one another, we had an MTA that was talking to a second MTA - perhaps QEDux was talking to the TSF mail server - what would happen is QEDux would ask the DNS for the tsf.org.za MX records (the Mail Exchange record) because QEDux had some mail send to TSF. Once again it's required that the MX record, the MTA, could begin talking to the TSF MTA.
The MX records are quite important because they indicate who we need to talk to, to exchange mail between different domains.
The final one we are going to talk about is the Cname record and Cname records are canonical names and the expression "canonical names" is fancy words for aliases. For example, www.QEDux.co.za might be a Cname for mail.qedux.co.za and what this means is that the web server and the mail server live on the same machine. The web server, www, is just an alias for mail.
Those are the three types of records that we're going to consider when we look at DNS.
We have seen DNS translate a name to an IP address, DNS can also do IP address to name translations.
Now sometimes you might need this - if I gave you an address of 196.7.138.125 you might want to know what name this is.
So we have a means where DNS converts from an IP address back to a name and we can use our dig command again - "dig -x 196.7.138.125" It does a reverse translation - and 196.7.138.125 should give us a name in return.
debian:/ # dig -x 196.35.20.131

; <<>> DiG 9.2.3 <<>> -x 196.35.20.131
;; global options:  printcmd
;; Got answer:
;; ->>HEADER<<- opcode: QUERY, status: NXDOMAIN, id: 27898
;; flags: qr rd ra; QUERY: 1, ANSWER: 0, AUTHORITY: 1, ADDITIONAL: 0

;; QUESTION SECTION:
;131.20.35.196.in-addr.arpa.    IN      PTR

;; AUTHORITY SECTION:
35.196.in-addr.arpa.    10463   IN      SOA     ns1.is.co.za. \
                dns-admin.is.co.za. 2004072000 28800 7200 604800 86400

;; Query time: 4 msec
;; SERVER: 192.168.2.7#53(192.168.2.7)
;; WHEN: Tue Jul 20 11:41:24 2004
;; MSG SIZE  rcvd: 102

debian:/ #
|
In the DNS we might need more than one host serving a particular type of service, for example "Google" would not only have a single machine serving all its requests. It might have 10 or 20 machines serving requests for searchers.
So how does that work, how would we have 20 machines all pointing to the same name?
They must all surely be known as www.google.com even though there are 20 different physical machines behind that name. One of the ways that they do this is to round robin DNS where DNS offers an IP address in a round robin fashion. (Offering a DNS service to machine number 1 through 20 and then back to 1 again, to start the cycle again.)
Firstly we need to determine if is it a DNS problem?
One of the quickest ways of doing that is to PING one of the addresses. So if we PING www.QEDux.co.za and we get no response - that's one thing (maybe your network is not connected to the Internet). If you have access to the Internet then it is possible that "ping" cannot access a DNS service to determine which IP address it needs to send a packet to. ("ping" uses "dig" to determine the IP address of a host, before it starts sending echo requests to the host).
We might also try "host www.QEDux.co.za" and if it cannot resolve the name into an IP address then we know that there might well be a DNS fault.
Another way of testing is to do an "arp -a". If the "arp -a" takes some time to return, it probably means it's trying to do a DNS look-up and that might be an indication that we have the DNS problem.
Lastly then, we can use our trusty dig. If we say "dig www.QEDux.co.za" we should get a response from our DNS server to tell us exactly what the IP address for www.QEDux.co.za is.
If you look at dig you can see that it gives us the question section and the answer section and it also tells us how long it took to answer that question. In my case, it took 39ms to answer the question, which probably means our DNS server, locally, is performing fine. If it took a long time this would indicate an issue or problem with the DNS Server.
debian:~> dig qedux.co.za

; <<>> DiG 9.2.2 <<>> qedux.co.za
;; global options:  printcmd
;; Got answer:
;; ->>HEADER<<- opcode: QUERY, status: NOERROR, id: 38401
;; flags: qr rd ra; QUERY: 1, ANSWER: 1, AUTHORITY: 0, ADDITIONAL: 0

;; QUESTION SECTION:
;qedux.co.za.                   IN      A

;; ANSWER SECTION:
qedux.co.za.            86170   IN      A       196.25.102.2

;; Query time: 4 msec
;; SERVER: 196.14.187.146#53(196.14.187.146)
;; WHEN: Thu Mar 11 10:58:41 2004
;; MSG SIZE  rcvd: 45
|
debian:~> host qedux.co.za
qedux.co.za has address 196.25.102.2
debian:~>
|
Another thing to check when you are trying to resolve DNS issues is to check in which order your DNS is looked up.
A possible scenario is that it is first looked up in files (like /etc/hosts) and then NIS and then DNS.
In the exercises you would need to go and remove the DNS out of your nsswitch.conf to see whether it is able to resolve your IP address.
You can use "nslookup" to check the DNS.
linux:~ # nslookup
Note:  nslookup is deprecated and may be removed from future releases.
Consider using the `dig' or `host' programs instead.
Run nslookup with
the `-sil[ent]' option to prevent this message from appearing.
> qedux.co.za
Server:         196.14.187.146
Address:        196.14.187.146#53

Non-authoritative answer:
Name:   qedux.co.za
Address: 196.25.102.2
|
If I try and look up www.ananzi.co.za it shows me that ananzi.co.za has the IP address 196.4.90.16 - it also tells me that this is a non-authoritative answer from the server and in my case, the server is my DNS server, locally.
debian:~> nslookup
Note:  nslookup is deprecated and may be removed from future releases.
Consider using the `dig' or `host' programs instead.
Run nslookup with
the `-sil[ent]' option to prevent this message from appearing.
> www.ananzi.co.za
Server:         196.14.187.146
Address:        196.14.187.146#53

Non-authoritative answer:
Name:   www.ananzi.co.za
Address: 196.4.90.16
|
I can request to use a different DNS server if I edit my resolve.conf.
I've now changed my DNS server to use a different DNS server and now when I do an nslookup on mail.goodle.com its using a different DNS server.
"nslookup" is one of the ways to look things up. I'm not going to dwell on it, its being replaced by dig so I want to spend a bit more time looking at dig.
If you do a query, using dig on the mail exchange server for google.com you're going to want to do a dig on google.com.
You don't know who is the authority domain for Google, so we can try one of our route servers.
Let's try g.rootservers.net and I'm looking for the mail exchange record.
riaan@debian:~> dig google.com g.rootservers.net MX

; <<>> DiG 9.2.2 <<>> \
                google.com g.rootservers.net MX
;; global options:  printcmd
;; Got answer:
;; ->>HEADER<<- opcode: QUERY, \
                status: NOERROR, id: 47512
;; flags: qr aa rd ra; QUERY: 1, ANSWER: 3, \
                AUTHORITY: 4, ADDITIONAL: 4

;; QUESTION SECTION:
;google.com.                    IN      A

;; ANSWER SECTION:
google.com.             300     IN      A       216.239.39.99
google.com.             300     IN      A       216.239.37.99
google.com.             300     IN      A       216.239.57.99

;; AUTHORITY SECTION:
google.com.             259531  IN      NS      ns1.google.com.
google.com.             259531  IN      NS      ns2.google.com.
google.com.             259531  IN      NS      ns3.google.com.
google.com.             259531  IN      NS      ns4.google.com.

;; ADDITIONAL SECTION:
ns1.google.com.         278491  IN      A       216.239.32.10
ns2.google.com.         291023  IN      A       216.239.34.10
ns3.google.com.         291023  IN      A       216.239.36.10
ns4.google.com.         291023  IN      A       216.239.38.10

;; Query time: 1191 msec
;; SERVER: 196.14.187.146#53(196.14.187.146)
;; WHEN: Thu Mar 11 11:04:41 2004
;; MSG SIZE  rcvd: 222

;; Warning: ID mismatch: expected ID 27547, got 47512
;; Got answer:
;; ->>HEADER<<- opcode: QUERY, status: \
                NOERROR, id: 27547
;; flags: qr rd ra; QUERY: 1, ANSWER: 0, AUTHORITY: 1, \
                ADDITIONAL: 0

;; QUESTION SECTION:
;g.rootservers.net.             IN      MX

;; AUTHORITY SECTION:
rootservers.net.        2529    IN      SOA     \
                ns1.mydomain.com. hostmaster.rootservers.net.

;; Query time: 816 msec
;; SERVER: 196.14.187.146#53(196.14.187.146)
;; WHEN: Thu Mar 11 11:04:48 2004
;; MSG SIZE  rcvd: 98

riaan@debian:~>
|
If we're trying to look for the mail exchanger for google.com we could use a dig command querying one of the top-level domain servers, which would hopefully give us back the name servers for google.com.
In fact there are 4 name servers for google.com, so we can choose one of them such as: ns2.google.com, and ask the authority. We'll get back that there are these 4 SMTP servers or Google and they are SMTP1,2,3, and 4.
If you can mail to somebody at google.com you can choose one of those mail exchange server's to send mail to.
riaan@debian:~> dig mail.google.com \
                ns2.google.com MX
; <<>> DiG 9.2.2 <<>> \
                mail.google.com ns2.google.com MX
;; global options:  printcmd
;; Got answer:
;; ->>HEADER<<- opcode: QUERY, \
                status: NXDOMAIN, id: 20162
;; flags: qr aa rd ra; QUERY: 1, ANSWER: 0, \
                AUTHORITY: 1, ADDITIONAL: 0

;; QUESTION SECTION:
;mail.google.com.               IN      A

;; AUTHORITY SECTION:
google.com.             60      IN      SOA     \
                ns1.google.com. dns-admin.google.com.

;; Query time: 311 msec
;; SERVER: 196.14.187.146#53(196.14.187.146)
;; WHEN: Thu Mar 11 11:08:55 2004
;; MSG SIZE  rcvd: 93

;; Got answer:
;; ->>HEADER<<- opcode: QUERY, \
                status: NOERROR, id: 30079
;; flags: qr aa rd ra; QUERY: 1, ANSWER: 3, \
                AUTHORITY: 4, ADDITIONAL: 7

;; QUESTION SECTION:
;ns2.google.com.                        IN      MX

;; ANSWER SECTION:
ns2.google.com.         86400   IN      MX      \
                40 smtp3.google.com.
ns2.google.com.         86400   IN      MX      \
                10 smtp1.google.com.
ns2.google.com.         86400   IN      MX      \
                20 smtp2.google.com.

;; AUTHORITY SECTION:
google.com.             263506  IN      NS      \
                ns1.google.com.
google.com.             263506  IN      NS      \
                ns2.google.com.
google.com.             263506  IN      NS      \
                ns3.google.com.
google.com.             263506  IN      NS      \
                ns4.google.com.

;; ADDITIONAL SECTION:
smtp3.google.com.       60      IN      A       \
                216.239.57.26
smtp1.google.com.       1037    IN      A       \
                216.239.57.25
smtp2.google.com.       297     IN      A       \
                216.239.37.25
ns1.google.com.         90282   IN      A       \
                216.239.32.10
ns2.google.com.         90282   IN      A       \
                216.239.34.10
ns3.google.com.         90282   IN      A       \
                216.239.36.10
ns4.google.com.         90282   IN      A       \
                216.239.38.10

;; Query time: 440 msec
;; SERVER: 196.14.187.146#53(196.14.187.146)
;; WHEN: Thu Mar 11 11:08:55 2004
;; MSG SIZE  rcvd: 292

riaan@debian:~>
|
Now if I said I'd give you an IP address, 196.7.138.125 and I ask you to what name that translates into you can use a dig -x to reverse search
riaan@debian:~> dig -x 196.7.138.126

; <<>> DiG 9.2.2 <<>> -x \
                196.7.138.126
;; global options:  printcmd
;; Got answer:
;; ->>HEADER<<- opcode: QUERY, \
                status: NXDOMAIN, id: 9001
;; flags: qr rd ra; QUERY: 1, ANSWER: 0, AUTHORITY: 1, \
                ADDITIONAL: 0

;; QUESTION SECTION:
;126.138.7.196.in-addr.arpa.    IN      PTR

;; AUTHORITY SECTION:
138.7.196.in-addr.arpa. 10789   IN      SOA    \
                ns1.iafrica.com. dns-admin.iafrica.com. 873

;; Query time: 10 msec
;; SERVER: 196.14.187.146#53(196.14.187.146)
;; WHEN: Thu Mar 11 11:14:27 2004
;; MSG SIZE  rcvd: 105
|
Table of Contents
SAMBA is an implementation of the Server Message Block protocol (SMB) on Linux. This allows Linux hosts to communicate with Windows hosts in a network seamlessly. While SAMBA can be run as a server in order to serve Windows clients, this is not what we will be focusing on in this chapter. Here we will concentrate on using the SAMBA client tools to contact windows servers / workstations on the network.
A Windows (95/98/NT, 2000 or XP) workstation with a shared directory. For the purposes of this discussion, the shared directory will be called MYSHARE. In addition, the workgroup on which the workstation should reside should be WORKGROUP, but of course you could have any workgroup you liked.
Linux has a number of client utilities that allow us to use these shares. For the purpose of this chapter, I have used a SAMBA server that was set up. This is simply because I did not have access to a Windows machine. However, for all intent and purpose, this is no different to using a Windows server.
smbclient is samba client with an "ftp like" interface. It is a useful tool to test connectivity to a Windows share. It can be used to transfer files, or to look at share names. In addition, it has a nifty ability to 'tar' (backup) and restore files from a server to a client and visa versa. Let's begin by starting a session to the Windows server:
smbclient <serviceName> [options]
|
In the case of the service name, this would be the conventional means of "mapping" a service in the Windows environment using the "net" command:
c:\net use P: \\some--Windows-server\some-share-name
|
The major difference here though is this: In the shell, the '\' has special meaning. Thus, there are three means of "getting around this". Firstly, we could quote the service name:
smbclient '\\Billy-the-machine\some-share'
|
secondly, we could escape each '\' like:
smbclient /\/\Billy-the-machine/\some-share
|
or finally, we could just use double the number of '\' as in:
smbclient \\\\Billy-the-machine\\some-share
|
Any which way will do. Using too few '\' will result in an error. Options that can be used are usernames, connection to a printer service, Etc.
smbclient \\\\Billy-the-machine\\some-share -U jwhittal
|
This will connect me to the share named "some-share" on Billy-the-machine with the username jwhittal. You will be prompted for a password. We'll return to this in a moment.
One means of finding out what the shares on the host machine are is by using the -L switch. Assuming the Windows server is 172.16.1.3, a command such as:
smbclient -L 172.16.1.3
|
will yield:
Domain=[WORKGROUP] OS=[Windows 5.0] Server= \
                [Windows 2000 LAN Manager]

        Sharename      Type      Comment
        ---------      ----      -------
        IPC$               IPC       Remote IPC
        ADMIN$         Disk      Remote Admin
        C$                 Disk      Default share

        Server                   Comment
        ---------            -------
        006097EFC730

        Workgroup            Master
        ---------            -------
        QEDUX                 IPENGUINI
        WORKGROUP        006097EFC730
|
This show that the default shares on the machine (172.16.1.3) are the IPC$ share, the ADMIN$ share and the C$ share. Now that we know the shares, let's connect to one - c$.
smbclient \\\\172.16.1.3\\c$ -U jwhittal
|
smbclient now offers us a prompt, similar to that offered by an ftp session. Simply typing "help" should show us all the commands we can use to 'put' and 'get' files. Once on the host server (the Windows machine), try putting your /etc/hosts file:
put /etc/hosts
|
It should transfer it elegantly to the Windows machine. Getting files from the remote side is just as easy:
get pdf995\setup.exe
|
What makes smbclient really nifty is the ability to "tar" up whole subdirectories from one machine to another. In interactive mode (i.e. When there is a smb: \> prompt), one can simply set the "tarmode" flag, as well as the "recurse" and "prompt" toggles, as these will allow us to copy large volumes of data from one machine to another. So, the following commands will copy the pdf995 directory from the Windows server to the Linux client:
smbclient \\\\172.16.1.3\\c$ -U jwhittal

smb: \> tarmode
smb: \> lcd /tmp
smb: \> recurse
smb: \> prompt
smb: \> mget pdf995/
|
And bingo, the entire directory get transferred to your Linux host. Naturally, transferring in the reverse direction is just as easy, only this time we can use a 'put' rather than a 'get'.
Another powerful feature is the ability to make these type of transfers in a non-interactive manner.
smbclient \\\\172.16.1.3\\c$ -U jwhittal -Tc backup.995.tar pdf995/
|
What this will do is to create (c) a tar (T) file called backup.995.tar of the directory on the Windows server pdf995/. Notice that despite Windows using a '\' for it's directory delimiter, the smbclient uses the '/' when specifying the directory. Once the tar begins, there is no problem with this, as the output below illustrates (notice here the correct Windows directory delimiter of '\'):
Domain=[WORKGROUP] OS=[Windows 5.0] Server= \
                [Windows 2000 LAN Manager]
                directory \pdf995\
      5386 (  142.2 kb/s) \pdf995\readme.html
                directory \pdf995\res\
       200 (    7.5 kb/s) \pdf995\res\995.bat
                directory \pdf995\res\convert\
     34871 (  396.0 kb/s) \pdf995\res\convert\a010013l.pfb
     36354 (  417.7 kb/s) \pdf995\res\convert\a010015l.pfb
     35156 (  377.3 kb/s) \pdf995\res\convert\a010033l.pfb
     36128 (  452.3 kb/s) \pdf995\res\convert\a010035l.pfb
		....
|
and restoring that file we deleted by accident:)
	smbclient \\\\172.16.1.3\\c$ -U jwhittal \
                -Tx backup.995.tar ./pdf995/readme.html
|
So here ends the small chat on smbclient. What makes it so nice is that is can be used to test connectivity to a Windows network. Furthermore, if you set up a SAMBA server and have no Windows clients to test on it (as in the RedHat Certified Engineer Exam), smbclient will do just fine in ensuring your configurations work as stated. Of course, if you plan on setting up SAMBA at all, you should really have Windows clients on which to use it, otherwise all the Linux/UNIX style applications (NIS, NFS and friends) fill the gap occupied by SAMBA.
Once we have established that a Windows machine has some worthwhile stuff to share, it might be nice to have that available at our fingertips each time we use our Linux machine. Perhaps the Windows server is sharing music, or video, or perhaps better still, a software repository. Smbclient has it's uses, but it might be undesirable to transfer this information back and forth as we find a use for it. In this case, a simple answer is to mount these drives on the Linux host as we would any other drive. This is simple to achieve - and works in a fairly similar fashion to what NFS might in an all UNIX environment.
smbmount \\\\172.16.1.3\\c$ /mnt/thumb -o username=jwhittal
|
This time, the smbmount command takes the share name, a mount point (/mnt/thumb in my example above) and finally some options. Clearly, since C$ is not a guest based share (and so it should not be), I will need to supply a username for the share. I will be prompted for the password for the user "jwhittal". Since this 'drive' is now mounted, we can begin copying information to and from the mount point. Clearly, this implies that it is being copied to the Windows server. One might additionally place this in the /etc/fstab file on your Linux client workstation and therefore have the Windows share reloaded on every reboot of the Linux client workstation.
Smbumount is the command used to unmount the Windows share. In fact, smbmount and smbumount are just synonyms for the mount and umount commands in Linux. An alternative to the smbmount command above is:
mount -t smbfs -o username=jwhittal \\\\172.16.1.3\\c$ /mnt/thumb
|
Clearly, this would require that the smbfs module is compiled into the kernel and that it is able to mount SAMBA file systems.
nmblookup is a command that can be used to do a number of meaningful operations. In the example below, it shows us that this workstation is the master browser for this workgroup, that this machine is a member of the workgroup domain "WORKGROUP", and that the user who is currently logged into this workstation is "jwhittal".
nmblookup -A 172.16.1.3
Looking up status of 172.16.1.3
	006097EFC730    <00> -         B <ACTIVE>
	WORKGROUP       <00> - <GROUP> B <ACTIVE>
	006097EFC730    <20> -         B <ACTIVE>
	006097EFC730    <03> -         B <ACTIVE>
	WORKGROUP       <1e> - <GROUP> B <ACTIVE>
	WORKGROUP       <1d> -         B <ACTIVE>
	..__MSBROWSE__. <01> - <GROUP> B <ACTIVE>
	JWHITTAL        <03> -         B <ACTIVE>
|
In the example below, the -M option indicates which machines are eligible to be master browsers on the network.
nmblookup -M -- -
querying __MSBROWSE__ on 172.16.1.255
172.16.1.3 __MSBROWSE__<01>
172.16.1.1 __MSBROWSE__<01>
|
This is a useful command when you require your Windows system to be backed up to a Linux/UNIX client machine with a tape drive. Smbtar will tar the data to the tape that is on the Linux/UNIX system.
This, in a nutshell, is a summary of some of the SAMBA client utilities. They not only allow a Linux machine to operate seamlessly with other hosts on the network, but they offer the ability to treat Windows shares as something akin to NFS in Linux. Thus, it becomes a simple operation to work in an all-Windows environment.
Table of Contents
In order to troubleshoot our network we need to make use of a couple of tools. First and probably the most important tool we'll learn by is the PING command.
PING stands for Passive Internet Groper and its job is to be able to essentially send an echo request to some device on the network.
If that device is alive, it will send an echo reply back.
Now this is probably one of the most important commands that you'll use with troubleshooting but often switches put very low priority on "ping packets" and so what can and often does happen is that the ping packets get blocked even though they are a valid packet, and even though there is a reply from PING the packets get dropped.
Nevertheless, let's not concern ourselves with what modern technology is doing, the issue is that there's a request sent by yourself to a device on the network and that device, if it's alive, if it's up, it routes an echo reply.
If I just leave the PING running it tells us a good number of things.
riaan@debian:~> ping 192.168.1.1
PING 192.168.1.1 (192.168.1.1) 56(84) bytes of data.
64 bytes from 192.168.1.1: icmp_seq=1 ttl=255 time=0.411 ms
64 bytes from 192.168.1.1: icmp_seq=2 ttl=255 time=0.369 ms
64 bytes from 192.168.1.1: icmp_seq=3 ttl=255 time=0.375 ms
...
|
Firstly, it tells us that 64 bytes were sent and that 64 bytes were received. And if we look at this, the 64 bytes that were sent was the echo request and the 64 bytes received was the echo reply. The second thing it tells us is that you've got a reply from the client or from the device being pinged.
The sequence number is called the ICMP sequence and that number increments for every PING that's received, that number increments and you will get consecutive numbers.
The next field is the TTL (Time To Live), and that would be set to something like 255. Every packet on the network has a time to circulate, once the time expires the packet evaporates from the network.
The last field in the report is the time, and this is the response time to send the packet to the workstation, and receive the reply.
This will show us how fast the network is and the time will often be in milliseconds (can move to seconds if the network is slow).
If you then push control-C to break this ping, to break out of the command, you'll see a summary of statistics of the packets that we sent.
riaan@debian:~> ping 192.168.1.1
PING 192.168.1.1 (192.168.1.1) 56(84) bytes of data.
64 bytes from 192.168.1.1: icmp_seq=1 ttl=255 time=0.411 ms
64 bytes from 192.168.1.1: icmp_seq=2 ttl=255 time=0.369 ms
64 bytes from 192.168.1.1: icmp_seq=3 ttl=255 time=0.375 ms
64 bytes from 192.168.1.1: icmp_seq=4 ttl=255 time=0.383 ms
64 bytes from 192.168.1.1: icmp_seq=5 ttl=255 time=0.378 ms

--- 192.168.1.1 ping statistics ---
5 packets transmitted, 5 received, 0% packet loss, time 4000ms
rtt min/avg/max/mdev = 0.369/0.383/0.411/0.019 ms
riaan@debian:~>
|
The first thing you will see is that the number of packets sent and the number of packets received. These should be almost equal if not equal. If you send more than you received then there is clearly some packets lost and that's the next line that is displayed on the output.
A percentage packets loss. Packets loss can occur for a number of reasons, it could be that the network was busy, it could be that there's a physical failure somewhere on the network and its packet's getting corrupt or packets getting lost so its packets lost indicator.
On the next line you will see your round-trip time and within that you should see a minimum time, an average time, a maximum time and sometimes they will give you the standard deviation time. In my case, the minimum time is 0.369ms; the average time was 0.383ms, the maximum time being 0.411ms. Obviously these vary from machine to machine or network to network. The final one is the standard deviation time of 0.019ms.
If you run the command "ping -c10" to the opposite workstation, ping sends 10 x 64 byte packets and then stops. (Take note of the statistics for this transmission.)
This can be quite useful when we need to do troubleshooting.
To further this example, let us send a 5 packet transmission -we know that the maximum transmission unit for Ethernet is 1500 bytes, so if we sent a packet of 2400 bytes that would really mean that every packet has to be split up. This time I'm going to send a packet with size of 2400 bytes and you'll see it sends that packet size of 2408, an extra 8 bytes because of headers.
If you then compare the report from sending a packet size of 64 bytes and one of 2400 bytes you will see a difference in speed with which it can transmit large packets.
In my case, the average time went up from 0.1ms to 1.2ms to transmit a large packet size.
There are other options that can be used with ping; you could for example ping every 10 seconds instead of every second.
riaan@debian:~> ping -help
Usage: ping [-LRUbdfnqrvVaA] [-c count] [-i interval] [-w deadline]
            [-p pattern] [-s packetsize] [-t ttl] [-I interface or address]
            [-M mtu discovery hint] [-S sndbuf]
            [ -T timestamp option ] [ -Q tos ] [hop1 ...] destination

riaan@linux:~> ping -i10 -c10 -s 2400 192.168.1.1
PING 192.168.1.1 (192.168.1.1) 2400(2428) bytes of data.
2408 bytes from 192.168.1.1: icmp_seq=1 ttl=255 time=6.02 ms
2408 bytes from 192.168.1.1: icmp_seq=2 ttl=255 time=4.93 ms
2408 bytes from 192.168.1.1: icmp_seq=3 ttl=255 time=4.90 ms
2408 bytes from 192.168.1.1: icmp_seq=4 ttl=255 time=4.92 ms
2408 bytes from 192.168.1.1: icmp_seq=5 ttl=255 time=4.92 ms
2408 bytes from 192.168.1.1: icmp_seq=6 ttl=255 time=4.91 ms
2408 bytes from 192.168.1.1: icmp_seq=7 ttl=255 time=4.93 ms
2408 bytes from 192.168.1.1: icmp_seq=8 ttl=255 time=4.91 ms
2408 bytes from 192.168.1.1: icmp_seq=9 ttl=255 time=4.91 ms
2408 bytes from 192.168.1.1: icmp_seq=10 ttl=255 time=4.92 ms

--- 192.168.1.1 ping statistics ---
10 packets transmitted, 10 received, 0% packet loss, time 90009ms
rtt min/avg/max/mdev = 4.905/5.031/6.023/0.343 ms
riaan@debian:~>
|
Essentially there are 2 types of things that would happen when we ping something.
1.We could ping the device and get a response
2.or we would not be able to ping it at all, getting no response. In this case the device would not know how to get back to us.
Ping uses a protocol called ICMP protocol (Internet Control Message Protocol) for in fact this protocol has any number of responses.
Some examples of ICMP messages would be:
"destination host is unreachable"
Respond with nothing at all
"ICMP re-direct"
ICMP time-outs if the device is not responding.
So ICMP can provide a whole number of responses depending on the state of the device it is attempting to reach.
If we try and PING something that's not available we will get no response whatsoever, and this could then mean that the device is down.
If we try and PING a device we might get an ICMP re-direct, in other words, the PING responses don't go to that particular machine, they get re-directed to some other machine.
So the very first thing you must do to set your network is see if you can PING a device and PING-ing a device will obviously mean that you have an IP address.
If you don't have an IP address, you need to take one step back and actually assign an IP address to your network card.
The next issue that you may be faced with is name resolution, and if you turn back to the Chapter 7 you can see how to determine whether it's the DNS that's the problem or perhaps something else.
The third thing you might want to do, you might want to have a look at your routing table.
We saw that "netstat -r" would show us our routing table and if you didn't want name LOOKUP to appear on our routing table, we could use netstat -rn
riaan@debian:~> netstat -rn
Kernel IP routing table
Destination     Gateway         Genmask         Flags   MSS Window  irtt Iface
192.168.1.0     0.0.0.0         255.255.255.0   U         0 0          0 eth0
192.168.10.0    0.0.0.0         255.255.255.0   U         0 0          0 eth0
0.0.0.0         192.168.1.1     0.0.0.0         UG        0 0          0 eth0
riaan@debian:~>
|
Using the routing table set up we might want to correct a list of MAC addresses on our network, and for that we can use our "arp" command. This should show us whether we are going to see any devices on our network or not. Perhaps we can only see one device and that's our default gateway.
Use "arp -a" to list potential devices on the network as well as the MAC addresses of those devices.
We can also use a command called "traceroute" which has the ability to trace the route between point A and point B for us. So if we perform a traceroute on QEDux.co.za we are tracing from our source through to the destination.
Now sometimes what companies do is they block a traceroute and a way to get around this is to use traceroute using ICMP rather than UDP.
linux:~ # traceroute 196.14.187.146
traceroute to 196.14.187.146 (196.14.187.146), 30 hops max, 40 byte packets
 1  192.168.1.1  0.329 ms   0.296 ms   0.339 ms
 2  10.0.1.1  0.496 ms   0.414 ms   0.422 ms
 3  www.stt-global.com (196.14.187.146)  0.541 ms   0.460 ms   0.585 ms
linux:~ #
|
If traceroute is blocked by the firewall (which is often the case if ICMP is being blocked), then one may use UDP to perform a traceroute. In the above example, the traceroute reflects the IP address of the hosts, as well as the time to reach and return from that node. The operation is done 3 times for each hosts. This gives a good idea of where the problems lie in a network.
If none of these things are working you might need to stop and restart your network. In Debian, this is /etc/init.d/networking restart, while in SuSE it is /etc/rc.d/network restart and in RedHat the /etc/rc.d/init.d/network restart will suffice.
Troubleshooting the network is really using a combination of tools to determine what the problems are and then going from there, knowing where to go and look for the solution to those problems, using the configuration file tools to your disposal.
Table of Contents
What I want to cover now is some basics of security and in covering this; we need to understand some terminology.
A firewall is a router-like device that exists between a trusted network and an untrusted network.
A typical example of an untrusted network is the Internet.
A typical example of a trusted network is your own internal network. Although this is not quite strictly true because most internal networks have been shown to be a source of a lot of security breaches, certainly more breaches than with the Internet.
A firewall is the mechanism that control access in and out of your network.
Almost every network that can be connected to the Internet is restricted through the use of a firewall and that generally blocks people from logging in and doesn't have to block people logging out.
So anybody logging in from the Internet to the Intranet will be blocked at the firewall, people trying to leave via the web browser to surf the net will generally be allowed through the firewall.
A firewall is a packet based device and what that means is that every packet is looked at, considered, weighed up and if meeting the required criteria may be passed through the network.
Many companies believe or have been lead to believe that having a firewall is the beginning and the end of their security set up. In fact, a firewall is only the tip of the iceberg although it is essential because it does block the gremlins from coming in from the outside in many cases.
Certain protocols like ICR for example, are blocked at the firewall whereas HTTP, SMTP (mail) and FTP might well be allowed through.
Protocols that would be blocked from coming in are things like pingsweep or just pings in general, because there's a whole wad of problems that can occur on the network if one allows a ping enter onto your network.
Firewalls offer a degree of protection from the Internet or from an untrusted network.
Often the internal network may have an illegal class address, for example 010.0.1.X, but of course the Internet can only cope with valid addresses, for example 196.7.14.X. As a result, the firewall does a process called NAT, Network Address Translation, where it will translate between the illegal internal address and the legal external address.
This is one of the ways that they've managed to overt the crisis of running out of version 4 (IPv4) IP addresses. Big companies have given back huge stocks of ip addresses for use on the Internet. They use NAT to translate their illegal IP addresses they use on their Intranet to those used in the Internet.
On a Linux machine, Linux can act as both a firewall and a NAT filter and it can also provide all sorts of services like http, sftp and ssh etcetera.
What services is your Linux box providing right now?
One of the ways to see this is to use the netstat command. If you run a "netstat -l"command it will show you what ports are currently listening on your Linux machine.
So you can do a netstat -l and pipe that through "less" and that will show you what ports are currently listening on the Linux machine.
root@debian:/etc# netstat -l
Active Internet connections (only servers)
Proto Recv-Q Send-Q Local Address           Foreign Address   State
tcp        0      0 *:printer              		*:*                     LISTEN
tcp        0      0 *:1011              	   	*:*                     LISTEN
tcp        0      0 *:2049              	    	*:*                     LISTEN
tcp        0      0 *:www                   		*:*   	             LISTEN
tcp        0      0 *:webcache              		*:*                     LISTEN
tcp        0      0 *:3128                  		*:*                     LISTEN
tcp        0      0 *:ssh                   		*:*                     LISTEN
tcp        0      0 *:netbios-ssn           		*:*                     LISTEN
tcp        0      0 *:nntp                  		*:*                     LISTEN
tcp        0      0 *:1025                	  	*:*                     LISTEN
tcp        0      0 *:auth                  		*:*                     LISTEN
tcp        0      0 *:smtp                  		*:*                     LISTEN
tcp        0      0 *:ftp                   		*:*                     LISTEN
tcp        0      0 *:telnet                		*:*                     LISTEN
tcp        0      0 *:daytime               		*:*                     LISTEN
tcp        0      0 *:discard               		*:*                     LISTEN
tcp        0      0 *:1024                  		*:*                     LISTEN
tcp        0      0 localhost:953           		*:*                     LISTEN
tcp        0      0 debian.zoo.org.za:domain 	*:*                     LISTEN
tcp        0      0 localhost:domain        		*:*                     LISTEN
tcp        0      0 *:sunrpc                		*:*                     LISTEN
udp       0      0 *:1008                  		*:*
udp       0      0 *:2049                  		*:*
udp       0      0 *:icpv2                 		*:*
udp       0      0 debian.zoo.o:netbios-dgm *:*
udp       0      0 debian.zoo.or:netbios-ns 	*:*
udp       0      0 *:netbios-dgm           	*:*
udp       0      0 *:netbios-ns            		*:*
udp       0      0 *:ntalk                 		*:*
udp       0      0 *:talk                  		*:*
udp       0      0 *:discard               		*:*
udp       0      0 *:1026                  		*:*
udp       0      0 localhost:921           		*:*
udp       0      0 *:1025                  		*:*
udp       0      0 *:791                   		*:*
udp       0      0 *:1024    			*:*
udp       0      0 debian.zoo.org.za:domain *:*
udp       0      0 localhost:domain        	*:*
udp       0      0 *:sunrpc                		*:*
raw        0      0 *:icmp                  		*:*                     7
raw       0	     0 *:tcp                   		*:*                     7
Active UNIX domain sockets (only servers)
Proto RefCnt Flags       Type       State         I-Node 	Path
unix  0      [ ACC ]     STREAM     LISTENING     184  	/var/run/news/nntpin
unix  0      [ ACC ]     STREAM     LISTENING     327   	/tmp/.gdm_socket
unix  0      [ ACC ]     STREAM     LISTENING     234    	/tmp/.font-unix/fs7100
unix  0      [ ACC ]     STREAM     LISTENING     53122  	/dev/printer
root@debian:/etc#
|
Looking at the above report, the following services are some of the services available or listening: the torque server, ntorque the network torque server, telnet, ftp, some rpc, netfile session and netfile's name server.
Now the problem with having so much available, is that people might be connecting to these services without us knowing - so a good rule of thumb is to shut down any services that are not being used.
Many of these services are started as inet services.
Now in Debian there's a file called /etc/inetd.conf which configures a lot of these services, it's a case of editing this file and commenting out using a #, those services that you don't want to be used.
I encourage you now to look through the netstat -l report to determine which of the services that you do not want to use (such as telnet), and to comment these entries out of your inetd.conf file.
root@debian:/etc# cat inetd.conf
# /etc/inetd.conf:  see inetd(8) for further informations.
#
# Internet server configuration database
#
#
# Lines starting with "#:LABEL:" or \
                        "#<off>#" should not
# be changed unless you know what you are doing!
#
# If you want to disable an entry so it isn't touched during
# package updates just comment it out with a single \
                        '#' character.
#
# Packages should modify this file by using update-inetd(8)
#
# <service_name> <sock_type> <proto> \
                        <flags> <user> \
                        <server_path> <args>
#
#:INTERNAL: Internal services
#echo           stream  tcp     nowait  root    internal
#echo           dgram   udp     wait    root    internal
#chargen        stream  tcp     nowait  root    internal
#chargen        dgram   udp     wait    root    internal
discard         stream  tcp     nowait  root    internal
discard         dgram   udp     wait    root    internal
daytime         stream  tcp     nowait  root    internal
#daytime        dgram   udp     wait    root    internal
#time           stream  tcp     nowait  root    internal
#time           dgram   udp     wait    root    internal

#:STANDARD: These are standard services.
telnet          stream  tcp     nowait  telnetd.telnetd \
                        /usr/sbin/tcpd
	/usr/sbin/in.telnetd
ftp             stream  tcp     nowait  root   \
                        /usr/sbin/tcpd
	/usr/sbin/in.ftpd

#:BSD: Shell, login, exec and talk are BSD protocols.
talk            dgram   udp     wait    nobody.tty
	/usr/sbin/in.talkd      in.talkd
ntalk           dgram   udp     wait    nobody.tty
	/usr/sbin/in.ntalkd     in.ntalkd

#:MAIL: Mail, news and uucp services.
smtp            stream  tcp     nowait  mail   \
                        /usr/sbin/exim exim -bs
#pop-3          stream  tcp     nowait  root   \
                        /usr/sbin/tcpd
	/usr/sbin/in.qpopper -f \
                        /etc/qpopper.conf
#imap2  stream  tcp     nowait        root   \
                        /usr/sbin/tcpd  \
                        /usr/sbin/imapd
#imap3  stream  tcp     nowait        root   \
                        /usr/sbin/tcpd  /usr/sbin/imapd

#:INFO: Info services
ident           stream  tcp     wait    identd  \
                        /usr/sbin/identd        identd
#finger         stream  tcp     nowait  nobody  \
                        /usr/sbin/tcpd
	/usr/sbin/in.fingerd

#:BOOT: Tftp service is provided primarily for booting.  Most sites
# run this only on machines acting as "boot servers."

#:RPC: RPC based services

#:HAM-RADIO: amateur-radio services

#:OTHER: Other services
#<off># netbios-ns      dgram   udp     wait    root
	/usr/sbin/tcpd  /usr/sbin/nmbd -a
#<off># netbios-ssn     stream  tcp     nowait  root
	/usr/sbin/tcpd  /usr/sbin/smbd
#<off># swat            stream  tcp     nowait.400      root
	/usr/sbin/tcpd  /usr/sbin/swat
391002/1-2 stream rpc/tcp wait root /usr/sbin/famd fam

root@debian:/etc#
|
In addition to commenting out lines in inetd.conf, you would need to restart your inetd server and the easiest way to do this is to use the "/etc/init.d/inetd restart "command, or to send a kill -SIGHUP to the inetd process.
root@debian:/home# /etc/init.d/inetd restart
Restarting Internet superserver: inetd
.
root@debian:/home#
|
Once you kill the inetd services that you're not using like telnet, time and finger, you then want to have a look at other services.
Look at my netstat - l report again, I see that there are other processes like SMTP and ftp that are currently running and I want to disable these so that people don't connect to me without me knowing.
So once you've shut down on the unnecessary services you can go into your /etc/init.d directory and you can see in the init.d directory there are a whole lot of files that would take the start-up or the shut-down services command.
This means that you could say for example, "/etc/init.d/ftp stop" and that would then stop the ftp server. Debian stops services permanently using the rcconfig.d
Inetd is the "old" way of doing things - the SysVR4 way. Now there is a newer superdaemon - xinetd. It has lots of additional security enhancements and is able to be configured in many different ways, but essentially it offers the same services that inetd did before. It is configured using two sets of files:
/etc/xinetd.conf - the configuration file for xinetd defaults and
/etc/xinetd.d/<service-config-name>
In xinetd, each service has an individual configuration file. Thus, POP3 will have a file containing configuration information for the pop3d daemon. Finger, telnet, rsync, Etc. all have configuration files here. Included below is a copy of the rsync configuration file:
# default: off
# description: The rsync server is a good addition to \
                        am ftp server, as it \
#       allows crc checksumming Etc.
service rsync
{
        disable = yes
        socket_type     = stream
        wait            = no
        user            = root
        server          = /usr/bin/rsync
        server_args     = --daemon
        log_on_failure  += USERID
}
|
The configuration is fairly straightforward. Options such as disable=yes are specified in the {} for the service. Additionally, xinetd configuration files can include the hosts that are/aren't allowed to connect to this service, what times of the day/night clients may/may not connect, Etc. For more information on configuration of you superdaemon processes, consult the manpage for xinetd.conf (man 5 xinetd.conf).
Table of Contents
Every system, installed out of it's shrink-wrapping is insecure. In essence, there are many services that are started at boot time that are not needed. In addition, there are users on the system that are not used or have login shells that should be disabled. This chapter hopes to address some of these security loophole and plug them with knowledge.
There are over 30 users that are generally installed on a Linux system. Many of these are purely installed by applications and are not real users. Examples of such users include 'lp', 'sync', 'bin', 'operator' and 'uucp'. These users should all be denied access to your system. At the very least, they should have no login shells available to them. While some of the users are required (like the 'bin' user) but have no need for a login shell, others can be completely removed from the system. One can remove unnecessary users using the userdel command.
For those users that are needed in order to run applications, their login shell should be set to a non-login shell such as /bin/false or /bin/nologin. Both these utilities may be used as replacements for the users shell. In addition, is a file /etc/nologin.txt exists, this will be used as a polite means of telling the user they may not enter.
The root user should be restricted to only being able to log on at the console. As with many other things in Linux, there are many ways of skinning this cat. A file:
/etc/securetty
|
lists all the terminals that are considered safe for root login. This is driven by the pluggable authentication module (PAM) login in /etc/pam.d
Services running on a vanilla Linux system can give the cracker a host of information about your system that should otherwise not be available. Remember, the more information an intruder can gain about your system, the better chance they have at breaking in and doing some damage.
The first thing that needs to be addresses are the /etc/issue and the /etc/issue.net files. These files give the user information prior to logging on about what O/S you are running as well as the version. Visitors are only welcome onto your system if they are authorized to do so. Therefore, it should be clear to users that access to this systems is restricted. Replace the /etc/issue command with a clear message to this effect. Give nothing away.
On Debian systems, there is the .hushlogin file. This, if set in the users home directory, will ensure that minimal information is printed when the users logs into the system. Without this file, there will be a relatively long message each time the user logs in.
Secondly, ensure that unnecessary services are terminated. There are two types of service:
Those services that are run as daemons on the system,
those services that are run from the super-daemon xinetd (or inetd for Debian)
Daemon based services are removed and inserted using the update-rc.d script. [8]
For example, to remove the advanced power management daemon (apmd) from the startup scripts we could use:
update-rc.d apmd remove
|
This will update all the links in the /etc/rc#.d that point to /etc/rc.init/ for the apmd. To reverse the process:
update-rc.d apmd defaults
|
Debian is excellent in this respect as a default installation will not install many services that are not required. RedHat, SuSE and Mandrake on the other hand start many unwanted services on installation. Fortunately that have, for the most part, stopped including telnet in these services and have instead adopted secure shell (ssh) in it's stead.
One quick means of checking what is running at startup is using the netstat command:
netstat -l
|
will show all listening services on your host.
Those services that are not started from the /etc/init.d directory are started using the inetd (or xinetd in the modern commercial distro's). Both will be addressed here.
Inetd is controlled by the /etc/inetd.conf file. Services such as telnet, finger, bootp and others are started from the superdaemon. Placing a comment (#) in front of the relevant entry in the inetd.conf file will stop this service. In so doing, root will need to send a signal to the inetd daemon to ensure that is re-reads it's configuration file and stops/starts the relevant services. Disabling inetd services can be simply enabled or disabled using the update-inetd command in Debian and the chkconfig command in the commercial distro's.
Xinetd is similarly controlled using a global configuration file (/etc/xinetd.conf). In addition however, each service has an entry in the /etc/xinetd.d/ directory. Entries are a little more complex than their inetd counterparts, but with a quick glance over the files in this directory, the astute reader will quickly discover their syntax and how to enable or disable services. The advantage that xinetd has over it's older counterpart is that services can be configured in more complex and restrictive ways. Simply put though, it is evident that the system administrator should disable all unnecessary services on the server prior to deployment.
Using both the chkconfig command (in SuSE, RedHat, Fedora or Mandrake), or the update-inetd command in Debian will automatically restart the superdaemon. Modifying the /etc/inetd.conf or /etc/xinetd.d/<file to modify> will require that we send a SIGHUP (-1) signal to the superdaemon.
An application called nmap is useful for checking what services are running on a system. Running the command:
nmap <ip address>
|
on the IP address of the server will show what services are currently enabled. Output from an nmap to my server shows the following output:
Starting nmap 3.50 ( http://www.insecure.org/nmap/ ) at 2004-04-22 08:28 SAST
Interesting ports on mtnkiosk (127.0.0.1):
(The 1654 ports scanned but not shown below are in state: closed)
PORT     STATE SERVICE
22/tcp   open  ssh
80/tcp   open  http
111/tcp  open  rpcbind
972/tcp  open  unknown
2049/tcp open  nfs

Nmap run completed -- 1 IP address (1 host up) scanned in 0.988 seconds
|
Once all unnecessary services are removed or disabled, we can begin to address issues of connection to our host. Without implementing a firewall, both xinetd (the older inetd is far more permissive and is not able to control security of the services running to the same degree as it's younger cousin xinetd) and tcp-wrappers give us the ability to control who has access to our services.
Tcp-wrappers consist of two files:
/etc/hosts.allow
/etc/hosts.deny
|
These two files control access in a fined-grained manner, and can be configured to handle most access to the system. As the names of the files imply, the hosts.allow file controls access to who IS allowed to connect to services on our system, while the hosts.deny controls who will NOT be allowed to connect to services on the server.
For the purpose of this section, we are going to implement the finger daemon/client software. Consult the man page of the finger daemon and client to understand what it can do. Choose one of your workstations as the server and the other as the client. In addition to installing the finger daemon on the server, you will need to install the finger client software on the client workstation . Using your nmap program, check that the finger daemon is running on your server.
To test whether finger is working, run the command:
finger root@<server-workstation>
|
This should give you information about the user "root" on the server similar to that displayed below:
#finger root@<server workstation here>
Login: root                             Name: root
Directory: /root                        Shell: /bin/bash
On since Thu Apr 22 08:17 (SAST) on pts/1 from 172.16.1.2
   23 minutes idle
     (messages off)
No mail.
No Plan.
|
The format of the hosts.{allow,deny} files are identical. In essence the following procedure is used:
consult the hosts.allow file - allow if daemon/client pair match
consult the hosts.deny file - deny if daemon/client pair match
allow the hosts access to the service
The first match of a daemon/client pair halts the checking of these files and access is either granted (if the match was found in the hosts.allow file) or denied (if the match was in the hosts.deny file). If no entries match in either the hosts.allow or the hosts.deny files, access is automatically granted.
The files have the format:
daemon list: client list
|
These lists and match-pairs can get quite complex, and the hosts.allow can over-ride entries in the hosts.deny files.
The first (simplest) method now is to deny access from everyone from the client workstation with an entry in the hosts.deny. The daemon list is the name of the daemon without the path. Thus, the finger daemon is in.fingerd, and the resulting entry in the hosts.deny file is:
in.fingerd: 172.16.1.2
|
This will deny access to anyone trying to finger the server from the host 172.16.1.2. Once changes are made in the hosts.allow and hosts.deny files, they become effective immediately. Save your hosts.deny file and try to "refinger" the root user on the server:
finger root@<server workstation here>
|
No reply. Good.
The format of the clients in the hosts.{allow,deny} represent some of the functionality mentioned. For example, in the hosts.deny, we might have an entry such as:
in.fingerd: ALL
|
denying everyone from using the finger daemon.
In the hosts.allow file however, we may wish to allow every hosts on the 172.16.1.0 network. Such might be the entry in the hosts.allow file:
in.fingerd: 172.16.1.
|
Other forms of this are:
in.fingerd: 172.16.1.0/255.255.255.0
|
which would match all hosts (172.16.1.0 to 172.16.1.255) on the network 172.16.1.
Special reserved words can be used too. The words ALL (as indicated above), EXCEPT and LOCAL can also be used as follows:
in.fingerd: 172.16.1. EXCEPT 172.16.1.2
|
In this pattern, users on the network who try to finger a user from hosts in the 172.16.1 network will be allowed access (if this entry appears in the hosts.allow file), however, fingers from 172.16.1.2 will be explicitly denied. Daemon lists can be included as follows:
in.fingerd, sshd: LOCAL
|
The LOCAL keyword indicates that hosts on the LOCAL network may use this service. Hosts considered to be on the LOCAL network will not contain a "." in the hostname. So, connecting from defender.QEDux.co.za will not be allowed access since this hostname contains ".". If the host was on the local network, it would be allowed.
Combining these files can produce some interesting results. Suppose we have hosts.{allow,deny} files as follows:
hosts.allow:
in.fingerd: LOCAL
|
hosts.deny:
in.fingerd: ALL
|
This would allow all hosts that are local to finger users on the server, but deny everyone else. There are many additional things one can do with tcp-wrappers. For example, suppose you wish to keep track of those users using secure shell to your host, you can include a spawn action that will allow you to log information to the syslog (or messages) directory.
in.fingerd : LOCAL : spawn
(/usr/sbin/safe_finger -l @%h | \ /usr/bin/logger -t \
                -- MY FINGER WATCHER \
                -- -p local0.info "%d-%a-%h" ) &
sshd: LOCAL : spawn
(/usr/bin/logger -t -- MY SSH WATCHER \
                -- -p local1.info "%d-%a-%h" ) &
|
This is an extended form of previous hosts.allow we have seen earlier. When a user tries to ssh to the server, the logger application will log an entry to the syslog (or messages) file indicating that a user from the IP address <%a> and the hostname <%h> has tried to access the daemon <%d>. In this case, the entry in the syslog file will be:
Apr 22 11:56:33 mtnkiosk -- MY SSH WATCHER \
                --: sshd-172.16.1.2-defender
|
There are 2 programs that allow us to test and troubleshoot tcp-wrappers - tcpdchk and tcpdmatch. The former is used to check that the rules have been constructed properly, while the latter is used to match hypothetical connections. Let's try a couple:
Assuming we have the following rules in our hosts.allow:
in.fingerd, sshd : LOCAL : spawn
(/usr/sbin/safe_finger -l @%h | /usr/bin/logger -t \
                --FINGER-- -p local0.info "%d-%a-%h"
 ) &
sshd : .QEDux.co.za : spawn
(/usr/bin/logger -t --SSH-- \
                -p local0.info "%d-%a-%h" ) &
vsftpd: 172.16.1.
|
A tcpdchk -v will produce:
Using network configuration file: /etc/inetd.conf

>>> Rule /etc/hosts.allow line 1:
daemons:  in.fingerd sshd
clients:  LOCAL
option:   spawn
(/usr/sbin/safe_finger -l @client_hostname | \
                /usr/bin/logger -t --FINGER-- \
                -p local0.info \
                "daemon_name-client_addr-client_hostname" ) \
                &
access:   granted

>>> Rule /etc/hosts.allow line 2:
daemons:  sshd
clients:  .QEDux.co.za
option:   spawn
(/usr/bin/logger -t --SSH-- \
                -p local0.info \
                "daemon_name-client_addr-client_hostname" ) \
                &
access:   granted

>>> Rule /etc/hosts.allow line 3:
daemons:  vsftpd
clients:  172.16.1.
access:   granted

>>> Rule /etc/hosts.deny line 18:
daemons:  ALL
clients:  ALL
access:   denied

tcpdmatch examples:

	tcpdmatch vsftpd 172.16.1.2

client:   address  172.16.1.2
server:   process  vsftpd
matched:  /etc/hosts.allow line 3
access:   granted

tcpdmatch sshd 172.16.1.2

client:   address  172.16.1.2
server:   process  sshd
matched:  /etc/hosts.deny line 18
access:   denied

tcpdmatch in.fingerd defender
client:   hostname defender
client:   address  172.16.1.2
server:   process  in.fingerd
matched:  /etc/hosts.allow line 1
option:
spawn (/usr/sbin/safe_finger -l @defender | \
                /usr/bin/logger -t --FINGER-- \
                -p local0.info "in.fingerd-172.16.1.2-defender" ) \
                &
access:   granted
|
In conclusion, tcp-wrappers are convenient tools to enable access control to services on your system. It should be noted however that any application (such as vsftpd, sshd, Etc.) should be compiled with the libwrap library in order that tcp-wrappers work. Since tcp-wrappers are centered around services that are started from inetd (or xinetd in more modern Linux's), these wrappers will not work with applications that do not have wrappers enabled.
[8] In RedHat, SuSE and Mandrake, the chkconfig command is used to modify these daemons and services.
chkconfig -level 2345 apmd off
|
would be the standard way of achieving this in the other commercial distro's.
Table of Contents
In a strict UNIX/Linux environment (i.e. One in which there is little interaction with Windows clients machines), there are two services that are very useful - those being NFS or the Network File System and NIS of the Network Information Service. NIS had a name change some years back - at that time is was called YelloPages, but this named had been copyrighted by another company and so SUN, the original developers of NIS were forced to change it's name - hence NIS. NIS utilities however have not followed this change of name and thus many of the utilities still begin with yp<this> and yp<that> - a point of some confusion to those new to NIS.
NFS was developed at a time when we weren't able to share our drives like we are able to today - in the Windows environment. It offers the ability to share the hard disk space of a big server with many smaller clients. Again, this is a client/server environment. While this seems like a standard service to offer, it was not always like this. In the past, clients and servers were unable to share their disk space.
NFS is gaining in popularity again primarily due to the move to thin-client technology. Thin clients have no hard drives and thus need a "virtual" hard-disk. The NFS mount their hard disk from the server and, while the user thinks they are saving their documents to their local (thin client) disk, they are in fact saving them to the server. In a thin client environment, the root, usr and home partitions are all offered to the client from the server via NFS.
What can you export as a resource, using a NFS server?
Anything; that is any block device. CDROM, USB thumb drives, parts of your hard disk (or your whole hard disk if you are brave).
There are a few "problems" with NFS. Firstly, it is only a Unix/Linux based service. In other words, it is relatively difficult to provide NFS to Windows PC's. Technically this can be done, but the Windows client needs to run NFS client software. There are some options here, namely PCNFS and Cygwyn and these will allow Windows clients to "mount" the NFS exported drive locally.
Secondly, NFS is so dependent upon the network that in the event the network becomes unavailable, the NFS clients may wait for the service to be restored, and this may cause the client to "hang". While this is not critical (it will not mean the client needs to be rebooted) it will cause the machine to slow as it tries to "find" the missing file system. For example, doing a df -h while the NFS server is unavailable causes that terminal session to "hang". The rest of the machine is still available, as long as you do not make use of the unavailable file system.
NFS uses the /etc/exports file for its configuration. We will do a very simple NFS export here, but of course, like everything in Linux, this has a number of configuration options, all of which increase the security - and complexity.
debian:/# cat /etc/exports
# /etc/exports: the access control list for filesystems \
                which may be exported
#               to NFS clients.  See exports(5).

/home   192.168.1.0/255.255.255.0(rw,ro,sync,no_root_squash)
debian:/#
|
The /etc/exports file must contain a directory, (in this example the directory being exported is /home), as well as the networks (or hosts) the file system is exported to.
In this case it's exported a range of hosts in the network 192.168.1.0. Alternately, it could be exported to a single host using the configuration:
/home 192.168.1.24/255.255.255.0(rw,sync,no_root_squash)
|
The export file must not have a space between the host (or network we're exporting to) and the options (enclosed in round brackets).
The most common options are going to be rw meaning read/write, (the drive is exported read-write) or ro, meaning read only, then you synchronize write to the disc and add extra options like no route squash.
| Note |
|---|---|
I would encourage you to go and read the man page on exports (man 5 exports) to see what other options you can use. | |
Once you have finished adding your options, you can then close the round bracket and your file will then export your home directory to the hosts on that network.
Having set up the exports file, it is simply a case of saying /etc/init.d nfs-user-server restart to initiate the changes.
debian:/# /etc/init.d/nfs-user-server restart
Stopping NFS servers: mountd nfsd.
Starting NFS servers: nfsd mountd.
debian:/#
|
That will start the NFS server and now there is nothing more to do from the server side.
From the client's side, we can do a couple of things and really the most important thing is we want to mount the exporter drive on the server.
Do a mount with the IP address 192.168.1.140, in my case this is the IP address of the server - and :/home.
I'm going to mount this directory on this server and I'm going to mount it on /mnt/nfs server (this directory needs to be created before you can mount the NFS drive to it.)
linux:/ # ls /mnt
.  ..
linux:/ # mkdir /mnt/debian
linux:/ # ls /mnt/debian/
.  ..
linux:/ # mount 192.168.10.144:/home /mnt/debian
linux:/ # ls /mnt/debian/
.    bazaar.txt   dir1         emails3.txt  foo      guest
..   columns.txt  emails1.txt  file.txt     foo.txt  hamish
bar  contact.txt  emails2.txt  file1        foo2     mem.stats
linux:/ #
|
Now in fact this is just a mount point like every other filesystem needing a mount point.
Once mounted run a "df -h" command which should show you the mounted drive and the server should be the home directory that we exported from the server should be mounted on /mnt/debian.
NIS is a service, as the name implies. Services are there to make life easier for us. DNS for example is also a service. If it were not there, we would need to remember IP addresses for every host on the Internet - clearly something that is impossible.
NIS provides information. This may be information about the public keys of all users on your network, or perhaps the latest copy of the networks file, or a copy of the auto.master and auto.misc for the autofs server. Information, information, information. Is it critical information? Well, that all depends. If you are never going to be sending encrypted email to anyone, then no, you do not need a list of all the public keys of other users on the network and probably would not make use of this service provided by NIS.
NIS is a hierarchical system of servers. At the top of the hierarchy is the NIS master server. This is the "authoritative" server for the NIS domain.
What is a domain? Well in any organization there may be a number of domains based upon the department one is in, or the seniority in the company, Etc. These are "human" domains.NIS domains are similar. There may be an "ENG" domain for the engineers, a MGMT domain for the management people, and an "ACCT" domain for the accounting people.
The NIS master server has a number of slave servers too. Their jobs are to act as backups to the master servers. If there is a problem with the master, then the slaves will stand in. In addition, a single master server may become inundated by the amount of requests it receives. So clients will be configured to point to the slave servers instead. Therefore, the master will have MUCH less work to do.
However, let's consider NIS, how it works and how to configure it from the client. How do we connect to a NIS server?
There are a number of methods as with everything in Linux. The easiest is probably to run the client configuration utility "authconfig". This will ask you to enter your NIS server as well as your NIS domain. Once done, it will try to start the NIS client. The client is called "ypbind", and if the domain or the server is unavailable, it will give up after a couple of seconds.
The authconfig file modifies a file in /etc called yp.conf. The format of this file can be found in the manual page of ypbind (man 8 ypbind), but here is a brief summary with an example of two:
domain nisdomain server hostname e.g.
domain QEDux server 192.168.1.2
|
domain nisdomain broadcast e.g.
domain QEDux broadcast
|
Then a restart of the ypbind should see you right.
Now, how do we know we are connected? The "domainname" command will return the domain to which we are currently connected.
$ domainname
|
returns,
QEDux
|
(Or whatever your domain name is.)
| Note |
|---|---|
to see the DNS domain name, one needs to use the command "dnsdomainname" rather than just "domainname" | |
The last thing that needs configuration is the /etc/nsswitch.conf. Remember, this file determines in which order things are looked up. The general order for many things is first FILES, then DNS, then NIS and NISPLUS. Supposing the NIS server has exported their /etc/networks file. To look this up using NIS first, we would need to change the entry in the nsswitch.conf as follows:
networks: nis files
|
Now, the network information will be looked up first in NIS and then in FILES. Notice too that if the NIS is unavailable, then networks entries will ONLY be looked up in files.
Did this work? Well the way to see that is to run the netstat command.
netstat -r
|
Notice I ommitted the 'n' switch. That would have got me only the numbers, I want the names of the networks too. These names are coming from the NIS server.
I've cited the use in the networks file, or for obtaining an up-to-date list of the public keys of people on you network, but this all seems rather trivial. One of the places NIS is most useful is in the management of user accounts.
Image for a minute you have 100 Linux machines in your environment and each has to have 50 user accounts. I can see you grimacing already! Enter NIS and bingo, we can administer all 50 users, on all 100 machines from a single NIS master server. Simple, efficient and easy. No mess, no fuss.
Linux offers a system for sharing disk space between hosts called the Network File System. NIS or the Network Information Service is a systems of providing information to hosts on the network.
It is a hierarchical system based upon a master-slave configuration. While it is not essential, it beats having to make copies of common files for each user on the system.
The downside of NIS and NFS is that these products are not available to non-Unix based clients so if you are running Windows on your desktop, you can't use NIS to authenticate your Windows desktop back to your Linux server.
While this may seem a problem in Windows heavy environments, is not since you can use LDAP- Light Weight Directory Access Protocol. This is out of the scope of this course but LDAP allows you a way of authenticating users across different platforms.
Table of Contents
How do we make connections to our Linux machines?
We essentially have a network and we could have one or more Linux machines on these networks, so the question is how do we connect between machines A and machine B?
In the old days you had a protocol or an application called telnet.
Telnet's responsibility was to connect between one and another machine, connecting across a network or across the Internet.
As the industry demands more security telnet becomes more and more outdated, this is primarily because telnet sends your password with text across the network and if you are at all astute, it's relatively easy to sniff the network and collect any telnet password.
So although telnet is still available a systems administrator would probably avoid using telnet at all costs.
On a Linux machine check whether telnet is running by telnet-ing into a local host, say port 23. If you route the port, you should be able to see whether telnet is running.
Now depending on which Linux distribution you are using, telnet is enabled or disabled, by default. It seems that Debian comes with telnet enabled.
Again generally that's not a good idea to allow anybody to telnet your machine because the minute you allow one-person access, of course his or her password is going over the network in clear text format and it's easy enough to sniff and that user becomes compromised.
Let's talk about the telnet clients, which is quite useful knowledge for things other than telnet itself. We would use a telnet client in the following examples:
1.When we connect to our SMTP server earlier where we did a telnet to the SMTP server on pert 25. And what did that do? Well, that connected us to our SMTP server and we were able to have a conversation with our SMTP server via our telnet client.
2.Similarly we could have done a telnet to our POP mail server on port 110 and that would have shown us a POP session and we could have logged in and seen what mail was waiting for us from a POP perspective.
Now you've seen that Debian enables POP, IMAP, telnet and the finger and all sorts of other services by default so part of this chapter we'll be switching these services off. This involves editing the /etc/inetd.conf file, and commenting out the services that we do not require.
So what do we have if we don't have telnet?
So if we can't use telnet to remotely connect between one machine and another, what can we use?
Well, it's an application called Secure Shell and secure shell is certainly the recommended way of connecting Linux machines and it can do more than a telnet session. A telnet session is just a login but secure shell is a, as the name implies, a shell - so it can do a login for us.
The original version was Secure Shell 1 but we are going to be talking about Secure Shell 2. It is provided by a package called OpenSSH.
There is another tool called "scp", which is secure copy, the same as the copy command except you copy securely across the network.
You've also got SFTP, which is Secure Ftp Session, and what that does is it secures ftp transfers from one machine's data file, from one machine to another.
So secure shell is more than just a login program, it's a copy program, an ftp program and it can do some other things as well.
Let us review the public and private key infrastructure, which we did look at earlier when we were talking about GPG.
Do not become confused between GPG and SSH:
GPG uses public and private key to encrypt and sign email's. SSH uses public and private keys to verify who you are.
Essentially the purpose is similar but these two are not the same.
Connecting to a remote machine and signing an email is very different processes. Secure Shell needs a public and private key pair just as GPG does.
Now in terms of secure shell and public and private key infrastructure, similar as GPG, you have things like RSA and DSA encryption algorithms. And RSA seems to be the favored option for creating key pairs. You also need a length of a key. So for example the length of the key could be 1024 bits. What this creates for us is a public key, which we can exchange with any other systems. And a private key that would remain private on our machine under all circumstances, you should not share it.
And in order to create the key pair we needed to supply a pass phrase.
So understanding the facts that we have a public key that we can share and a private key that we keep private at all costs and use as needed. And really what is happening at the OS level is that on our machine we have our private key and on the remote machine we have our public and we encrypt with our private key, which can only be decrypted with our public key. Now you will recall with GPG we could encrypt and sign, here there is no real signing involved, here it is more focused on encrypting the data we send and receive over the network.
The first thing we need to do is to create our public private key pairs using an application called ssh-keygen.
"ssh-keygen" takes a number of parameters so you need to, at this stage, log-in as an user.
Once logged in, issue the ssh-keygen command as expressed below:
1.Using the"-t" option generate a RSA key.
2.How big is my key going to be? 1024 bits it asks if we generate the key (thus the command is ssh-keygen -t rsa -b 1024).
3.Now it needs to save this key somewhere and by default it's going to save the key in "/home/riaan/.ssh/" called id_rsa.pub . (In fact it will save your public key as that and your private key will just be saved as id_rsa.)
4.So once we've run the ssh-keygen command, we then enter a pass phrase note that the same philosophy is applied to entering pass phrases as with gpg.
riaan@debian:~> ssh-keygen -t rsa -b 1024
Generating public/private rsa key pair.
Enter file in which to save the key (/home/riaan/.ssh/id_rsa):
Enter passphrase (empty for no passphrase):
Enter same passphrase again:
Your identification has been saved in /home/riaan/.ssh/id_rsa.
Your public key has been saved in /home/riaan/.ssh/id_rsa.pub.
The key fingerprint is:
15:9e:85:1d:fc:23:2c:ed:81:8c:d3:5a:94:21:93:19 riaan@linux
riaan@debian:~>
|
Once the pass phrase is generated or entered, ssh-keygen returns a "fingerprint" of this particular key.
As an example to demonstrate the usefulness of the key just generated, let us take a scenario with two machines - machine A and machine B.
We want to be able to log-in from machine A to machine B. On machine A we've created a public private key pair and we're going to put our public key on machine B (remote) so that machine B can authenticate who we are.
As part of this authentication, machine B would need to be able to encrypt data flowing between one and the other machine. If it was just a matter of connecting and we weren't worried about encrypting passwords or encrypting usernames or whatever, we would just use telnet to connect between one and the other.
Assuming that you want to connect on a regular basis to machine B and assuming that you are the system administrator on machine A, you send your public key via email to the administrator of workstation B.
Now workstation B is going to get that key and it's going to add the key to their authorized_keys.
Administrator B will create a user on their machine for you to use, and will add your public key to the authorized key of that user.
For our purposes we create a user for Riaan on workstation B called "riaanbre", Riaan generates his public private key pair on workstation A. He then sends me his public key.
Once Riaan's key is in his home directory, the System administrator for workstation B would run the command:
ssh-keygen -l -f
|
-l would display the fingerprint of the encrypted key
-f would give it a file
Riaan puts his key in the /home/ directory for the user called "riaanbre" on workstation B we could then could test it against Riaan.key.pub (in this case this is the name of the file that Riaan sent to the administrator of machine B).
Once the administrator at workstation B has verified Riaan's fingerprint, he adds Riaan's fingerprint (key) to a file called /home/riaan/.ssh/authorized_keys.
Once Riaan's key is an authorized key he should be able to secure shell into machine B by using:
ssh -l riaanbre 192.168.1.144
|
or he could have said
ssh riaanbre@192.168.1.144
|
That would then prompt him for a password. Before he gets that password, it would send him a fingerprint of the host he's connecting to.
Now, why would the host send a fingerprint?
Primarily because if workstation B was masquerading or if there was another work station, call it workstation 5, masquerading as workstation B, then when Riaan tries to connect to workstation B, he's actually connecting to the private machine.
In this case the fingerprint of the host is used to check that Riaan is not connecting to the masquerading workstation(s) but actually to the correct workstation.
How do you check that this is the workstation that you are expecting to connect to?
Well, in the directory /etc/ssh/ssh_host_rsa or dsa (as the case may be) key.pub is the public key for that host. The way we test our public key is by using the command "ssh-keygen -l -f":
riaan@linux:/etc/ssh> ssh-keygen -l -f ssh_host_rsa_key.pub
1024 d7:aa:e9:09:1c:eb:f6:04:f7:15:ef:fa:8d:b8:f9:70 ssh_host_rsa_key.pub
riaan@linux:/etc/ssh>
|
The system administrator of workstation B has verified with Riaan that the fingerprint that he's receiving when he's trying to connect to workstation B is actually the fingerprint of workstation B. Riaan can then accept it with a yes at that point.
riaan@debian:~> ssh 192.168.10.144
The authenticity of host '192.168.10.144 (192.168.10.144)' can't be established.
RSA key fingerprint is f6:11:d9:54:32:37:18:e1:f4:5b:4a:06:37:1e:98:68.
Are you sure you want to continue connecting (yes/no)? yes
Warning: Permanently added '192.168.10.144' (RSA) to the list of known hosts.
riaan@192.168.10.144's pass phrase
|
Riaan accepted the fingerprint for the host, workstation B, it's now added to his main known hosts lists so it won't ask him again whether this is in fact the fingerprint for his host because it will have it recorded.
It now asks him to enter a pass phrase and this pass phrase is not the login password, this is his pass phrase that he entered when he created the key with the initial "ssh-keygen -t rsa -b 1024".
So Riaan is now able to log in, using his pass phrase, to the remote machine workstation B. Even though he's got a password on workstation B, he's not using that password, and this is quite important, because an encrypted password of his pass phrase is the thing that's passed across the network, not the unencrypted password on workstation B.
When Riaan accepted workstation B's fingerprint it was added to a file in Riaan's home directory, so that would be home/riaan/.ssh/ to a file called known_hosts and Riaan could quite easily go and delete that host out of there so that the next time he connected to workstation B, it will again ask him, "Is this the correct fingerprint"?
Why would you want to do that? Well, perhaps the machine has changed, perhaps there's a new administrator, who knows why, perhaps the administrator of workstation B re-created his host key.
The known_host is just a public file because all it obtains are a whole bunch of public keys for the host that you are connected to.
As part of this process, you will have seen that Riaan's public key travels from workstation A to workstation B and it got assigned to his .ssh in his home directory.
The question is, why would you want to exchange keys? Because ultimately you still have to type in a password. Well, the reason that you're exchanging keys is that you know, from workstation A, Riaan can type his pass phrase rather than his password on workstation B, and that ensures that all transactions are encrypted including the username and the password.
And how does he pass his public key around to the various machines? Well, he can ftp it or he can secure key copy it or he can send it via email.
You can copy it in a number of ways, remember it's a public key so it's not that critical if other people get hold of his public key as there's not much they can do with it.
Let's assume that Riaan's having to open a number of sessions over and over again. Well, he's going to get pretty hacked-off at having to continually type his pass phrase every time he opens a new session between workstation A and workstation B.
So he decides to use a tool called ssh agent and ssh agent's job is to keep track of the public keys that are being used in connecting to hosts.
Essentially, what happens is when Riaan, on workstation A, needs to connect to workstation B, the ssh agent will verify that this key does come from Riaan. In other words, the ssh agent's responsibility is to handle the key. The first time Riaan connects between workstation A and workstation B, he gets prompted for his pass phrase.
Once he's given his pass phrase he can then add the fact that he has been granted access and the ssh agent's job for that session is to remember the key.
He then starts off a second ssh and what happens? Well the ssh agent responds with the verification on the key and so he can connect to workstation B as many time as he wants without being asked to enter his pass phrase.
There is a catch - the catch is, is that any session, any secure shell session has to be started off of the sibling of the ssh agent. So if you started a terminal and we ssh'ed into workstation B, you then did a sshadd to add the public key to the agent, then you started a new terminal session and you ssh'd into workstation B, it would again ask you for a pass phrase.
The first thing Riaan has to run is "exec ssh-agent /bin/bash" and what that does is replace the current shell with "ssh-agent" which starts a new shell. At this point Riaan needs to use "ssh-add" to add his public key to the agent.( read the man page for ssh-add to learn how this is done)
Once Riaan has done an ssh-add, he's asked for his pass phrase and the pass phrase that it's asking for there is the pass phrase that Riaan supplied when the private and public key pair was created.
Riaan added his public key to the agent and when he tries to secure shell into workstation B, it didn't ask him for his pass phrase. Why? Because when he added the user to the ssh-agent, at that point it's asking for his pass phrase. (If he tried to open a different terminal it would again ask him for his pass phrase because that new terminalouldn't be a sibling of the ssh-agent that we started earlier.)
If you administrate a good number of machines you would not want to type a password every time you connected to one of these machines. To get around this create an account and a public private key pair but instead of entering a pass-phrase, enter no pass phrase at all. Not entering a pass-phrase is the equivalent of secure shelling without a password.
The downside of this is that if control is lost of the administrators' workstation, whoever gets hold of this workstation has then got access to the other workstations on the network.
This time you're going to destroy your public private key pair using the "ssh-keygen -t rsa -b 1024" command. When asked for a pass phrase hit enter.
It will probably say something like I'm going to over write the current RSA public private key pair and you say Yes - you do want to over write them.
When it asks for a pass phrase hit enter, in other works you don't give it any pass phrase at all and it will create a public private key pair - id_rsa and id_rsa.pub.
It will also produce a fingerprint.
riaan@linux:~/.ssh> ssh-keygen -t rsa -b 1024
Generating public/private rsa key pair.
Enter file in which to save the key (/home/riaan/.ssh/id_rsa):
/home/riaan/.ssh/id_rsa already exists.
Overwrite (y/n)? y
Enter passphrase (empty for no passphrase):
Enter same passphrase again:
Your identification has been saved in /home/riaan/.ssh/id_rsa.
Your public key has been saved in /home/riaan/.ssh/id_rsa.pub.
The key fingerprint is:
4d:86:ee:58:66:71:c1:65:01:98:14:46:92:82:7d:d8 riaan@linux
|
At this point you need to copy this to workstation B and over write your authorized key, or you append it to your authorized key file. Log out of workstation B.
At that point you should be able to secure shell from workstation A to workstation B, as a user without a password.
Now you can run remote commands such as:
ssh riaan@192.168.1.114 (or whatever your second machine's IP address is) uptime
and this runs the "uptime" command on the remote machine and returns the output to the local screen, without having to log in to the remote machine. This pretty much gives you full control on the remote machine.
So we've been able to verify the fingerprint of the host we are connecting to, we've been able to generate public private key pairs in order to authenticate who we are and where we're coming from, and we've been able to generate entry pass phrase public private keys which allowed us to log in automatically without entering a password from one host to another.
The secure set of utilities, Secure Shell, Secure FTP will now use the public private key sets in order to encrypt and decrypt traffic flowing between the two.
Of course, we've gone through a whole wad of effort there to exchange key pairs but in fact if you were to log in as root from workstation A to workstation B, it would still encrypt the whole conversation. You would be encrypting using the password from workstation B rather than the pass phrase from workstation A.
File Transfer Protocol has been around for a very long time and is still very much in use today. The file transfer protocol is used for transferring files around the Internet.
A lot of people mistakenly attach big files to email, but email was never meant to handle big file attachments. Email was to send electronic mail between two individuals, not to send entire documents.
If you need to send big files you need to FTP them or transfer them by essentially a different courier method/mechanism.
FTP is another client/server implementation in Linux. On the server the FTP daemon on the client an FTP client.
A lot of Web-browsers behave like ftp clients allowing you to connect to a ftp server rather than a http server.
You can either use FTP as a real user with a password, or you can FTP as a user "anonymous".
When you use anonymous FTP, you are not normally prompted for a password.
If you are, you can use a password like <yourname>@. Leaving off the domain after the @ will result in your domain (from which you are connecting), being affixed to the password. They (the ftp server people) do not check this, so many people just type in <character>@. In that case that would allow me to anonymously log in from the client to a server.
Once on the server you really have just a big file repository with a whole lot of files that we can send and essentially I would "get" (which is the command to download a file) file from the server or I could "put" (which is a command to upload files to a ftp server) files to the server. And it's important that you understand that when you connect to an FTP site, you are getting files from the site and when you want to send something to the site, you put file to that site.
One of the problems here is that if you do a pwd, for example, on your site you are not printing the working directory on your local Linux machine; you're printing the working directory on the remote site. If you say "cd linuxdistribution", you're not changing directory on the local client side, you are actually changing directory on the remote side and if you want to change directory on the local side, you say "lcd /home/dir" which changes directory on the local side.
This is what often confuses people when they first start using FTP, is they'll say cd to my home directory and it will say no such file directory and they get confused because they think that the directory is there, they know it's there. But it won't allow them to change directories and that's because when you cd you're changing directory on the remote server side rather than on the local client side.
So, it's just worth bearing in mind FTP to 192.168.1.1 - let's say - and it would ask you for a user and you could then say anonymous and it would ask you for password and you would say Hamish (or whatever your username is) @, (and give it your email address) and then from there you would be logged in.
You would be logged in to the pub directory - you can do a listing and you can change directory to pub/Linux/distribution and then from the FTP site you can download all the distribution files that you need.
Similarly, if there was an upload area where you could put files, you could say put /pub/ftp/upload and that would actually send a file to the FTP server. A lot of FTP servers don't allow you to upload files to the server, as they are primarily for download, but theoretically you are able to upload files with FTP as well.
So that's the 30 second guide to using FTP and I've given you some examples and exercises where you can actually go and try using FTP to get and put various files.
ftp 192.168.10.144
Connected to 192.168.10.144.
220 debian.zoo.org.za FTP server \
                (Version 6.4/OpenBSD/Linux-ftpd-0.17) ready.
Name (192.168.10.144:riaan): anonymous
331 Guest login OK, send your complete e-mail address as password.
Password:
|
You need to enter your password here now.
ftp> ls
150 Opening ASCII mode data connection for '/bin/ls'.
total 144
-rw-r--r--    1 test     visitor       266 Feb 16 14:25 .alias
-rw-------    1 test     visitor      4265 Mar 17 13:35 .bash_history
-rw-r--r--    1 root     root          701 Feb 27 10:31 zoo.org.za.zone.gz
226 Transfer complete.
|
Perform a listing of your LOCAL directory (the directory on the machine from which you are connecting to the ftp server). For this you will need to shell out of your current ftp session. Shelling out will mean starting a shell environment, placing the ftp client in the background. You can shell out with a "!" command. The ! Command actually runs a command in a shell, so if you wish to shell out to run a number of commands, you will need to start another shell as follows:
!/bin/bash
|
This will give you a prompt at which you can type commands into your LOCAL machine. Note, you cannot shell out onto the remote machine as that would have serious security implications.
Getting and putting files in an ftp session can be done using one of two modes: binary and ascii. Many modern ftp clients will switch themselves automatically into binary or ASCII mode depending upon the file that is being put/got. However, to make sure, you can switch the mode yourself using the "type" command. Thus, a
type binary
|
will ensure that the client is expecting a binary file as the next file that is up/down-loaded.
ftp> get bind9.tar.gz
local: bind9.tar.gz remote: bind9.tar.gz
227 Entering Passive Mode (192,168,10,144,4,15)
150 Opening BINARY mode data connection for \
                'bind9.tar.gz' (2844 bytes).
100% |************************|  2844     \
                265.69 KB/s    00:00 ETA
226 Transfer complete.
2844 bytes received in 00:00 (69.23 KB/s)
ftp> put /home/riaan/Python_for_.NET_whitepaper.pdf \
                ./Python_for_.NET_whitepaper.pdf
local: /home/riaan/Python_for_.NET_whitepaper.pdf remote: \
                ./Python_for_.NET_whitepaper.pdf
227 Entering Passive Mode (192,168,10,144,4,17)
150 Opening BINARY mode data connection for \
                './Python_for_.NET_whitepaper.pdf'.
100% |************************| 52773       \
                0.98 MB/s    00:00 ETA
226 Transfer complete.
52773 bytes sent in 00:00 (743.59 KB/s)
|
ftp to ftp.is.co.za as an anonymous user and look inside the Debian directory. Obtain a listing of all files in this directory
Change directory to the pool/f/fortune-mod/ directory and obtain one of the fortune binaries.
Perform a local directory change to the /tmp directory and obtain another of the fortune files.
Obtain a listing of the ftp commands that are available on your ftp client using the "?" operator (of type "help").
Get a number of files in a single operation (hint: get help on the mget command).
Ftp to yourself (localhost) and log in as your user. This time we are not logging in as the anonymous user.
Obtain a litsing of all files in your directory you are connected to.
Put a file from the /tmp directory (perhaps one of the fortune programs you just downloaded from Internet Solutions (ftp.is.co.za) into your home directory.
Put many files at once into your home directory.
Quit you ftp session and look in you home directory to verify the files are there.
Table of Contents
X has been around for a long time, and is well understood. It is based upon the client/server model we have explored throughout this course. The clients are those applications we wish to run on our machines in order to "get the work done". Typical clients are Mozilla Firefox, Ximian's Evolution, an Xterminal such as RXVT, or an application like DaliClock. In short, clients are those programs we normally see on the X display.
The server on the other hand is, in the case of Linux, usually the Xfree86 server. The server is responsible for interacting with the hardware. It's job is to be able to render an image, line, font or graphic using the hardware at it's disposal. Perhaps that hardware may be a state-of-the-art video card and a flat-panel LCD display, or it may be an old video card and a CRT display.
What makes X so versatile is that is does not constrain the client and the server to be on the same machines. In the simplest case, in order to be able to play KAsteroids on your Linux machine, you will be required to run both the client (KAsteroids) and the server (Xfree86) on the same machine. However, this needn't be the case. You may very well run KAsteroids on machine A, but use machine B's server to affect the display. In fact, X is so versatile that it can be used with remote procedure calls (RPC's) to between the client and the server. We'll return to this in due course, but we first need to understand how the X server interacts with the client windows.
Lets's give an example. Every client must have the ability to close windows, move them around the screen, minimise/maximise the windows, bring a window to the foreground or push it to the back, Etc. How does the X server handle all these functions?
It doesn't. It has an assistant to perform these tasks on it's behalf. Enter the window manager. The window manager has the task of beautifying the windows, allowing them to be placed here and there on the screen, allowing the user to minimize or close a window, Etc. In fact, as far as X is concerned, the window manager is yet another client - a bit like KAsteroids. (Bet you can tell I like that game!).
Now, of course there are those individuals that like "this" way of doing things rather than "that" way - and have written a window manager according to their taste. And since tastes vary considerably, so do window managers. Some (like twm) are very simplistic and functional, while others like enlightenment are complex beasties with all the bells and whistles you would expect from the most complex Space Shuttle dashboard. And of course, many in between like fvwm, icewm, Etc.
Probably the most basic functionality one would require from a window manager (apart from putting a nice border around every window and some snazzy buttons in the corners to enlarge or shrink a window, close or minimize, maximize, Etc.) is a way to launch an application. After all, if we can't launch applications, then what is the use of all these nice buttons and borders. So, window managers usually provide a means of launching applications from menus, from a command prompt or other more complex methods. How each does it is not standardized either - primarily because the X server is not dictating the way the end product should work or look.
Well, having considered X and now window managers, its time to look at widgets. What are they? Well let's consider the fact that, if you were a programmer (and possible some of you are); to create a nice radio button on the screen for a user to press, or possibly to place a scroll-bar to allow the user to scroll up/down, left or right, using the straight X libraries (Xlib) is a really complex difficult task. Why? Well simply because, as we said, X is not really that concerned with how your application "looks or works". It's job is merely to display - this is starting to sound like a typical government department!!!
Instead however, there were widgets defined. These were simply a set of API (application programmer interface) libraries that the programmer could call to "place a scrollbar here", or "place a minimize button there". These are the widgets - widgets are the scrollbars, the radio buttons, the check-boxes, Etc.
Now the early widget libraries were Athena (a really clunky GUI interface) and Motif - a much slicker (although not free) interface. To see what the Athena widgets look like, try starting xcalc or xfontsel. Not nice hey! Now you can understand why Motif gained popularity in the 1980's and 1990's. BUT, it was not free - something that no self-respecting Open Source person would tolerate.
So developers started work on alternative toolkits. Enter the Gtk - or the GIMP toolkit. Gtk is well known in Open Source circles today and is the underlying toolkit in the development of Gnome. To be fair to those KDE enthusiasts, KDE is built upon an equally competent toolkit called the Qt. The open-ness of Qt is a point of some fierce debate, but this is not the forum. Finally, in response to the Motif toolkit, some enthusiasts developed LessTif - an obvious pun on the Motif name. LessTif was release free and packed a mean little punch in what is could achieve. Hence, LessTif is being used in a good number of window managers.
We have X which interacts with the hardware. A window manager which provides us the functionality for managing our screen real-estate, and toolkits which allow our clients to have the nifty features we expect in a GUI environment. However, perhaps we are running Netscape Navigator, which used the Motif toolkit, xcalc which used Athena, and other clients which use Qt and Gtk. Many different toolkits equals many different toolkits clogging up our memory. Not only that, but the look and feel of one is different from the look and feel of the next. What are we going to do Bob? Enter the final component of our X environment: the desktop environment.
The desktop environment provides the consistency we as users expect from our window environment. That all similar buttons work the same, that the windows all look and feel similar, that there is a file manager to manage our directories. These are all functions of the desktop environment and a place to put our useful applications like a clock. An analogy of the taskbar in Windows springs to mind here. This is something that Microsoft got right from day 1 and we see where it has got them today. However, MacOS got it right before that - and just to lend counterweight to my argument - it got them less far.
Why all this complexity in the UNIX/Linux environment? Simply to provide flexibility and functionality. These are two words that are not known in those environments mentioned earlier. If you don't like the way MS Windows looks or works, how much can you do about that? Similarly for MacOS. These layers of abstraction allow us to run an environment that we want - not that we are told we will have. Unfortunately this is all rather confusing for the user and possibly a little daunting for the newbie. But, that how it is.
Now that we know the theory of how this all works, it's time to do some practice. We're going to do some simple things as the environment is a complex one and we could be at this for some time if we go the 'complex' route.
For the sake of these examples, assume we have two machines, porkey and bodger. They are connected on the same network. Now they both run X Window servers and want to begin to display client applications. If porkey wants to display xclock on bodger, it can be done as follows:
xclock -display bodger:0.0
|
Now provided bodger has given porkey access to display the client application with the command:
xhost +
|
xclock will pop up on bodger. Similarly, displaying xeyes on porkey from bodger is simply a matter of:
xeyes -display porkey:0.0
|
It is beyond the scope of this course to go into the :0.0 and the xhost stuff, so you'll have to take my word for it.
Thus, in the case of the xeyes application, it is executing on bodger, but instead of using bodgers own X server to display it, bodger is using porkey's X server to display it. Now try that on Windows!
For more information on X11 and the X Window client/server system, consult the HOWTO's on www.tldp.org.
Table of Contents
We have covered the theory of LAN's and WAN's earlier in this course. Now we need to cover the connection to an ISP, which constitutes the latter.
Running TCP/IP over a LAN and a WAN require different encapsulation protocols. What this means is that when communicating over a WAN, delay needs to be factored into the communications, handshaking, signaling, etc. LAN's of course have all this built-in in the TCP/IP protocol already. For this reason, TCP/IP can be transported over a SLIP link or a PPP link. SLIP stands for serial line IP, while PPP stands for Point-to-Point protocol. SLIP was the predecessor of PPP and did a good job, but for some reason PPP gained acceptance and is now the de-facto protocol for transmission over serial links.
What happens when we send packets from a LAN to the WAN? When the packet reaches the router (in this case the router is the same machine as our Linux machine), it is "translated" into PPP packets and sent over the wire. Since communication is slower over a WAN, time-to-live settings need adjustment, as well as sequencing of packets from source to destination and vice versa.
It is difficult in a course such as this to describe all possible problems that one needs to deal with when configuring the WAN, but I am providing a checklist of those that may occur and possible solutions to them. The order of this checklist is important.
You will need to know a number of things from your ISP, so here is a checklist before you begin:
What is the ISP's telephone number for their dial-in subscribers? (dur)
What type of authentication do they use (PAP or CHAP).
Your username and password for authentication.
What is their DNS server's IP addresses?(there should be two of these)
What is their SMTP server's IP address (or name)?
Who can you call with technical queries?
Do they provide you with an IP address dynamically or do you need a static one from them?
Armed with these answers, you can begin the following checklist.
Is your modem plugged in and responding?
Internal or external modem? Whether you are using an internal or an external modem is immaterial. Both will use a single "comm" port. In Linux, "comm" ports are the (usually) default 2 serial ports on your system. One means of checking you serial ports is using the dmesg command. Typing this: "dmesg|grep ttyS"
debian # dmesg |grep ttyS
ttyS0 at I/O 0x3f8 (irq = 4) is a 16550A
will show you your serial ports. They should be S0 and S1 which translate to COM1 and COM2 in DOS. Once you know which serial ports are active on your system, you can try to make contact with them to determine which has the modem attached. We'll assume you have attached the modem to COM1, the first serial port.
Now starts the fun. Using a program called "minicom", try to make contact with the serial port 1. You will no doubt have to read the instructions for minicom, but the simplest form involves starting minicom as follows:
minicom /dev/ttyS0This should bring you to a "blank" screen.
Now, once we have this we should be able to issue the modem with commands. These commands emanate from a command set called Hayes. Do a search on Google for the word Hayes and this will bring up a full set of Hayes commands. Whether your modem supports the full set of Hayes commands, or a subset, is should respond to those we plan to issue to it.
So go ahead, and issue the following command:
atzThis should respond with something akin to "Initializing modem".
Then try:
atdt <some-telephone-number>This should start dialing the telephone number you have entered. To stop the dial process, issue a sequence of 3 "+" characters as follows:
"+++"Things to note:
The modem must be plugged into a telephone socket to dial
Try dialing your cell phone to test it.
If the phone is not dialing, perhaps you are talking to the wrong COM port. Try ttyS1 instead.
Can you dial out manually
Right. Now that you have verified that you can dial out, you need to try to dial to your ISP. This will require that you know their number. Try it now. If it works, and they are running PPP on their side (waiting for your call), there should be a whole stack of junk printed to your screen. If this works, then we are on the road. Sometimes, the ISP will prompt you for a username and a password. Try entering your username and password. Don't worry if it starts sending you lots of junk again. As long as it's authenticating you, you are in business. Hang-up with the "+++" as before.
Are you using a chat script?
Chat scripts are used to perform the dial process. All this stuff we have been doing manually, will need to be done by a chat script. Chat scripts are funny beasties. In essence, there is a "send" section, and an "expect" section. In other words, I send you "A", and I expect "B" in reply. A typical example may be:
<expect>	login:
<send>		username
<expect>	password:
<send>		blah blah (you password here of course)
<expect>	welcome to QED Technologies ISP
<send>		(nothing)
<expect>	Etc. Etc.
Once this process is complete, you should have authenticated. To find out more about chat scripts, consult the manpage for chat (man 8 chat).
Testing you chat script is a little tricky. In essence, you can only test it when dialing up to the ISP. Then you need to consult your /var/log/messages (or /var/log/syslog in Debian) to see what it is trying to do.
How are you authenticating at the ISP?
Two methods of authentication are used by ISP. PAP or the Password Authentication Protocol and CHAP, the Challenge Handshake Access Protocol. Most ISP's nowadays use PAP rather than CHAP, but find out from you ISP which they use. There are two files in /etc/ppp that handle authentication. Pap.secrets and chap.secrets. Both these files have identical formats, so one clever trick is to link one to the other. That way, whether your ISP uses CHAP or PAP, the file will be there. The general format of the file is:
client		server	secret			IP addresses
"hamish"	*		\
                        "my-most-secret-password"	*
Now, the username I will be authenticating with is "hamish", to any (*) server with the secret "my-most-secret-password" and for any (*) IP address. Since chap-secrets and pap-secrets are linked, authentication can happen one way or another. Once the CHAT script is complete, the PPP daemon will be started. Pppd will authenticate using one of these two methods. PPPd has it's own configuration file, namely the /etc/ppp/options file. In this file goes all the options that pppd will need in order to set up this link. Knowing which options to set and which to leave out is a black art (IMHO). Look at the manpage for pppd (man 8 pppd) for a complete list of options. Expect that you will be making a number of calls to your ISP before this works correctly. When it does work, don't mess with it!-)
Do you get an IP address (or is it assigned statically)?
Modern ISP's issue IP addresses dynamically. That is, once you have authenticated, there is a process of IP address negotiation, as handled by the link control protocol (LCP). Watch your syslog or messages file to get an idea of how the negotiation is happening. If you have authenticated correctly, the pppd will have negotiated an IP address for you. Check this using the ifconfig command. There should be an entry for the ppp0 interface and associated with this should be an IP address.
Can you ping you local IP address?
Right. Now you have the link up, it is time to try to ping your local IP address (ppp0). Do this as normal. If you get a reply, then you have an IP address locally that you can see. As part of the ppp0 interface, you should have a remote IP address too. Check that you can ping that too. If so, you are successfully able to ping across the wide area network link.
Can you do a DIG on a host on the Internet?
Most ISP's will issue you with two DNS server entries. You can check that they are there by cat'ting your /etc/resolv.conf file. If they are, then you should be in business. If not, you will need to contact your ISP to check what their DNS servers are. Of course, you could use ANY DNS servers on the Internet, but the closer you are to the servers, the quicker they respond and the less time you spend waiting. It is probably a good time to DIG a host on the Internet. A sure-fire one is Google, so go ahead and try to resolve www.google.com. If this works, your resolving is working and you can try to ping Google.
Can you ping a host on the Internet?
Try to ping a host on the Internet. Perhaps try to ping Google or some other host you know will be alive. If this works, proceed to step 9. If not, the first place to look will be the resolver. Work your way backward up this list to try to isolate the problems. Remember not all ISP's are equal. There is no "accepted" way of doing things, so one ISP might work differently from another. In all the years I have set up these links, I have yet to find this a totally smooth process. Expect problems and then you may be pleasantly surprised. If you can ping a host on the Internet, fire up your favorite browser and surf away.
Bingo, you're done!
Finally, how do you bring up your PPP link. Probably the easiest method is to do an ip-up ppp0. This should do all the tasks in one go, and within a couple of minutes you should have a working PPP link and be able to browse the Internet. I highly recommend you read the HOWTO's on connecting to an ISP. Go to www.tldp.org and get them down. They are far more comprehensive than this chapter, but this should provide you with the necessary detail to get things rolling.
Matthew west has created a practical lab that will test your knowledge of Network Administration. This can be downloaded from this link
This is how to use the scripts:
extract the archive: tar -xzvf naprac.tar.gz
run the "nabrk" to start the practical: ./nabrk
run the "nachk" to check that you have successfully completed it: ./nachk
Symbols
- /etc/exports
- NFS, Configuring NFS
- /etc/hosts
- name resolution, The host file
- /etc/hosts.allow
- configuration, Configuration of tcp-wrappers
- /etc/hosts.deny
- configuration, Configuration of tcp-wrappers
- /etc/inetd.conf
- security, netstat
- /etc/init.d nfs-user-server restart
- NFS, Configuring NFS
- /etc/init.d/networking restart
- network troubleshooting (Debian), Summary
- /etc/nsswitch.conf
- name resolution, So where to look up the host name?
- NIS, Configuration of NIS clients
- /etc/rc#.d
- service level security, Service level security
- /etc/rc.d/init/network restart
- network troubleshooting (RedHat), Summary
- /etc/rc.d/network restart
- network troubleshooting (SuSE), Summary
- /etc/rc.init/
- service level security, Service level security
- /etc/ssh/ssh_host_rsa/
- /etc/sysconfig/network-scripts/
- RedHat, The loopback interface
- /etc/sysconfig/network-scripts/ifcfg-eth0
- RedHat, The loopback interface
- /etc/sysconfig/network-scripts/ifcfg-eth1
- RedHat, The loopback interface
- /etc/sysconfig/network/
- SuSE, The loopback interface
- /etc/sysconfig/network/ifcfg-eth0
- SuSE, The loopback interface
- /etc/sysconfig/network/ifcfg-eth1
- SuSE, The loopback interface
A
- Address Resolution Protocol
- Application layer
- OSI model, The OSI Model
- TCP/IP model, The Application Layer
- ARP
- MAC, IP addresses, Transferring information across the Internet
- arp
- network troubleshooting, Further Troubleshooting with ping and arp
- arp -a, What is ARP?
- network troubleshooting, Verifying Your Routing Table
- ARP table, ARP and the ARP table
- TCP/IP stack, Transferring information across the Internet
- arp table, Creating and using the ARP table
- arping, arping
- Asynchronous Transfer Mode
- networking types, How do we connect the machines Physically
- ATM, Others: Wi-Fi and ATM
B
- Boot Protocol
- BOOTP, Boot Protocol
- BOOTP relay
- man sysctrl 5 (sysctrl.conf), Why DHCP is restricted to a broadcast domain
- bridges, Hubs, switches and bridges
- broadcast, DHCP offers the following benefits:
- broadcast domain, Broadcast versus collision domains
- Broadcast packets
- CSMA/CD, What is a BROADCAST?
- Broadcast services
- Broadcasts, Broadcasts, Unicasts and Multicasts
- bytes
- definition, Packets, frames, bytes, octets and datagrams
C
- Carrier Sense Multiple Access Collision Detection
- CSMA/CD, Understanding CSMA/CD
- chat script
- Dial Up, Checklist
- CIDR
- IP address/subnetmask combination, CIDR
- Class A
- IP addresses, IP addresses
- Class A addresses, The network interfaces that you'll see if you run ifconfig -a
- Class B
- IP addresses, IP addresses
- Class B addresses, The network interfaces that you'll see if you run ifconfig -a
- Class C
- IP addresses, IP addresses
- Class C addresses, The network interfaces that you'll see if you run ifconfig -a
- Client/Server technology, Client/Server Technology
- collision domain, Broadcast versus collision domains
- Cyclic Redundancy Check
- TCP/IP model, Overview of how the TCP/IP Model Works
D
- datagrams
- definition, Packets, frames, bytes, octets and datagrams
- default gateway, A default gateway
- routing, The loopback interface
- dhclient
- DHCP request, Explain "dhclient"
- DHCP
- broadcast domain, Why DHCP is restricted to a broadcast domain
- Dial Up lines
- analogue, Dial-up lines (analogue and digital (ISDN))
- Digital, ISDN , Dial-up lines (analogue and digital (ISDN))
- dig
- troubleshooting DNS client configuration, Using DIG, Why use DIG? How to use DIG? Examples
- DIGINET
- Digital Lines, WAN, Digital lines (T1, E1, and ADSL Etc.)
- Digital Signature
- GPG, Digital signatures
- DNS client configuration
- troubleshooting, Troubleshooting your DNS client configuration
- DNS Name Server, DNS Name Server
- DNS records, Types of records in a DNS
- DNS server
- round robin, Describe round robin DNS servers
- Domain Name System
- DNS, Domain Naming System
- domainname
- Dynamic Host Configuration Protocol
- dynamic IP addressing
- DHCP, BOOTP, IP Address Allocation
E
- fundamentals, Electronic Mail
- retrieving, Retrieving email
- Ethernet
- network technology, Ethernet
F
- Fiber Data Distributed Interface
- networking types, How do we connect the machines Physically
- finger
- daemon/client pair, Configuration of tcp-wrappers
- tcp-wrappers, Configuration of tcp-wrappers
- fingerprint
- forward name resolution, Forward versus reverse name resolution
- frames
- definition, Packets, frames, bytes, octets and datagrams
- FTP
- client/server, Fourth example:
- remote access, FTP
- TCP/IP model, Overview of how the TCP/IP Model Works
G
- gateways, Routers and gateways
- get
- FTP, FTP
- GNU Privacy Guard, Back to reality?
- gpg --gen-key, Back to reality?
- gpg -fingerprint, Verifying keys
- gpg -import
- verifying keys, Verifying keys
H
- Host portion
- IP addresses, Network and Host Portion
- Hubs, Hubs, switches and bridges
- Hybrid form / Session Key
I
- ICMP
- ping, TCP/IP stack, Lets look at ping from the TCP/IP Stack point of view
- ICMP sequence
- ping, troubleshooting, Sequence Number
- ifconfig, The ifconfig command
- ifconfig -a, The network interfaces that you'll see if you run ifconfig -a
- IMAP
- in.fingerd
- tcp-wrappers, Configuration of tcp-wrappers
- inet services
- security, netstat
- inetd
- service level security, Inetd:
- Service level security (Debian), Service level security
- service restrictions, xinetd and inetd service restrictions
- Internet Connection Sharing
- router, Explaining routers
- IP address
- configuring network address, How to put an IP address onto your network card
- IP addresses, IP addresses
K
- key.pub
L
- LAN, Briefly on LAN 's and WAN's
- networking types, How do we connect the machines Physically
- logical network, Logical and physical networks
- logical network layout
- network structure, Logical versus physical network layout
- loopback interface, The loopback interface
M
- MAC address
- MAC layer
- TCP protocol layers, MAC Layer
- TCP/IP model, The MAC Layer
- mail transport agent
- MTA, MTA and MUA
- mail user agent
- MUA, MTA and MUA
- Master/Slave NIS
- redundancy, Master/Slave NIS and redundancy
- Maximum Transmission Unit
- CSMA/CD, Maximum transmission unit (MTU)
- message digest
- encrypting, Digital signatures
- minicom
- Dial Up, Checklist
- Multicasts, Broadcasts, Unicasts and Multicasts
N
- name resolution process, Describe the name resolution process
- NAT
- problems with IPv4, Basic explanation - relating NAT to problems with IPv4
- security, Basic explanation - relating NAT to problems with IPv4
- netstat
- routing, Routing and using the "netstat" command
- security, netstat
- netstat -l
- security, netstat, xinetd and inetd service restrictions
- service level security, Service level security
- netstat -r
- network troubleshooting, Verifying Your Routing Table
- netstat -rn
- routing table, Show how to look at the routing table in Linux
- Network File System
- definition, What is NFS?
- Network Layer
- TCP/IP model, The Network Layer
- Network portion
- IP addresses, Network and Host Portion
- network security, Network, System and Service Security
- Network Terminating Unit
- Digital Lines, WAN, Digital lines (T1, E1, and ADSL Etc.)
- NFS
- configuring, Configuring NFS
- NFS server, How can we use NFS?
- NIS, Network Information Service (NIS)
- DNS Name Server, NIS
- nmap
- xinetd, security, Xinetd:
- nmblookup
- SAMBA, Nmblookup
- nslookup
- troubleshooting DNS client configuration, Using NSLOOKUP
O
- octets
- definition, Packets, frames, bytes, octets and datagrams
- one-way hashing
- GPG, Digital signatures
- Open Relays, Open Relays and SPAM
- OpenSSH
- remote access, SSH
- OSI model, The OSI Model
P
- packets
- definition, Packets, frames, bytes, octets and datagrams
- Physical Layer
- TCP/IP model, The Physical Layer
- physical network, Logical and physical networks
- physical network layout
- network structure, Logical versus physical network layout
- ping
- flooding, Flooding with PING
- network troubleshooting, Further Troubleshooting with ping and arp, PING
- TCP/IP stack, Lets look at ping from the TCP/IP Stack point of view
- testing connectivity, Test the network with Ping
- plumbing a device, Plumbing a device
- plumbing a network card
- IP addressing, Plumbing a network card
- POP3
- ports, listening
- Security, Checking on listening ports.
- Presentation layer
- OSI model, The OSI Model
- Private Keys
- Public Keys
- pump
- DHCP request, Explain "dhclient"
- put
- FTP, FTP
R
- Remote Procedure call
- client/server, Client / Server implemented with RPC
- reverse name resolution, Forward versus reverse name resolution
- router, Routers and gateways
- definition, Explaining routers
- routing table, Show how to look at the routing table in Linux
S
- SAMBA, SAMBA
- service security, Network, System and Service Security
- Session layer
- OSI model, The OSI Model
- SFTP
- Secure FTP Session, SSH
- SIGHUP
- xinetd, security, Xinetd:
- smbclient
- ftp-like service, Using smbclient
- SAMBA, Using smbclient
- smbmount
- SAMBA, Smbmount/smbumount
- smbtar
- SAMBA, Smbtar
- smbumount
- SAMBA, Smbmount/smbumount
- SMTP
- email, SMTP
- SMTP server
- email, Open Relays and SPAM
- SSH
- remote access, SSH
- ssh agent, Sample Session Using ssh agent
- ssh-keygeb -t rsa -b 1024
- generating key for ssh, Sample Session for Generating a key
- static IP addressing, IP Address Allocation
- sub-netting
- IP addresses, Why use sub-netting
- subnetmask
- configuring network address, How to put an IP address onto your network card
- Summary
- ping, troubleshooting, Summary
- switches, Hubs, switches and bridges
- building bridging tables, Switches and building bridging tables
- Symmetric Keys
- GPG, Symmetric Keys
- system security, Network, System and Service Security
T
- TCP
- connection orientated protocol, The Transport Layer
- TCP protocol layers, The Transport Layer
- TCP/IP model, Introducing the TCP/IP Model
- Transmission Control Protocol, The Transport Layer
- transport layer protocol, The Transport Layer
- TCP wrappers
- security, TCP Wrappers
- tcp-wrappers
- configuration, Configuration of tcp-wrappers
- troubleshooting, Troubleshooting TCP-wrappers
- tcp-wrappers, configuration
- daemon/client pair, Configuration of tcp-wrappers
- TCP/IP, Network Administration Fundamentals
- TCP/IP stack, Summary - TCP/IP Stack
- tcpchk -v
- troubleshooting tcp-wrappers, Troubleshooting TCP-wrappers
- telnet
- remote access, Inherent problems with telnet
- TIME
- ping, troubleshooting, Time
- Token Ring, Overview of how the TCP/IP Model Works
- network technology, Token Ring
- networking types, How do we connect the machines Physically
- Transport layer
- OSI model, The OSI Model
- TCP protocol layers, The Transport Layer
- TCP/IP model, The Transport Layer
- TTL
- ping, troubleshooting, TTL
U
- UDP
- connectionless protocol, The Transport Layer, The Transport Layer
- TCP protocol layers, The Transport Layer
- TCP/IP model, Introducing the TCP/IP Model
- transport layer protocol, The Transport Layer
- User Datagram Protocol, The Transport Layer
- Unicast services
- Unicasts, Broadcasts, Unicasts and Multicasts
- update-rc.d <servicename> <setting>
- service level security, Service level security
- update-rc.d apmd remove
- service level security, Service level security
V
- Verifying keys
- GPG, Verifying keys
W
- WAN, Briefly on LAN 's and WAN's, What technology must we look at when using a WAN
- Analogue lines, Analogue lines
- networking types, How do we connect the machines Physically
- WAN - Digital lines
- WI-FI, Others: Wi-Fi and ATM
X
- xinetd
- security, Xinetd:
- Service level security (SuSE, RedHat), Service level security
- service restrictions, xinetd and inetd service restrictions
Y
- ypbind