| Configuration of the Master Server | ||
|---|---|---|

|
Chapter 2. Berkley Internet Name Daemons (BIND) |  |
| Configuration of the Master Server | ||
|---|---|---|
|
|
Chapter 2. Berkley Internet Name Daemons (BIND) | |
Right, enough theory, let's get down to it.
we'll begin by configuring the master server, and once that is working fine, we'll configure the slave.
BIND has two primary areas of configuration.
The file responsible for controlling BIND usually resides in /etc/named.conf. Within this file, the administrator can define where the zone files will reside.
I like to stick to a standard, and that is to keep all the zone files in /var/named. Of course you needn't follow me - that's entirely up to you!
Configuring BIND can be just that - a bind. So, I will try to highlight areas that will potentially be problematic.
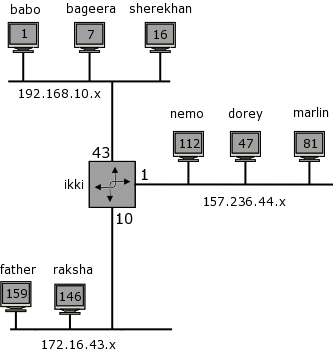
For the purpose of this course, I've decided we'll create a domain called zoo.org.za. For this purpose, I've repeated the network diagram we showed earlier again. Keeping it handy while reading this section will make your life a little easier.
The zoo will contain some of my favorite animated cartoon characters from some of my childhood movies [you will see Nemo, Marlin and Dorey here too - and from that you can draw your own conclusions!-)]
The structure of zone files is essentially the same irrespective of the zone you're configuring. A zone file will contain a set of records that pertain to that zone. These are called resource records.
We will obviously need a zone file for the name to IP address records and another for the IP address to name records. Then again, we need a set of zone files for each new zone we create.
Within our zoo.org.za domain, if we have a felines sub-domain (i.e. Felines.zoo.org.za) we'll need another set of zone files for this sub-domain. But I'm running ahead.
To begin, we'll create the forward zone files (name to IP address). we'll also do everything the 'long-winded' way now, and show you abbreviations at the end.
![[Important]](../images/admon/important.png) |
Important |
|---|---|
|
Resource record begin in column 1 always - no spaces, tabs or other funny stuff or your zone file will not work. |
|
This is for zoo.org.za.zone :
zoo.org.za    IN    SOA    baloo.zoo.org.za.  \
                                mowgli.zoo.org.za. (
                                2004022201 ; serial number
                                3h ;	refresh
                                1h ;	retry
                                1w;	expire
                                1h ;	minimum
                                )
|
The line begins with the domain we are responsible for - the start of our authority.
Notice how I have specified it in lower case. Case to DNS is unimportant, although it is preserved.[3]
This is an INternet (IN) record type. There are other record types, but for all practical purposes, you will probably only ever deal with Internet record types.
Since we are going to be the authority for this domain, this record is really telling all other name servers that this is our Start of Authority (SOA).
Next we specify the primary master name server for this SOA. In this case, baloo is the primary master name server for the zoo.org.za domain.
|
Important |
|---|---|
|
You will notice that I have written the name as baloo.zoo.org.za. - a full stop after the za. I'll explain why shortly. ??????<xref to page 18>??????? |
|
Then we specify the system contact for this domain. In place of the @ sign, we put a full stop, since @ in the zone file has special significance. So, in this example, mowgli@zoo.org.za is the contact for this zone. If you're having a problem with our zone, contact mowgli.
From here on, everything in the round brackets is merely information for the secondary name servers (the slaves). we'll explain more on the meaning of these when we set up the slave server.
The next entries relate to describing the name servers for this zone. Notice again that I include a full stop on the end of the FQDN for the two name servers.
You could of course have 3 or more name servers too, but let's not get too fancy.
zoo.org.za	IN	NS	baloo.zoo.org.za.
zoo.org.za	IN	NS	ikki.zoo.org.za.
|
Again these resource records are for the zoo.org.za domain. They are Internet records (IN) and they are the name servers (NS) for this domain.
Finally, we list the two name servers as baloo and ikki.
That done, we can now start describing the resource records for all the other hosts in our domain.
bagheera.zoo.org.za.		A	192.168.10.7
sherekahn.zoo.org.za.		A	192.168.10.16
baloo.zoo.org.za.		A	192.168.10.1
ikki.zoo.org.za.		A	192.168.10.43
|
Now, since this is the zone file for this domain, even having other IP addresses in this domain doesn't affect where we put these resource records.
tweetie.zoo.org.za.		A	172.16.43.159
raksha.zoo.org.za.		A	172.16.43.146
ikki.zoo.org.za.		A	172.16.43.10

nemo.zoo.org.za.		A	157.236.144.29
dude.zoo.org.za.		A	157.236.144.101
marlin.zoo.org.za.		A	157.236.144.93
ikki.zoo.org.za.		A	157.236.144.1
|
Having defined our zoo.org.za zone file, we should be set to start our name server but remember that I said DNS does both forward lookups (name to IP address) AND reverse lookups (IP address to name). Since these are described in different 'trees' (see Figure 2.4), we still have not described the reverse zone file.
I like calling my reverse zone files as follows. If I'm describing the range 192.168.10.x then the file is called:
192.168.10.zone
|
In this file, we need to define a SOA record as before, with one slight modification.
Whereas previously we were describing the zone zoo.org.za, here we are defining the zone 10.168.192.in-addr.arpa. So my SOA for this zone file reads as follows:
10.168.192.in-addr.arpa IN SOA  baloo.zoo.org.za. \
                                mowgli.zoo.org.za. (
                                2004022201	; serial
                                3h		; refresh
                                1h		; retry (1 hour)
                                1w		; expire (1 week)
                                1h		; minimum (1 hour)
                                )
|
We need to define the name server records as well as individual resource records for each of the hosts in the forward mapping zone file. I've listed my entries below:
; This entry describes the reverse mappings \
                in the 192.168.10.zone file
10.168.192.in-addr.arpa.	IN	NS	baloo.zoo.org.za.
10.168.192.in-addr.arpa.	IN	NS	ikki.zoo.org.za.

1.10.168.192.in-addr.arpa.	IN	PTR	baloo.zoo.org.za.
7.10.168.192.in-addr.arpa.	IN	PTR	bagheera.zoo.org.za.
16.10.168.192.in-addr.arpa.	IN	PTR	sherekahn.zoo.org.za.
43.10.168.192.in-addr.arpa.	IN	PTR	ikki.zoo.org.za.
|
What is different about entries in this zone file from those in the forward zone file described above is the fact that these are pointer (PTR) records instead of address (A) records as before.
We can create similar files for the 157.236.144 network and the 172.16.43 network. I'll leave those to you as an exercise.
Now that we have all our zone files we're ready to begin serving name requests.
Well, not quite . . .
We need a couple of additional zone files. By default, every host on the Internet needs an address of 127.0.0.1. This is the interface referred to as the loopback.
To look at the loopback on your host using the command:
ifconfig lo
|
The loopback is used by applications on the local machine to talk to other applications locally. In order for this to continue to work uninterrupted, you will need to include two additional zone files. They are generally included as part of the BIND install, but if not, copy them from the files named.local and 127.0.0.zone as part of this course.
The last zone file is the root zone file. (boy this DNS configuration is really long-winded!).
We may need an updated root zone file as the one shipped with BIND may be a little outdated. It's your responsibility as the DNS administrator to keep this file up-to-date.
In the default install of BIND it should be called something like named.ca or root.ca, which should be sufficient to get us going.
Now that all our zone files are configured and ready, we need to modify the main named configuration file - named.conf. This usually resides in the /etc directory.
There are many options we can include in this file, but for now, we'll restrict ourselves to those options that will ensure we get a name server running ASAP.
The options directive specifies global options for the name server. Entries will include parameters such as the directory containing your zone files, specification of the forwarder, whether to forward first or forward only, etc.
Then, for every zone we are responsible for, we need a zone entry, and zone entries take the form:
zone "domain_name" [ ( in | hs | hesiod | chaos ) ] {
    type master;
    file path_name;}
|
Of course, there are many more options that comprise the zone statement, but I've deliberately left them out as I don't want to complicate life too much right now.
Translating this syntax into a practical example:
zone "zoo.org.za" IN {
    type master;
    file "zoo.org.za.zone";};
|
|
Important |
|---|---|
|
Remember to finish each directive and parameter with a semi-colon (;). If you don't you'll experience problems that are often difficult to detect. |
|
The rest of the zones are similar in fashion to the one show above, but I'll include them here to illustrate the reverse mapping named.conf entries.
zone "10.168.192.in-addr.arpa" IN {
    type master;
    file "192.168.10.zone"; };
|
Now you will need to add the extra zone entries for the other networks on your pretend network. Remember to include entries for the loopback zone and the root zone as I have included them below.
Zone "." IN {
    type master;
    file "named.root"; };

zone "localhost" IN {
    type master;
    file "named.local"; };

zone "0.0.127.in-addr.arpa" IN {
    type master;
    file "127.0.0.zone"; };
|
A point worth noting here is that the root zone, is represented as a full stop ( . ), since the real representation of "" would look a little confusing.
I would really suggest that you keep an eye on your syslog or messages file in /var/log, as this will spit out the errors when or if they occur.
You can even run bind in the foreground so that errors are sent to the console instead of to a log file.
/usr/sbin/named -g -d 1 -c /etc/bind/named.conf
|
This will start named in the foreground, spitting all error/log messages to the console.
Okay folks. we're ready to start our DNS server now and starting named is quite simple.
/usr/sbin/named -g -d 1 -c /etc/bind/named.conf
|
This will start named in the foreground, spitting all error/log messages to the console.
Now our server is read to answer queries about our domain, so let's ask some using dig.
dig @my-DNS-server-IP-Address ikki.zoo.org.za A

dig @my-DNS-server-IP-Address nemo.zoo.org.za A

dig @my-DNS-server-IP-Address -x 157.236.144.81

dig @my-DNS-server-IP-Address panther.zoo.org.za
|
Your DNS should be capable of resolving these without any problems.
Humph. It did not work, so where to from now?
There are a number of BIND tools that you can use, some of which I'll review later.
However, right now you have a problem. Your DNS is not starting up or, if it is, it's not answering the questions properly. BIND comes bundled with a couple of useful utilities.
Most notably the named-check{zone,conf} syntax checkers which, will by no means pick up every problem in your named.conf file or your zone files, but they will assist you in isolating the really obvious ones.
So, let's run named-checkconf on our /etc/bind/named.conf file:
/usr/sbin/named-checkconf -t /etc/bind
|
By default, this utility will check the named.conf file. It will spew out errors if you have any, otherwise it will be completely silent and just return you to your prompt.
Then we need to check our zone files using the named-checkzone utility.
/usr/sbin/named-checkzone  -d \
                    10.168.192.in-addr.arpa 192.168.10.zone
|
which, should return:
loading "10.168.192.in-addr.arpa." \
                    from "192.168.10.zone" class "IN"
zone 10.168.192.in-addr.arpa/IN: loaded serial 2004022301
OK
|
If there are problems in your zone files, this should catch the majority of them.
You will have noticed that each time we do a lookup on a name we need to type the entire name.
Now we don't necessarily want to do this each time, as it expends valuable carpel energy!!!! For a simpler lookup, we can modify our /etc/resolv.conf file to accommodate the domain. The domain option in the resolv.conf file is not absolutely necessary, since the nslookup and the dig commands will use the hostname, remove the domain part and use this to look up the FQDN.
Thus:
nslookup ikki
|
would look up:
ikki.zoo.org.za
|
When using dig, the syntax is slightly different:
dig +search ikki
|
The search option will use the searchlist or the domain directive in the resolv.conf file, in a similar way to nslookup.
How do we get this functionality?
The resolv.conf file has a number of directives that may be used to speed up or change the way lookup answers are returned.
This directive defines the name server that will be used to do DNS queries. There can be up to MAXNS records in this file.
![[Note]](../images/admon/note.png) |
Note |
|---|---|
|
MAXNS is a constant that is set in the C header include file for the resolver. To see how many MAXNS is on your host, look in the resolv.h header file. This file resides in /usr/include on my system, but your mileage may vary depending on your version of Linux. MAXNS is set to 3 for me. |
|
The reason for having more than a single entry is for some degree of redundancy/load sharing.
In addition, an option "rotate" may be used which will rotate the use of the nameserver directive should there be more than one entry.
This directive allows the resolver to search through the list of defined domains in order to do a name lookup. An entry may look as follows:
search zoo.org.za co.za com
|
Thus:
dig +search ikki
|
will try name lookups as follows:
ikki.zoo.org.za
ikki.co.za
ikki.com
|
The first to match will be returned. Note though, that this can be slow and network resource hungry, especially if the name server is remote to your client. So, if you are dialing up at 9600 baud, don't set this option [believe it or not, we here in South Africa, still have some people dialing up at this archaic speed!]
The domain directive and the search directive are mutually exclusive. The domain directive will be used by appending it to the hostname specified on the command line.
Typing:
dig +search ikki
|
with the domain directive set to QEDux.co.za, will always look up the name:
ikki.QEDux.co.za
|
This is less resource intensive than the search command and you are ill advised to use both of these directives in your file. Read resolv.conf(5) for details on these directives.
In the case of our DNS records, ikki.zoo.org.za has 3 different entries in the DNS, since it is multihomed. Which one should be returned?
Suppose for a minute that I am on the 157.236.144 network. Clearly, I don't want the 192.168.10 ikki address to be returned at the top of the list when doing a query.
Similarly, I would be unwise to have the 172.16.43 address returned at the top of the returned addresses. For this reason, the sortlist directive will sort returned answers according to a specified set of criteria.
My sortlist directive is set as follows:
sortlist 157.236.144/255.255.255.0 172.16.43/255.255.255.0
|
This should solve the problem. Since each of these directives can be set on a per host basis, they needn't be the same on every host.
In sum then, my resolv.conf file will look as follows:
; just to complicate matters, there is NO full stop on the end
; of the domain directive. Semicolons on this file are taken to
;  be comments.
    domain zoo.org.za
    sortlist 157.236.144/255.255.255.0 172.16.43/255.255.255.0
    nameserver 192.168.10.43
    nameserver 196.7.138.45
    nameserver 66.8.48.243
    options rotate
|
Now that we've configured and run our master server successfully, it's time to create some shortcuts.
The zone directive in the named.conf file specifies the domain for this zone. In our examples, we had zone statements as follows:
zone "zoo.org.za" IN {
        type master;
        file "zoo.org.za.zone";
};
or
zone "144.236.157.in-addr.arpa" IN {
        type master;
        file "157.236.144.zone";
};
|
Within our zone files, we had entries as follows:
baloo.zoo.org.za.	IN	A	192.168.10.144
bagheera.zoo.org.za.	IN	A	192.168.10.7
sherekahn.zoo.org.za.	IN	A	192.168.10.16
|
Earlier, we stressed the importance of not leaving off the full stop on the end of the FQDN in the zone files. Now we can explain why.
When BIND uses these files to answer a DNS query, it appends the domain name onto the end of the name returned if and only if, there is NO full stop on the end of the name.
Thus, setting up the zone file as follows:
baloo.zoo.org.za	IN	A	192.168.10.144
bagheera.zoo.org.za	IN	A	192.168.10.7
sherekahn.zoo.org.za	IN	A	192.168.10.16
|
A query for sherekahn.zoo.org.za will return sherekahn.zoo.org.za.zoo.org.za, since the trailing full stop has been omitted. Not quite what we had in mind!
Now, we can modify our zone files as follows (for the zone zoo.org.za):
baloo		IN	A	192.168.10.144
bagheera	IN	A	192.168.10.7
sherekahn	IN	A	192.168.10.16
bear		IN	CNAME	baloo
panther	IN	CNAME	bagheera
|
or our reverse zone files as follows (for the zone 144.236.157.in-addr.arpa):
112	IN	PTR	nemo.zoo.org.za.
92	IN	PTR	dude.zoo.org.za.
81	IN	PTR	marlin.zoo.org.za.
|
Since the domain is specified in the zone directive of the named.conf file, we are able to omit the full specification. Note here that if we wish to specify resource records in this format, we will need to omit the domain as well as the ending full stop.
The most useful of the directives is the $ORIGIN directive.
This directive can be placed at the beginning of a section in the zone files, which shortens both the amount of typing you need to do to set up the DNS and makes it a lot easier to read.
The $ORIGIN persists until another $ORIGIN directive is encountered.
By default, in the absence of a $ORIGIN directive, the zone directive in the named.conf file specifies the domain name.
An example shown below illustrates the use of $ORIGIN:
$ORIGIN	zoo.org.za.
Bagheera	A	192.168.10.7
baloo		A	192.168.10.1
bear		CNAME	baloo
or
$ORIGIN	43.16.172.in-addr.arpa.
10		PTR	ikki.zoo.org.za.
146		PTR	raksha.zoo.org.za.
|
This could be used when we create sub-domains.
Initially, we could start with a domain zoo.org.za, and within this zone file, change the ORIGIN to felines.zoo.org.za
Another shortcut is using the @ instead of the domain name.
If the domain name is the same as that specified in the zone directive, then simply using the @ will be equivalent to the domain.
If the zone is "43.16.172.in-addr.arpa", then we could represent this in the zone file as:
@    IN    SOA    baloo.jungle.org.za. mowgli.jungle.org.za.\
                    (
		2004022406	; serial
		10800		; refresh (3 hours)
		3600		; retry (1 hour)
		604800	; expire (1 week)
		3600		; minimum (1 hour)
		)
		NS		ikki.zoo.org.za.
		NS		baloo.zoo.org.za.
|
where the @ is used to refer to the zone.
Notice too that for the NS resource records, there is no domain specified. This is because the domain is inherited from the previous entry (which in this case was the @, which in turn was "43.16.172.in-addr.arpa").
The NS resource records could have been written as:
43.16.172.in-addr.arpa	NS	ikki.zoo.org.za.
43.16.172.in-addr.arpa	NS	baloo.zoo.org.za.
|
Or alternatively as:
@			NS	ikki.zoo.org.za.
@			NS	baloo.zoo.org.za.
|
The time to live is the amount of time a name server can cache a record. Cached for too long and the data may become stale. Cached for too short a time and the zone transfers will consume network bandwidth. Clearly we need to set an optimum time for an entry to remain in the cache. Remember too that both positive and negative replies will be cached, but both need a time to live.
There are a couple of places to set the time to live. In the SOA resource record, the last entry specifies the TTL. This is the time to keep NEGATIVE responses to a query.
Then there's the $TTL variable, which can be set at the top of the zone file.
$TTL 3h
|
would allow records (both positive and negative answers) on the slaves to be cached for a maximum of 3 hours.
Finally, each resource record entry can contain a time to live. This will for only that entry to the timed out sooner or later. One of the uses of this is when you know a host will be changing networks. Thus, 3 hours may be a little long before updating the slave servers.
One could easily add an entry as follows:
dude  1h IN  A    157.236.144.92
; explicit make the TTL of this RR 1 hour
|
[3] My domain for example is QEDux.co.za. I always write the QED in uppercase, and it is preserved in name lookups.
|
|
 |
|
| Masters and slaves |  |
Configuring the Slave Name Server |