(to the power of -1)
Copyright © 2004 The Shuttleworth Foundation
Unless otherwise expressly stated, all original material of whatever nature created by the contributors of the Learn Linux community, is licensed under the Creative Commons license Attribution-ShareAlike 2.0.
What follows is a copy of the "human-readable summary" of this document. The Legal Code (full license) may be read here.
You are free:
to copy, distribute, display, and perform the work
to make derivative works
to make commercial use of the work
Under the following conditions:
 Attribution. You must give the original author credit.
 Share Alike. If you alter, transform, or build upon this
work, you may distribute the resulting work only under a license identical to this one.
Share Alike. If you alter, transform, or build upon this
work, you may distribute the resulting work only under a license identical to this one.
For any reuse or distribution, you must make clear to others the license terms of this work.
Any of these conditions can be waived if you get permission from the copyright holder.
Your fair use and other rights are in no way affected by the above.
This is a human-readable summary of the Legal Code (the full license).
2005-01-25 22:20:35
| Revision History | |
|---|---|
| Revision 0.0.1 | 01/NOV/2004 |
| Initial version | |
Table of Contents
- 1. Introduction and History
- 2. Booting
- 3. Logging in
- 4. The Kernel versus Process Management
- 5. Memory Management
- 6. Drivers
- 7. System Tuning
- 8. Tips and Tricks
- A. Referances
- Index
List of Figures
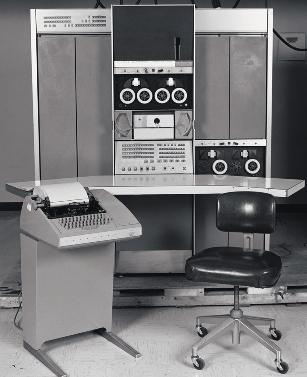
- 1.1. PDP 7 with teletypewriter
- 1.2. Relationship between hardware, assembler and a compiler
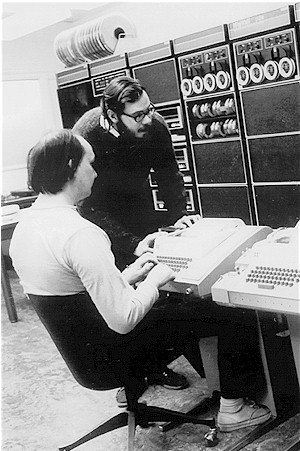
- 1.3. Dennis Richie and Ken Thompson working on a PDP-11.
- 1.4. Professor Andy Tannebaum
- 1.5. Linus Torvald
- 1.6. Tux, the Linux mascot
- 1.7. The BSD mascot
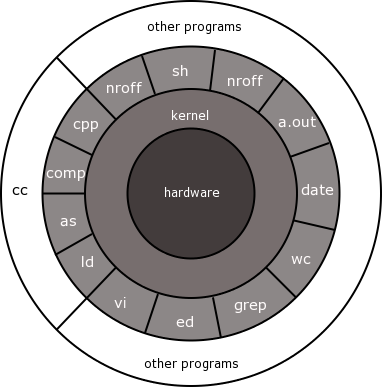
- 1.8. Operating System Layers
- 1.9. Bootloader in memory
- 1.10. Kernel loaded into memory
- 1.11. Kernel memory and User Memory
- 1.12. Kernel Memory, table and buffer cache allocations
- 4.1. The Layers of the Operating System
- 4.2. Separate fields are interpreted by the shell
- 4.3. Process Life Cycle
- 4.4. The Scheduler
- 4.5. Round-Robin Scheduling
- 4.6. Sleep Queue and Run Queue
- 4.7. Multitasking flow
- 4.8. Time-slicing
- 5.1. Kernel Memory, table and buffer cache allocations
- 6.1. Kernel Binary
- 6.2. Loadable modules
- 6.3. Block and Character Device Drivers
- 7.1. Let us look again at the sleep queue
- 8.1. Hard disk partitions
- 8.2. Generic Unix Filesystem Support
- 8.3. Inode List
- 8.4. Free Blocks Bitmap (Extension to Inode List Figure)
- 8.5. Block Groups
- 8.6. Filesystems
- 8.7. Mounting filesystems
- 8.8. /dev/hda3 - Where are you working now?
- 8.9. /dev/hda4 - Where are you working now?
- 8.10. Filesystem Structure
- 8.11. Datablock addressing in the inode
- 8.12. The Virtual Filesystem
List of Tables
Table of Contents
This part of the course is intended to bridge the gap between the courses that you have attended and the more advanced/internals-based knowledge required for the true understanding of the advanced topics and supporting a UNIX or Linux system.
Please take note that this is a course of technical concepts written in simple terms to assist with the understanding of how the internals of the operating system hangs together - it is intended to assist with the administration of the operating system itself and the theory can be applied to both the UNIX and the Linux operating systems.
There are many good books written about the in-depth internal functions of Unix and of Linux, I do not want to re-invent that particular wheel, what I would wish to achieve is an advanced course that shows the internal workings of the system in an approachable fashion so that anyone can use this course to learn.
Throughout the course there are sections that were compiled in conjunction with Sebastian Spitzner.
After training Unix and Linux for many years he feels that this method of lecturing is the most approachable way of explaining the lower level information without becoming too entrenched in the "nitty-gritty" details, like knowing the hex addresses in memory where the kernel keeps its various data structures, which is of little practical use.
Take some serious time to read through and understand the history lecture, it has been structured to give you a fuller understanding of the roots of the Unix and Linux operating systems.
Unix has managed to influence every operating system available today.
It seems that most of the people who want to work in, or who actually work in Linux do not know the history of the operating system and as you will see, it will give you a greater understanding of the software.
In short, Linux is an operating system based on UNIX (Developed by AT&T's Bell Labs division), which is based on MULTICS.
The following timeline will explain the main events that have affected the UNIX family of operating systems, of which Linux is one.
We pick up our history in the 1950s, when the first important event that affected UNIX took place.
![[Note]](../images/admon/note.png) | Note |
|---|---|
TTYs and Line-oriented Text Display which was the general input and output devices of the PDP 7 | |
The term "tty" stands for "teletypewriter", which was an early form of terminal.
Teletypewriters, such as the one shown in the picture of the PDP-7 REF, were merely automatic typewriters producing hard-copy line-based output on continuous paper.
In these early days of computing, this kind of terminal output did not allow screen or cursor-based programs to function.
Hence the first text editors were "line-oriented", such as "ed" and later "ex". "Vi" was developed later, based on "ex", and was screen-oriented. It used the redrawable ability of cathode ray tube (CRT) displays to show text one screen at a time.
The US government passed a decree imposing a restraint of trade against AT&T. The company was not permitted to make money from non-telecommunications business.
This is significant, because until 1982 (when the US Government finally broke up the AT&T telecommunications monopoly into smaller companies), AT&T could not sell operating systems, i.e. UNIX, for profit.
This had a great impact on the distribution of Unix as you will see throughout the rest of the History section, as AT&T chose to use the product internally first, and then distributed it to computer research institutions such as Universities.
The Multiplexed Time Sharing and Computing System or MULTICS project was a joint attempt by General Electric (GE), AT&T Bell Labs and the Massachusetts Institute of Technology (MIT) at developing a stable multiuser operating system
The aim is to create an operating system that could support a lot of simultaneous users (thousands!).
Multics stands for Multiplexed Information and Computer service.
The people involved in the project at this time are Ken Thompson, Dennis Ritchie, Joseph Ossanna, Stuart Feldman, Doug McIIroy and Bob Morris.
Although a very simple version of MULTICS could now run on a GE645 computer, it could only support 3 people and therefore the original goals of this operating system had not been met, the research and development is just so expensive and Bell Labs withdraws their sponsorship. This meant that the other interested parties could not afford to carry the project on their own and so they also withdrew.
Dennis Ritchie and Ken Thompson now decide to continue this project on their own.
Ken Thompson Dennis Ritchie wrote a Space Travel Game that was actually a serious scientific astronomical simulation program. However the game was a disaster as the spaceship was hard to maneuver and used a lot of resources to run.
After developing the Space Travel Program they had learnt a lot more. With Canaday involved as well they were able to create the design for a new file system, which they built on PDP-7, called UNICS (Uniplexed Information and Computing Service), and this later became UNIX.
A note to UNIX traditionalists: We use the spelling "Unix" rather than "UNIX" in this course only for the sake of readability.
They attempted using a Fortran program to further develop Unix, but they found that it was not what they were looking for and so they turned to BCPL (Basic Combined Programming Language).
B was developed from BCPL and it was the first high-level language to be used on Unix with a PDP11/20.
Lets draw a diagram of three different machines and then lets take a look at why developing in assembler is not always the best idea:
Remember that all a computer actually does is mathematics.
Am operating system is a "resource allocator" and a "controlling of operations" program.
When computers first started becoming popular we had to use punch cards or load the programs directly into memory manually.
Assembler is machine code and is specific to the machine type and hardware that you are working with. The instruction written for one machine cannot work for another machine at this low level.
A computer has registers and instruction sets, and the instructions are binary coded, the assembly program talks to the machine in assembler which is translated to binary code.
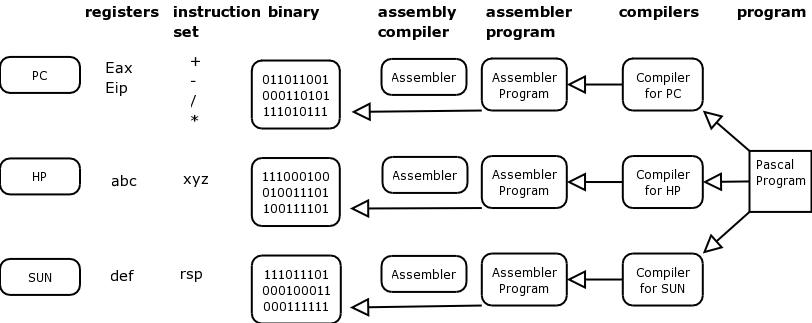
So, if writing a program for a PDP-7 and using assembler, when wanting to move the program to a PDP-11 you would have to rewrite the entire assembler program, this time to suit the machine and hardware type for a PDP-11.
To remedy this, developers invented compilers for application programming tools. In other words if using Pascal to develop, the Pascal compiler for a PDP-7 would translate your program into assembly program and then assembler code for a PDP-7.
If wanting to port that program to a PDP-11, then get the Pascal compiler for a PDP-11 and recompile the original program on the PDP-11. It will then work as above.
This explains why the higher-level languages started being used, such as Pascal, Fortran etcetera. They are there to provide libraries between program and assembler. A compiler would be needed for each specific machine.
These days a compiler automatically generates the assembler code.
So, the first Unix was written in the Assembler program of a PDP-7 machine, as we have now discussed though this is not going to make it easily portable to another type of architecture.
At this stage and because of the success of Unix Bell Labs now chooses to re-sponsor the project.
B is still considered too slow, so the team worked to develop Unix in a faster development program called New B or NB. They could now also afford to upgrade to a later model of the PDP range called a PDP11/45.
The C Programming language was developed in 1972 as a result of Ken Thompson and his team wanting to have a language to write Unix in. Although Ken Thompson worked with C initially eventually they needed more functionality which Dennis Ritchie then added.
It is also at this time that Unix "pipes" are also now developed, and this is seen as a milestone because of the power it added to the system [1]
Unix now had its own language and philosophy. Its power was generated by stringing programs together not by any one individual program.
A quote from "A quarter Century of Unix" by P Salus" states:
write programs that do one thing and do it well.
write programs that work together
write programs that handle text streams, because that is a universal interface.
More and more requests are coming in to AT&T to allow other companies and users to use the Unix system.
At this stage Unix is firmly entrenched at Universities and Colleges and AT&T refusing to supply bug-fixes and support on the system forced users to work together. (The start of Unix User Groups.)
Unix had been sold as a text processing system at AT&T internally and here the developers and users were the same community and therefore got direct feedback for new product and for bugs etcetera, Support was right there in same company, maybe even on the same office floor.
By using research organizations at Universities the bright varsity students got sucked up into this type of company after their studying, this was beneficial to research organizations and they continued to give the system to students.
Unix is still used these days used to teach students computer science.
The US patent office held the rights at this stage.
There are now 500 installations throughout the United States, mainly at Universities.
After 1974 military and commercial enterprises started demanding licenses to use Unix and AT&T decided to close the source and supply only binary distributions.
Berkley UCB did a lot of development on DARPA TCP/IP (bright brains for a good price), and the students also started adding on various other utilities, ultimately deciding to write Unix from scratch. (BSD Unix)
BSD3 utilities are available in System V Unix, when installing the operating system you should be asked if you would like to install the BSD Utilities, they will be installed into the /usr/ucb directory.
Unix, is able to be ported to an IBM 360, an Interdata 7/32 and an Interdata 8/32 proving that Unix is portable to systems other than those manufactured by DEC.
1978 "The C Programming Language" by Ritchie is published.
1978 Bill Joy creates "the "vi" editor a full screen editor, and at the same time he sees the need "to optimize the code for several different types of terminals, he decided to consolidate screen management by using an interpreter to redraw the screen. The interpreter was driven by the terminal's characteristics - termcap was born,". P Sulcas
All other Unixs' branch from these two variants of the Unix code, AT&T Unix and BSD Unix. (See timeline below).
The release of AT&T Version 7 was the start of many of the Unix ports, the 32 bit ports and a product called Xenix, (an SCO and Microsoft joint product, and the fist Unix port that could run on an 8086 chip).
By 1980, AT&T found that the operating system was a viable option for commercial development. Microprocessors were becoming very popular, and many other companies were allowed to license UNIX from AT&T. These companies ported UNIX to their machines. The simplicity and clarity of UNIX tempted many developers to enhance the product with their own improvements, which resulted in several varieties of UNIX.
From 1977 to 1982, Bell Labs combined features from the AT&T versions of UNIX into a single system called UNIX System 3.
Bell Labs then enhanced System 3 into System 4, a system that was only used internally at Bell Labs.
After further enhancements, System V was released and in 1983, AT&T officially announced their support for System V.
1982 Sun developed the Sparc processor, licensed BSD Unix called it SUN OS.
1983/4 Then licensed AT&T System V, made their changes and called that version Solaris. There is a lot of cross coding and an interesting note is that if though if doing the "uname" (uname is a command that supplies details of the current operating system for your interest) command on Solaris the report says SunOS is the operating system.
1985 - Some quotable quotes - "Xenix is the operating system future" and "640 KB memory is enough for anyone"
In 1989, AT&T organized that System V, SUNOS, XENIX, and Berkeley 4xBSD were combined into one product called System V Release 4.0. This new product was created to ensure that there was one version of UNIX that would work on any machine available at that time.
The different versions of UNIX prompted AT&T to form a UNIX International Consortium. The aim of this consortium was to improve the marketing of UNIX, since the market was starting to demand clarity on standardizing the product.
By 1992, UNIX was readily available on an Intel platform, providing mainframe-type processing power on a PC. This made UNIX appealing to the end-user market.
Table 1.1. Major vendors/ hardware and related operating systems.
| Vendor | Hardware | Operating System (Unix based) |
|---|---|---|
| HP | PARisc | HP-UX |
| IBM | RS6000 / Power PC | AIX |
| Digital / DEC / Compaq | Alpha | Digital Unix |
| NCR | DG-UX | |
| SCO | Intel PC Compatible | SCO Xenix, SCO Unix, SCO Open Server 5, UnixWare 7 |
Source code has changed hands a few times:
| year | Owner of Source code |
|---|---|
| 1969 | AT&T |
| 1993 | Novell |
| 1995 | SCO |
| 2001 | Caldera, which started trading under the name "The SCO Group" in 2002 |
| Note |
|---|---|
| |

1985 Professor Andy Tanenbaum wrote a Unix like operating system from scratch, based on System V standards POSIX and IEEE, called MINIX for i386 for Intel PC aimed at university computer science research students.
MINIX was also bundled with a popular computer science operating system study book by that author. Although the operating system was free the book was to be purchased.
A Finnish student called Linus Torvald first came into contact with Unix like systems through his use of this MINIX at the university of Helsinki Finland in Computer Science.
Linus Torvald wanted to upgrade MINIX and put in features and improvements, but Andrew Tanenbaum wanted Minix the way it was and so Linus decided write his own kernel.
He released Linux on the Internet as an Open Source product and under his own license and then later in 1991 under the GPL.
If you want to travel around the world and be invited to speak at a lot of different places, just write a Unix operating system. | ||
| -- | ||

The FSF (Free Software Foundation), started by Richard Stallman, as a development effort to promote the use of Free Software, Stallman recognized the need to write a free and open source Unix-like operating system so that people could have a Unix system under a non-propriety non-restrictive commercial license
The FSF started a project called GNU to fulfill this aim GNU stands for "GNU is not Unix" (a recursive acronym).
By 1991 GNU had already amassed a compiler (GCC- GNU C Compiler), a C library, both very critical components of an operating system, and all associated generic Unix base programs (ls, cat, chmod etcetera).
They were missing a kernel, which was going to be called the GNU HURD (HURD is not yet complete 2004 April).
The FSF naturally adopted the Linux kernel to complete the GNU system to produce what is known as the GNU/Linux operating system, which is the correct term for all distributions of Linux like Red Hat Linux and SuSE Linux.
1994 Linux 1.0 release

To download the Linux source code, available under the GNU Public license, from the official kernel site.
Remember that would be the kernel or core of the operating system that you would be downloading, if wanting additional functionality then most of that additional functionality that you may want to have will also be available under the GNU Public license.
When installing Linux, the source code is usually stored in /usr/src/linux.
You may find it easier to work with a distribution of Linux that has already put all the required functionality onto a CD-ROM. (Debian, Red Hat, SuSE, Mandrake to mention a few.)
As long as Linux conforms to the POSIX - IEEE Portable operating system standards, it will be compliant with most UNIX type (or other type of apps See Running Programs below) applications. Enabling you to compile and run your UNIX apps on a Linux machine.
Linux conforms to quite a few of the UNIX brands taking the best of breed from products such as SVR4 and Solaris 2.x and using some of the technology such as:
The ability to load and unload kernel modules.
It is possible to mount a file system on Linux, from UNIX instead of the file systems already supplied in Linux (ext2, and ext3), for example the journaling file system from AIX (IBM version of UNIX) or the IRIX file system called XFS (Silicon Graphics). This is hugely powerful, to be able to bring an alien file system to use on the Linux system.
When working in UNIX I always thought that one of its powerful features was that the operating system did not "care" what type of file you were working with. It was always up to how the application or how you accessed the file, but we could load any kind of file on the system and work with it (a DOS file, a DOS database file). We would do a massive amount of shuffling information around using the powerful tools that are available in UNIX itself, and then easily port the changed file back to the originating system.
We could mount any device as a file system and work with the data as required, an excellent way of being able to support our clients.
Well when rooting around for more in-depth knowledge of Linux I found out the following, and I am sure that there is probably more:
Mounting file systems - All versions of MS-DOS and MS-Windows, Solaris, SunOS, BSD and other versions of UNIX (SCO, SVR4 etcetera), OS/2, MAC etcetera (see /usr/src/linux/fs).
Running programs - Executing apps written for MS DOS and Windows, SVR4, other UNIX variants.
In parallel BSD has had its own continuing revolution, around 1990 Free BSD was created as the source code successor to the original BSD code before that it was known as 386BSD.
1994 Linux 1.0 release

Mid 90s FreeBSD bore two spin-offs (known as source code forks) [this happens when certain people decide to take OS development in different direction]. NetBSD and Open BSD all three derivatives are currently maintained today.
Net BSD is aimed at broad platform support and is widespread in the scientific community;
OpenBSD is most popular on PC and is used and focuses on security and is very popular as a firewall platform
There are commercial derivatives of BSD the most popular is BSDi
Standard C library
PAM library - authentication and session management
Curses
The only way that you can get a Unix system to do anything is through system calls, which are a part of the kernel.
This is the API to the kernel, the kernel has approximately 250 system calls that do different things and only binary programs can call these, including the libraries, which are just centralized repositories of binary code
Libraries fulfill two purposes:
They save duplication of the same code that would otherwise be contained duplicated inside many binaries individually; this saves disk space.
Very often library calls provide an abstraction interface to similar system calls to simplify programming tasks for a programmer.
An example for number 1 above:
The three binary programs ping, traceroute and telnet all support a command line argument that is a hostname of a computer on the Internet to connect to. However these programs must format packets sent to IP addresses not hostnames.
Somehow these programs must convert a hostname to an IP address and instead of all three containing the same code they all call the same library call in the standard C library called gethostbyname(). Where they supply the requested hostname that was read from the command line ion the parenthesis of the call.
The C library now does the hard work of issuing multiple system calls to connect to a DNS server on the Internet, send a namelookup query, interpret a response and return the resolved IP address to the calling program (ping, traceroute or telnet).
A Unix kernel fulfills 4 main management tasks:
Memory management
Process management
file system management
IO management
The kernel exists as a physical file on the file system in Linux it is /boot directory and is usually called vmlinux (uncompressed version), vmlinuz (compressed version), or similar filenames commonly with a kernel version number at the end.
For example;
/boot/vmlinuz-2.4.18-22
|
At system boot time RAM only contains the boot loader, consuming a few kilobytes at the beginning of memory.

The boot loader loads the kernel binary into memory from the hard disk, and places it at the beginning of memory.

Once the kernel has been read in the boot loader tells the CPU to execute it by issuing a JMP (Jump) instruction. The kernel now begins to execute
To better understand what the system is doing and how it is doing it is good to visualize what is happening where in memory, remembering that all work on the system is performed in memory (see the section called “Assembler/ compilers / hardware architecture ”).
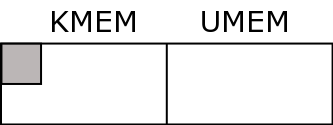
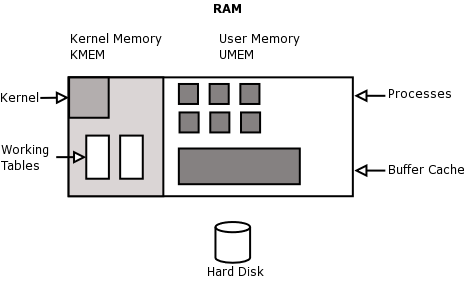
Memory is divided into two areas, kernel memory and user memory
Kernel memory is also known as kmem, kernel space and kernel land
This contains the kernel binary itself, working tables to keep track of status on the system and buffers.
The kernel binary is typically 3 meg big and the working tables consume another 3 meg (only an example; may vary)
Examples of working tables that the kernel keeps in kernel memory for the operation of the system are the Global Open File Table, the Process Table and the Mount Table.
Traditionally once the size of kernel memory has been set on bootup (as determined by the finite set sizes of all the tables) it cannot be resized (System V). Linux has a clever way of overcoming this limitation by allowing kernel tables to grow into user memory as required!
User memory is also known as umem, user space and user land.
This is for the use of user programs.
Memory management is dealt with in more detail in Chapter 5.
[1] C is the most popular programming language developed and the most portable. All the major operating systems have been written in C. i.e. Netware, Ms Windows, (5% still written in assembler to do with drivers). MS Windows is also now been written in C++)
Table of Contents
The kernel un-compresses
The kernel claims a certain amount of memory for its working tables and buffers (kernel memory).
All the driver that are built into the kernel initialize by detecting their respective hardware
The kernel mounts the root file system The kernel mounts the root directory of the root file system to the kernels' idea of a system (superstructure) root directory.
The kernel executes /sbin/init
The kernel now waits for asynchronous events to occur; i.e. It is now ready to serve the system by servicing requests from processes and hardware.
Everything that happens subsequently on the system has to either be requested by a binary through a system call to the kernel, or an asynchronous event triggered by hardware
Let's look at the process of booting up the machine from the time that it is switched on.
The BIOS does a Hardware Check and then proceeds to read the boot information on floppy, hard disk or CD-ROM as defined.
There are two popular boot loaders available, the first is LILO (Linux Loader) and the second is GRUB (Grand Unified Boot loader).
They are both two-stage boot loaders and will generally be installed on the small part of the hard disk that used to be called the masterboot record (MBR) in the old days.
Once the boot information is found (if found on floppy the process for loading the second boot and the kernel is slightly different) the first part of the boot loader is loaded into RAM and then it jumps into that part of RAM and proceeds' to execute the code and loads the second part of the boot loader.
A map of available operating systems is read from the disk and it is at this time that the user is presented with an opportunity to choose the operating system to use, if there is no response from the user, the boot loader will start the default operating system.
Assuming that LILO is the boot loader program that we have installed in this case, it displays Loading Linux on the screen, copies the kernel image and set-up code into memory and then starts to perform the set-up code.
Once Linux is initialized, the BIOS is no longer important to most of the rest of the boot process as Linux initializes the hardware in its own manner.
The set-up functions as an initializer of hardware and also sets up the environment so that the kernel program can execute, this includes:
Amount of RAM in the system (this it seems to get from the BIOS)
Keyboard rate and delay
Disk controller and disk parameters
Checks for a video adapter card, IBM Micro channel bus and bus mouse.
Checks that the kernel image is loaded correctly
Interrupt Descriptor Table and Global Descriptor table (Provisionally at this stage)
FPU reset (If applicable)
Maps hardware interrupts from 32 to 47 to allow for CPU exceptions
Goes to protected mode
Calls startup_32() function and then terminates
In a nutshell, this table has to store each interrupt (and exception) vector and its interrupt or exception handler. This has to happen prior to the kernel being able to enable interrupts.
80x86 processors require the use of segmentation, Linux prefers to use paging when not required to use segmentation by the architecture of the machine.
Segment Descriptors are held in one of two tables, either the GDT (defined once off) or a Local Descriptor Table (could be defined per process).
This type of exception will occur when the CPU detects an unsolvable condition when attempting to execute a command or an instruction.
| Number | Exception /Handler | Signal |
|---|---|---|
| 0 | Divide Error /divide_error() | SIGFPE |
| 1 | Debug / debug() | SIGTRAP |
| 2 | NMI / nmi() | None |
| 3 | Breakpoint / int3() | SIGTRAP |
| 19 | ... | see the section called “SIGNALS” |
Not all of the types of CPU exceptions can be fixed and the CPU will attempt to create a core dump to report the line of code where the instruction failed.
The PIC (Programmable Interrupt Controller) holds the IRQ lines or hardware interrupts from 0 to 15, which the BIOS uses. The interrupts are then mapped from 32 to 47 by the kernel because the CPU uses the other interrupts to use for exceptions. (From 0 to 19)
Although the first startup_32 function is responsible mainly for decompressing the kernel image it also sets up the segmentation registers with initial values and a provisional stack.
At this time "Uncompressing Linux" is shown on the screen Then once the decompression is complete "OK, booting the kernel" displays
The final position of the kernel in memory is then established at 0x00100000, and it is now that the second startup_32 function begins its job, which will include inter-alia:
Segmentation registers get their final values
Sets up the Kernel Mode stack for init - "init" is the father of all process and is also referred to as Process 0, or the swapper.
initializes the Page Tables
Sets bss segment of the kernel to zeros
Fills first reserved page frame with information from BIOS and operating system
Identifies the model of the CPU
(See Memory Addressing - Intel Microprocessors) There are only 6 segmentation registers, a program can re-use a register for different reasons, and in between save the context of the other reason(s) in memory restoring it to the register as needed. Three registers are reserved for, program code, program stack segment and the data segment.
Page tables are stored in memory and are there to match or to map the linear addresses to physical addresses. Prior to starting the paging unit, the kernel has to initialize the paging tables. The paging unit with an Intel processor handles 4 KB pages at a time. A page table is only used for the current virtual memory used by a process (regions).
In UNIX programming, the linear address space is usually partitioned into segments. So the bss segment is used for uninitialized variables. In other words, variables that are not set prior to the program executing, but rather set and unset during the execution of the process as it needs the variable(s). (Could also ref. Text, initialized Data, stack segments for your interest)
Startup_32() then calls the Start_kernel() function.
This section will give you ideas of where to find out information, some of the functions and tables we will cover throughout the course, but some you may have to look around more for yourself if you need the information.
The following are initialized by start_kernel():
Page Tables by paging_init()
Page Descriptors by free_area_init(), kmem_init() and mem_init()
Exception Handlers and Interrupt Vector data structures by trap_init() and IRQ_init()
Caches by kmem_cache_init() and kmem_cache_sizes_init()
System date and clock time_init()
Process 1 called by kernel_thread()
Process 1 executes /sbin/init program (see Logging in)
Many messages are displayed during this process, you would have seen that when doing your installation of the operating system in chapter two of the system administrators course.
When the system stops booting you will see the ever-familiar login prompt on your screen (unless you have started X Windows, in which case the screen will be presented in a graphical display).
Page Descriptors are generally controlled by a page hash table (index of sorts). Used when process calls long file, when lots of page descriptors are loaded into memory hard to find a specific set of data, therefore a page hash table acts as a preliminary index so that only relevant pages of the file are loaded into memory and memory not swamped with irrelevant detail.
(Ref. Slab, slab allocators, general and specific caches) kmem_cache_init() and kmem_cache_sizes_init() are used during system initialization to create the general caches. Specific caches are created by kmem_cache_creat(). Fundamentally slab allocators allow caches to be created because of the same frames of programs being run again and again and rather than reallocating memory each time for the same purpose, the kernel uses a slab allocator (memory algorithm) to store the memory areas in a cache. (most frequently used etcetera is allocated into the algorithm)
(ref. /proc/sys/kernel/threads-max)
An example of a kernel thread is init or process 0. It is a system process that only ever runs in Kernel mode. Some other examples would be the buffer flusher, the swapper, network connection services (keventd, kapm, kswapd, kflushd (bdflush), kupdated, ksoftirqd). These execute single C functions as apposed to a regular process that will use User and Kernel mode and the kernel has to call any C functions used. (See system calls and traps).
The Operating System called Linux consists of multiple programs, the most important one is called "the kernel" or the core of the operating system. The operating system controls the access of the hardware and the relationships with the apps and the users.
Although some operating systems speak directly to the hardware such as DOS, the UNIX and Linux operating systems deal with the hardware through the kernel and a device driver file (discussed previously).
To control the accesses of hardware and other functionality the operating system chooses to operate in either a user-mode or the kernel-mode. We will discuss further implications of this in the section on processes.
It is said that the Linux operating system is multi-user and multi-processing, and yes a lot of users can access the system apparently all at the same time. However with just one CPU only one process can ever run at a time.
It appears multitasking because it has a method of keeping each process separate, and calculating a fair share of processing time for each process, a system whereby it is possible to monitor the use of resources at all times and to keep usage at an optimum level.
We will cover the process in much more detail after the bootup section of the course, however for our purposes at this time we need to look at a definition that can stand the test of the boot sequence.
A process can be one of two things, either the instance that a program is executed in memory OR the part (context) of the program that is currently executing in memory.
In order to maintain a smooth flow of processor / process time there is a system process available called the scheduler or "sched".
Another process that commences during the bootup sequence is the initializer or "init", as discussed previously, Process 0 the father of all other processes.
Table of Contents
This section is covered in the system administration course, however we are attempting to ensure that you have the inner working details as well as the administration details.
Can you see when you read the man pages that the commands, file structures etcetera are divided into categories that are represented by numbers, for example - shutdown(8).
The following is a list of these categories:
1   Executable programs or shell commands
2   System calls (functions provided by the kernel)
3   Library calls (functions within program libraries)
4   Special files (usually found in /dev)
5   File formats and conventions e.g. /etc/passwd
6   Games
7   Miscellaneous (including macro  packages  and  conventions), \
                e.g. man(7), groff(7)
8   System administration commands (usually only for root)
9   Kernel routines [Non standard]
|
This was taken from the man page on "man"
Although you may think that the init program must be very complicated, actually all it does is call the inittab file and follow the instructions therein.
The following descriptions are extracts from the man pages for "init":
Init is the parent of all processes. Its primary role is to create processes from a script stored in the file /etc/inittab. This file usually has entries which cause init to spawn gettys on each line that users can log in. It also controls autonomous processes required by any particular system.
A runlevel is a software configuration of the system which allows only a selected group of processes to exist. The processes spawned by init for each of these runlevels are defined in the /etc/inittab file. Init can be in one of eight runlevels: 0-6 and S or s. The runlevel is changed by having a privileged user run telinit, which sends appropriate signals to init, telling it which runlevel to change to.
Runlevels 0, 1, and 6 are reserved. Runlevel 0 is used to halt the system, runlevel 6 is used to reboot the system, and runlevel 1 is used to get the system down into single user mode. Runlevel S is not really meant to be used directly, but more for the scripts that are executed when entering runlevel 1. For more information on this, see the manpages for shutdown(8) and inittab(5).
Runlevels 7-9 are also valid, though not really documented. This is because "traditional" Unix variants don't use them. In case you're curious, runlevels S and s are in fact the same. Internally they are aliases for the same runlevel.
After init is invoked as the last step of the kernel boot sequence, it looks for the file /etc/inittab to see if there is an entry of the type initdefault (see inittab(5)). The initdefault entry determines the initial runlevel of the system. If there is no such entry (or no /etc/inittab at all), a runlevel must be entered at the system console.
Runlevel S or s bring the system to single user mode and do not require an /etc/inittab file. In single user mode, a root shell is opened on /dev/console. ONLY When entering single user mode, init reads the console's ioctl(2) states from /etc/ioctl.save. If this file does not exist, init initializes the line at 9600 baud and with CLOCAL settings.
When init leaves single user mode, it stores the console's ioctl settings in this file so it can re-use them for the next single-user session.
When entering a multi-user mode for the first time, init performs the boot and bootwait entries to allow file systems to be mounted before users can log in. Then all entries matching the runlevel are processed.
After it has spawned all of the processes specified in /etc/inittab, init waits for one of its descendant processes to die, a powerfail signal, or until it is signaled by telinit to change the system's runlevel.
When one of the above three conditions occurs, it re-examines the /etc/inittab file.
New entries can be added to this file at any time. However, init still waits for one of the above three conditions to occur. To provide for an instantaneous response, the telinit Q or q command can wake up init to re-examine the /etc/inittab file.
When init is requested to change the runlevel, it sends the warning signal SIGTERM to all processes that are undefined in the new runlevel. It then waits 5 seconds before forcibly terminating these processes via the SIGKILL signal.
Note that init assumes that all these processes (and their descendants) remain in the same process group which init originally created for them. If any process changes its process group affiliation it will not receive these signals. Such processes need to be terminated separately.
/sbin/telinit is linked to /sbin/init. It takes a one-character argument and signals init to perform the appropriate action. The following arguments serve as directives to telinit:
0,1,2,3,4,5 or 6 -- tell init to switch to the specified run level.
a,b,c -- tell init to process only those /etc/inittab file entries having runlevel a,b or c.
Q or q -- tell init to re-examine the /etc/inittab file.
S or s -- tell init to switch to single user mode.
U or u -- tell init to re-execute itself (preserving the state). No re-examining of /etc/inittab file happens. Run level should be one of Ss12345, otherwise request would be silently ignored.
It is possible to pass a number of flags to init from the boot monitor (e.g. LILO).
Init accepts the following flags:
Single user mode boot. In this mode /etc/inittab is examined and the bootup rc scripts are usually run before the single user mode shell is started.
The LILO boot loader adds the word "auto" to the command line if it booted the kernel with the default command line (without user intervention). If this is found init sets the "AUTOBOOT" environment variable to "yes". Note that you cannot use this for any security measures - of course the user could specify "auto" or -a on the command line manually.
Init listens on a fifo in /dev, /dev/initctl, for messages. Telinit uses this to communicate with init. The interface is not very well documented or finished. Those interested should study the initreq.h file in the src/ subdirectory of the init source code tar archive.
Init reacts to several signals:
Init looks for /etc/initrunlvl and /var/log/initrunlvl. If one of these files exist and contain an ASCII runlevel, init switches to the new runlevel. This is for backwards compatibility only! . In the normal case (the files don't exist) init behaves like telinit q was executed.
On receipt of this signals, init closes and re-opens its control fifo, /dev/initctl. Useful for bootscripts when /dev is remounted.
Normally the kernel sends this signal to init when CTRL-ALT-DEL is pressed. It activates the ctrlaltdel action.
Examples of programs for specified run level taken from the /etc/inittab file:
Always running in runlevels 2, 3, 4, or 5 and displays login (from getty) on console (tty1)
1:2345:respawn:/sbin/getty 9600 tty1Always running in runlevels 2, 3, or 4 and displays login (getty) on console (tty2)
2:234:respawn:/sbin/getty 9600 tty2Run once when switching to runlevel 3 and uses scripts stored in /etc/rc3.d/
3:3:wait:/etc/init.d/rc 34.Shutdown the machine, with the relevant options when control-alt-delete is pressed
ca:12345:ctrlaltdel:/sbin/shutdown -t1 -a -r now
id:3:initdefault:
|
By default the system must boot to run-level 3.
Sysinit:
si::sysinit:/etc/init.d/rcS
|
The run-level specified here is single-user mode and once reached it calls the "sysinit", which runs all the scripts in /etc/init.d/rcS.
As defined in Debian as /etc/init.d/rcS which then runs all the /etc/rcS.d/S* scripts and then symlinks to /etc/init.d/* and /etc/rc.boot/* (depreciated)
| Start up file | Program | Comment |
|---|---|---|
| README | ||
| S05keymaps-lct.sh | /init.d/keymaps-lct.sh | |
| S10checkroot.sh | /init.d/checkroot.sh | |
| S20modutils | /init.d/modutils | |
| S30checkfs.sh | /init.d/checkfs.sh | |
| S35devpts.sh | /init.d/devpts.sh | |
| S35mountall.sh | /init.d/mountall.sh | |
| S35umsdos | /init.d/umsdos | |
| S40hostname.sh | /init.d/hostname.sh | |
| S40network | /init.d/network | |
| S41ipmasq | /init.d/ipmasq | |
| S45mountnfs.sh | /init.d/mountnfs.sh | |
| S48console-screen.sh | /init.d/console-screen.sh | |
| S50hwclock.sh | /init.d/hwclock.sh | |
| S55bootmisc.sh | /init.d/bootmisc.sh | |
| S55urandom | /init.d/urandom |
A typical /etc/rc3.d/ directory
3:3:wait:/etc/init.d/rc 3
|
| Script | Program called | Comment |
|---|---|---|
| K25nfs-server | /init.d/nfs-server | |
| K99xdm | /init.d/xdm | |
| S10sysklogd | /init.d/sysklogd | |
| S12kerneld | /init.d/kerneld | |
| S15netstd_init | /init.d/netstd_init | |
| S18netbase | /init.d/netbase | |
| S20acct | /init.d/acct | |
| S20anacron | /init.d/anacron | |
| S20gpm | /init.d/gpm | |
| S20postfix | /init.d/postfix | |
| S20ppp | /init.d/ppp | |
| S20ssh | /init.d/ssh | |
| S20xfs | /init.d/xfs | |
| S20xfstt | /init.d/xfstt | |
| S20xntp3 | /init.d/xntp3 | |
| S89atd | /init.d/atd | |
| S89cron | /init.d/cron | |
| S99rmnologin | /init.d/rmnologin |
When changing run levels to run level 3 or down from run level 3, use the scripts just once in the directory file /etc/init.d/rc 3. The scripts starting with an S* (Start) are used at bootup time and the scripts starting with a K* (Kill) are used at shutdown time.
Below are some of the files that would be in this directory /etc/rc3.d:
Each time a process terminates, init records the fact and the reason it died in /var/run/utmp and /var/log/wtmp, provided that these files exist. (See full desciption on Processes Chapter 6).
The file /etc/inittab contains the background programs that used to keep the system running. One of these programs is one getty process per serial port.
co:2345:respawn:/sbin/getty ttyS0 CON9600 vt102 respawn
|
Re-run the program if it dies. We want this to happen so that a new login prompt will appear when you log out of the console.
/sbin/getty ttyS0 CON9600 vt102
|
In this case, we're telling the program called getty to connect to /dev/ttyS0 using the settings for CON9600.
This is a line that exists in /etc/gettydefs. This entry represents a terminal running at 9600bps.
The terminal is a later-model VT102 (later than vt100).
The getty program lives in /sbin and is used by /etc/inittab to call the /etc/gettydefs file as follows:
Define co in gettydefs:
# Serial console 9600, 8, N, 1, CTS/RTS flow control
co# B9600 CS8 -PARENB -ISTRIP CRTSCTS HUPCL # B9600
SANE CS8 -PARENB -ISTRIP CRTSCTS HUPCL #@S @L login: #co
|
This means that the console is a serial console running at 9600 baud rate, 8 bits, No parity, 1 stop bit and carrier and receive flow control set up.
If the line does not manage to handshake then it refers to the end of line label of where to try next, in the case above it is looking at "co" again.
If you check the man pages you can find out all the labels that you can use in a gettydefs, definition.
As long as you define each label in the inittab correctly and then follow it up with a corresponding entry in the gettydefs file you can redefine any handshake between, terminals, consoles, printers and any other serial devices.
Each configuration line has the syntax:
<label>#<initial_flags>#<final_flags>#<login_prompt>#<next_label>
|
The <label> is referred to on the getty command line.
The <next_label> is the definition used if a RS-232 Break is sent. As the console is always 9600bps, this points back to the original label.
<initial_flags> are the serial line parameters used by getty.
<final_flags> are the serial line parameters set by getty before it calls login. You will usually want to set a 9600bps line, SANE terminal handling, eight data bits, no parity and to hang up the modem when the login session is finished.
The <login_prompt> for serial lines is traditionally the name of the machine, followed by the serial port, followed by login: and a space. The macro that inserts the name of the machine and the serial port may vary.
When using a modem, you will have top investigate and ultimately use the uugetty program. This program does file lock checking.
Modem entries in /etc/gettydefs
38400# B38400 CS8 # B38400 SANE -ISTRIP HUPCL #@S @L @B login: #19200
19200# B19200 CS8 # B19200 SANE -ISTRIP HUPCL #@S @L @B login: #9600
9600# B9600 CS8 # B9600 SANE -ISTRIP HUPCL #@S @L @B login: #2400
2400# B2400 CS8 # B2400 SANE -ISTRIP HUPCL #@S @L @B login: #1200
1200# B1200 CS8 # B1200 SANE -ISTRIP HUPCL #@S @L @B login: #300
300# B300 CS8 # B300 SANE -ISTRIP HUPCL #@S @L @B login: #38400
|
Add the following line to your /etc/inittab, so that uugetty is run on your serial port (use the information pertaining to your environment):
1:456:respawn:/sbin/uugetty ttyS1 F38400 vt100
|
The first lines in the preceding extract are typical for the system console. They set many initial and final flags that control how the console behaves.
console# B19200 OPOST ONLCR TAB3 BRKINT IGNPAR ISTRIP IXON IXANY
PARENB ECHO ECHOE ECHOK ICANON ISIG CS8 CREAD # B19200 OPOST ONLCR
TAB3 BRKINT IGNPAR ISTRIP IXON IXANY PARENB ECHO ECHOE ECHOK ICANON
ISIG CS8 CREAD #Console Login: #console
|
| Note |
|---|---|
This entry would be one line in the /etc/gettydefs file, but because of display and printing issues we have entered linebreaks. | |
You can use the term utility from within an X terminal window. X (or XFree86 with most versions of Linux) enables you to open a window specifically to run term.
Most of the X connection handling is with a utility called txconn. You must execute the txconn program on the remote machine (connected over a network, as X doesn't work with any reasonable degree of speed over a modem) and place it in the background as a daemon. When txconn goes to the background, it returns a message containing a display number that identifies the process:
Xconn bound to screen 11
|
When you connect to the remote txconn daemon from an X window, you use this number to identify the screen. You identify the screen by using the DISPLAY environment variable. If the binding were to screen 11, as shown in the preceding message, you would set the variable to
setenv DISPLAY remotename:11
|
Where remotename is the name of the remote machine (for the C shell). With the Bourne or Korn shell, you set the same environment variable with the following commands:
DISPLAY=remotename:11

export DISPLAY
|
When the term client is started in the local X window, it will connect to screen 11 on the remote machine. txconn knows about screen 11 on the remote so all X instructions will be transferred to the local machine's X window.
You can run the local machine with windows opening on the remote system's X session using txconn, but a better approach is to use the tredir command.
Running X sessions over a modem using txconn is possible, although the high amount of traffic X involves can bring even the fastest modem to a crawl. A local area network connection has enough speed to sustain X window traffic. A low-overhead version of X called LBX is available for some platforms that may help solve the overhead problem for modems. Also useful is a utility called sxpc, which compresses X protocol packets for transmission over modems. You can get sxpc with some versions of term, and it has worked well with 14.4kbps and higher speed modems, although performance is predictably slow.
Check gettydefs(5), stty(1), termio(3), agetty(8), mgetty(8), setserial(8) for further insight.
"Basic Concepts About Termcap and Terminfo quoted from www.die.net
The file /etc/termcap is a text file that lists the terminal capabilities. Several applications use the termcap information to move the cursor around the screen and do other screen-oriented tasks. tcsh, bash, vi and all the curses-based applications use the termcap database.
The database describes several terminal types. The TERM environment variable selects the right behaviour at run-time, by naming a termcap entry to be used by applications.
Within the database, each capability of the terminal appears as a two-letter code and a representation of the actual escape sequence used to get the desired effect. The separator character between different capabilities is the colon (":"). As an example, the audible bell, with code "bl", usually appears as "bl=^G". This sequence tells that the bell sound is obtained by printing the control-G character, the ASCII BEL.
In addition to the bl capability, the vb capability is recognized. It is used to represent the "visible bell". vb is usually missing in the linux entry of the termcap file.
Most modern applications and libraries use the terminfo database instead of termcap. This database uses one file per terminal-type and lives in /usr/lib/terminfo; to avoid using huge directories, the description of each terminal type is stored in a directory named after its first letter; the linux entry, therefore, is /usr/lib/terminfo/l/linux.
To build a terminfo entry you'll ``compile'' the termcap description; refer to the tic program and its manual page.
Terminfo (formerly Termcap) is a database of terminal capabilities and more.
For every (well almost) model of terminal it tells application programs what the terminal is capable of doing. It tells what escape sequences (or control characters) to send to the terminal in order to do things such as move the cursor to a new location, erase part of the screen, scroll the screen, change modes, change appearance (colours, brightness, blinking, underlining, reverse video etc.). After about 1980, many terminals supported over a hundred different commands (some of which take numeric parameters).
One way in which terminfo gives the its information to an application program is via the "ncurses" functions that a programmer may put into a C program. Some programs get info directly from a terminfo files without using ncurses.
Included in the terminfo are often a couple of initialisation strings, which may change the appearance of the screen, change what mode the terminal is in, and/or make the terminal emulate another terminal.
However this is not done automatically, one might expect that the getty program should do this but if it did, one could make a change to the set-up at the terminal and this change wouldn't be happen because the init string would automatically cancel it.
To force an intialisation you will use commands given on the command line (or in a shell script such as /etc/profile) to send the init strings - "tset", "tput init", or "setterm -initialise".
Sometimes there is no need to send the init strings since the terminal may set itself up correctly when it is powered on (using options/preferences one has set up and saved in the non-volatile memory of the terminal). Most dumb terminals have an entire setup sequence sort of like the CMOS of a PC, and it is here that you can set the hardware side of the handshake.
For the Debian Distribution of Linux, several commonly used terminals (including the monitor-console) are in the ncurses-term package. These are put into /etc/terminfo/. All of the terminals in the database are in the ncurses-bin package and go into /usr/share/terminfo/.
See the man pages: terminfo(5) or termcap(5) for the format required to create (or modify) the source files.
The data in the source files is compiled with the "tic" program (Also capable of converting between termcap source format and terminfo format).
The installation program which was used to install Linux probably installed the compiled files on your hard disk so you don't need to compile anything unless you modify /etc/termcap (or terminfo.src ).
"tic" will automatically install the resulting compiled files into a terminfo directory ready to be used by application programs.
In order to save disk space, one may delete all of the terminfo database except for the terminals types that you have (or might need in the future). Don't delete any of the termcaps for a "Linux terminal" (the console) or the xterm ones if you use X Window. The terminal type "dumb" may be needed when an application program can't figure out what type of terminal you are using. It would save disk space if install programs only installed the terminfo for the terminals that you have and if you could get a termcap for a newly installed terminal over the Internet in a few seconds.
We have discussed the environment variables prior to this course. The Environment variable TERM should be set to the name of terminal you are using.
This name must be in the Terminfo data base.
Type "set" at the command line to see what TERM is set to (or type: tset -q).
At a console (monitor) TERM is set to "linux" which is the PC monitor emulating a fictitious terminal model named "linux". Since "linux" is close to a vt100 terminal and many text terminals are also, the "linux" designation will sometimes work as a temporary expedient with a text terminal.
If more than one type of terminal may be connected to the same port (/dev/tty...) then TERM needs to be set each time someone connects to the serial port. There is often a query escape sequence so that the computer may ask the terminal what type it is. Another way is to ask the user to type in (or select) the type of terminal s/he is using.
You may need to use tset for this or write a short shell script to handle this.
The .profile login script is executed and contains within it the following statement: eval `tset -s ?vt100`. The user is then asked if they are using a vt100 and either responds yes or types in the actual terminal type they are using. Then tset sends the init string and sets TERM to this terminal name (type).
| Note |
|---|---|
Terminal emulation and the gettydefs file layout always remind me how flexible a Unix derived system actually is. You can change anything you want or need to change to make things work and these sections are a good portrayal of that fact. | |
There are warnings as well, no system this powerful can be changed with no thought as to how the change may affect other sections of the operating system, as you can see they are linked and intricately so.
There are 6 virtual terminals in Linux, available by using Alt-F1 through Alt-F6.
There are normally 6 terminals available in X also, F7 through F12. If an X session is started from F1 and you also have an active session on F2, you can type Ctrl-Alt-F2 to go from the X session to the virtual console on F2. Also to get back to your X session, you can type Ctrl-Alt-F7.
The above paragraph assumes that your terminals are set up in the standard manner with 6 virtual terminals available, all that spawn the getty program.
Check the /etc/inittab file for the following lines:
1:2345:respawn:/sbin/mingetty tty1
2:2345:respawn:/sbin/mingetty tty2
3:2345:respawn:/sbin/mingetty tty3
4:2345:respawn:/sbin/mingetty tty4
5:2345:respawn:/sbin/mingetty tty5
6:2345:respawn:/sbin/mingetty tty6
|
| Note |
|---|---|
mingetty and fbgetty are used most often on the consoles for Linux (as long as you are not using a real text terminal). (See fbgetty). | |
Each virtual terminal uses approx 8KB of kernel memory. As per performance tuning examples allocate fewer virtual terminals if this amount of kernel memory is affecting the performance. (see table below, "off" instead of "respawn")
1:2345:respawn:/sbin/mingetty tty1
2:2345:off:/sbin/mingetty tty2
3:2345:off:/sbin/mingetty tty3
4:2345:off:/sbin/mingetty tty4
5:2345:off:/sbin/mingetty tty5
6:2345:off:/sbin/mingetty tty6
|
When the screen goes "insane" say after you read a binary file with the command "cat" e.g. /etc/wtmp.
$ reset
|
As you type the word reset you may not be able to see it on your screen, just continue typing though and enter. (We used to use "J stty sane ^J" for serial terminals in the old days.)
"The screen program allows you to run multiple virtual terminals, each with its own interactive shell, on a single physical terminal or terminal emulation window. Even if you use Linux virtual consoles or multiple xterm windows, it is worth exploring screen for its rich feature set, which includes:
scrollback history,
copy-and-paste,
output logging,
digraph entry, and
the ability to detach an entire screen session from your terminal and reattach it later.
If you frequently log on to a Linux machine from a remote terminal or using a VT100 terminal program, screen will make your life much easier with the detach feature.
You are logged in via a dialup connection, and are running a complex screen session with editors and other programs open in several windows.
Suddenly you need to leave your terminal, but you don't want to lose your work by hanging up.
Simply type ^A d to detach the session, then log out. (Or, even quicker, type ^A DD to have screen detach and log you out itself.)
When you log on again later, enter the command screen -r, and screen will magically reattach all the windows you had open. "
Table of Contents
We have logged in and we have access to the system, either as root or as a user.
In order to continue we need to get more familiar with the workings of the kernel in relation to the operating system, the user and the hardware.
Let's look at the diagram that we used in the Fundamentals course explaining the layered structure and workings of the operating system. We also used a version of this diagram before in chapter 3.
| Note |
|---|---|
We have covered the important part of the hardware knowledge required here in the "history" section above - please re-read if unsure as understanding of that level is important. | |
Remember that the kernel controls:
System call facility that allows processes to use kernel functions.
Process creation and tracking
Process priority control
Swapping pages
IPC - inter-process communication
Cache, Buffer and I/O management
File creation, removal and modification and permissions
Multiple filesystems
Log file data accumulation
So the kernel itself is a process manager, what does that mean to the user running a command in the Applications layer and wanting a result immediately displayed on the terminal screen.
Executing a program in userland or user-mode does not mean that the program can access the kernel in any way. If the program is executed in kernel mode there are no restrictions to the kernel.
We have already discussed how each CPU has its own instruction set to switch from User to Kernel modes and then to return from kernel to user mode.
A user executing a request will only need to access kernel mode if the requested service is a kernel provided service. It accesses the kernel service through something called a system call (mentioned in Fundamentals course)
A user wants to access a regular file or a directory file, the user is issuing a command (Application Layer or Standard Library of Utilities Layer), but in order to get the information required the hard disk is going to have to be accessed, and the hard disk is defined as a block device. Therefore it has a block device file in /dev and has to be accesses through the kernel.
PREVIOUS EXPLANATION (Fundamentals): "The procedures in the Standard Library are called, and these procedures ensure that a trap instruction switches from User mode into Kernel mode and that the kernel then gets the control to perform the work requested of it."
Let's look at some of the relevant system calls (Standard Library of Procedures) that would have to take place: switch()
switch () -- A switch has to be made from user to kernel mode - switch() is a TRAP written in C in order to be able to talk to the assembler code needed to talk to the hardware device. switch() is a system call.
open() --Now the file has to be opened, as a process could not access a file in any other way. The system call, open(), is structured as follows:
fd = open(path, flag, mode)where:
fd= a file descriptor and an open file object are created, the file descriptor links the process and the opened file and the object contains the relevant data for the link such as a pointer to the kernel memory being used, a current position or offset from where the next function that has to be performed on that file, where the file actually is, and even a pointer to the other functions specified by the flag field defined below.
path= the pathname of where the file is to be found
flag= how the file must be opened, or if it must be created (read, write, append)
mode= access rights of newly created file
flock() -- As more than one user could be accessing the same file there is an flock() system call which allows file operation synchronisation on the entire file or just parts of the file.
creat() -- If the file does not exist it will need to be created and this is the function name for that system call. (Handled the same as open() by the kernel.)
read() write() -- Device files are usually accessed sequentially (regular files either randomly or sequentially.) From the current pointer or offset a read() or write() can be performed. Nread/nwrite specifies the number of characters read /written and updates the offset value.
lseek(), close(), rename() and unlink() -- To change the value of the offset the kernel will use lseek().
close(fd) -- To close a file the syntax would be close(fd) using the file descriptor name
rename(old,new) -- To rename = rename(old, new)
unlink() -- To remove = unlink(pathname) this one may make more sense a little later in this course, but this will change the parent directory count and list.
PREVIOUS EXPLANATION (Fundamentals): "Once the kernel has performed the task, it will return a successful or a failure status and then instigates a return from the trap instruction back into user mode. exit()
In the case of the exit() system call we would hope that the brackets would contain a zero (0) to represent a successful completion of a process.
A program is an executable file on the hard disk, whereas a process is a running program.
A process is an instance of a disk program in memory, executing instructions on the processor.
The only way to run a program on a Unix/Linux system is to request the kernel to execute it via an exec() system call.
Remember that the only things that can make system calls are processes (binary programs that are executing.)
So how do you as a human get the kernel to run a program for you? The shell acts as your gateway to the kernel! You use the shell to make system calls to the kernel on your behalf in fact, the shell is simply an interface for you to get access to the kernel's exec() system call.
When you type in a command line to the shell, the shell parses your input in a certain way. Let's take a look at how the shell does this, say you type in a few arbitrary words as follows:
$ one space three four
|
The shell will parse this line into separate fields where each field is separated by an IFS or Internal Field Separator character, which is by default set to whitespace (any combination of spaces and/or tabs.)
Refer to the next diagram.

In a simple command line (no pipes) the shell will regard the first field as the name of a command to run.[2]
All the remaining fields are seen as command line arguments to pass to that command. The shell determines whether it knows the command as a built-in, or an external program on the disk, as found in the first matching directory in the PATH variable.
If the command is a shell built-in, the shell just runs a function within its existing program in memory, with the same name as the built-in command, and passes the arguments from the command line as arguments to the function.
If the command is an external program on the disk (binary or shell script,) the shell will perform an exec() system call, and specify the path to the program and the command line arguments, in the parenthesis of the exec() system call. For example if you type the following command at the shell prompt
$ ls -al
|
the shell will run code similar to the following:
execle("/bin/ls", "ls", "-al", "TERM=linux,LOGNAME=joe, ")
|
As you can see the shell has simply given you access to the kernels exec() system call.
The creation of a process, through the exec() system call, is always performed through an existing process. The kernel keeps track of which process created another. You can use "ps" to show the kernels process table, or excerpts thereof, to determine a process' process ID (PID) and parent process ID (PPID.)
If you run the following command
linux:/ # ps -f
UID        PID  PPID  C STIME TTY          TIME CMD
root      4421  4411  0 15:49 pts/7    00:00:00 su
root      4422  4421  0 15:49 pts/7    00:00:00 bash
root      4429  4422  0 15:50 pts/7    00:00:00 ps -f
|
You will see all the processes started in your current login session. This is just a small excerpt from the kernels entire process table. Look at the PPID column of the ps command that you ran above. Can you see that the PPID of ps is the same as the PID of your shell process (we'll assume "bash")?
Now make a note of that shell's PPID. Let's try and find its parent (I assuming that you are in your login shell and that you have not started any sub-shells by hand.) Now run the following command:
$ ps -ef | less
F S   UID   PID  PPID  C PRI  NI ADDR SZ WCHAN  TTY          TIME CMD
0 S     0     1     0  0  75   0 -   155 schedu ?        00:00:04 init
0 S     0     2     1  0  75   0 -     0 contex ?        00:00:00 keventd
0 S     0     3     1  0  94  19 -     0 ksofti ?        00:00:00 ksoftirqd_CPU0
0 S     0     4     1  0  85   0 -     0 kswapd ?        00:00:00 kswapd
0 S     0     5     1  0  85   0 -     0 bdflus ?        00:00:00 bdflush
0 S     0     6     1  0  75   0 -     0 schedu ?        00:00:00 kupdated
0 S     0     7     1  0  85   0 -     0 kinode ?        00:00:00 kinoded
0 S     0     8     1  0  85   0 -     0 md_thr ?        00:00:00 mdrecoveryd
0 S     0    11     1  0  75   0 -     0 schedu ?        00:00:00 kreiserfsd
0 S     0   386     1  0  60 -20 -     0 down_i ?        00:00:00 lvm-mpd
0 S     0   899     1  0  75   0 -   390 schedu ?        00:00:00 syslogd
0 S     0   902     1  0  75   0 -   593 syslog ?        00:00:00 klogd
|
Look in the PID column for the same number that you saw in your shell's PPID column. The process that you find will be the parent of your shell. What is it? It is the login program. Using the same methodology as before now find Login's parent. It is "init". Now find "init's" parent. Can you see that "init" has no parent in the process table?
Who or what started "init", the kernel!
Remember that "init" is the first process run by the kernel at bootup: this behaviour is hard-coded in the kernel. It is "init's" job to start up various child processes to get the system to a usable state (Refer to bootup section Refer to init section.)
What constitutes a process or the properties of a process?
A process consists of:
An entry in the process table
Data area, etcetera uarea (contains the properties of the process)
The properties of a process
A process has many status properties maintained by the kernel, some of which are:
RUID: Numeric real (login) user ID
RGID: Numeric real (login) group ID
EUID: Numeric effective user ID
EGID: Numeric effictive group ID
PID: Numeric proces ID
PPID: Numeric parent process ID
When a process is started it inherits most of the properties of its parent, such as the real and effective UID/GID values.
Every process also has an environment associated with it. The environment is simply a list of variables. These are passed to a process by it's parent process, when it makes the exec() system call.
Every UNIX kernel has one or more forms of the exec() system call. Although we generally refer to "exec()", the exact call names may differ slightly, but they all start with "exec".
On Linux, the kernel's variant of the traditional exec() system call is called execve(2), and its syntax is:
execve(program_file, program_arguements, environment_variables)
|
The standard C library on Linux provides several different interfaces to the low-level execvp() system call, all providing slightly different behaviour. These library calls are:
execl(3)
execlp(3)
execle(3)
execv(3)
execvp(3)
To see the difference between these calls, you can look up the man pages for them in the relevant manual sections.
Although the basic way to run a process is through exec(), the whole process creation effort is a bit more involved. When a C programmer wants to start a process there are a few more system calls that will usually be used together with exec(). To better explain this we will look at a process creation example, namely that of running an "ls" command from the shell.
When you type in "ls -a" the shell does the following:
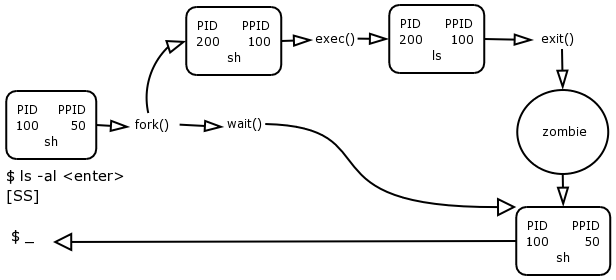
As you hit enter after the "ls -al" command, the shell determines that ls is an external program on the filesystem, namely /bin/ls. It needs to exec() this. What it does first is to issue a fork() system call. It then issues a wait() system call.
The fork() system call performs a type of cloning operation. This gets the kernel to copy an existing process table entry to a next empty slot in the process table.
This effectively creates a template for a new process.
The kernel now assigns a new unique PID to this forked process and updates its PPID to reflect the value of the process that forked it. The forker is called the parent process and the forked process is called the child process.
The parent process, in this case the shell, now issues the exec() system call on behalf of the child. The exec() system call gets the kernel to read the ls program off the filesystem on the hard disk and place it into memory, overwriting the calling process, in this case the child shell template.
The PID and PPID entries of the forked child remain the same, but the name of the child process in the process table entry is now updated to the name of the exceed process, in this case ls.
The child now runs and in the case of "ls -al", produces some output to the terminal. Once the child is finished whatever it has to do it informs the kernel that it has completed by issuing an exit() system call.
The wait() causes the parent to halt execution until the child performs its' exit().
The exiting child now falls into a "zombie"* state. The kernel has de-allocated the process memory, however its process table entry still exists. It is the job of the parent to inform the kernel that it has finished working with the child, and that the kernel can now remove the process table entry from the child (currently in the zombie state)[3]
The exit() of the child actually causes the return of the wait() system call, which ends the pausing of the parent process, so that it can now continue running.
It is important to note that every process becomes zombie for a brief amount of time when it exits, usually a split second, as a part of its natural life cycle.
Question:
What would happen if shell omitted the wait()?
Answer:
You would get the shell prompt back, the child process would continue to run until completed and if the parent shell still exists it will still receive the exit status from the child process and would still have the task of informing the kernel that the child process is complete. So that the kernel can remove the child's entry from the process table.
To show the state of a process, use the "-l" to the ps command.
Example
$ ps -el
F S   UID   PID  PPID  C PRI  NI ADDR SZ WCHAN  TTY          TIME CMD
0 S     0     1     0  0  75   0 -   155 schedu ?        00:00:04 init
0 S     0     2     1  0  75   0 -     0 contex ?        00:00:00 keventd
0 S     0     3     1  0  94  19 -     0 ksofti ?        00:00:00 ksoftirqd_CPU0
0 S     0     4     1  0  85   0 -     0 kswapd ?        00:00:00 kswapd
0 S     0     5     1  0  85   0 -     0 bdflus ?        00:00:00 bdflush
0 S     0     6     1  0  75   0 -     0 schedu ?        00:00:00 kupdated
0 S     0     7     1  0  85   0 -     0 kinode ?        00:00:00 kinoded
0 S     0     8     1  0  85   0 -     0 md_thr ?        00:00:00 mdrecoveryd
0 S     0    11     1  0  75   0 -     0 schedu ?        00:00:00 kreiserfsd
0 S     0   386     1  0  60 -20 -     0 down_i ?        00:00:00 lvm-mpd
0 S     0   899     1  0  75   0 -   390 schedu ?        00:00:00 syslogd
|
Look for the column heading "S" (it is the second column)
| symbol | meaning |
|---|---|
| S | sleeping |
| R | running |
| D | waiting (usually for IO) |
| T | stopped (suspended) or traced |
| Z | zombie (defunct) |
The scheduler is a service provided by the kernel to manage processes and the fair distribution of CPU time between them.
The scheduler is implemented as a set of functions in the kernel. On Unix System V**, the scheduler is represented in the process table as a process named sched, with a PID of 0. Linux does not indicate the scheduler in this way. Even on system V this serves no practical purpose as not even the root user can manipulate the scheduler by sending it signals with the kill command.[4]
The kernel classifies processes as being in one of two possible queues at any given time: the sleep queue and the run queue.
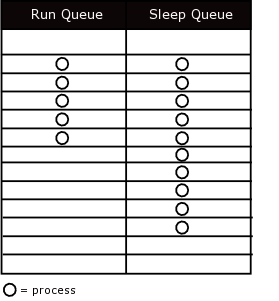
Processes in the run queue compete for access to the CPU. If you have more processes that want to execute instructions than you have processors in your system, then it becomes obvious that you have to share this finite resource between these processes.
The processes in the run queue compete for the processor(s). It is the schedulers' job to allocate a time slice to each process, and to let each process run on the processor for a certain amount of time in turn.
Each time slice is so short (fractions of a second), and each process in the run queue gets to run often every second it appears as though all of these processes are "running at the same time". This is called round robin scheduling.
As you can see, on a uniprocessor system, only one process can ever execute instructions at any one time. Only on a multiprocessor system can true multiprocessing occur, with more than one process (as many as there are CPUs) executing instructions simultaneously.
There are different classes of scheduling besides round-robin. An example would be real-time scheduling, beyond the scope of this course.
Different Unix systems have different scheduling classes and features, and Linux is no exception.
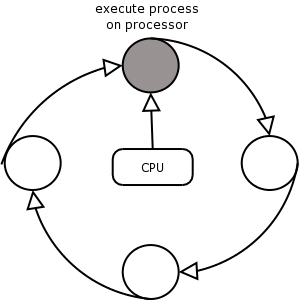
Find out which different scheduling classes and features are supported by different Unix flavours including Linux.
Look up some information about a distribution of Linux called RTLinux (Real Time Linux).
Processes that are waiting for a resource to become available wait on the sleep queue in this way, the process will not take up a slot on the run queue and during the priority calculation.
However once the resource becomes available that resource is reserved by that process, which is then moved back onto the run queue to wait for a turn on the processor.
If we look at this in a different way we will find that every process gets onto the sleep queue, even as a new process the resources still have to be allocated to the process, even if the resource is readily available.
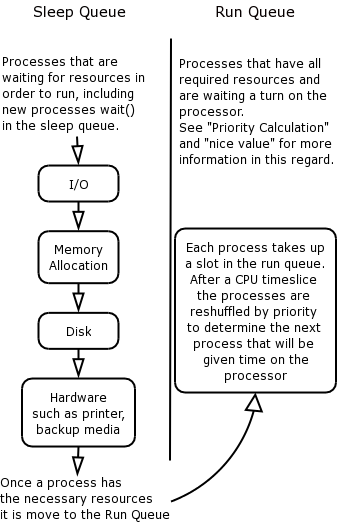
Once again we need to look a little more at the multitasking environment in Linux and some of the data structures that make this possible.
In the header file include/linux.h a Linux Task can be in one of the following states:
TASK_RUNNING, it means that it is in the "Ready List"
TASK_INTERRUPTIBLE, task waiting for a signal or a resource (sleeping)
TASK_UNINTERRUPTIBLE, task waiting for a resource (sleeping), it is in same "Wait Queue"
TASK_ZOMBIE, task child without father
TASK_STOPPED, task being debugged

Each 10 milli-seconds (This may change with the HZ value) an Interrupt comes on IRQ0, which helps us in a multitasking environment.
The interrupt signal to the CPU comes from PIC (Programmable Interrupt Controller), say 8259, which is connected to PIT (Programmable Interval Timer) say 8253, with a clock of 1.19318 MHz.
So Time-slice = 1/HZ.
With each Time-slice we interrupt current process execution (without task switching), and the processor does housekeeping then the previous process continues to run.
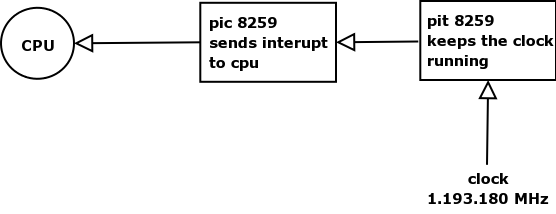
Functions can be found under:
IRQ0x00_interrupt, SAVE_ALL [include/asm/hw_irq.h]
do_IRQ, handle_IRQ_event [arch/i386/kernel/irq.c]
timer_interrupt, do_timer_interrupt [arch/i386/kernel/time.c]
do_timer, update_process_times [kernel/timer.c]
do_softirq [kernel/soft_irq.c]
RESTORE_ALL, while loop [arch/i386/kernel/entry.S]
|
Linux and every other Unix variant manages multitasking by using a variable that keeps track of how much CPU time ha been used by the task.
Each time an interrupt is sent to IRQ 0 the variable decreases and when the count is 0 the task has to be switched.
| Note |
|---|---|
The "need_resched" variable is set to 1, then assembler routines control "need_resched" and call the scheduler [kernel/sched.c] if needed at that time. | |
The scheduler is a piece of code that designates which task is the next to run on the processor.
In classic Unix, when an IRQ comes (from a device), Unix makes "task switching" to interrogate the task that requested the device.
Linux ensures that the work that is not a high priority is postponed and the higher priority work is given the resources first. This tends to have a marked effect on performance of the system.
This is called "Bottom Half" where the IRQ handler re-schedules the lower level priority process to be run later in the scheduling time. Bottom-Half has been around since kernel 1.x but in the more recent versions of the kernel there is a task queue allocated to this job that appears to be more dynamic that the BH. (A tasklet is allocated for multiprocessors).
Task or process Switching is needed in many cases, some examples would be:
When a Time Slice ends the scheduler gives access to another process
If needing a resource, the process will have to go back into the sleep queue to wait for or to be given access to that resource, and only then would it be ready to be scheduled access to the processor again.
If we have a process waiting for information from another process in the form of piped information. That process would have to run before this process can continue, so the other process would be given a chance for the processor.
[2] There are three main types of command:Shell built-ins, Binary programs, Shell programs/scripts Refer to the Shell Scripting course for more information.
[3] A zombie process is also known as a defunct process.
[4] This includes SVR3 systems like Open Server 5, SVR4 systems like Solaris and SVR5 systems like UnixWare 7.
Table of Contents
All data accessed from files on the system that are performed through the use of read() and write() system calls, pass through the filesystem buffer cache.
This buffer cache greatly speeds up disk access, often the most critical performance bottleneck on the system, so that recently accessed files can be served quickly from this RAM based cache, instead of reading then from or writing them to the physical hard disk.
Traditionally, Unix up to and including SVR3 keeps the buffer cache in kernel memory. This means that on SVR3 based Unix systems like SCO Unix and SCO Open Server V changing the size of the buffer cache requires configuring the kernel to use a new size and then rebooting the system so that the kernel can allocate this and thereby change the size of kernel memory appropriately on initialisation.
Linux is renowned for its fast disk access and this is mainly because of its efficient implementation of the buffer cache. The buffer cache rose and shrinks dynamically in user memory as required. (Actually, kernel memory grows dynamically into user memory to allow this - the buffer cache is still considered part of kernel memory.)
As files are accessed on disk the buffer cache grows in user memory as much as it can. Remember that user processes live in user memory. The buffer cache never interferes with these and as the number and size of processes grow and shrink in memory, the buffer cache automatically expands and shrinks around them.
You can monitor memory usage with the free(1) command. The size of the file system buffer cache is displayed in the "cached" column, not the "buffers" column as you might expect. Other caches (like the directory cache) are reflected in the "buffers" column. It is important to understand this information. What you need to know to keep track of memory usage is how much user memory is being consumed by applications.
The amount of free memory indicated by the free command includes the current size of the buffer cache in its calculation. This is misleading, as the amount of free memory indicated will often be very low, as the buffer cache soon fills most of user memory. Don't' panic. Applications are probably not crowding your RAM; it is merely the buffer cache that is taking up all available space. The buffer cache counts as memory space available for application use (remembering that it will be shrunk as required), so subtract the size of the buffer cache to see the real amount of free memory available for application use. Therefore:
Available user memory = total memory - (used application memory + buffer cache)
riaan@linux:~> free
             total       used       free     shared    buffers     cached
Mem:        498572     493484       5088          0      50960     237436
-/+ buffers/cache:     205088     293484
Swap:       706852          8     706844
riaan@linux:~>
|
![[Tip]](../images/admon/tip.png) | Tip |
|---|---|
The word root The word root often confuses People, the word root can be used to mean 4 different things
| |
Another important cache that is maintained on Unix systems is the directory cache, on System V this is known as the Directory Name Lookup Cache (DNLC) on Linux it is called the D cache.
The directory cache contains a list of the most recently accessed file and directory names mapped to inode numbers it also acts as a controller for an inode cache of recently used inodes.
The directory cache on Linux grows and shrinks dynamically in user memory like the buffer cache.
The issue of swapping and paging is often misunderstood. Swapping and paging are two totally different things.
Swapping was the first technology used in Unix System V as physical memory fills up with processes there is a problem. What happens when the system runs completely out of RAM? It "grinds to a halt"!
The conservation and correct management of RAM is very important because the CPU can only work with data in RAM, after it has been loaded from the hard disk by the kernel. What happens when the mounting number and size of processes exceeds physical memory? To allow for the situation, and because only one process can ever execute at any one time (on a UniProcessor system), only really that process need to in RAM. However organising that would be extremely resource intensive, as multiple running processes are scheduled to execute on the processor very often (see the section called “Scheduler”)
To address these issues the kernel advertises an abstract memory use to applications by advertising a virtual address space to them that far exceeds physical memory. An application may just request more memory and the kernel may grant it.
A single process may have allocated 100mb of memory even though there may only be 64mb of RAM in the system. The process will not need to access the whole 100mb at the same time this is where virtual memory comes in.
Swap space is a portion of disk space that has been set aside for use by the kernels' virtual memory manager (VMM). The VMM is to memory management what the scheduler is to process management. It is the kernels memory management service for the system.
Some systems are pure swapping systems, some systems are pure paging systems and others are mixed mode systems.
Originally Unix system V was a pure swapping system.
To swap a process means to move that entire process out of main memory and to the swap area on hard disk, whereby all pages of that process are moved at the same time.
This carried the disadvantage of a performance penalty. When a swapped out process becomes active and moves from the sleep queue to the run queue, the kernel has to load an entire process (perhaps many pages of memory) back into RAM from the swap space. With large processes this is understandably slow. Enter paging.
Paging was introduced as a solution to the inefficiency of swapping entire processes in and out of memory at once.
With paging, when the kernel requires more main memory for an active process, only the least recently used pages of processes are moved to the swap space.
Therefore when a process that has paged out memory becomes active, it is likely that it will not need access to the pages of memory that have been paged out to the swap space, and if it does then at least only a few pages need to be transferred between disk and RAM.
Paging was first implemented in system V[?] in 19??
For efficient paging, the kernel needs to keep regular statistics on the memory activity of processes it keeps track of which pages a process has most recently used. These pages are known as the working set.
When the kernel needs memory, it will prefer to keep pages in the working sets of processes in RAM as long as possible and to rather page out the other less recently used pages as they have statistically been proven to be less frequently accessed, and therefore unlikely to be accesses again in the near future.
Current Unix systems use the following methods of memory management:
SVR3 and newer based systems are mixed swapping and paging systems, as is FreeBSD. Paging is normally used but if memory usage runs extremely heavy, too quickly for the kernels' pager to page out enough pages of memory, then the system will revert to swapping. This technique is also known as desperation swapping.
Linux is a pure paging system it never swaps, neither under normal usage nor does it employ desperation swapping under heavy usage.
When the FreeBSD VM system is critically low on RAM or swap, it will lock the largest process, and then flush all dirty vnode-backed pages - and will move active pages into the inactive queue, allowing them to be reclaimed. If, after all of that, there is still not enough memory available for the locked process, only then will the process be killed.
Under emergency memory situations when Linux runs out of memory (both physical and swap combined) the kernel starts killing processes. It uses an algorithm to work out which process to kill first - it tries to kill offending memory hogs that have been running for a short amount of time first before less used processes that have been running for a long time, which are most likely important system services. This functionality is known as the out of memory (OOM) killer.[5]
Table of Contents
A driver is a kind of program that extends the kernel's functionality in some way.
There are many different drivers in the kernel to provide support for hardware devices, file system types, binary executable formats, network protocols and a host of other imaginable things.
The bulk of the kernel binary, which exists both as a disk file (/boot/vmlinuz or /boot/vmlinux) and in memory at run-time, is made up of drivers.
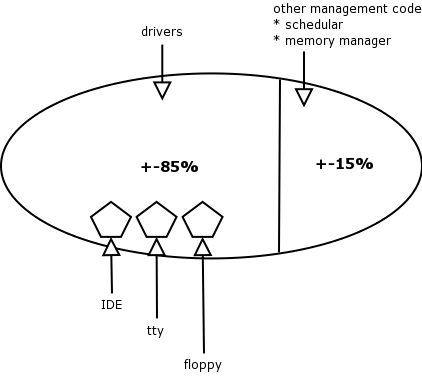
There are two types of drivers:
Internal drivers that are part of the kernel binary and are therefore part of kernel memory when the system is running, and
external drivers that are not part of a kernel binary which are loaded into user memory when required.
These external drivers are also known as loadable kernel modules.
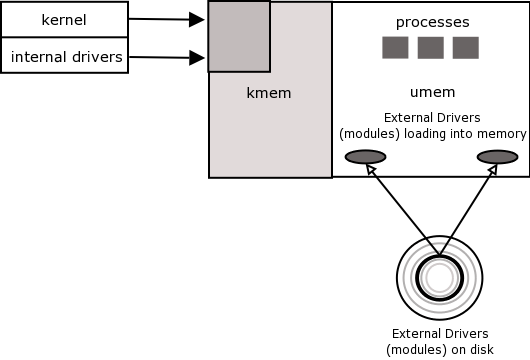
Loadable modules exist as disk files, stored under /lib/modules. These can be loaded into user memory as required. They can also be unloaded from user memory when you don't need them anymore.
Originally, Unix up to and including SVR3 could only incorporate internal drivers that were directly a part of the kernel binary. The vendor shipped all the drivers and other kernel components as pre-compiled binary files located on the installed filesystem.
If you added a new hardware device to the system like a SCSI controller, you would have to build a new kernel binary that incorporated the appropriate driver for this device. This driver would either already be supplied by the Unix vendor or be a third party driver supplied by the hardware vendor of the device you are installing.
The installation script supplied by the vendor by the third party vendor, or the Unix vendor (when installing generic drivers) would normally also create an appropriate device file in the /dev directory, that would allow programs to gain access to the hardware with normal file access system calls such as open(), close(), read(), write().
After this operation was complete, you would have to reboot this system in order for the new kernel to run, which now included the appropriate driver. This new kernel would now be able to communicate with the respective device.
SVR4 introduced the concept of loadable modules. BSD and Linux also follow this design model, however every Unix system uses different commands to manage these.
There are several commands available to administer loadable modules on Linux.
You can run the lsmod(8) to display the list of currently loaded modules in user memory.
riaan@linux:~> lsmod
Module                  Size  Used by    Not tainted
sr_mod                 14616   0 (autoclean) (unused)
snd-mixer-oss          15576   1 (autoclean)
videodev                6272   0 (autoclean)
isa-pnp                32712   0 (unused)
usbserial              19836   0 (autoclean) (unused)
....
....
....
ne2k-pci                5248   1
8390                    6608   0 [ne2k-pci]
ide-scsi               11056   0
scsi_mod              100788   2 [sr_mod ide-scsi]
ide-cd                 32416   0
cdrom                  29216   0 [sr_mod ide-cd]
nls_iso8859-1           2844   2 (autoclean)
ntfs                   80300   2 (autoclean)
lvm-mod                64996   0 (autoclean)
reiserfs              217908   1
|
You can use the insmod(8) or modprobe(8) commands to load a module from the /lib/modules directory structure into user memory for use by the parent.
The advantage of using modprobe over insmod to load modules, is that modprobe will consult a dependency file /lib/modules to determine which other drivers need to be loaded before the requested module.
To unload a module from user memory you can use the rmmod(8) or modprobe -r commands. The module may not be in use by the kernel or the attempt at removal will fail.
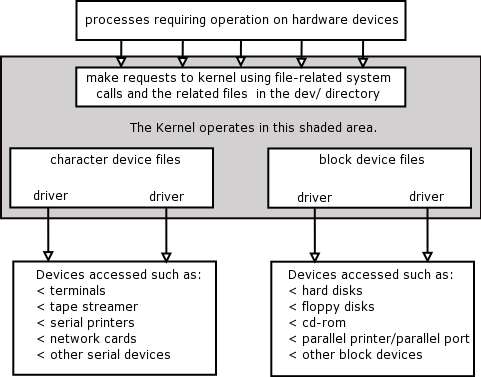
Accessing devices involves the kernel interacting with the IO devices via a device driver.
Device drivers can be linked into the kernel image and then are available as needed. Or they can be added into the kernel as a separate module and without rebooting the kernel.
The kernel then has access to that module and therefore the driver, but because it is in a module, the kernel image can stay lean and mean and only call on the module if and when you need the device.
However having said this, there are different levels of device driver support, and although not all the types are currently supported with Linux, it seems to be pointing that way development wise. There are also limits to the number of device drivers that the kernel can support. We will mention all of the options:
No support - where the application program contains assembler code to access the IO ports of the device directly. (X-Windows handles graphic display) See iopl() and ioperm() where process given permissions to access a IO ports directly - the process would have to be running with root permissions at this time though.
Min support - here the kernel would see the hardware device and maybe even recognise it, but cannot deal with the IO interface of the device. Here the user apps access the device sequentially reading or writing a sequence of characters. (Currently serial and parallel port supported.)
Extend Support - the kernel would recognise the hardware device and can handle the IO interface directly, there may not even be a device file for the device.
Table of Contents
We are going to speed quite a bit of time talking about various subjects that will give you a better understanding of performance tuning.
There are two things that you are going to have to become au-fait with and these are:
Monitoring the system over time and making changes one step at a time - do not rush ahead and change a whole set of allocations and resources without checking how everything affects everything else.
Getting to know how your system works from the hardware, low-level to the memory management and process scheduling aspects.
Truly tuning your machine performance can take months of analysing data and making sure that you make the most of what you have. Checking the system load at low times and at peak time, when developing or when data capturing, it all makes a difference as to how your system can perform.
Some of this will have to be done before you start purchasing your machine and some of it will continue for many months after you have recompiled your kernel for the first time.
So, in order to understand all the statistics we are going to have to analyse, let's get some more back ground of the important aspects of this system.
If you look at the machine in front of you, it is a finite resource at this time; it consists of a set of interdependent resources or components that have to be shared between users and processes.
Now Linux has a couple of problems to be aware of especially on a busy machine:
There are never enough of each type of resource
Each process will need a different resource mix, and different and at the same times
We will always have badly behaved processes where the program is written to hog the CPU, fill up memory, forget to de-allocate memory after reserving some etcetera.
You cannot take out your current disk and plug in a faster one for a couple of minutes whilst there is a crisis. So really tuning would then be taking the resources that you have and allocating them by balancing conflicts and establishing compromises.
Some Examples:
If a process or processes are waiting for memory, and memory is full at that time, then the system will start to page memory our to the swap space. Now the system is waiting for time on the disk, waiting for time on the CPU and waiting for memory. In this case if it is happening all the time I would suggest that you put in more memory.
A dumb serial card interrupts the CPU with every character whereas an intelligent serial card interrupts when the buffer is full (8+ characters).
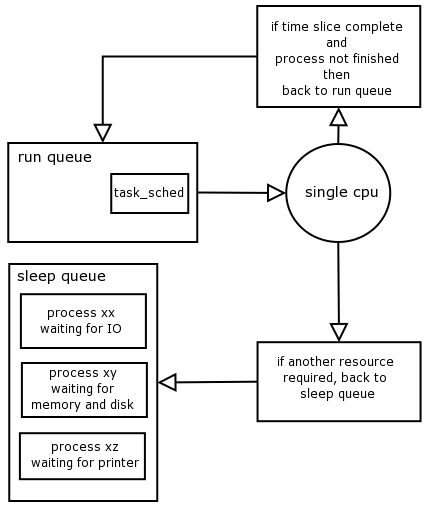
If processes are waiting for disk and you have a slow disk, this will eventually cause a disk bottleneck, where there may be nothing on the run queue and the processes are waiting for disk.
Processes on the run queue only need one more resource before they can run and that is the CPU.
All processes perform IO and may have to wait for their request to be satisfied by the hardware. If a process is reading a file for example login reads /etc/passwd as a user logs in, the kernel will be making requests to the disk (to exec(), the open() etcetera). Disks have built in latencies due to rotational delay, movement of the heads and so on.
While the process is waiting for the disk request to complete it cannot use the CPU, the process is then put onto the sleep queue where it will wait for IO, wait for disk. Once the disk is freed up, the process is again placed into the run-queue.
A substantial amount of input to a process can be interactive such as from a keyboard or mouse. Systems with large numbers of interactive jobs will have most of their processes in wait for IO state. Processes can be held up when outputting to the slower devices such as terminals and printers.
When the hardware devices send an interrupt to the CPU, the clock, or a device that is now freed-up, the process running on the CPU is suspended while the interrupt service routine is executed (process to task_sched not to run queue). The clock interrupt routine is also responsible for gathering statistics dealing with process scheduling, updating page management information etcetera. If a system spends a lot of time dealing with these interrupt service calls it is said to be interrupt-bound.
A good rule of thumb is to make sure that there is enough memory, and that you allocate enough swap space on your disk (at least the same amount of memory again), even though using the swap space as additional memory will take more time than being in RAM at least the processes can still run and do not have to stop altogether.
The scheduling policy in Linux is an important part of the theory behind Performance Tuning. I know that we have spoken about scheduling previously, in connection with time slicing, the run queue and sleep queue, parent and child processes etcetera
Two of the most critical parts of a kernel are the memory subsystem and the scheduler. This is because they influence the design and affect the performance of almost every other part of the kernel and the Operating System.
The scheduler watches processes and re-calculates process position on run-queue and CPU all the time. Generally those that are CPU deprived are given a higher priority and those that have been using a lot of CPU time and penalised for that and therefore probably end up with a lower priority.
If we group types of processes we could say that there are just three types:
No user interaction required - usually a lengthy process that should run in the background (parent does not wait().) Could be a database update or search scientific number sorting and crunching or even a compilation of a program. These processes are given a low priority by the scheduler and penalised heavily for being left in the background and considered not urgent at all. **Remember that, if you schedule a process to run in the background and you choose the default priority (not override with nice or BSD version renice) then your process will run extremely slowly especially on a busy machine a all other processes will have a higher priority by default.[6]
The processes that are waiting for IO are an interesting bunch and we can really get our teeth into looking at these (almost literally - See below for Process Table wait states). If a user response is required the process will wait() for the response, but once the response is received the user "customer" demands good response times and therefore this process is given a higher priority and put back on the run queue for the next bout of re-calculation of position. It is said that the delay from user response to result should be only between 50 and 150 milliseconds.
The last section are called real-time processes and for these the scheduler drops everything else, to the point that if a process is already on the processor, the scheduler switch the process out to TASK_RUNNING state in which it waits to run again on the CPU - this in order to allow for the real-time process to run.
Generally these are system processes (daemons) but they could also be processes that interact with hardware devices.
Linux and Unix schedulers generally favour IO bound processes over the CPU bound processes.
The scheduler recalculates the priorities of the processes on the run queue using an algorithm which we will discuss after this, however in the older Unix variants, the scheduler would run a recalculation on a regular basis or at the end of each time slice.
On the Linux run queue the priority is only calculated once all the processes have used up there allocated time slices (called a quantum) and then the scheduler recalculates their position or their new position on the run queue.
The scheduler is implemented in the 'main kernel file' kernel/sched.c.
The corresponding header file include/linux/sched.h is included (either explicitly or indirectly) by virtually every kernel source file.
The following is an extract from the man pages:
"The fields of task structure relevant to scheduler include:
p->need_resched: this field is set if schedule() should be invoked at
the 'next opportunity'.

p->counter: number of clock ticks left to run in this scheduling slice,
decremented by a timer. When this field becomes lower than or equal to zero,
it is reset to 0 and p->need_resched is set. This is also sometimes called
'dynamic priority' of a process because it can change by itself.

p->priority: the process' static priority, only changed through
well-known system calls like nice(2), POSIX.1b sched_setparam(2) or
.4BSD/SVR4 setpriority(2).

p->rt_priority: real-time priority

p->policy: the scheduling policy, specifies which scheduling class the task belongs to. "

Scheduler Classes:
SCHED_OTHER (traditional UNIX process),
SCHED_FIFO (POSIX.1b FIFO real-time process)
SCHED_RR (POSIX round-robin real-time process).
|
The scheduler's algorithm is simple, despite the great apparent complexity of the schedule() function.
Each process gets a time slice that's 1/100th of a second long.
At the end of each time slice, the do_timer() function is called and priorities are recalculated.
Each time a system call returns to user mode, do_timer() is also called to update the times.
Scheduling processes is not as easy as just finding the process that has been waiting the longest. Some operating systems do this kind of scheduling, which is referred to as "round-robin." The processes could be thought of as sitting in a circle. The scheduling algorithm could then be though of as a pointer that moves around the circle, getting to each process in turn.
The Linux scheduler does a modified version of round-robin scheduling, however, processes with a higher priority get to run more often and longer.
The nice value is a property that exists for every process. It is not, as is often misunderstood, the priority of a process. It is a number that influences the priority property of a process.
The nice value and the priority of a process are two different things as reported by the "ps -el" (See Screen Shot below). You will see a column labelled or titled "NI" for the nice value and "PRI" for the priority.
riaan@linux:~> ps -el
  UID   PID  PPID CPU PRI NI   VSZ  RSS MWCHAN STAT  TT       TIME COMMAND
 1001   650   649   0   8  0  1324 1184 wait   SLs   p0    0:00.01 zsh
 1001   664   650   0  76  0  3764 3056 select SL+   p0    0:02.53 ssh -v -C
 1001  1113  1112   0   8  0  1332 1192 wait   SLs   p1    0:00.03 zsh
|
The nice number can be one of 40 different values on System V the range for nice values is 0 through 39 and on BSD the range is -20 through 19, Linux uses the BSD style.
A higher nice value makes a process run at a lower priority and therefore slower and conversely a lower nice value gives a process a higher priority and it therefore runs faster.
The default nice value of a process is the middle value (0 on Linux) running a process in the background of some shells will result with the shell modifying the process's nice value to make it run a bit slower.
Normal users can change their process's nice values higher from the default middle value (lower priority; therefore being nice to other users) and only root can change processes to run with a lower nice value than the default middle value (higher priority).
Linux also allows you to be nice to your fellow processes. If you feel that your work is not as important as someone else's, you might want to consider being nice to him or her. This is done with the nice command, the syntax of which is:
nice >nice_value< >command>
|
For example, if you wanted to run the date command with a lower priority, you could run it like this:
nice -10 date
|
This decreases the start priority of the date command by 10.
To change the nice value of an existing process use the renice command. You can lookup its man page.
The nice value only affects running processes, but child processes inherit the nice value of their parent.
The nice value has incredible power with the scheduler and if used correctly e.g. for a report for the financial director to get there as fast as possible, can be of great benefit to the system administrator and the end-user.
The numeric value calculated for the priority is the opposite of what we normally think of as priority the lower the number the higher the priority.
It is the scheduler that must select the most deserving process to run out of all of the runnable processes in the system. A runnable process is one, which is waiting only for a CPU to run on.
Linux uses a reasonably simple priority based scheduling algorithm to choose between the current processes in the system. When it has chosen a new process to run it saves the state of the current process, the processor specific registers and other context being saved in the processes task_struct data structure.
This structure represents the states of all tasks running in the systems.
All executing processes have an entry in the process table. The first entry in the process table is the special init process, which is the first process started at boot time.
There is a field that represents the process state, a field that indicates the processes priority
a field, which holds the number of clock ticks (counter), which the process can continue executing without forced rescheduling.
It also contains the schedule policy (SCHED_OTHER, SCHED_FIFO, SCHED_RR) to determine how to schedule the process.
In order to keep track of all executing processes through from the parent to child processes etcetera,
next_task and prev_task
There is a nested structure, mm_struct, which contains a process's memory management information, (such as start and end address of the code segment
Process ID information is also kept within the task_struct.
The process and group id are stored.
File specific process data is located in a fs_struct substructure.
Finally, there are fields that hold timing information; for example, the amount of time the process has spent in user mode
other information less crucial to scheduling.
It is this information saved in the task_struct that is used by the scheduler to restore the state of the new process to run and then gives control of the system to that process.
For the scheduler to fairly allocate CPU time between the runnable processes in the system it keeps information in the task_struct for each process:
There are the three scheduling policies that influence the process. Remember that the Real time processes have a higher priority than all of the other processes. In round robin scheduling, each runnable real time process is run in turn and in first in, first out scheduling each runnable process is run in the order that it is in on the run queue and that order is never changed.
The priority that the scheduler will give to this process is the value used for recalculation when all runnable processes have a counter value of 0. You can alter the priority of a process by means of system calls and the renice command.
This field allows the scheduler to give each real time process a relative priority. The priority of a real time processes can be altered using system calls.
The counter variable holds the amount of time (in jiffies) that this process is allowed to run for. It is set to priority when the process is first run and is decremented each clock tick.
| System Call | Description |
|---|---|
| nice( ) | Change the priority of a conventional process. |
| getpriority( ) | Get the max priority of a group of conventional processes. |
| setpriority( ) | Set the priority of a group of conventional processes. |
| sched_getscheduler( ) | Get the scheduling policy of a process. |
| sched_setscheduler( ) | Set the scheduling policy and priority of a process. |
| sched_getparam( ) | Get the scheduling priority of a process. |
| sched_setparam( ) | Set the priority of a process. |
| sched_yield( ) | Relinquish the processor voluntarily without blocking |
| sched_get_ priority_min( ) | Get the minimum priority value for a policy. |
| sched_get_ priority_max( ) | Get the maximum priority value for a policy. |
| sched_rr_get_interval( ) | Get the time quantum value for the Round Robin policy. |
Can have a value in the range 0 to 99. In order to determine the process that runs next, the Linux scheduler looks for the non-empty list with the highest static priority and takes the process at the head of this list. The scheduling policy determines for each process, where it will be inserted into the list of processes with equal static priority and how it will move inside this list.
For real time processes with a sched_priority of 0.
SCHED_FIFO is a simple scheduling algorithm without time slicing. For processes scheduled under the SCHED_FIFO policy, the following rules are applied:
A SCHED_FIFO process that has been preempted by another process of higher priority will stay at the head of the list for its priority and will resume execution as soon as all processes of higher priority are blocked again.
When a SCHED_FIFO process becomes runnable, it will be inserted at the end of the list for its priority.
A SCHED_FIFO process runs until either it is blocked by an I/O request, it is preempted by a higher priority process, or it calls sched_yield.
SCHED_RR is a simple enhancement of SCHED_FIFO. Everything described above for SCHED_FIFO also applies to SCHED_RR, except that each process is only allowed to run for a maximum time quantum.
If a SCHED_RR process has been running for a time period equal to or longer than the time quantum, it will be put at the end of the list for its priority. The length of the time quantum can be retrieved by sched_rr_get_interval.
Default Linux time-sharing scheduling
SCHED_OTHER can only be used at static priority 0. SCHED_OTHER is the standard Linux time-sharing scheduler that is intended for all processes that do not require special static priority real-time mechanisms.
The process to run is chosen from the static priority 0 list based on a dynamic priority that is determined only inside this list. The dynamic priority is based on the nice level (set by the nice or setpriority system call) and increased for each time quantum the process is ready to run, but denied to run by the scheduler.
Now let's get some statistics to show you how to connect all these finer points together to make some good sense.
When you are testing the system with the following commands or doing the suggestion exercises you may want to see the machine paging or struggling more, a way of doing this would be to limit the memory that is allowed to be used from your bootup prompt as follows:
Boot: Linux mem=48M
|
Do not use more than the memory that you have as this will cause the kernel to have a crash.
| Note |
|---|---|
If you have a motherboard with an old BIOS or an old kernel it may not be possible to access more than 64MB by default. You would then have to tell the system about the amount of memory e.g. 128MB. For this you can use the boot prompt as above or edit the /etc/lilo.conf file. | |
Print the accumulated user and system times for the shell and for processes run from the shell. The return status is 0.
Times is a shell-builtin command and therefore the shell has no extra resources required to find the command.
The report shows the amount of time taken for a command to run in real time (stop watch), the amount of time that the process in on the processor using user state and not system calls, the time on the processor and in system mode.
The difference between the user and the system time is the amount of time the process spent waiting.
If we wanted to save time we could avoid the screen altogether and send the output to /dev/null.
For example:
$ times ls -lR / > /dev/null
|
| Note |
|---|---|
If you have run this command previously the time will be influenced by the output still being in the buffer cache. | |
User time does not change because you are writing to the console driver, but there should be a difference between the user and the system time.
We may need to reduce the real time and we do not want to change the hardware, the buffer cache may increase to handle this but then it will use more memory and that may cause the system to put pages into swap area.
This times command represents time in its reports to the nearest 10th of a second that the process takes to execute.
top provides an ongoing look at processor activity in real time. It displays a listing of the most CPU-intensive tasks on the system, and can provide an interactive interface for manipulating processes.
It can sort the tasks by CPU usage, memory usage.
top [-] [d delay] [p pid] [q] [c] [C] [S] [s] [i] [n iter] [b]
|
| d | Specifies the delay between screen updates. |
| P | Monitor only processes with given process id. This flag can be given up to twenty times. This option is neither available interactively nor can it be put into the configuration file. |
| Q | This causes top to refresh without any delay. If the caller has superuser privileges, top runs with the highest possible priority. |
| s | Specifies cumulative mode, where each process is listed with the CPU time that it as well as its dead children has spent. |
| S | Tells top to run in secure mode. This disables the potentially dangerous of the interactive commands (see below). A secure top is a nifty thing to leave running on a spare terminal. |
| i | Start top ignoring any idle or zombie processes. |
| C | display command line instead of the command name only. The default behavior has been changed as this seems to be more useful. |
| h | Show all threads. |
| n | Number of iterations. Update the display this number of times and then exit. |
| b | Batch mode. Useful for sending output from top to other programs or to a file. In this mode, top will not accept command line input. It runs until it produces the number of iterations requested with the n option or until killed. Output is plain text suitable for display on a dumb terminal. |
Top reads it's default configuration from two files, /etc/toprc and ~/.toprc.
| /etc/toprc | The global configuration file may be used to restrict the usage of top to the secure mode for non-non-privileged users. |
| ~/.toprc | The personal configuration file contains two lines. The first line contains lower and upper letters to specify which fields in what order are to be displayed. The second line is more interesting (and important). It contains information on the other options. |
top displays a variety of information about the processor state.
| "uptime" | This line displays the time the system has been up, and the three load averages for the system. The load averages are the average number of process ready to run during the last 1, 5 and 15 minutes. This line is just like the output of uptime(1). The uptime display may be toggled by the interactive l command. |
| Processes | The total number of processes running at the time of the last update. This is also broken down into the number of tasks which are running, sleeping, stopped, or undead. The processes and states display may be toggled by the t interactive command. |
| "CPU states" | Shows the percentage of CPU time in user mode, system mode, niced tasks, iowait and idle. (Niced tasks are only those whose nice value is positive.) Time spent in niced tasks will also be counted in system and user time, so the total will be more than 100%. |
| Mem Statistics | on memory usage, including total available memory, free memory, used memory, shared memory, and memory used for buffers. |
| Swap Statistics | on swap space, including total swap space, available swap space, and used swap space. |
| PID | The process ID of each task. |
| PPID | The parent process ID each task. |
| UID | The user ID of the task's owner. |
| User | The user name of the task's owner. |
| PRI | The priority of the task. |
| NI | The nice value of the task. Negative nice values are higher priority. |
| SIZE | The size of the task's code plus data plus stack space, in kilobytes, is shown here. |
| TSIZE | The code size of the task. |
| DSIZE | Data + Stack size. |
| TRS | Text resident size. |
| SWAP | Size of the swapped out part of the task. |
| D | Size of pages marked dirty. |
| LC | Last used processor |
| RSS | The total amount of physical memory used by the task, in kilobytes, is shown here. |
| SHARE | The amount of shared memory used by the task is shown in this column. |
| STAT | The state of the task is shown here. The state is either S for sleeping, D for uninterruptible sleep, R for running, Z for zombies, or T for stopped or traced. These states are modified by trailing > for a process with negative nice value, N for a process with positive nice value, W for a swapped out process |
| WCHAN | depending on the availability of either /boot/psdatabase or the kernel link map /boot/System.map this shows the address or the name of the kernel function the task currently is sleeping in. |
| TIME | Total CPU time the task has used since it started. If cumulative mode is on, this also includes the CPU time used by the process's children which have died. You can set cumulative mode with the S command line option or toggle it with the interactive command S. The header line will then be changed to CTIME. |
| %CPU | The task's share of the CPU time since the last screen update, expressed as a percentage of total CPU time per processor. |
| %MEM | The task's share of the physical memory. |
| COMMAND | The task's command name, which will be truncated if it is too long to be displayed on one line. Tasks in memory will have a full command line, but swapped-out tasks will only have the name of the program in parentheses (for example, "(getty)"). |
Several single-key commands are recognized while top is running (check the man pages for full details and explanations).
Some interesting examples are:
| r | Re-nice a process. You will be prompted for the PID of the task, and the value to nice it to. Entering a positve value will cause a process to be niced to negative values, and lose priority. If root is running top, a negative value can be entered, causing a process to get a higher than normal priority. The default renice value is 10. This command is not available in secure mode. |
| S | This toggles cumulative mode, the equivalent of ps -S, i.e., that CPU times will include a process's defunct children. For some programs, such as compilers, which work by forking into many separate tasks, normal mode will make them appear less demanding than they actually are. For others, however, such as shells and init, this behavior is correct. |
| . "f or F" | Add fields to display or remove fields from the display. |
Collect, report, or save system activity information. The sar command only reports on local activities.
/var/log/sa/sadd Indicate the daily data file, where the dd parameter is a number representing the day of the month. /proc contains various files with system statistics.
sar [opts] [-o filename] [-f filename] [interval/secs] [count]
|
The sar command writes to standard output the contents of selected cumulative activity counters in the operating system.
The accounting system, based on the values in the count and interval parameters, writes information the specified number of times spaced at the specified intervals in seconds. If the interval parameter is set to zero, the sar command displays the average statistics for the time since the system was booted.
The default value for the count parameter is 1. If its value is set to zero, then reports are generated continuously.
The collected data can also be saved in the file specified by the -o filename flag, in addition to being displayed onto the screen. If filename is omitted, sar uses the standard system activity daily data file, the /var/log/sa/sadd file, where the dd parameter indicates the current day.
The default version of the sar command (sar -u) might be one of the first facilities the user runs to begin system activity investigation, because it monitors major system resources.
| %user | %age of CPU utilisation executing at user level |
| %nice | %age of CPU utilisation executing at user level with nice priority |
| %system | %age of CPU utilisation executing at kernel or system level |
| %idle | The time that the CPU(s) is idle. |
If CPU utilization is near 100 percent (user + nice + system) then we are CPU-bound. However I would opt to monitor this for a number of days before making that decision, I would also get a look at all other available statistics so that I have a complete picture as to how the system is running prior to changing anything.
sar -o data.file interval count >/dev/null 2>&1 &
|
All data is captured in binary form and saved to a file (data.file). The data can then be selectively displayed with the sar command using the -f option.
Set the count parameter to select records at count second intervals. If this parameter is not set, all the records saved in the file will be selected.
| tps | Total number of transfers per second that were issued to the physical disk. A transfer is an I/O request to the physical disk. Multiple logical requests can be combined into a single I/O request to the disk. |
| rtps | Total number of read requests per second issued to the physical disk. |
| wtps | Total number of write requests per second issued to the physical disk. |
| bread/s | Total amount of data read from the drive in blocks per second. Blocks are equivalent to sectors with post 2.4 kernels and therefore have a size of 512 bytes. |
| bwrtn/s | Total amount of data written to the drive in blocks per second. |
Looking at the IO report, if the amount of data read and written to the disk is as much as was requested from the disk to read and write then you do not have a bottleneck. However if the read/write requests are not being met then that is where the system bottleneck resides.
proc/s Total number of processes created per second.
How busy is the system?
More and more the emphasis is being placed on having an efficient network and here is an excellent tool to monitor the network setup.
With the DEV keyword, statistics from the network devices are reported. The following values are displayed:
| IFACE | Name of the network interface for which statistics are reported. |
|---|---|
| rxpck/s | Total number of packets received per second. |
| txpck/s | Total number of packets transmitted per second. |
| rxbyt/s | Total number of bytes received per second. |
| txbyt/s | Total number of bytes transmitted per second. |
| rxcmp/s | Number of compressed packets received per second (for cslip etc.). |
| txcmp/s | Number of compressed packets transmitted per second. |
| rxmcst/s | Number of multicast packets received per second. |
With the EDEV keyword, statistics on failures (errors) from the network devices are reported. The following values are displayed:
| IFACE | Name of the network interface for which statistics are reported. |
|---|---|
| rxerr/s | Total number of bad packets received per second. |
| txerr/s | Total number of errors that happened per second while transmitting packets. |
| coll/s | Number of collisions that happened per second while transmitting packets. |
| rxdrop/s | Number of received packets dropped per second because of a lack of space in linux buffers. |
| txdrop/s | Number of transmitted packets dropped per second because of a lack of space in linux buffers. |
| txcarr/s | Number of carrier-errors that happened per second while transmitting packets. |
| rxfram/s | Number of frame alignment errors that happened per second on received packets. |
| rxfifo/s | Number of FIFO overrun errors that happened per second on received packets. |
| txfifo/s | Number of FIFO overrun errors that happened per second on transmitted packets. |
With the SOCK keyword, statistics on sockets in use are reported. The following values are displayed:
| Totsck | Total number of used sockets. |
| Tcpsck | Number of TCP sockets currently in use |
| Udpsck | Number of UDP sockets currently in use. |
| Rawsck | Number of RAW sockets currently in use. |
| ip-frag | Number of IP fragments currently in use. |
The FULL keyword is equivalent to specifying all the keywords above and therefore all the network activities are reported.
| runq | sz Run queue length (number of processes waiting for run time) This will not include the processes waiting for resources on the sleep queue. Only the processes that need one more resource before they can run, and that resource is access to the CPU. |
| plist | sz Number of processes in the process list. |
| ldavg | 1 System load average for the last minute. |
| ldavg | 5 System load average for the past 5 minutes. |
The run queue length should not be too long, depending on how busy your system is there should never be that many processes with all resources waiting torun on the CPU. If the queue is always long (not just long at month end time) you may have a process that is continually hogging the CPU.
However if the load is high and the run queue mostly empty look for IO or memeory problems.
The following values are displayed:
| Kbmemfree | Amount of free memory available in kilobytes. |
| Kbmemused | Amount of used memory in kilobytes. This does not take into account memory used by the kernel itself. |
| %memused | Percentage of used memory. |
| Kbmemshrd | Amount of memory shared by the system in kilobytes. Always zero with 2.4 kernels. |
| Kbbuffers | Amount of memory used as buffers by the kernel in kilobytes. |
| Kbcached | Amount of memory used to cache data by the kernel in kilobytes. |
| Kbswpfree | Amount of free swap space in kilobytes. |
| Kbswpused | Amount of used swap space in kilobytes. |
| %swpused | Percentage of used swap space. |
This information can fill in your diagram on memeory division and kernel usage of its part of memeory very nicely.
If your system is running slowly and you see that you are using full memory and having to use swap space ON A REGULAR basis NOT just a once off job. You may need to consider increasing the size of your memory. You might choose to flush the buffers more often and get rid of cache that has not been used for a while.
The more of a picture you get of your entire system, the more of an overview you get of how it is working the better decisions you can make about the performance issues.
| Dentunusd | Number of unused cache entries in the directory cache. |
| file-sz | Number of used file handles. |
| %file-sz | Percentage of used file handles with regard to the maximum number of file handles that the Linux kernel can allocate. |
| inode-sz | Number of used inode handlers. |
| super-sz | Number of super block handlers allocated by the kernel. |
| %super-sz | Percentage of allocated super block handlers with regard to the maximum number of super block handlers that Linux can allocate. |
| dquot-sz | Number of allocated disk quota entries. |
| %dquot-sz | Percentage of allocated disk quota entries with regard to the maximum number of cached disk quota entries that can be allocated. |
| rtsig-sz | Number of queued RT signals. |
| %rtsig-sz | Percentage of queued RT signals with regard to the maximum number of RT signals that can be queued. |
In this table we refer to the internal structure of a filesystem, and although we have mentioned this information before, it is likely that this will be better understood after studying the chapter in Finer Points on Filesystems.
Again if tables are too full it will affect performance, however if they are too empty then maybe there is too much space allocated to the system tables. If your performacne is not down graded do not change anything. Monitor for at least one month regularly prior to making any decisions on this report.
cswch/s Total number of context switches per second.
Context switching occurs when an operational process on the CPU is moved back to the run queu to await another turn on the processor - so what would this imply if the context switches per second are very high?
The following values are displayed:
| pswpin/s | Total number of swap pages the system brought in per second. |
| pswpout/s | Total number of swap pages the system brought out per second. |
Again a memory usage report, monitor this one carefully if system performance has down graded.
The SELF keyword indicates that statistics are to be reported for the child processes of the sar process itself, The ALL keyword indicates that statistics are to be reported for all the child processes of all the system processes.
Again we are looking at a report on CPU usage versus memory. We have discussed this before, mainly I find this report interesting for the geneology issues. As this is a performance section though with what you know so far of child/parent processes and the system calls involved what would this report tell you?
At the present time, no more than 256 processes can be monitored simultaneously. The following values are displayed:
| cminflt/s | Total number of minor faults the child processes have made per second, those which have not required loading a memory page from disk. |
| cmajflt/s | Total number of major faults the child processes have made per second, those which have required loading a memory page from disk. |
| %cuser | Percentage of CPU used by the child processes while executing at the user level (application). |
| %csystem | Percentage of CPU used by the child processes while executing at the system level (kernel). |
| cnswap/s | Number of pages from the child process address spaces the system has swapped out per second. |
Run the following commands and check the results, how is your system performing:
sar -u 2 5 -- Report CPU utilization for each 2 seconds. 5 lines are displayed.
sar -r -n DEV -f /var/log/sa/sa16 -- Display memory, swap space and network statistics saved in daily data file 'sa16'. You may not have a file called sa16, check in the /var/log/sa directory and see which days you have stored and use one of those files.
sar -A -- Display all the statistics saved in current daily data file.
.Run the following commands as close together as possible. From your primary screen- this will tie up the IO subsystem.
# dd if=/dev/root of=/dev/nullFrom your secondary screen run the following:
# sar -b 1 30This will show you what is happening on your system. Make a note of what you see:
vmstat [-n] [delay [ count]]
vmstat[-V]
|
vmstat reports information about processes, memory, paging, block IO, traps, and cpu activity.
vmstat does not require special permissions to run. These reports are intended to help identify system bottlenecks. Linux vmstat does not count itself as a running process. All linux blocks are currently 1k, except for CD-ROM blocks which are 2k.
The first report produced gives averages since the last reboot. Additional reports give information on a sampling period of length delay. The process and memory reports are instantaneous in either case.
| -n | switch causes the header to be displayed only once rather than periodically. |
| delay | is the delay between updates in seconds. If no delay is specified, only one report is printed with the average values since boot. |
| count | is the number of updates. If no count is specified and delay is defined, count defaults to infinity. |
| -V | switch results in displaying version information. |
FIELDS
| Processes | |
| r | The number of processes waiting for run time. |
| b | The number of processes in uninterruptable sleep. |
| w | The number of processes swapped out but otherwise runnable. This field is calculated, but Linux never desperation swaps. |
| Memory | |
| swpd | the amount of virtual memory used (kB). |
| free | the amount of idle memory (kB). |
| buff | the amount of memory used as buffers (kB). |
| Swap | |
| si | Amount of memory swapped in from disk (kB/s). |
| so | Amount of memory swapped to disk (kB/s). |
| bi | Blocks sent to a block device (blocks/s). |
| bo | Blocks received from a block device (blocks/s). |
| System | |
| in | The number of interrupts per second, including the clock. |
| cs | The number of context switches per second. |
| These are percentages of total CPU time | |
| us | user time |
| sy | system time |
| id | idle time |
Report Central Processing Unit (CPU) statistics and input/output statistics for devices and partitions.
iostat [ -c | -d ] [ -k ] [ -t ] [ -V ] [ -x [ device ] ] [ interval [ count ] ]
|
The iostat command is used for monitoring system input/output device loading by observing the time the devices are active in relation to their average transfer rates.
The iostat command generates reports that can be used to change system configuration to better balance the input/output load between physical disks.
The iostat command generates two types of reports:
1.the CPU Utilization report
2.and the Device Utilization report.
The first report generated by the iostat command is the CPU Utilization Report. This report detail is taken intitially from the time the system is booted up, thereafter the report will report only on the time since the last report.
For multiprocessor systems, the CPU values are global averages among all processors.
The report has the following format:
| %user | Show the percentage of CPU utilization that occurred while executing at the user level (application). |
| %nice | Show the percentage of CPU utilization that occurred while executing at the user level with nice priority. |
| %sys | Show the percentage of CPU utilization that occurred while executing at the system level (kernel). |
| %idle | Show the percentage of time that the CPU or CPUs were idle. |
You need the idle time of your system to be relatively low. You can expect the idle time to be high when the load average is low.
The processor may not have a runnable process on it, but the current processes are waiting for IO. If the load average and the idele time are both high then you probably do not have enough memory. In the worse case scenario, where you have enough memory you may have a network or disk related problem.
If you have a 0 idele time and your users are happy that means that your system is being used well and is busy and has enough resource to manage the load. Yet if you upgraded to a faster CPU that would also improve the performance of this machine.
If your system is running only 25% idele then a faster CPU is not your problem and you must look at more memory and a faster disk.
A system that is running 50% in a system-state is probably spending a lot of time doing disk IO. To improve this you could speak to the developers and see how they have written their programs for example: are they moving characters rather than blocks of data at a time. Also check your filesystem and disk structure, maybe that could also be improved.
The second report generated by the iostat command is the Device Utilization Report. The device report provides statistics on a per physical device or partition basis.
The report may show the following fields, (depending on whether -x and -k options are used):
| Device | This column gives the device name, which is displayed as hdiskn with 2.2 kernels, for the nth device. It is displayed as devm-n with newer kernels, where m is the major number of the device, and n a distinctive number. When -x option is used, the device name as listed in the /dev directory is displayed. (See Chapter on Tips and Tricks for more info on Major and Minor device numbers) |
| tps | Indicate the number of transfers per second that were issued to the device. A transfer is an I/O request to the device. |
| Blk_read/s | Indicate the amount of data read from the drive expressed in a number of blocks per second. Blocks are equivalent to sectors with post 2.4 kernels and therefore have a size of 512 bytes. |
| Blk_wrtn/s | Indicate the amount of data written to the drive expressed in a number of blocks per second. |
| Blk_read | The total number of blocks read. |
| Blk_wrtn | The total number of blocks written. |
| kB_read/s | Indicate the amount of data read from the drive expressed in kilobytes per second. Data displayed are valid only with kernels 2.4 and later. |
| kB_wrtn/s | Indicate the amount of data written to the drive expressed in kilobytes per second. Data displayed are valid only with kernels 2.4 and later. |
| kB_read | The total number of kilobytes read. Data displayed are valid only with kernels 2.4 and later. |
| kB_wrtn | The total number of kilobytes written. Data displayed are valid only with kernels 2.4 and later. |
| rrqm/s | The number of read requests merged per second that were issued to the device. |
| wrqm/s | The number of write requests merged per second that were issued to the device. |
| r/s | The number of read requests that were issued to the device per second. |
| w/s | The number of write requests that were issued to the device per second. |
| rsec/s | The number of sectors read from the device per second. |
| wsec/s | The number of sectors written to the device per second. |
| rkB/s | The number of kilobytes read from the device per second. |
| wkB/s | The number of kilobytes written to the device per second. |
| avgrq-sz | The average size (in sectors) of the requests that were issued to the device. |
| avgqu-sz | The average queue length of the requests that were issued to the device. |
| await | The average time (in milliseconds) for I/O requests issued to the device to be served. |
| svctm | The average service time (in milliseconds) for I/O requests that were issued to the device. |
| %util | Percentage of CPU time during which I/O requests were issued to the device. |
It would be good to see when the IO is slow or fast and move the relevant slower process runs to late at night when the devices are less used and when a slower response time does not matter as much.
We have discussed the ps command earlier so I am not going to take you through the structure or options of the command. However there are a couple of issues that likely you have not been told about before.
In Linux the ps command that we are going to look at is the one that uses /proc for the required inforamtion that it reports on.
This version of ps accepts several kinds of options, read the man pages for the list. The following table expresses some of the output modifiers that can be used. There are more than this but I thought these were the most useful:
| Switch | Description |
|---|---|
| -H | show process hierarchy (forest) |
| -m | show all threads |
| -w | wide output |
| C | use raw CPU time for %CPU instead of decaying average |
| S | include some dead child process data (as a sum with the parent) |
| c | true command name |
| e | show environment after the command |
| n | numeric output for WCHAN and USER |
| --cols | set screen width |
| --columns | set screen width |
| --html | HTML escaped output |
| --headers | repeat header lines |
| --lines | set screen height |
This ps works by reading the virtual files in /proc. This ps does not need to be suid kmem or have any privileges to run.
Programs swapped out to disk will be shown without command line arguments (and unless the c option is given) and in brackets.
%CPU shows the cputime/realtime percentage. It is time used divided by the time the process has been running.
The SIZE and RSS fields don't count the page tables and the task_struct of a proc; this is at least 12k of memory that is always resident. SIZE is the virtual size of the proc (code+data+stack).
Both Linux (and FreeBSD) have a way of displaying the various states of a process at any one time. It seems apparent that the process that would display this information is the "process status" command or ps.
This information can become invaluable to you when analysing your performance or needing to know how far a process is towards completion and what might be holding the process up.
You have a "process state" and a "flag" set for each process:
PROCESS FLAGS
ALIGNWARN	001	print alignment warning msgs
STARTING		002	being created
EXITING		004	getting shut down
PTRACED		010	set if ptrace (0) has been called
TRACESYS		020	tracing system calls
FORKNOEXEC	040	forked but didn't exec
SUPERPRIV	100	used super-user privileges
DUMPCORE	200	dumped core
SIGNALED		400	killed by a signal

PROCESS STATE CODES
D   uninterruptible sleep (usually IO)
R   runnable (on run queue)
S   sleeping
T   traced or stopped
Z   a defunct ("zombie") process
|
| Note | |
|---|---|---|
NOTE: For BSD formats and when the "stat" keyword is used, additional letters may be displayed:
| ||
It is also possible to find out the current wait states of the processes, in other words what resource or activity are they waiting for, you will need to examine the man pages of your version of Linux very carefully for this, but the command will look similar to the following:
debian:~# ps axo user,pid,stat,f,wchan,command

USER       PID 	STAT    F        WCHAN  	COMMAND
root         1 		S          100 	select 		init
root         2 		SW       040 	bdflus 	[kflushd]
root         3 		SW   	040	kupdat 	[kupdate]
root         4 		SW   	040	kswapd 	[kswapd]
root         5 		SW   	040 	contex 	[keventd]
root       148 		S    	040 	select 		/sbin/syslogd
root       151 		S    	140 	syslog 	/sbin/klogd
root       175 		S    	140 	select 		/usr/sbin/inetd
root       179 		S    	140 	select 		/usr/sbin/lpd
root       182 		S    	140 	select 		/usr/sbin/cupsd
root       190 		S    	140 	select 		/usr/sbin/sshd
daemon 194     	S    	040 	nanosl 	/usr/sbin/atd
root       197 		S    	040 	nanosl 	/usr/sbin/cron
root       201 		S    	100 	read_c 	-bash
root       202 		S    	000 	read_c 	/sbin/getty 38400 tty2
root       203 		S    	000 	read_c 	/sbin/getty 38400 tty3
root       204 		S    	000 	read_c 	/sbin/getty 38400 tty4
root       205 		S    	000 	read_c 	/sbin/getty 38400 tty5
root       206 		S    	000 	read_c 	/sbin/getty 38400 tty6
root       336 		S    	040 	select 		/sbin/dhclient-2.2.x -q
root       337 		S    	140 	select 		/usr/sbin/sshd
root       340 		S    	100 	wait4  	-bash
root       579 		R    	100 	-  ps axo user,pid,stat,f, \
                        wchan,command
|
The WCHAN field is actually resolved from the numeric address by inspecting the kernel struct namelist, which is usually stored in a map file:
/boot/System.map-<KERNEL VERSION>
|
If you tell ps not to resolve the numerics ("n" flag), then you can see the hex values:
debian:~# ps anxo user,pid,stat,f,wchan,command
USER   PID 	STAT    F    WCHAN    COMMAND
       0     1 	S                  100        130dd4	 init
       0     2 	SW  	        040        12a233 	[kflushd]
       0     3 	SW   	        040        12a298 	[kupdate]
       0     4 	SW   	        040        12381a 	[kswapd]
       0     5 	SW   	        040        11036b 	[keventd]
       0   148 	S    	        040        130dd4 	/sbin/syslogd
       0   151 	S    	        140        114d1a 	/sbin/klogd
       0   175 	S    	        140        130dd4 	/usr/sbin/inetd
       0   179 	S    	        140        130dd4 	/usr/sbin/lpd
       0   182 	S    	        140        130dd4 	/usr/sbin/cupsd
       0   190 	S    	        140        130dd4 	/usr/sbin/sshd
       1   194 	S    	        040        11373c 	/usr/sbin/atd
       0   197 	S   	        040        11373c 	/usr/sbin/cron
       0   201 	S    	        100        1bee13 	-bash
       0   202 	S    	        000        1bee13 	/sbin/getty 38400 tty2
       0   203 	S    	        000        1bee13 	/sbin/getty 38400 tty3
       0   204 	S    	        000        1bee13 	/sbin/getty 38400 tty4
       0   205 	S    	        000        1bee13 	/sbin/getty 38400 tty5
       0   206 	S    	        000        1bee13 	/sbin/getty 38400 tty6
       0   336 	S                  040        130dd4 	/sbin/dhclient-2.2.x -q
       0   337 	S    	        140        130dd4 	/usr/sbin/sshd
       0   340 	S    	        100        119017 	-bash
       0   580 	R    	        100        -	    ps anxo user,pid,stat, \
                        f,wchan,command
|
As you can see it is possible to find out much more than initially apparent. Read the man pages of ps carefully.
These commands on their own cannot improve the performance of your machine, however if you monitor the resources it is possible to re-allocate them in a more balanced fashion to suit your needs and your system load.
The Linux default resource allocations are not the resource allocations that will suit every system but they should suit most systems.
[6] When putting a process into the background, it is automatically penalised with a lower nice value than the default user process nice value.
Table of Contents
Swapping space and paging space is the same thing, they are also known in the Linux environment as "virtual memory".
This would then allow processes to have more memory if required by moving the contents of an piece of memory to disk that is not being used at that time.
No part of the Linux kernel can be moved out of memory, and this adds an interesting perspective to our topic, as every bit of memory that is used by the kernel cannot be used by anything else on the system.
So as an example, let's say that you have installed the operating system and that you have not changed any of the defaults from that time, if you look harder you would also see that you have hardware support built into the kernel that you are not using at that time, for example a SCSI hard disk device driver BUT you are not using that type of hard disk at all.
There are many device drivers compiled into the kernel and most of them you will never use. By tuning this down we can improve performance fairly substantially. This is not hard to do so do not be discouraged, performance tuning can come at you from many angles in such a powerful operating system.
You will need a list of hardware devices that you do have on your system. Refer to the list that you compiled prior to the installation in the system administration course.
The Linux source needs to be loaded on your system, use the main site or use one of the mirror sites as mentioned in the front of this course. If you have purchased Linux it is part of the CopyRight that you have access to the source code (remember to keep the source in /usr/src/linux).
Load and unzip patches if applicable and remove any unneccessary files created in the installation of the patches. (see the section called “DETOUR:”)
It is a good idea to make a backup of the file prior to your changing it.
#  cd  /usr/src

#  make a backup of the file called "linux" - you can zip it as well if want.
|
When you download the source unpack it into the /usr/src directory.
Then you may also have to apply the relevant kernel patches as follows:
# gunzip -c patch?.gz | patch -s -p1
|
Apply the patches in order.
The -s argument to patch tells patch to work silently, and only complain about errors.
The -p1 tells patch that we are in the /usr/src/linux directory, so that it knows how to find files, and puts new files in the right place.
The -s flag is optional; the -p1 argument is mandatory.
Find unnecessary files using the following command:
#  find /usr/src/linux -name '*.orig' -o -name '*~' -exec rm -f {} ;

#  find /usr/src/linux -name '*.rej' -print
|
That will list any files for which there were "rejected "; patches that could not be fitted into the source correctly. If you find any of these files, start from the beginning again.
#  cd  /usr/src/linux

#  make config
|
There will now be lots of questions to answer about your system, hardware and software wise.
Please make sure that you are well prepared!
If you were to say that you do not have a SCSI drive and you do have one, it will not be recognised, if you say that you have one and you do not then you are going to waste memory resources.
Make a copy of the kernel file that you have been using in case you have a problem later on, then you can still boot with the original kernel and get the system up at least.
# mv /zImage /zImage.old
|
You should also have your Boot Floppy (see system administration course).
In an article in a Linux news publication a while ago I saw the following questions as being pointed out as most useful or likely:
"'Kernel math emulation' CONFIG_MATH_EMULATION <!-- riaancheck -->
|
If you don't have a math co-processor, you should answer this question YES. Those who do have a math co-processor should answer NO.
A kernel with math-emulation compiled in it will still use the processor if one is present. The math-emulation simply won't get used in that instance. This will result however in a somewhat larger kernel and a waste of memory.
In connection with hard disk support it was pointed out that this one causes confusion:
'XT harddisk support' CONFIG_BLK_DEV_XD
|
NO. This really doesn't have to do with hard disks -- it has to do with your controller card. AT controller cards are 16-bit cards supported by the standard hard disk driver. XT controller cards are 8-bit cards that are rare in 386 machines.
'TCP/IP networking' CONFIG_INET
|
YES if you plan to have your system interactive on the net. This includes SLIP and PPP connections. Answer NO if you aren't going to connect to the net right now; you can always compile another kernel later.
'System V IPC' CONFIG_SYSVIPC :
|
This isn't used for many things, but doesn't use much memory. YES is recommended.
'Use -m486 flag for 486-specific optimizations' CONFIG_M486 :
|
If you have an i386 system, answer NO. Otherwise you should select YES. This uses a little bit of memory. Adding this flag will not slow a 386 down, other than using extra memory, but will speed up a 486 quite a bit. There are a series of questions, which have to do with different types of SCSI drivers and interfaces. If you have a SCSI controller, then you would want to enable the drivers via the configuration process. For those who don't have a SCSI controller, select NO, and move on to the next step in the configuration.
Network device support mainly has to do with selecting the proper Ethernet device or other network connection. PPP and SLIP are used to connect to TCP/IP networks over the serial port; PLIP is used to connect TCP/IP networks over the parallel port, and the rest are ethernet controllers. Do not select drivers of devices you do not have. This can sometimes cause conflict later when you are booting.
Another important section in the kernel configuration process has to do with the different filesystems. There is an advantage to compiling the kernel to have only the filesystems you need. There are several different filesystems supported by Linux:
'Standard (minix) fs support' CONFIG_MINIX_FS :
|
This is the original Linux filesystem. It is considered to be one of the more stable filesystems, and is still widely used. You probably want this unless you are really desperate for space or will really never use it.
'Extended fs support' CONFIG_EXT_FS :
|
Only select this if you still have filesystems from the 'old days' that will use this precursor of the second extended filesystem. This filesystem is slow and no longer actively maintained. It is there only for backwards compatibility. NO.
'Second extended fs support' CONFIG_EXT2_FS :
|
The ext2 filesystem is the most 'full-featured' of the filesystems. It is a super rewrite of the original extended filesystem, with improved speed as well. This is by far the most popular filesystem. A filesystem debugging package is available for this filesystem that can help you recover from fairly bad filesystem crashes. YES.
'msdos fs support' CONFIG_MSDOS_FS :
|
This filesystem allows for access to the FAT filesystem used by MS-DOS. It is a great advantage for those who need to access floppies or hard disk partitions that use that filesystem. In addition, if you use the UMSDOS filesystem (usually because you installed Linux on an MSDOS partition), you need to include MSDOS filesystem support.
'/proc filesystem support' CONFIG_PROC_FS :
|
The PROC filesystem does not touch your disk. It is used by the kernel to provide data kept within the kernel itself to system programs that need that information. Many standard utilities will not function without this filesystem. YES.
'NFS filesystem support' CONFIG_NFS_FS :
|
The NFS filesystem is necessary for those who have a physical network and need to mount NFS filesystems from other computers. If you are on a TCP/IP network, you probably want this option.
'Kernel profiling support' CONFIG_PROFILE :
|
This is used only by seasoned kernel hackers. You don't need this if you need to read this article...
'Selection (cut and paste for virtual consoles)' :
|
If you want to be able to use your mouse in any of your VC's, then you would select YES. Note that this requires a separate selection program to work. Your mouse will be inactive without this program. This has nothing to do with X-windows.
The last section of the configuration process that needs insight has to do with sound card options. If you want sound card support, then you would definitely select YES.
Full driver? NO
|
Select NO because configure the kernel to handle only a particular sound card.
Disable? NO.
|
It seemed strange that the driver question would come before a question about disabling the sound drivers altogether. Nonetheless, you should select NO, and answer the questions that follow accordingly, depending on what hardware you have."
Using the depend command from with the /usr/src/linux directory will create the dependencies that you have now set up.
#  cd /usr/src/linux

#  make depend

# make zImage
|
make zImage -- creates a compressed image which also saves memory.
You need to edit the configuration file for LILO in order that you will boot with the new kernel. (This is assuming that you are using LILO as your preferred boot loader program.)
# vi /etc/lilo/config
|
OR
# vi /etc/lilo.conf
|
boot = /dev/had

#This is the path to the NEW kernel image to be booted
image = /zImage
label = linux

#This is the path to the OLD kernel image to be booted
#if the other should fail to boot
image = /zImage.old
label = linux.old
|
Now when you boot you will see that it uses by default the new kernel that you just loaded.
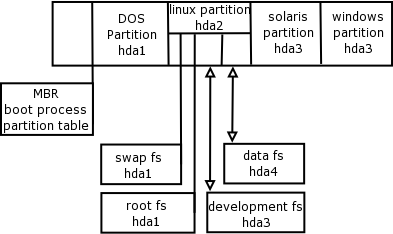
Original Unix filesystems were composed of 3 main areas:
Superblock
Inode list
Datablocks
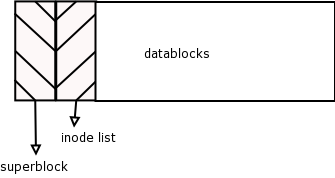
The superblock is a data structure at the beginning of the filesystem, and takes up 1 filesystem block. The superblock contains status information about the filesystem such as the filesystem block size, the number of free blocks and the mount status.
The inode list, also known as the inode table, contains data structures that provide information about files.
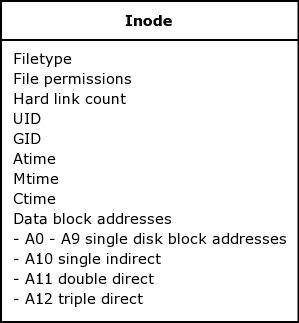
The datablock area contains actual file data, as well as directory files, which are filesystem metadata.[7]
Various enhancements were made to the original Unix filesystem by different people. These enhancements are:
Free blocks bitmap
Block groups
Extents
Datablock pre-allocation
The free blocks bitmap contains a one-to-one status map of which data blocks contain data. One bit describes one data file, a one in the bitmap indicates the corresponding datablock is in use and a zero indicates that it is free.
This was originally a BSD extension to UFS, made by UCB in the BSD FAST FILESYSTEM (FFS). What was done for for FFS (the Berkeley "Fast File System") was to have a "free blocks bitmap" for each cylinder group.
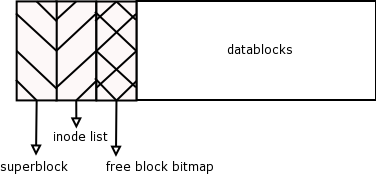
To make disk access faster, the filesystem can be divided into block groups, a block group simply contains all the part of the filesystem that a generic Unix filesystem is made of as shown in Figure 5. However, the distributing of multiple superblocks inodes and data block areas around the entire physical disk allows the system to allocate an inode closer to its data blocks.
This means that when a new file is saved, the system will find some free blocks to allocate for data and then try to find a free inode that is in the nearest inode list before the data blocks that were allocated.
In contrast, for example, on a 1GIG filesystem of the traditional Unix type (as in Figure 5), reading a file whose data blocks were near the end of the filesystem, would result in the heads on the disk moving a far distance to the beginning of the filesystem to read the inode for that file. If this filesystem utilised block groups, then the inode for this file would be much closer to the end of the filesystem and to the data blocks, so the heads would have a comparatively shorter distance to travel.
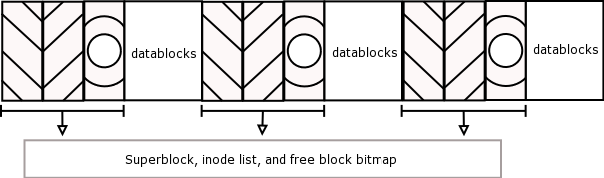
Extent based allocation is an efficiency improvement to the way that disk block addresses are referenced in the inode.
Instead of referencing each and every data block number in the inode, contiguous block addresses can simply be referenced as a range of blocks. This saves space for large files that have many data blocks.
For example if a file takes up data blocks 21, 22, 23, 24 and 25, expressing this as a block range in an extent based filesystem would specify 21-25 instead.
To prevent micro-fragmentation of data blocks, of a single file, all around the filesystem, the filesystem driver can pre-allocate data blocks in entire groups at a time.
For instance, if a file is first saved, that consumes 3 blocks, 32 blocks (if this were the pre-allocation size for this specific filesystem) would be allocated for this file in one go. The remaining 29 blocks would not be sued for other files. When this file grows, the new blocks can therefore be allocated contiguously after the first three.
Pre-allocation is handled transparently by the filesystem driver behind the scenes. This means that although fragmentation still occurs as a natural part of a filesystem structure, file data is stored in large ranges of blocks, so that single blocks of a file are never scattered individually around the filesystem.
The blocks pre-allocated in this scheme will not show as allocated in the output of df, and will immediately be sacrificed automatically when disk space runs low.
I would like to take you through some general information on filesystems before going into the specific types available with Linux.
We did look at filesystems and inodes, and the installation in the system adminsitration course, and then we did a bootup section in this course. Each time we spoke about the system mounting the root filesystem before the booting process can complete.
You can have more than one filesystem on your system, why would you want to do that though?
A smaller filesystem is easier to control and easier to maintain.
Smaller filesystems or divisions are quicker as the searching for datablocks is over a smaller area on disk. So if you have an active system the size of your filesystems will affect performance.
Backups can become easier as some filesystems do not change that much and do not need such a rigid backup routine as other sections that are changing all the time.
Put different operations onto different sections, for example, the development area is separate from the financial records and the user area where data capture goes on all the time.
Security is enhanced as a sensitive area need only be accessible at certain times (mounted) and secured at other times (not mounted).
Organises the disk space within a division.
Manages files and implements file types (regular, directory, device etcetera.)
Maps filenames to the inodes
Maps file offsets to logical block numbers (watches for bad tracks as well)
A filesystem is an area of blocks allocated on the disk. See Figure 1 (Hard Disk Partitions). These are logical divisions on the Linux partition.
A logical decision must be made to ascertain how big each area should be, take into account the number of users you have and the amount of data you will need. As it is fairly difficult to re-allocate space on a working system please put some thought into this.
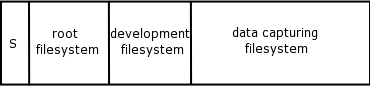
Where:
S=swap space allocated 64MB
Root filesystem allocated 800MB
Development filesystem allocated 300MB
Data Capturing filesystem allocated 1500MB
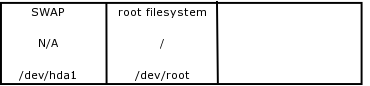
During the installation you specified that your first logical partition was hda1 and that it was 64MB, this is an extention of virtual memory the system creates a device file that points to that area on the disk from block x to block y (Minor device number) and that the type of filesystem is a swap space (major device number). This filesystem is not accessed by the user and therefore is not mounted or attached.
The root filesystem is created by block p to block t and is 800 MB in size. During the bootup process, the kernel and the drivers work together and the root structure (/dev/hda2) is mounted or attached to the mount point (/).
Through this mounting process the user can now see the directory hierarchy and the entire system that has installed within the root filesystem.
If you did not attached the datablocks referenced by /dev/hda2 to a mount point you would not be able to see the operating system.
# mount /dev/devel /devel
|
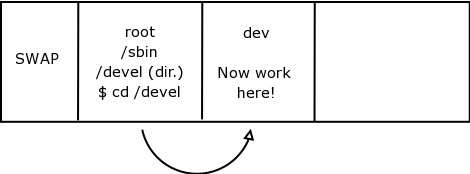
When you created the development filesystem, you called it devel, the kernel then created a related device file called /dev/devel or /dev/hda3, this device file points to a set of datablocks that are 300 MB in size.
You will be asked where you want to mount this filesystem and let's say we decide to call the mountpoint /devel. An empty directory called devel is created directly under /.
When you attach the device file to the mount point, it is no longer an empty directory but a pointer to a set of datablocks, so when you change directory into /devel you actually move to the relevant data block section of the disk. (refer to Figure 8 - Where are you working now?)
# mount /dev/data /data
|
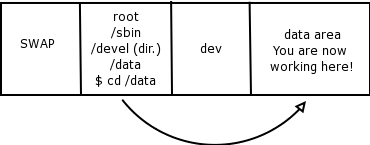
Again you choose to create a filesystem called /dev/data or /dev/hda4. Once mounted or attached it represents a set of datablocks pointed to by the major and minor device numbers of that device.[8]
At the beginning of this course we spoke of mounting different versions or types of filesystems, those that are not of Linux type.
Some of these filesystems would have to have some kernel support built in to the Linux kernel.
Some would have utilities to work with them, even if not mounted and without kernel support being required.
To do this you would work with programs that require user space only.
mtools: for MSDOS filesystem (MS-DOS, Windows)
dosfstools for MS-DOS FAT filesystem
cpmtools: for CP-M filesystem
hfsutils: for HFS filesystem (native Macintosh)
hfsplus: for HFS+ filesystem (modern Macintosh)

When you create a filesystem of say 800MB the system also creates a superblock, and inode table and then the datablock allocation for that filesystem.
Inode numbers start at 1 although 1 is never allocated out, inode number 2 usually points to the root directory file. They are stored as a sequential array at the front of the filesystem and that structure is called the ilist, inode table or inode list.
The amount of inodes required for each filesystem is calculated depending on the data block size of the filesystem. (Generally works at approx 4K per inode).
Each inode is 64 bytes in size and we have already covered in the Fundamentals course the fields contained therein.
The disk inodes are the ones residing on the hard disk and not in the buffer cache and normally defined in ino.h header file.
The maximum size of an ext2 filesystem is 4 TB, while the maximum file size is currently limited to 2 GB by the Linux kernel.
Disk block addressing is controlled by the inode and the field that expresses the actual datablocks that contains the physical file, the address field is a total of 39 bytes in length.
Although most files are fairly small, the maximum file size in Linux is 2GB, how does the inode cope with addressing that number of disk blocks?
The inode block numbers work in a group of 13:
The first 10 point directly to a datablock which contain the actual file data - this is called direct addressing = 10Kb.
Then the 11th block points to a datablock that contains 256 pointers, each of those pointers point to a single address block as above. This is called single indirect block addressing = 256Kb.
The 12th block points to a datablock that has 256 pointers and each of those pointers point to a datablock with 256 pointers, and each of those pointers to a datablock as per point 1 above. This is called double indirect block addressing = 64Mb.
The 13th point has a triple indirect setup where the 256 pointers each point to 256 pointers that each point to 256 pointers that each point to a datablock as per point 1 above = 16GB.
So the max size is actually 16GB, BUT this is limited by the inode sizing not by the structure of the operating system.
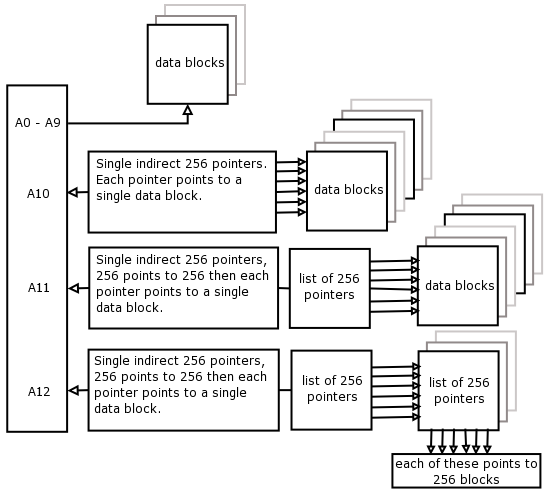
In memory, inodes are managed in two ways:
1. A doubly linked circular list and,
2. A hash table.
Function iget(struct super_block *sb, int nr) to get the inode, if it is already in memory, then I_count is incremented, if it is not found, must select a "free" inode call superblock function read_inode(0 to fill it, then add it to the list.
(See Iput(), namei())
Let's take a step backwards and look at the function, locality and general information on the superblock itself.
Each filesystem or logical allocation of blocks on the hard disk physical Linux partition will have a superblock and an inode table.
When the filesystem is mounted or attached to a mount point, a switch on the superblock is marked as open and the superblock is put into memory.
If for any reason the filesystem is unattached in an unorthodox manner, e.g. a system crash, switching off the machine etcetera then this switch is still set to open and the filesystem is then considered dirty.
When you attempt to remount this filesystem you will have to run a process to clean up the superblock where it attempts to match the "picture" of the filesystem on harddisk to the superblock picture in memory before it can successfully mount the filesystem the pictures have to be the same.
Quite often we hear of people who run the fix-up program (used to be called fsck) and answer the questions to delete, move, reallocate blocks and they answer as best they can.
The best way is to let the fix-it program run on its own and do its best to make things right. We will look at this program later on in this section.
The Superblock contains a description of the basic size and shape of this file system. The information within it allows the file system manager to use and maintain the file system.
To quote from the man pages:
Amongst other information it holds the:
Magic Number
This allows the mounting software to check that this is indeed
the Superblock for an EXT2 file system. For the current version
of EXT2 this is 0xEF53.

Revision Level
The major and minor revision levels allow the mounting code to
determine whether or not this file system supports features that
are only available in particular revisions of the file system.
There are also feature compatibility fields which help the
mounting code to determine which new features can safely be
used on this file system,

Mount Count and Maximum Mount Count
Together these allow the system to determine if the file system
should be fully checked. The mount count is incremented each time
the file system is mounted and when it equals the maximum mount
count the warning message "maximal mount count reached, running
e2fsck is recommended" is displayed,

Block Group Number
The Block Group number that holds this copy of the Superblock,

Block Size
The size of the block for this file system in bytes, for example
1024 bytes,

Blocks per Group
The number of blocks in a group. Like the block size this is
fixed when the file
system is created,

Free Blocks
The number of free blocks in the file system,

Free Inodes
The number of free Inodes in the file system,

First Inode
This is the inode number of the first inode in the file system.
The first inode in an EXT2 root file system would be the directory
entry for the '/' directory.
Usually only the Superblock in Block Group 0 is read when the file system is mounted but each Block Group contains a duplicate copy in case of file system corruption.
EXT2 file system tries to overcome fragmentation problem by allocating the new blocks for a file physically close to its current data blocks or at least in the same Block Group as its current data blocks.
Blocks Bitmap
Inode Bitmap
Inode Table
Free blocks count
Free Inodes count
Used directory count
We have spoken before as to how the buffer cache can improve the speed of access to the underlying devices.
This buffer cache is independent of the file systems and is integrated into the mechanisms that the Linux kernel uses to allocate and read and write data buffers.
All block structured devices register themselves with the Linux kernel and present a uniform, block based, usually asynchronous interface.
Linux uses the bdflush kernel daemon to perform a lot of housekeeping duties on the cache.
Some of these functions would happen automatically as a result of the cache being used. Please remember that this report could differ from version to version.
bdflush version ?.?
0:    60 Max fraction of LRU list to examine for dirty blocks
1:   500 Max number of dirty blocks to write each time bdflush activated
2:    64 Num of clean buffers to be loaded onto free list by refill_freelist
3:   256 Dirty block threshold for activating bdflush in refill_freelist
4:    15 Percentage of cache to scan for free clusters
5:  3000 Time for data buffers to age before flushing
6:   500 Time for non-data (dir, bitmap, etc) buffers to age before flushing
7:  1884 Time buffer cache load average constant
8:     2 LAV ratio.
|
If you flush the buffers often, it is more efficient if you have a system crash because everything would have been updated from the buffers to the disk - HOWEVER if you do this too often you will see a degrade on performance.
Work to have a balance here as well, flush the buffers often enough to be safe for your system. If your system is very active maybe you need to flush more often. If you have a development environment then flush less often (less activity in the buffers).
We used to average 30 seconds and then work on the performance from that point.
In Linux the filesystems are separated from the kernel and from the system services by an interface layer known as the Virtual File system, or VFS.
When a developer wants to add support for a new filesystem to the kernel, a new filesystem driver must be written that knows how to access the relevant filesystems data structures.
Because the kernel provides the VFS abstraction layer, the filesystem driver is written to interface to this.
When the kernel needs to perform a common operation like writing a file to the disk, it will run a generic function that is a part of the VFS API. This relevant VFS function will look up the specific filesystem function to run for handling this request in the filesystem driver for the relevant filesystem on which this file is located. The kernel uses its mount table to determine which filesystem type and heads driver to use.
When a filesystem driver is loaded, it registers its specific functions in the VFS so that the kernel knows what functions to call from its generic VFS functions, and where they are located in memory. (see the section called “Device Drivers”)
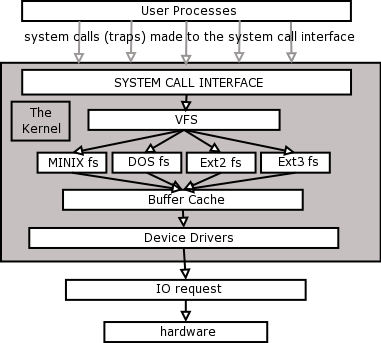
The VFS interface provides support for many types of filesystems, and presents a unified interface to the Linux kernel, they look like a hierarchical tree structure that represents the filesystem as a whole entity.
Linux's first filesystem used on hard disk was the Minix filesystem there were different releases of this filesystem, which grew in features.
Linux native filesystem that became popular after Minix was called the extended filesystem or ext. Version 2 of this filesystem was the mainstay in Linux for many years throughout the 2.0 and 2.2 kernels.
The original Minix filesystem was a generic Unix filesystem supporting 14 character filenames and no symbolic links (soft links). Later Minix filesystems supported up to 30 character file names.
The extended 2 or ext2 filesystem is based on the generic Unix filesystem structure, as discussed earlier, and it also uses some of the mentioned enhancements; these are
free blocks bitmap
block groups
extents
data block pre-allocation
ext2 was designed with extensibility and backwards compatibility in mind. This means that newer kernels supporting newer versions of the extended filesystem should always be able to mount and handle older extended filesystems.
The extended 3 filesystem or ext3 adds journaling support to ext2 filesystem. The backwards compatibility of the extended filesystem is notable here, as an ext3 filesystem can be mounted as ext2; this will just cause journaling features to be unavailable.
You can use the fsck(8) command as root to check and repair filesystems.
The file system checker or fsck, can peform both physical and non-physical checks on a filesystem. The default is to do a non-physical check on the filesystem structures. The -c option performs a physical, non-destructive check in addition to the normal filesystem check.
The physical check utilises the badblocks program to find all the logical filesystem blocks that are damaged (contain bad sectors), and mark them off in the filesystem so that they are not used for storing datablocks.
The bad blocks will be allocated to inode number 1 on the relevant filesystem. This inode has no corresponding filename in any directory in the filesystem, hence you cannot get hold of it.
You must un-mount a filesystem before you can check it, except the root filesystem, which can never be un-mounted. To check the root filesystem ensure that you are in single user mode (run level 1 or s), this will ensure that there are no processes from multi-user mode writing to the disk when you do the check.
When a file is saved, data blocks are allocated to it for the file data, an inode is allocated to describe that file, and a new directory entry is made in the directory that contains the file. The directory entry consists of a filename and a matching inode number (and depending on the filesystem possibly more information). Setting up the directory entry is the last operation performed in this sequence.
In the event of an improper shutdown, such as a power failure or system hang, it is possible that a file that has been saved will have its data blocks allocated, an inode, but the directory entry will not yet have been written to disk. This is the most common form of filesystem corruption.
To fix this problem, when fsck is run and it finds such files without filenames in the filesystem it has essentially found a lost file it now has to give it a new filename, essentially reconnecting it to the filesystem directory structure. Fsck will create a new filename entry for the lost file in the filesystems' lost+found directory, which is located in the root directory of the filesystem. Fsck will create this directory if it does not exist fsck will name the file after the inode number.
Different Unix systems may have slightly different symantics here. On Linux, fsck will construct the filename of a lost file has a # character followed by the inode number. For example, if fsck finds a lost file in the root filesystem that has the inode number of 2105, then the repaired file will be called "/lost+found/#2105".
The Linux kernel supports a special filesystem type of proc. This can be monitored to any directory like a normal filesystem, however there is normally only one instance of this type of filesystem mounted on the root filesystem to the /proc directory. There are many programs, which expect this filesystem type to be mounted here.
If you look at the /etc/fstab file, you will see that there is a filesystem mounted to /proc of type "proc". The device file used maybe any string, as this is unused is proc's case.
The proc filesystem provides an abstracted interface to kernel settings in kernel memory, without having to access kernel memory directly by using the device file /dev/kmem.
If you do an "ls -l /proc", you will see a number of files and directories. These are not real disk files, but rather fake files generated automatically by the kernel that contain the values of different system variables and kernel settings.
Some of these files can be written to as if they were regular text files, so that the system administrator can change the behaviour of the kernel in real time other files can only be read from.
There are four main kinds of information displayed as virtual files in the proc filesystem:
The process table
Kernel tuneable parameters
Detected hardware devices
Other tables and settings including the mount table, memory information and currently supported filesystems.
Look at the proc(5) man page ("man 5 proc")
Examine the files and directories under /proc by using the ls and cat commands.
| Note |
|---|---|
Note that you can also view and modify system tuneable parameters by running the sysctl(8) command, which using the sysctl(2) system call in the kernel. (See the section called “Performance Tuning”) | |
User programs and services that run on Unix systems can either log to their own log files directly, or through a standardised system logging service called syslog.
On System V the syslog binary is called "syslog", on FreeBSD it is called "newsyslog", and on Linux it is called "syslogd".
There are library calls in the standard C library that offer application programmers access to the syslog service. This shows that the use of syslog is an inherent part of Unix application design.
Many other security programs such as ssh and tcpwrappers (See Network Administration) will log to syslogd. It is important that syslogd is always running on your system.
Additional security precautions that you could take are:
Pick one machine as your loghost and secure it as much as possible. If possible work to run syslogd on this machine and nothing else.
To ensure full resources stop the other system daemons such as inetd and sendmail, you will also need basic networking but nothing else should be running
You could consider not running ssh on your loghost and then you would have to log in to the loghost console to check the security logs.
Make sure the system clock is always set to the correct time on the loghost.
In order to allow the loghost to receive syslog messages from other machines, you may need to enable it to receive remote logging.
Do this by adding the -r command line upon syslogd startup.
Edit /etc/rc.d/init.d/syslog, and find the line:
daemon syslogdadd the -r option to this line as follows:
daemon syslogd -rSet syslogd up so that everytime syslogd is started the log information is sent to the loghost as follows:
To do this, make sure that the client is able to receive calls from loghost, then add an entry into /etc/hosts so that logging is not interrupted if there is a resolving problem and then add the following to the client /etc/syslog.conf file as the last line in the file:
*.info @loghost.co.za
Syslogd is started by the normal startup scripts in /etc/rc.d/rc3.d.
Let's review some of what we have learnt form the introduction, the configuration file for syslogd is /etc/syslog.conf. Syslogd is the system daemon or process that does the actual logging.
Time specific messages are recorded into log files as designated by the .conf file.
If you are being notified of login attempts and failures, system errors and possible security problems then you will find that:
A log will keep track of what is happening on your system at all times.
It will alert you to problems before they arise, for example; if your partition is becoming full or if there is an impending attack.
The problem would be seen prior to your "healthy" backups being cycled out.
"In syslog.conf, there are two fields, the selector and the action. The selector field tells what to log and the action field tells where to log it (i.e., to a certain file, or to a certain host on the network).
The selector has the form: facility.level
The action has the form of a path, e.g., /var/log/messages or /var/log/secure, or /dev/console, or a full host name preceeded by an @ sign: @loghostname.loghost.co.za
The facility and level have many possible combinations. But for security's sake, it is far easier to just log everything. "
| Note |
|---|---|
If you are part of a cluster, make sure the machine logs to another loghost as well as itself. | |
Make sure the time is correct on your system. Otherwise you will have trouble tracing problems and break-ins.
System logs are generally kept in the /var partition, mainly /var/log. Make sure that /var is large enough to hold much more than the basic log file. This is to prevent accidental overflows, which could potentially erase important logging info.
The default syslog.conf does not do a very good job of logging. Try changing the entry for /var/log/messages to:
*.info /var/log/messagesIf you start getting too much of a certain message (say from sendmail), you can always bump that particular facility down by doing:
*.info;mail.none /var/log/messages
The types of inter process communication are:
Signals - Sent by other processes or the kernel to a specific process to indicate various conditions.
Pipes - Unnamed pipes set up by the shell normally with the "|" character to route output from one program to the input of another.
FIFOS - Named pipes operating on the basis of first data in, first data out.
Message queues - Message queues are a mechanism set up to allow one or more processes to write messages that can be read by one or more other processes.
Semaphores - Counters that are used to control access to shared resources. These counters are used as a locking mechanism to prevent more than one process from using the resource at a time.
Shared memory - The mapping of a memory area to be shared by multiple processes.
Message queues, semaphores, and shared memory can be accessed by the processes if they have access permission to the resource as set up by the object's creator. The process must pass an identifier to the kernel to be able to get the access.
If using signals one must remember that they will only be able to be processed when the process is in user mode, if you have sent a signal to a process and at that exact time it is in kernel mode, it will only be processed when the process is back in user mode.
In a way all that you are doing with a signal is sending a process a very simple message.
Let's use an example that will clarify what I mean: If you want to stop a shell process, the only signal that will stop it is the SIGKILL, which is represented by a -9 switch. So you would use the following command:
# kill -9 PID
|
| Note |
|---|---|
It is not always so clever to use a -9 switch with the kill command, this means stop that process no matter what. Well that is OK if you are sure of what is going on in your system, but if for example, you were to kill a database process in that way you may corrupt the entire database. (MySQL) | |
As we saw from the previous section on IPCs, signals are grouped with the other inter-process communication tools.
Signals can be sent to a process in one of the following ways:
By a keyboard interrupt sequence <DEL>
Errors conditions (some that would produce a core dump) that arise, for example if the process attempts to access a portion in memory that does not exist.
Mostly they are used in the shell or in shell scripts and in this way communicate with the child processes.
A process can ignore the receipt of a signal, except in two cases and that is if receiving a SIGKILL signal or a SIGSTOP signal. A process will only be prepared to receive a signal from the same UID or GID or the process owner - unless root overrides this
Other than those two signals it is pretty much up to the process as to how a signal is handled. For example, if the process hands the signal over to the kernel then the kernel will ONLY run the default value of the signal, so if the kernel receives a signal to run a SIGFPE that means that the kernel must dump the core of that process and then exit.
When Linux uses a signal on a process, the information that it needs to run the signal is stored in the task_struct for that process. The information on how a process must handle a signal is kept by Linux for each and every process.
The number of signals that are supported on a machine depends on the word size of the processor, 32 bit means 32 signals, 64 bit means 64 signals.
This table was downloaded from the following site: http://www.comptechdoc.org/os/linux/programming/linux_pgsignals.html
| Signal Name | Number | Description |
|---|---|---|
| SIGHUP | 1 | Hangup (POSIX) |
| SIGINT | 2 | Terminal interrupt (ANSI) |
| SIGQUIT | 3 | Terminal quit (POSIX) |
| SIGILL | 4 | Illegal instruction (ANSI) |
| SIGTRAP | 5 | Trace trap (POSIX) |
| SIGIOT | 6 | IOT Trap (4.2 BSD) |
| SIGBUS | 7 | BUS error (4.2 BSD) |
| SIGFPE | 8 | Floating point exception (ANSI) - dumps core |
| SIGKILL | 9 | Kill(can't be caught or ignored) (POSIX) |
| SIGUSR1 | 10 | User defined signal 1 (POSIX) |
| SIGSEGV | 11 | Invalid memory segment access (ANSI) |
| SIGUSR2 | 12 | User defined signal 2 (POSIX) |
| SIGPIPE | 13 | Write on a pipe with no reader, Broken pipe (POSIX) |
| SIGALRM | 14 | Alarm clock (POSIX) |
| SIGTERM | 15 | Termination (ANSI) |
| SIGSTKFLT | 16 | Stack fault |
| SIGCHLD | 17 | Child process has stopped or exited, changed (POSIX) |
| SIGCONT | 18 | Continue executing, if stopped (POSIX) |
| SIGSTOP | 19 | Stop executing(can't be caught or ignored) (POSIX) |
| SIGTSTP | 20 | Terminal stop signal (POSIX) |
| SIGTTIN | 21 | Background process trying to read, from TTY (POSIX) |
| SIGTTOU | 22 | Background process trying to write, to TTY (POSIX) |
| SIGURG | 23 | Urgent condition on socket (4.2 BSD) |
| SIGXCPU | 24 | CPU limit exceeded (4.2 BSD) |
| SIGXFSZ | 25 | File size limit exceeded (4.2 BSD) |
| SIGVTALRM | 26 | Virtual alarm clock (4.2 BSD) |
| SIGPROF | 27 | Profiling alarm clock (4.2 BSD) |
| SIGWINCH | 28 | Window size change (4.3 BSD, Sun) |
| SIGIO | 29 | I/O now possible (4.2 BSD) |
| SIGPWR | 30 | Power failure restart (System V) |
These signals are generated by processes or the kernel to notify other processes that an event has occurred.
[7] Filesystem metadata is all the data saved on the filesystem that does not belong to real files. that is, data that no user intentionally wanted to save as being a part of any file, however it is required for the management of the filesystem.Superblocks, inodes and directory files are examples of filesystem metadata.
[8] hda4 is the last primary logical division that comes as a default standard. If you need further filesystems you will have to create logical partitions.
14 years UNIX support, training and research
Maurice Bach "The Design of the UNIX operating system"
PC A Power User's Guide - Harry Fairhead
Unix Power Tools - O'Reilly
System Performance Tuning - O'Reilly
Termcap and Terminfo - O'Reilly
A Quarter Century Of Unix - P Sulcas
SCO Unix Internals course attended with Peter Kettle 1994 (approx)
Understanding the Linux Kernel - Daniel P Bovet & Marco Cesati - O'Reilly (has a really excellent Source Code Structure list at the back of the book.)
Sebastian Spitzner - Phyrix Systems (Pty) Ltd.
The Linux Documentation Project www.tldp.org
The Linux Kernel On-line book http://www.tldp.org/LDP/tlk/tlk.html http://kernelbook.sourceforge.net/
The Linux Virtual File System http://cgi.cse.unsw.edu.au/~neilb/oss/linux-commentary/vfs.html
Linux source code (Mirror sites if app) http://www.kernel.org/ http://www.kernel.org/mirrors/