Copyright © 2004 The Shuttleworth Foundation
Unless otherwise expressly stated, all original material of whatever nature created by the contributors of the Learn Linux community, is licensed under the Creative Commons license Attribution-ShareAlike 2.0.
What follows is a copy of the "human-readable summary" of this document. The Legal Code (full license) may be read here.
You are free:
to copy, distribute, display, and perform the work
to make derivative works
to make commercial use of the work
Under the following conditions:
 Attribution. You must give the original author credit.
 Share Alike. If you alter, transform, or build upon this
work, you may distribute the resulting work only under a license identical to this one.
Share Alike. If you alter, transform, or build upon this
work, you may distribute the resulting work only under a license identical to this one.
For any reuse or distribution, you must make clear to others the license terms of this work.
Any of these conditions can be waived if you get permission from the copyright holder.
Your fair use and other rights are in no way affected by the above.
This is a human-readable summary of the Legal Code (the full license).
2005-01-25 22:35:07
| Revision History | |
|---|---|
| Revision 0.0.1 | 01/NOV/2004 |
| Initial version | |
Table of Contents
- 1. Tour de Shell Scripting
- 2. The Shell
- 3. Regular Expressions
- Introduction
- What are regular expressions?
- The fullstop
- Let's explore "sed" syntax
- Square brackets ( [ ] ), the caret ( ^ ) and the dollar ( $ )
- Using sed and pipes
- The splat (asterisk) ( * )
- The plus operator ( + )
- Returning from detour to our discussion on curly braces …
- RE's are greedy for matching patterns
- Placeholders and word boundaries
- Word boundaries ( < and > ) - a formal explanation
- The tr command
- The cut command
- The paste command
- The uniq command
- The Sort command
- The grep command
- 4. Practically Shell Scripting
- 5. Using Quotation marks in the Shell
- 6. So, you want an Argument?
- 7. Where to From Here?
- 8. Loops
- 9. User input to a script
- 10. Additional Information
- 11. Positional parameters & variables re-visited
- 12. Bits and pieces - tying up the loose ends
- A. Writing html pages
- B. An introduction to dialog
- C. A Comparisson of bash, tsch and ksh
- Index
List of Figures
List of Tables
Table of Contents
This course is structured with the following students in mind:
A "newbie" to shell scripting, OR
A user who wants a refresher on a particular aspect of shell scripting.
For Category 1 users I suggest you work through each section, do all the relevant exercises and Labs.
If you fall into Category 2 above, then just look up the section you need a refresher on, do the examples below each section to drive the point home and move on.
The Lab (project) is designed to get you into the groove of writing shell scripts and is, in essence, an example of the practical application of the shell script.
You will learn an immense amount from doing the exercises and Labs, and you should have a great deal of fun too. In the Labs, we begin by building a really simple script and progress to a script that you will want to show your friends... but don't. Unless they're Linux nuts too, they'll think you're just weird!!!!
Finally, for those geeks out there, (or those of you who think you're too clever for this sort of stuff), there are additional challenge sequences.
For example, where the "wannabe-geeks" build a simple menu system, you must build a menu system with the "ncurses" library. This may mean reading up on the dialog package, figuring out how it works and then implementing it. I have included in the appendices explanations of the challenge sequences. Look out for the challenge sequences and really pull out all the stops!
Oh, a final word of warning. If you haven't noticed already, Unix and Linux people have a pretty wacky sense of humor. I'm no exception. If you find some of my jokes and quips in this course offensive, you're definitely taking this whole Linux thing WAY TOO SERIOUSLY. Take a chill pill and re-read it and relax!
Pencil and Paper
Yes. I know these two concepts are foreign to some of you, but hey, give an old codger like me a break.
To have logged onto your favorite Linux distribution as a user (with your username).
We don't at this stage need to be logged in as root.
![[Note]](../images/admon/note.png) | Note |
|---|---|
At some time during this course you will need to log in as root. If you get to that point and are not the system administrator for the machine you are working on, then you may need to build your very own Linux machine. Any system administrator in their right mind would NEVER give you the root password. Of course, if you are the system administrator, you already have the root password! | |
In order to learn to be a great system administrator, and "shell script-er", you MUST be. . . . .
LAZY.
Yes, that's right, LAZY. Say it, and again. Once more. Good!!!
Why? Because, if you are anything like me, you want to spend your time doing things you love, not the mundane boring stuff that will leave you feeling like you've really had to work hard!
If you're lazy, you will think of simpler, better, faster and more efficient ways of getting through your day's tasks, look efficient, get many pats on the old' back, or taps on the old' head and leave work feeling like you're just the smartest person around.
Next, if you REALLY want to learn to script, NEVER do manually, what you can do by using a script. Script everything!!!!
So, let's get scripting. But first, what is a shell?
The shell, in UNIX and Linux is the equivalent of a command interpreter in Windows. Its job is to accept commands, as typed by the user on the command line, and interpret each of those commands, acting on it however necessary. The shell is a little like DOS operating system in many ways; the only difference being that it's like DOS on steroids. I hope that over the remainder of this course you will you will understand this sentiment.
For example typing:
ls -l
|
on the command line produces some output. How does UNIX know to call the ls command? How does it know to interpret the -l as a switch? What about the output? How does the command output know to come to the screen? By chance? Nope. Nothing in Linux happens by chance!
The shell does these things!
What about a shell script?
A shell script is in essence, a whole bunch of shell commands entered together in a file. A little like the DOS batch file, where many shell commands are grouped together to perform some function(s).
What if we wanted to run two commands over and over again? Say,
free
|
and
df -h
|
One way of doing it would be to type the commands in over and over again. More work!!! Of course it is. We are looking at means of sticking to adage 1.1, not so? So, we could get clever and type both commands on a single line, separated by a semi-colon
free;df -h
|
We've reduced our finger-work, but not by much. Again the better way of doing this is to put both these commands into a file. For our example we will call this file mycmds.sh:
riaan@debian:/tmp> vi mycmds.sh    <To create the script>
riaan@debian:/tmp> chmod +x mycmds.sh
riaan@debian:/tmp> ./mycmds.sh
	     total       used       free     shared    buffers     cached
Mem:        321628     317836       3792          0      14644      88536
-/+ buffers/cache:     214656     106972
Swap:       506480       1060     505420
file system            Size  Used Avail Use% Mounted on
/dev/hda1             5.5G  3.5G  2.1G  63% /
tmpfs                 158M  4.0K  158M   1% /dev/shm
riaan@debian:/tmp>
|
Then all we have to do it execute it, and voila , we have "created a new command", aka mycmds.sh. Now each time, we merely need to run the script and the commands are executed together.
This is a shell scripting course, but we're going to start off by looking at the info pages, the man pages and the whatis database before we start scripting. This is a good idea because at least we know that we're all on the same page.
So, what is this man page, and info page, and that other stuff you mentioned?
Man pages is a term used as a short-hand for manual pages - or the manual. Info pages, are like manual pages (man), but are a newer format that the movers and shakers are trying to adopt.
Which to use? Well both actually.
In some cases, man does not contain all the necessary information, and then one needs to refer to the info pages. Sometimes it may be far easier to locate that which you are looking for by firing up the manual page. First we'll tackle info pages.
The diagram below illustrates the structure of the info pages. Refer to it while reading this section
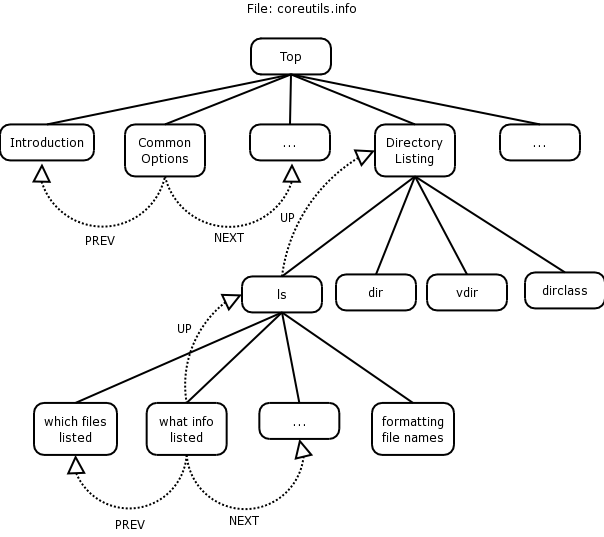
Info pages are like man pages in many ways, except they provide a lot more information than man pages (well mostly anyway). Info pages are available on all the Linux distributions currently available, and they are similar to the man pages, although in some instances give you more information.
If we look at a typical way of invoking info, it would be the word info, followed by a space, followed by the name of the command that you want to invoke info on. For example, for the command ls:
info ls
---^-
|
| Note |
|---|---|
Type the commands just as you see them here. I have placed minus signs under the command and it's arguments, and a caret (^) under the space. This is to illustrate that the command should be typed EXACTLY as is. | |
This should give us an information page on the ls command. We could invoke info on a whole range of utilities by typing:
info coreutils
---^------
|
where coreutils is just another group of info pages. Coreutils is a grouping of info pages, containing commands such as ls, cd, cp, mv or list directory contents (ls), change directory (cd), copy files and directories (cp) and move or rename files (mv). One could, for instance, type:
info mv
|
The way info is structured, is that when you first start it, it will display the node at which you are beginning your search.
In our coreutils example, on the top of the page (right at the top) the first line looks as follows:
File: coreutils.info, Node: Top, Next: Introduction, Up: (dir)
|
Starting on the left-hand side, we see the file that we're "info'ing" the coreutils.info file.
The filename that contains information about the ls, cp, mv and cd commands amongst others is coreutils.info.
The current Node is Top, which indicates that we're at the top of the coreutils info page and cannot go higher within this group of pages.
From the top level of the info page on coreutils we can now do a couple of things:
We can go to the next node (by typing 'n'), which is the next topic, called Introduction. You will notice that there is no link to a Previous topic, since we are at the top of this group of pages.
We could scroll down to the menu and select a particular topic (node) we want displayed.
File: info.info,  Node: Top,  Next: Getting Started,  Up: (dir)

Info: An Introduction
*********************

   The GNU Project distributes most of its on-line manuals in the "Info
format", which you read using an "Info reader".  You are probably using
an Info reader to read this now.

   If you are new to the Info reader and want to learn how to use it,
type the command `h' now.  It brings you to a programmed instruction
sequence.

   To read about expert-level Info commands, type `n' twice.  This
brings you to `Info for Experts', skipping over the `Getting Started'
chapter.

* Menu:

* Getting Started::             Getting started using an Info reader.
* Expert Info::                 Info commands for experts.
* Creating an Info File::       How to make your own Info file.
* Index::                       An index of topics, commands, and variables.


--zz-Info: (info.info.gz)Top, 24 lines --All-------------------------------------------------------------------------
|
If you were to scroll down to the Directory listing line, you'll see that on the left-hand side there's an asterisk, followed by the topic, followed by a double colon and what is inside the info group:
* Directory listing:: ls dir vdir d v dircolors
|
These are the topics covered in this particular node.
If you hit enter at this stage. You should see that the node has changed. The top line of your page will look as follows:
File: coreutils.info, Node: Directory listing, Next: Basic operations,Prev: Operating on characters, Up: Top
|
This is similar to the top of the coreutils.info page as described above, but this example includes a previous node, which is "Operating on characters", with the next node being "Basic operations".
Once I've scrolled down (using my arrow keys) to * Directory listing, I may want to go and look at information about the ls command to see what I can do with ls. Again you use the up or down arrow key and scroll to "ls invocation" and hit Enter
Once there you can read the ls info page to see what it tells you about the ls command.
How do you go back to the Directory listing info page? Type u for UP, which should take you to the previous listing.
How do you go from "Directory listing" to "Basic operations", when you're currently at the "Directory listing" node? n will take you to the NEXT node (taking you from the "Directory listing" to "Basic operations").
If you want to go right to the top, in other words, back to the coreutils group, press t for TOP.
You can do searches within info by using the forward slash (/) and then include a pattern, which might be something like
/Directory
|
This tells info that you want to look for the pattern Directory. Bingo! We find Directory listing, as it is the first entry that matches the pattern. If you want to use the same pattern to search again, press forward slash followed by enter:
/<ENTER>
|
This will allow you to search for the pattern "Directory" once again. How do you quit info? q will quit info.
If you want to go one page up at a time, then your backspace key will take you one page up at a time.
Finally, to obtain help within info, type '?'. This will get you into the help page for info. To leave help, press CTRL-x-0.
That is essentially how info works. Part of the reason for moving to info rather than man pages is to put everything into texinfo format rather than gz-man format. In the future, much more software will include manual pages in texinfo format, so it's a good idea to learn how the info pages work.
Run info on find.
press u.To which node of the info page does this take you?
Search for the find command.
Select the find command.
If I were to try to find a file using it's inode number, how would I do this. (Hint: search for inum)
What node does this (inum) form part of?
Go to the "Finding Files" node and select the Actions node.
How do you run a command on a single file once the file has been found.
Having covered the info pages, we need to look at man pages since man is the standard on most UNIX and Linux systems. 'man' is short for manual. This is not a sexist operating system. There are no woman pages but we can find out how to make some a little later (to keep man company).} Manual pages are available on every operating system. (If your system administrator hasn't installed them, ask him politely to do so, as no Linux system should be running without man pages.).
The man command is actually run through a program called less, which is like more except it offers more than the more command does.
| Note |
|---|---|
Mark Nudelman, the developer of less, couldn't call it more, since there was already a more command, so it became less. Linux people do have a sense of humor. | |
To invoke man pages type:
man <command>
|
For example, the ls command that we info'ed above,
$ man ls | less
|
Looking at our example above, the manual page on the ls command is run through the less command.
What can you do from within man?
Well, pretty much the things you can do with info. Instead of a menu system, and nodes, we're looking at a single page detailing all the options and switches of the ls command.
If we want to search for a particular pattern we would use forward slash (/) just like we did in info.
For example, we could type
/SEE ALSO
|
This pattern search would take us to the end of the man page to look at the SEE ALSO section.
We could type question mark with a pattern, which does a reverse search for the specified pattern. Remember forward slash does a forward search and question mark does a reverse search.
?NAME
|
This pattern search will reverse search up the man page to look for the pattern NAME.
| Note |
|---|---|
You will notice that I'm not saying look for the string NAME, rather I'm saying look for the pattern NAME. This is because pattern matching is a critically important part of UNIX and Linux and shell scripting. We'll learn more about patterns as we go through the course. | |
If we want to scroll down one page at a time within the man page (i.e. we've looked at page 1 and we've read and understood it, and we want to go to page 2), then the space bar takes us forward by a page.
Similarly if we want to reverse up the man page, we press b for back, which will scroll backwards through the man page.
How do we get back to our prompt? The 'q' key comes in handy again. 'q' for quit.
man pages are generally broken down into a host of different sections. There's a SYNOPSIS section, a DESCRIPTION section, and a SEE ALSO section. Read through the man page and you will understand the different sections.
If you need help on moving around through the man page, type 'h' for help, which will give you a listing of all the help commands. You will see that it has displayed the help commands NOT for man but for less. Why? Because the pager for man, (pager, the tool that gives you one page at a time instead of just scrolling the man page past you too fast to read), is the less command
We will cover the less command a bit later but you can look it up with the info pages as follows:
info less
|
So 'h' within the man page will show you help on the 'less' command at the same time as displaying the requested manual page.
Sometimes you need to read a man page three or four times before you completely understand it, and of course sometimes you may never understand it! Don't be deterred. That's what separates the kanga's from the roo's.
do a man on the nl command
What is the function of this command?
How would one right justify the number ensuring it has leading zeros?
And also number non-blank lines?
Who wrote this program?
What else should we view to get a complete picture of the nl command?
What version of the nl command do you have installed on your system?
The whatis database is usually rebuilt on a Linux system at night. The job of the whatis database is to search through every manual page on your system looking for the NAME section within these man pages, classifying them and placing them into a database, to facilitate searching in the future.
The whatis database is useful in that it gives us the ability to quickly look up what a particular command does. So if I asked you to tell me what the nl command does, you could look it up in the man pages or you could look it up in the whatis database.
man nl
|
or
whatis nl
|
The latter method should return with the NAME section from the man page, showing you what the commands job is on the system. It should tell you that nl numbers the lines. Similarly wc counts words, lines and characters for you.
The whatis database is very useful because it allows you to quickly find out, what a particular command on the system does.
If the whatis database is not up-to-date, it is quite simple to update it. Generally though, the updating of the whatis database is a simple automated process. Once a night, the operating system should go about updating the whatis database. Even if the system administrator has installed a whole host of new software on the system, by virtue of the fact that the man pages for that software would be installed at the same time as your new application is installed, your whatis database should pick up those pages and add them to its database each night.
As a side note, updating the whatis database manually is simply a matter of
$ makewhatis -u -w
|
and the whatis database will be updated.
The idea behind being lazy is that you want to take a system and get it to do stuff automatically for you, so that you can spend more time surf-skiing or walking on the mountain, or doing things you enjoy doing.
Now people say to me "Why must I be lazy?"
Because it means that you need to think of better, quicker ways of doing things and shell scripting is a way to achieve that.
If you haven't thought of a better way of doing it, you're not applying your mind. If you apply your mind you will find that there are many different ways to skin a cat in Linux. Shell scripting is one of the many ways you can speed up mundane tasks.
So the idea behind shell scripting is to automate this process of getting jobs to be done on your behalf.
To achieve this using scripts, you could take a series of system administration tasks, put them together in a single script, run them unattended and they should produce output that would (hopefully) match what you require.
Finally, this brings me to another adage.
Addage 1.3
There is never only one way of solving a problem in Linux. The way I solve a problem may be completely different to the way you solve it. But does this matter? Absolutely not! Is my solution better than yours? Perhaps, but I have been doing this for a long time, so take note of how I do it.
There are some basic commands that we are going to look at. The idea is to get you into the process of understanding how commands are structured and build an understanding of what the commands do.
From hereon out, I'm going to assume that you can find out lots of things about commands primarily by looking at info and man pages.
Almost every Linux command can be run from the command line using various switches (or arguments / options) which allow one to change the output of this command in a number of different ways.
The who command is designed to tell you who's logged on to the system.
If we run the who command without any switches, the left hand column shows the user id. This the user currently logged on to the system. In your case, you might be logged on as root, or perhaps as your user. The second column indicates where you are logged in.
riaan@debian:~> who
riaan    :0           Apr 30 11:13 (console)
riaan    pts/0        Apr 30 11:13
riaan    pts/3        Apr 30 11:14
riaan    pts/4        Apr 30 11:30
riaan    pts/5        Apr 30 13:19
riaan    pts/6        Apr 30 12:07
riaan    pts/7        Apr 30 12:09
riaan@debian:~>
|
So if you look at the who command output, my user riaan is logged in from :0 which is the X console. He's also logged on to
pts/0 and
pts/1
|
These are pseudo terminals, indicating he's also logged into two pseudo terminals.
The final, third column indicates what time the user logged on.
The who command tells us about users using our system. That's great!
What are the other switches that we can use with who.
who --help
|
This will show you the various switches that we can use with the who; command. So if we use a:
who -H
|
it prints a heading line for us. The output should look as follows:
$ who -H
NAME             LINE     TIME         FROM
heidi            ttyp1    Nov 27 17:29 (168.210.56.177:S)
mwest            ttyp2    Nov 10 15:04 (apotheosis)
heidi            ttyp4    Nov 11 13:18 (168.210.56.177:S)
|
To view a short listing which is the default listing for the who command:
who -s
|
Using the -u switch:
who -u
|
will show the users and their process id''s.
In scripts, one can use the same commands as on the command line, including all the switches those commands use. One can run any command and produce standard text output, which one can use. We'll talk about how you can use the output later.
Run the command
$ who -u
root     tty2         Aug  4 10:41   .          2839
riaan    :0           Aug  4 07:53  old         2836 (console)
|
to identify which users are logged into your system and from which processes they are logged on.
This will show how long a terminal has been idle. It will show not only which users are logged on and what process ids they are but also how long that user has been idle. Idle users might have gone out for lunch or they might have left for the day. In default mode, most of these systems don't log you out if you're idle for longer than 10 or 15 minutes. In the old days, most systems were configured to automatically log you out after 15 minutes.
| Note |
|---|---|
On Debian, the -i switch does not add any extra output, it simply prints a message suggesting that you not use -i as it will be removed in future releases. Use -u as above. However the -i switch may work with other brands of Linux. | |
Okay, so that's the who command. We're going to use these commands later to build a system to monitor our system automatically, because we want to be spending our time doing things we enjoy.
How many users are currently logged onto your system?
Is any user logged onto your terminals tty1 -> tty6?
Who (which user and or terminal) has been idle for the longest time?
Ensure that all output is displayed with a heading line.
What run-level are you currently running in and what was your previous run-level? What other command will show you this information?
What would you imagine a users message status would be? (Take a guess or read the man page for write)
What does the w command do? You could run:
riaan@debian:~> whatis w
w (1)                - Show who is logged on and what they are doing.
riaan@debian:~>
|
riaan@linux:~> w
 21:40:17 up 11:03,  6 users,  load average: 0.30, 0.34, 0.30
USER     TTY        LOGIN@   IDLE   JCPU   PCPU WHAT
root     tty2    	21:40    8.00s    0.06s  0.06s -bash
riaan    :0        	10:38    ?xdm?  58:31   0.04s -:0
riaan    pts/0     10:38   11:01m  0.00s  2.08s kdeinit: kwrited
riaan    pts/3     11:18   10:22m 14:37   2.63s /usr/lib/java/bin/java -mx32m -jar /home/riaan/jedit/4.2pre9/jedit.j
riaan    pts/4     11:28     1:07m  0.21s   0.21s /bin/bash
riaan    pts/5     11:28     0.00s   0.17s   0.03s w
|
which should print some information about the w command.
The w command not only tells us who are logged in, but also what they're doing. Are these users running applications? What actual processes are they running at this time? Perhaps someone's running an application like OpenOffice. w will tell us this.
If you look at the output of this command, it's got a list of headings that are fairly similar to the format of the who command.
Later we'll have a look at modifying the report columns, to get the output into a different format that may be more useful.
One of the reasons for taking you through these commands is that we're going to start writing our first shell scripts using these commands, so it is as well that we understand them now.
The date command is a useful command that can do all sorts of nifty things for us (apart from printing out the date).
It can convert between Unix time, (which is the number of seconds since 1/1/1970 - commonly known as the epoch) and a human readable (normal) date and time.
Conversely, it can also convert back from date time today to the number of seconds that have elapsed since the 1/1/1970. It can format output in a whole variety of ways. Let's look at some examples of the date command.
For that I'm going to do:
info date
|
If you scroll down, you will see a section with examples. Looking at the example:
date +" "
|
We may now include a string describing the format inside these quotation marks.
In the shell there's a big distinction between double quotes, single quotes (which is another lesson altogether, see Chapter 5), and back quotes - let's not get them confused for now.
Within this double quoted string we can include any number of arguments. What arguments can we include? Each argument starts with a percentage sign.
To display the time, we could use:
%H - -will give us the hours in 24 hour format (0-23).

%M - -will give us the minutes (0-59) of the day
|
If we had the following string:
date +"%H:%M"
|
we will end up with hours and minutes of the day on our system. The result of the above command should be similar to:
15:04
|
But let's say that we want the hours in 12-hour format rather than 24-hour format. We could then replace the %H with a %l. The result would then be:
3:04
|
There's a host of other things that we could do. For example if we are in 12-hour format, 3:04 doesn't indicate whether it is morning or afternoon. Thus we could include %p:
date +"%l:%M %p"
|
This would show us that the time is actually:
3:04 PM
|
rather than 3:04 AM.
That's for time, but what about for the date? What happens if we want to show the date, which is:
24-Nov-2003
|
then, we should in theory be able to create a date string to reflect this format.
A way we can do is this is using the following:
date +"%d-%b-%Y"
|
where %b is a short format for month to produce Nov instead of November.
If we want to combine the date and time:
date +"%d-%b-%Y %l:%M %p"
|
This would give us the full date and time report:
24-Nov-2003 3:04 PM
|
There are a lot of other parameters that you can use within the date command. You can view these by looking at the relevant info page with :
info date
|
We're going to use this command in our script, because in almost every script that you will write you are going to want to know what time the script started, what time the script ended, when it did a particular job within the script, etc.
Using the info command for assistance, format the output of date, so that it resembles the following: Today's date is Tuesday, 27 January 2004. The time is currently 11h 32m and 49s.
Show the date in Julian format.
What day of the year is today?
Include in the output of the date, the time zone and the AM/PM indicator
Given the number 1075200287, determine what date, day and time this represents.
The final command I want to describe is a command used to send output to the screen: echo.
We've seen so far that we were able to run commands but, as yet, we don't know how to simply output some text to the screen. We may want to print a string to the screen, prior to printing the date.
Something such as:
Today's date is:
24-Nov-2003  3:04 PM
|
We would need some way of echoing that to the screen, wouldn't we?
In order to do this, there is the echo command. echo can be a bit of a nasty gremlin because there are at least two echo commands on your system. One is a shell built-in, and one is an external command and therefore it can be a bit tricky.
We're going to start off with a vanilla case. Later on we will see how we can choose which echo command we want to use.
So by way of an example, we'll use it to format the date command.
echo "Today's date is: "
date +"%d-%b-%Y %l:%M %p"
|
This would be a good time to show you how to create your first shell script. We're going to edit a file and for this you can use any editor[1]
Open your editor (whatever editor you prefer) and put the following commands in the first lines of the file:
echo "Today's date is: "
date +"%d-%b-%Y %l:%M %p"
|
Save that file as myfirstscript and exit your editor.
You've just created your first shell script. Great! How easy was that? How do you run it to make it actually do its job?
Linux has three sets of permissions that set the permission mode of the file . One for the owner, one for the group and one for everyone else (i.e. Everyone that is not the owner, and is not part of the group to which the file belongs). You would have covered this in an earlier course (Linux Fundamentals). The mode of the file will also determine whether the file is executable or not.
Thus, to make the file executable, the mode of the file must have the execute (x) permissions set.
Note that this differs from Microsoft Windows which looks at the extension to decide the type of the file. Windows assumes that .com and .exe are executable files. Notice too, that myfirstscript does not have an extension. Is that valid? Sure it is. This is Linux after all!!
In sum, to make our script executable we must change the mode of the file. How? Using chmod (change mode) command as follows:
chmod +x myfirstscript
|
This script is now executable. Does this mean that we've executed it? No, not yet. We execute it with:
./myfirstscript
|
and that should output:
Today's date is:
24-Nov-2003  3:04 PM
|
Finally, you will notice that in order to execute this command, I preceded it with a "./".
Try running the script without the "./". What happens?
What the "./" does is that the shell FIRST looks in they current directory (.) for the script before trying to look in the PATH. We will cover this is a little more detail later.
Of course, you could add the script to a new directory ~/bin (in my case /home/hamish/bin). Since this directory is in my PATH environment, the script will be "found" and will execute even without using "./"
Write a simple script to print "Hello <YOUR USER NAME>" on the screen.
Modify your scripts to additionally output the directory you are currently in.
Write a simple menu system, with the menu options as follows(note: this menu does not have to respond to the user's input at this stage):
0. Exit
1. Output a text version
2. Output an HTML version
3. Print help
4. Provide a shell prompt
Select an option [1-4] or 0 to exit:
Include the current date and time in the top right hand corner of your menu
Ensure that your menu system (I'm assuming you called it menu.sh) can execute. Execute it.
Challenge sequence:
Consult the appendixAppendix B and teach yourself the dialog package.
There are many examples in /usr/share/doc/dialog-xxx.yyy.
Once you understand this package, modify your menu system in 3 above to use the ncurses library (dialog) to spruce it up.
This section is going to cover file commands. File commands are commands such as ls (list).
Notice again, how the laziness of the Unix people comes to the fore. They could have had a command called list, but that would have required two more characters (and two more carpals - fingers!) and clearly that was a lot more effort, so we just have the ls command. The ls command shows us a listing of files in a particular directory.
This is an appropriate place to take a detour on our tour de scripting and have a look at file matching and wildcard matching. It may be something that you're familiar with, but let's have a look at it and come back to ls in a moment.
Wildcard matching allows us to match a number of files using a combination of characters. What are those characters?
Table 1.1. Wildcards
| Symbol | Name | Purpose |
| * | Splat | matches 0 or more of any character |
| ? | question mark | matches 0 or 1 character |
| [ ] | square brackets | matches one from a range of characters |
| ! | bang | invert the pattern |
So if we typed
ls *
|
we end up listing 0 or more of any characters. So it would match any filename of any length because any filename would have a minimum of a single character. The splat matches 0 or more characters following each other.
The question mark will match a single instance of any character. Later, when we study regular expressions, the full stop ( . ) matches any single character. Given the expression:
ls -la ab?a
|
this would match the files:
abba
ab1a
ab_a
ab9a
abca
...
|
What range of characters do [] include? Well we may say something like:
[abc]
|
which would match any (single character) within the following range: a or b or c but it does not match abc since this is 3 characters long. Similarly
[ab]cde
|
would match acde or bcde but it would not match abcde. Square brackets indicate a range of alternative characters. How would we match both:
ham01
|
and
ham10
|
Simple, with:
ham[0-9][0-9]
|
as [0-9] implies that any character in the range 0 to 9 will match.
Would it also match ham9?
No, for the reason that our pattern search is expecting 2 numeric characters after the pattern ham. (two sets of square brackets are displayed)
We could also combine letters and numbers, for example:
ls [abc123]
|
which would match the files:
a
b
c
1
2
3
|
(Yes Linux and UNIX can have files with all of the above names!)
Notice when we used the square brackets [0-9], we use the range specifier, which was the dash character in the middle. This dash has nothing to do with the minus sign and means match anything in that range from 0 through to 9.
Thus, typing:
[a-z]
|
matches any character in the range from a to z.
The final pattern matching wildcard is the bang command. The exclamation mark is the inverse of what you're trying to match. If we were to look at our pattern matching, we could say:-
ls [!a-c]*
|
which, would match everything NOT starting with an "a" or a "b" or a "c", followed by anything else.
So would it match abc ?
No, because it starts with an a.
Would it match bcde?
No, because it starts with a b.
Finally would it match erst?
Yes, because q is not in the range a to c. So it would match q followed by any set of zero or more characters.
Prior to doing the following command ensure that you create a new temporary directory, and change directory to this new directory [ by doing so, it will be easier to clean up after the exercise is over. ]
I'd like you run the following command (I'm not going to explain it now, it will be covered later).
touch {planes,trains,boats,bikes}_{10,1,101,1001}.{bak,bat,zip,tar}
|
This command creates a number of files for us in one go. Typing:
ls p*
|
will show us all files that start with a 'p', followed by 0 or more characters (planes_ in our case). Similarly
ls b*
|
will show us the files boats_ and bikes_ since only these files begin with a 'b'. If we typed:
ls bik*
|
it will produce all the bikes files, while
ls b*_??.*
|
will indicate all the files that start with a 'b', followed by 0 or more characters, followed by an underscore followed by exactly 2 characters, followed by a full stop, followed by 0 or more characters. Thus only
boats_10.bak
boats_10.bat
boats_10.zip
boats_10.tar
bikes_10.bak
bikes_10.bat
bikes_10.zip
bikes_10.tar
|
I've given you some additional examples that you can try out in your own time. It would be worth your time running through these examples and ensuring that you understand everything.
Exercises:
Run the following command in a new subdirectory
touch {fred,mary,joe,frank,penny}_{williams,wells,ferreira,gammon}.{1,2,3,4,5}
|
Look at the following tu understand the different fields
touch {fred,mary,joe,frank,penny}_{williams,wells,ferreira,gammon}.{1,2,3,4,5}
  ------Name----------    ----------Surname-------    -Category-
|
list all the people who fall into category 5
List all the people whose surnames begin with a w.
List only people in category 2, whom's surnames begin with a w, and whom's first name begins with an "f"
Move all "fred's" into a directory on their own, but exclude the "gammons"
Ensure that joe and penny wells in category 3 and 5 are deleted.
List only those people whose names have 5 characters in them.
Returning from our detour, there's a whole bunch of other file commands that we can look at. We've touched on the ls command, which gives us a listing of files and from the previous set of examples on pattern matching and wildcarding, you will have gotten an idea of how ls works.
ls , like every other Linux command can take switches. Below is a quick summary to some of the switch options.
-l show a long listing (include file name, file size, date last modified, the permissions, the mode of the file, the owner, the group of the file)
-a shows all files including {hidden} files (. and ..)
Two special hidden files are:
. 	this file is our current directory
.. 	this file is our previous or parent directory.
|
Often in your home directory, you will have full control over your . directory (i.e. your current directory) but you will most probably have absolutely no control of your .. directory (i.e. your parent directory).
We have other commands like:
cp copy files or directories
mv move files or directories
wc shows the number of lines, number of words and number of characters in a file.
wc -l show us the number of lines in our file.
nl numbers the lines in our file.
There are many system commands that we can use. We're going to start using these in our shell scripts.
Remember, a shell script is nothing more than a group of Linux commands working together to produce a new command.
In order to build our system that is going to manage our Linux machine, we're going to need to know a little bit about system commands. System commands such as:
df shows the disk free space
du shows the disk usage
fdisk shows the partitioning on our disk
iostat shows the input output status
vmstat shows the virtual memory status
free shows the amount of free memory
We will use these commands, but they are a subset of the commands available to us for monitoring our system.
For example, mostly we want to run a command to check whether our file systems are filling up. It makes no sense to have a full filesystem! For that we might use the df command
df would produce a listing of our partitions on our Linux machine and will show us which partitions are 100% full, which partitions are almost empty, which partitions are mounted, etc..
What we're going to be doing, is working our way towards building a system that will automatically show us when a partition becomes 100% full.
Or perhaps we want to build a system that shows us when it's greater than a particular threshold. So we might set a threshold of 95% full, it's no good telling us when the system has crashed that it's crashed; we want to know before the system crashes.
Several switches can be used with df such as:
df -h
|
This produces output in human readable format. If you run this command now, you should see at least one partition and that's the root partition. It should show you how much space is being used, how much is available, what the size of the partition is and what particular filesystem it's mounted on.
The df command is what we'll start working on for our practical, because it most certainly is one of the most useful commands that you're going to need to run to make sure your system is not becoming overfull.
Alternately, you could use the du (disk usage) command to show you which files are consuming the largest volume of disk space:
du - s
|
will show a summary of our current filesystems' capacity. Again, how do you get information about these commands? Using the info or man command will inform you about switches pertinent to these commands.
For example a further switch for the df command might be:
df - hT
|
which will tell us what type of filesystem we're running. It might be an extended 2, 3, or a vfat filesystem.
The "du" command, like the "df" command, has a complete set of switches unique to it and shortly we'll start looking at those in a bit more detail.
The fdisk command is used primarily to show us what partitions we have on a particular disk.
BlackBeauty:/install # fdisk -l

Disk /dev/hda: 10.0 GB, 10056130560 bytes
240 heads, 63 sectors/track, 1299 cylinders
Units = cylinders of 15120 * 512 = 7741440 bytes

   Device 	Boot      Start         End      Blocks   		Id  System
/dev/hda1   *           1          760     	5745568+ 	83 	Linux
/dev/hda2             761        1299     4074840    	5  	Extended
/dev/hda5             761         827      506488+  	82  	Linux swap
/dev/hda6             828        1299     3568288+  	83  	Linux
|
It should show you what your partitions are.
If you execute the above command as a user (in other words, your prompt is a dollar) you're not going to be able to see what your partitions are set to. Why? Because only the superuser (root) has permission to look at the disk. In order to run this command, you need to be root.
baloo:/home/riaan# free
	     total       used       free     shared    buffers     cached
Mem:        498572     493308       5264          0      48700     230492
-/+ buffers/cache:     214116     284456
Swap:       706852       8196     698656
|
This command shows the total memory, used memory, free memory, swap space, how much of our swap space has been used and how much of our swap space is still available for use.
baloo:/home/riaan# vmstat
procs -----------memory---------- ---swap-- -----io---- --system-- ----cpu----
 r  b   swpd   free   buff  cache   si   so    bi    bo   in    cs us sy id wa
 0  0   3792   3508  14208  59348    0    0    32    72 1065   818 11  4 84  2
|
The vmstat command shows us how busy our system is, how many processes are running and how many are blocked. It also shows memory information: how much memory is being used by the swap daemon and what our buffers and caches are. Additionally, it shows us how many processes are being swapped into and out of memory. Finally, it shows users, system, idle and waiting time. We're going to use it later to monitor our system
Finally, the iostat command.
iostat
Linux 2.6.4-52-default (debian)    09/02/04

avg-cpu:  %user   %nice    %sys %iowait   %idle
           2.51    0.03    1.99    0.82   94.64

Device:            tps   Blk_read/s   Blk_wrtn/s   Blk_read   Blk_wrtn
fd0               0.00         0.00         0.00          4          0
hda               3.93       304.75        23.83    3868650     302512
hdd               0.01         0.59         0.00       7524          0
|
This command gives you information about input and output on your system, and how well (or otherwise) it is performing.
We'll take a closer look at the system performance commands in more detail later.
| Note |
|---|---|
In order to provide you with further information on the performance of your system, you should install the sysstat package. rpm -ivh sysstat.x.y.z-r1.rpm (RedHat system) (see the appendix for other distributions) The iostat command is part of the sysstat package, so if you don't install sysstat, then skip the iostat stuff) | |
Write a simple script to display the free/used disk space on your machine
Additionally, show the status of the memory and allow the vmstat commands to produce 3 iterations.
Using the iostat command, write a script that will illustrate how busy you machine is
Linux is built being able to run instructions from the command line using switches to create the output.
The question of course is how do we make use of that?
One of the ways to make use of this is by using the three special file descriptors - stdin, stdout and stderr.
Under normal circumstances every Linux program has three streams opened when it starts; one for input; one for output; and one for printing diagnostic or error messages. These are typically attached to the user's terminal (see man tty(4)) but might instead refer to files or other devices, depending on what the parent process chose to set up. | ||
| --Taken from the BSD Library functions manual - STDIN(3) | ||
Table 1.2. Standard Input, Standard Output and Standard Error
| Type | Symbol |
| standard input | 0< |
| standard output | 1> |
| standard error | 2> |
Generally standard input, referred to as "stdin", comes from the keyboard.
When you type stuff, you're typing it on stdin (a standard input terminal). A standard input device, which is usually the keyboard, but Linux also allows you take standard input from a file.
For example:
cat < myfirstscript
|
This would tell cat to take input from the file myfirstscript instead of from the keyboard (This is of course the same as: cat myfirstscript).
Essentially what this boils down to is that the input for this command (cat) is no longer coming from where it was expecting to come from (the keyboard), but is now coming from a file.
Linux associates the file descriptor 0 with standard input. So, we could have said:
cat 0< myfirstscript
|
which would have produced the same as the previous command.
Why could we leave out the 0?
Since, at the time of creating a process, one standard input is associated with the process.
Standard output, as created at process creating time, goes to the console, your terminal or an X terminal. Exactly where output is sent clearly depends on where the process originated.
Our console or terminal should be the device that is accepting the output. Running the command:
cat file
|
would [con]catenate the file, by default, to our standard output i.e. our console or terminal screen. (Where the process originated.)
We can change this and redirect the output to a file.
Try the following:
ls -al myfirstscript > longlisting
|
This redirects the output not to the screen, but rather to a new file 'longlisting'. The process of redirection using the '>' will create the file 'longlisting' if it was not there. Alternately, if the file 'longlisting' existed, it would remove it, (removing the contents too of course) and put a new file there with the directory listing of "myfirstscript" within it.
How would we see the contents of the file?
cat longlisting
|
This will show the size, the owner, the group and the name of the file myfirstscript inside the file 'longlisting'.
In this example, the output of the ls command has not gone to the standard output (the screen by default), but rather into a file called 'longlisting'.
Linux has got a file descriptor for standard output, which is 1 (similar to the 0 for standard input file descriptor).
The above ls -la example can be rewritten as:
ls -al myfirstscript 1> longlisting
|
which, would do the same thing as leaving out the file descriptor identifier and just using the greater than sign.
In the same way we use our standard input as < (or a 0<), we use a > (or a 1> ) to mean standard output.
Returning to the cat example above, we could type data on the command line that gets sent directly to a file. If the file is not there it will create it and will insert the content we typed on the command line, into the file. This is illustrated below:
$ cat > test
This is the first line.
This is the second line.
This is the final line. < Ctrl-d pressed here >
$ cat test
This is the first line.
This is the second line.
This is the final line.
|
Doing this does not return us to a prompt. Why? What is it waiting for?
It's waiting for us to actually enter our string into a buffer. You should start typing a sentence then another sentence, and another, etc. Each time you type a character, it's getting appended to the file 'newfile'.
When you have finished typing in what you want, press Ctrl-d. The Ctrl-d (^D) character will send an end of file signal to cat thereby returning you to your prompt.
If you list your directory contents using:
ls -al
|
you should see the file 'newfile'. This file is the one that you've just created on the command line.
cat newfile
|
will show you the contents of 'newfile' displayed onto the standard output.
Now why did all of this work? It worked because cat was taking its input from standard input and was putting its output not to standard out as normal, but was rather redirecting output to the file 'newfile'.
On typing the command and hitting enter, you are not returned to your prompt since the console is expecting input to come from stdin; you type line after line of standard input followed by ^D. The ^D stopped the input, by sending an end-of-file character to the file, hence the file 'newfile' is created.
Question: What do you think tac > newFile will do?
If you decide you want to copy the contents of two files to another file (instead of using the cp command - there is more than one way to skin a cat in Linux) you could do the following:
cat < myfirstscript > mynewscript
|
Incidentally, this is equivalent to
cp myfirstscript mynewscript
|
Well that's fine and dandy, but what happens if we don't want to delete our longlisting script and want to rather append it to a file that's already there.
Initially we typed:
ls -al myfirstscript > longlisting
|
If you did this a second time, it would overwrite the first file longlisting. How could you append to it? Simply adding two greater than signs, immediately following one another as in the example below, would append output to the file 'longlisting'
ls -al myfirstscript >> longlisting
|
Each time you ran this command, it would not clobber (remove the contents of) the longlisting file but would rather append to it and as a result, the file 'longlisting' would grow in size.
A final note on standard output and standard input is that redirection must be the final command that you execute on the command line. In other words, you can't do any other command after the redirection. We will talk about this in a later section on pipes.
The final component in this dialog of file descriptors is standard error.
Every command could send it's output to one of two places: a) it could be valid output or b) it could be an error message.
It does the same with the errors as it does with the standard output; it sends them directly to your terminal screen.
If you run the command (as your user):
find / -name "*" -print
|
you would find that find would find a load of things, but it would also report a lot of errors in the form of 'Permissions denied. . .'.
Perhaps we're not interested in 'Permission denied...' - we may wish to discard these messages (as root, no error messages would be returned).
If we ran the command, we could put standard error into a file (remember standard error by default is going to the console; the same place as stdout). In this case I'm going to put it into a special file on the Linux system called /dev/null.
/dev/null is similar to the "Recycle Bin" under Windows except it's a waste paper basket with a point of no return - the Linux black hole! Once information has gone into /dev/null, it's gone forever.
Initially, I'm going to put any errors that the find command generates into /dev/null, because I'm not interested in them.
We saw that standard input was file descriptor 0, the standard output was file descriptor was 1, so no prizes for guessing that standard error has file descriptor 2.
Thus, the command
find / -name "*" -print 2> /dev/null
|
discards any errors that are generated by the find command. They're not going to pollute our console with all sorts of stuff that we're not interested in.
| Note |
|---|---|
Notice there is no space between the 2 and the > | |
We could do this with any command, we could for example say:
ls -al 2> myerror
|
Which would redirect all the error messages into a file called "myerror".
To recap we can use either:
<	OR	0<	for standard input
>	OR	1>	 for standard output
but for standard error I have to use 2>
|
It's not optional to leave off the number two (2). Leaving it off would mean that the standard output would go to "myerror", including a 2 means standard error.
In the listing case of:
ls -al 2> myerror
|
puts any errors into a file called 'myerror'.
If we wanted to keep all those error messages instead of using a single greater than sign, we would use double greater than signs.
By using a single greater than sign, it would clobber the file 'myerror' if it exists, no different to standard output. By using a double greater than sign, it will append to the contents of the file called myerror.
ls -al 2>> myerror
|
Thus the contents of 'myerror' would not be lost.
With our new found knowledge, let's try and do a couple of things with the find command. Using the find command, I want to completely ignore all the error messages and I want to keep any valid output in a file. This could be done with:
find / -name "*" -print 2> /dev/null > MyValidOutput
|
This discards any errors, and retains the good output in the file "MyValidOutput". The order of the redirection signs is unimportant. Irrespective of whether standard output or standard error is written first, the command will produce the correct results.
Thus, we could've rewritten that command as:
find / -name "*" -print >MyValidOutput 2>/dev/null
|
Finally I could've appended the output to existing files with:
find / -name "*" -print >> output 2>> /dev/null
|
Clearly appending to /dev/null makes no sense, but this serves to illustrate the point that output and errors can both be appended to a file.
What happens if we want to take our standard output and put it into the same file as standard error? What we can do is this:
find / -name "*" -print 2> samefile 1>&2
|
This means that standard error goes into a file called samefile and standard output goes to the same place as file descriptor 2 which is the file called samefile.
Similarly we could've combined the output by doing:
find / -name "*" -print 1> file 2>&1
|
This captures the output of both standard output and standard error into the same file.
Clearly, we could've appended to a particular file instead of overwriting it.
find / -name "*" -print 1>> file 2>>&1
|
Using the simple scripts from the previous exercises, ensure that all output from the df, du, vmstat, iostat commands are written to a file for later use.
Write a script to run the vmstat command every 10 seconds, writing output to a file /tmp/vmoutput. Ensure that the existing file is never clobbered.
Propend the date to the beginning of the output file created by the script in question 2 above. (put the date on the front - or top - of the file)
Up to now, we've seen that we can run any command and we can redirect its output into a particular file using our redirection characters (>, <, >>, 2> or 2>>).
It would be good if we could redirect the output of one command into the input of another. Potentially we may want the output of the next command to become the input of yet another command and so forth. We could repeat this process over and over until we achieve the desired output.
In Linux, this is affected using the pipe character, (which is a vertical bar '|'). An example is:
ls -la | less
|
This would pass the output of the ls -al command to the input of the less command.
The effect would be to page your output one page at a time, rather than scrolling it to the standard output all in one go - too fast for you to be able to read, unless of course you are Steve Austin!.
What makes the pipe command powerful in Linux, is that you can use it over and over again.
We could type:
ls -l | grep myfirstfile | less
|
Instead of grep's standard input coming from a file (or keyboard) it now comes from the ls command. The grep command is searching for a pattern (not a string) that matches myfirstfile. The output of the grep command becomes the input of the less command. Less could take its input from a keyboard, or from a file, but in this case it's taken its input from the command grep.
How many of these pipes can we have on a single line? As many as we want! We will see this and how it's used to good effect in our shell scripts from the next chapter onwards.
If pipes were not available, we may have to archive the above command in two or more steps. However, with pipes, this task is simplified (speeded up).
If we take a step back to run the who command:
who | grep <your user name>
|
| Note |
|---|---|
The < and > here don't mean redirection! | |
We will see only the people that are logged on as your user (hopefully that is only you!!). Perhaps you want to only see people who are logged on to pseudo terminals, then:
who | grep pts
|
which would tell us only the usernames of the people logged on to pseudo terminals.
In these examples we are using the output of the who command as the input to the grep command.
Additionally we could redirect the output of this command to a file called outfile:
who | grep pts > outfile
|
This would produce the file 'outfile' containing only those users who have logged onto pseudo terminals. That's nifty.
We will see this put to good effect as we start scripting, building very complex filters where we use the output of one command to be the input of the next, and the output of that to be the input of the next.
[1] If you haven't been taught vi, an excellent place to start is using vimtutor. Type vimtutor on the command line to begin the lessons. It only takes 45 minutes, but is well worth the effort. vi is the best editor in the world, in my humble opinion Almost everyone in the UNIX/Linux world has some relationship with it - a love-hate relationship: some people love it, some people hate it. But if you're going to learn any editor, learn vi. Since it is the de-facto editor on almost any UNIX/Linux variant in the market today, learning the basics at least should stand you in good stead in you years as a system administrator.
Table of Contents
In order to work with the shell, you will need to be logged in as your user on your system.
What is the shell? The shell is a command interpreter, which I'll talk about in a minute. In essence, there are two types of shells:
the login shell and
the non-login shell
The login shell's responsibility is to log you into the system. This is the shell you get when you're prompted with your username and you have to enter your password. The second type of shell is a non-login shell. This is the shell we're going to be programming in, which in my case, is bash, but could also be the sh, csh , the ksh, or another shell.
There are many non-login shells. We're not going to be concentrating on all the non-login shell as there are most probably 50 different shells that one could use. In order to understand the shell, we need to understand a little more about how the shell starts up.
I'm going to explain the start-up process briefly in order to convey an idea of where your login settings are. For a full comprehensive description of these files, consult the system administration course in this series.
Throughout this course, we'll use bash, primarily because that's the shell that you're probably going to have as your non-login shell on most Linux systems. How do you find out what shell you're using? Well the easiest way to do this, is:
echo $0
|
$0 will return "bash" if you're using the Bourne Again shell, or "sh" if you're using the Bourne shell, "ksh" if you're using the korn shell or "csh" if you're using the C shell or the tcsh.
Once you've established what shell you're using, you know what command interpreter set you're going to be using when creating shell scripts.
The login shells' responsibility is to start the non-login shell and to make sure that your environment variables are set so as to ensure that you can get all the default parameters needed at start-up.
Your login shell will set the PATH environment variable, TERM, the UID and GID of the terminal amongst other things. These are the essential requirements in order to work efficiently. Environmental variables will be covered in detail later. Additionally, the login-shell will set default variable such as USERNAME, HISTSIZE, HOSTNAME, HOME, etc.
Upon start-up, your login shell consults two sets of files:
users', as well as the system-wide login shell initialisation files also known as the profile files
users', as well as the system-wide non-login shell initialisation files commonly referred to as 'shell rc' files.
System-wide profile and shell rc initialisation files reside in the /etc directory, and are owned by root.
System-wide initialisation and profile files:
/etc/profile
/etc/bashrc
|
Users' profile and shell rc files are owned by the specific user, reside in their home directories and are hidden. [2]
~/.bash_profile
~/.bashrc
|
The profile files contain the initialisation data used at login time, thus:
/etc/profile
~/.bash_profile
|
are used by the login shell.
The non-login shell (bash in my case) files are:
/etc/bashrc
~/.bashrc
|
which are run in order to set up variables and other necessaries at shell initialisation.
There are many things you can achieve using these files. For example you can initialise parameters, you can set your PATH, you can set what your prompt looks like, and much more.
Using these files, you can set up your entire environment. Obviously because you, are the owner of your ~/.bash_profile and ~/.bashrc, you have full control to make changes to these files.
Only the root user can change the /etc/profile and /etc/bashrc.
The appendix Appendix C details the differences between bash, tcsh and ksh.
SUMMARY: At login time, your login shell consults /etc/profile which is owned by root, your home ~/.bash_profile which is owned by yourself, the /etc/bashrc which is owned by root and your home ~/.bashrc which is owned by yourself.
Each time a new shell is started, it executes the /etc/bashrc and ~/.bashrc.
Notice that starting a new shell without logging out and in again (a child process) means that the shell has no need to run the profile files again.
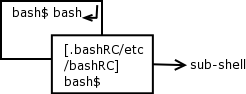
At your command prompt type:
bash
|
This will start a second shell. Looking at the diagram you can see that from the original shell, we've started a new shell. Is that original shell gone? Absolutely not. All you have done is to run a command that just happens to be a new shell. The original shell is still running and so is the new shell.
Again we could run bash at the prompt which would start yet another shell. Each time we run bash, it's consulting /etc/bashrc and ~/.bashrc using these files to initialising the shell. So how do we get back to our original shell? Well we could type:
exit
|
This will return us to the previous shell. Within this shell, we can type exit again which will return us to our original shell. If we type exit one more time, it will return us to our login prompt.
Understanding the distinction between your profile files and your shell rc files is important because when you start to program in the shell you need to know where to set variables in order that they be propagated from shell to shell correctly.
| Note |
|---|---|
A common thread in Linux is that initialisation files are frequently named by including an 'rc' in the name. The editor, improved vi or vim, uses an initialisation file called .vimrc. The run level initialisation directories are called rc0, rc1, rc2, etc. Hence the name shell rc files, since it's bashrc (for bash) or kshrc (for ksh) of cshrc (for tcsh) | |
These exercises should assist in your understanding of the login and non-login shell initialisation files.
Log in as a user, edit your .bash_profile. Add a variable called MYFULLNAME as follows:
MYFULLNAME="Hamish B Whittal"
Save the file and logout.
Now login again.
Type the following at the prompt:
echo $MYFULLNAME
What happens? Why?
Now type bash again. In the new shell that open type the following:
echo $MYFULLNAME
What happens? Why?
Start another "bash" shell
In it type;
echo $MYFULLNAME
What happens? Why?
Edit your .bashrc, adding this:
MY_FAV_MOVIE="Finding Nemo"
Save the file and log out, log in again then type the following at your prompt:
echo $MY_FAV_MOVIE
echo $MYFULLNAME
What happens? Why?
Type bash;
echo $MY_FAV_MOVIE
echo $MYFULLNAME
What happens? Why?
Type bash;
echo $MY_FAV_MOVIE
echo $MYFULLNAME
What happens? Why?
Can you explain what is happening in these examples and why?
Exit back to your original prompt.
We need to have a quick look at what the shell actually does. The main functions of the shell are described below.
The shell interprets commands. A command typed in at the prompt will know how to be executed because the shell will use its PATH to search for the command.
Typing cd, the command interpreter knows this is a built-in command , and will not search for it in the PATH.
Typing pwd, it understands that it needs to display the local working directory.
Using mv, the shell must know to run an external program, as this is not a shell built-in. [3].
Equally the shell is responsible for parsing the command line to detect errors in syntax. For instance typing
cd..
|
produces an error because there is no white space between the cd and the .. (this is a problem ex-DOS people often stumble over). In this instance the command interpreter would typically give you feedback such as
cd..
bash:cd..: command not found
|
The shell allows variables to be set. Variables such as your PATH variable, or your input field separator (IFS), or setting your shell HISTORY size.
The shell is also responsible for input, output and error redirection (consult the previous chapter to refresh your memory on IO redirection).
The final job of the shell is to allow you, a user, to customise your environment. Setting variables, changing your prompt, running scripts automatically are all things that allow the user some control over their environment.
In summary, a shell script is like a batch file in DOS. Unlike the DOS command interpreter, the shell incorporates a powerful, almost full programming environment.
For instance, it allows 'if' statements, 'while' loops, 'for' loops, 'arrays', as well as a host of other programming techniques.
Scripting will make you life easier as a system administrator.
Table of Contents
- Introduction
- What are regular expressions?
- The fullstop
- Let's explore "sed" syntax
- Square brackets ( [ ] ), the caret ( ^ ) and the dollar ( $ )
- Using sed and pipes
- The splat (asterisk) ( * )
- The plus operator ( + )
- Returning from detour to our discussion on curly braces …
- RE's are greedy for matching patterns
- Placeholders and word boundaries
- Word boundaries ( < and > ) - a formal explanation
- The tr command
- The cut command
- The paste command
- The uniq command
- The Sort command
- The grep command
One of the most important (and powerful) parts of UNIX and Linux, and one that is often overlooked, is the concept of regular expressions.
Regular expressions could change your life (in the Linux world!!!) and if you don't know how to use them you will find yourself handicapped.
This chapter will not only teach you about regular expressions it will also teach how and when to use them.
First log in using your username.
Then you need files containing data. Go to the site and retrieve the file bazaar.txt. This is an extract from Eric S Raymond's book, "The Cathedral and the Bazaar" (the team highly recommends this book as per the preface to this course). All files you download from the site should be placed in your user area. Use the 'less' command to browse the file to familiarise yourself with it's contents. Repeat the process for the files:
emails1.txt
emails2.txt
emails3.txt
columns.txt
telnum.txt
Thirdly, we need a program within Linux that uses regular expressions. For this we're going to use a program called sed. sed is one of those many "Swiss army knives" that you're going to find in Linux.
| Note |
|---|---|
Some of the other tools that you will use regularly are: find, awk, perl and grep. | |
A regular expression is a pattern matching tool. The pattern can comprise alphanumeric and non-alphanumeric characters, numbers, letters and digits.
Patterns can be used to match certain sequences of characters - almost like a shape and sort. OK, but what does this actually mean?
When doing file manipulations in an earlier chapter, we used patterns. For example, the splat ( * ) is a pattern that matches 0 or more characters. Thus:
ls *
|
matched filenames of 0 or more characters.
The splat is a pattern matching either none (0) characters, or 1 character, or 1 character followed by another character (i.e. 2 characters) or 1 character followed by another and another (i.e. 3 characters) etc., irrespective of what those characters are.
Thus, we've had a glimpse of patterns previously, however RE patterns are much more versatile (and complex) and we want to look at them in detail.
The first of our pattern sequences: a fullstop (or a period as the Americans call it) matches any character.
We might say:
sed 's/Linu./LINUX/g' bazaar.txt
|
This sed expression means:
s (search for) / Linu.  / (replace with) LINUX / g (globally) <filename to search>
 ----------^-------^-----------------^---------
|
Looking at the command in detail: The pattern 'Linu.' says match any set of characters that begins with a uppercase 'l', followed by i, an 'n' and a 'u' followed by any other character - the fullstop matches the "any other character". In the file bazaar.txt the following strings appear, that would match this pattern:
Linus
Linux
|
The pattern we used in the sed above, will match occurrences of Linux and Linus.
Using the fullstop in place of 's' or 'x' ensures that these two strings are matched. However, the pattern will also match:
Linup
|
Why? Because it matches the pattern 'Linu' followed by any single character.
![[Important]](../images/admon/important.png) | Important |
|---|---|
The fullstop in regular expression terms matches any character. | |
Pipe the sed expression through nl, and look at line 9 ... "Linus Torvalds" has been changed to "LINUX Torvalds".
sed 's/Linu./LINUX/g' bazaar.txt | nl
|
Sed is an acronym for "Stream Editor". The "stream", in our example above, comes from the file bazaar.txt.
Besides the input stream sed must also have a command pattern-command combination.
SYNTAX:
sed [command] / pattern / [replace sequence]  / [modifier] [command]
|
In this case our command is 's' for search while the pattern we're searching for is enclosed in forward slashes (forward slashes are not strictly required, but we'll not going to complicate matters right now).After the second forward slash, we have a replace sequence.
sed will search for a pattern (Linu.) and on finding it, will replace it with the replace sequence (LINUX).
Finally we have a modifier in this case a 'g' meaning "globally" i.e. search for a pattern and replace it as many times as you find it on a line. If there were 10 instances of 'Linu<any character>' on a line, it would replace all occurrences.
Since sed is a stream editor, it considers each line in the file bazaar.txt independently (in essence, "finish processing this line, then get the next line from the input file"). The stream ends when an end-of-file character is reached. Thus the "globally" modifier only operates on the current line under consideration.
If we just wanted to replace only the second instance and not the first or the third, etc. we could replace the g with a 2. sed would then only replace the second instance of the desired pattern. As you go through this chapter, you will become friendly with sed, and work with many patterns.
To Summarise: a fullstop (.) as a regular expression matches any single character.
Using sed and the bazaar.txt file, write regular expressions to match the following:
Any word containing the letters "inu" in order. Thus, your RE should match Linux , Linus, linux and linus.
Match only 5 letter words.
Write a RE to match only words with an even number of letters up to a maximum of 10 letters.
Replace all the words 'the' with the word "ETH" in the file bazaar.txt
Square brackets mean a range of characters. If we tried [abc], ( you should remember this from earlier), it means match a single character which is either and 'a' or a 'b' or a 'c'.
A caret ( ^ ) matches a start of line and the dollar ( $ ) the end of the line.
Now I'm going to use these together to create more complex RE's. We're going to write a sed expression that's going to match lines (not search and replace as before, ) that begin with 'a', 'e' or i and print ( p ) them.
sed '/^[aeI]/p' bazaar.txt
|
You will notice that before we were doing a search-replace, this time around we're doing a pattern match, but merely printing the matched lines.
This regular expression would match lines that begin with either 'a' or 'e' or i. Now, you'll notice when we ran this command, the lines that begin with 'a', 'e' or i are printed twice while every non-matching line is printed only once. sed parsed the entire file, line by line and each time it matched a line that began with 'a', 'e' or i, the line was printed (which is why the lines were duplicated). In our example we can see that line 6 begins with an i - hence a match:
I believe that most important software....
|
Similarly, line 8 is also printed twice:
editor) needed to be built....
|
How would we match both 'e' and 'E'? Simply include 'E' in the pattern so that the RE becomes:
sed '/^[aeEI]/p' bazaar.txt
|
This time if you run it, you will notice that line 16 is also matched:
Extract taken from....
|
We've seen two things:
that [ ] match a range or choice of characters, and
that the caret matches the start of a line.
Now what makes this slightly more complex is that if this caret appeared inside the square brackets, it's meaning becomes altered.
Examine the following Regular Expression:
sed '/^[^aeEI]/p
|
This causes every line that does NOT begin with 'a', 'e', 'E' or i to be printed. What's happening here? Well, the caret inside the square bracket means "do not match".
The caret outside the square bracket says match the start of the line, the caret inside the square bracket says do not match a,e,E or I. Reading this RE left to right:
"any line that starts with NOT an 'a' or an 'e' or an 'E' or and i - print it".
What happens if we replace the 'p' with a 'd'?
sed '/^[^aeEI]/d'
---------------^
|
means:
"any line that starts with NOT an 'a' or an 'e' or an 'E' or and i - delete "it".[4]
Here are the new concepts you've learned:
.We've learnt that we can simply match a pattern without doing a search and replace. In the previous example we talked about search and replace patterns, now we're talking about matching-only patterns. We do this using a straightforward slash without a 's' preceding it. In this case, we operate first by printing then by deleting the pattern. Earlier we looked at searching and replacing, now we're looking at other operations that sed can perform. In essence, "find the pattern accordance with my pattern structure and print or delete it".
Secondly, a caret outside a square bracket means "start of line", while a caret inside a square bracket means "invert the pattern" or more commonly "do NOT match the pattern""
Just the same way that the caret means the beginning of the line, the $ means the end of the line. An expression such as:
sed '/[aeEI]$/!d' bazaar.txt
|
means
"don't ( ! ) delete any line that ENDS in either an 'a', an 'e' an 'E' or an 'I'".
|
We've used the following expressions:
| . | any single character |
| [ ] | a range of characters |
| ^ | start of line (when outside [ ]) |
| ^ | do not (when inside [ ]) |
| $ | end of line |
Perhaps we want to print only the lines beginning with 'a', 'e', 'E' or i.
How can sed achieve this? We could try,
"delete all lines NOT beginning with an 'a,e,E or I'"

sed '/^[^aeEI]/d' bazaar.txt
|
Bingo. However it also produced a series of blank lines. How do we remove blank lines, leaving only the lines that we are interested in? We could pipe the command into yet another sed, where we could look for blank lines. The pattern for a blank line is:
^$
|
So the following command would delete the unwanted blank lines:
sed '/^[^aeEI]/d' bazaar.txt | sed '/^$/d'
|
Bingo (again), we end up with the lines we wanted. You might want to pipe this command through nl just to see the line numbers:
sed '/^[^aeEI]/d' bazaar.txt | sed '/^$/d' | nl
|
Notice that the first sed is acting on a file, while the second sed is acting on a stream of lines as output by the initial sed. Well we could have actually simplified this slightly, because sed can accommodate multiple command-pattern-command sequences is they are separated by a ';' Hence, a modified command:
sed '/^[^aeEI]/d;/^$/d' bazaar.txt | nl
 ----------------^----------------------
[ notice the ^ indicating the ; ]
|
These examples illustrate two concepts:
How to put multiple sed commands on the same line,
It is important to optimise your shell scripts.[5] In the first example (where we called sed twice) we were invoking sed twice, which obviously takes time. In the second instance we're invoking sed once, while doing two sets of commands (albeit sequentially) thereby optimising our code, naturally making it run significantly quicker.
By way of re-enforcing this, run the following commands:
time sed '/^[^aeEI]/d' bazaar.txt |sed '/^$/d' |nl
time sed '/^[^aeEI]/d;/^$/d' bazaar.txt |nl

[ the 'time' command will time the commands ]
|
This will show the elapsed time in addition to a host of other information about how long this command took to run. In this case since our RE is so simple and the file we're operating on is so small, the time difference is marginal. If however this were a 100Mb file, invoking sed twice would be a significant impairment on the speed with which your script executes.
sed is a stream editor, but what's a stream? A stream is just like a river, in which information is flowing. sed is able to edit the stream as it 'flows' past. We've been invoking sed using a file as an argument, however we could alternatively have used sed as part of a pipe :
cat bazaar.txt | sed '/^[^aeEI]/d;/^$/d'
|
This would produce the same results as invoking sed earlier. sed is one of the commands that you should be comfortable using since it can be used in many and varied ways. Now, as part of the pipe, sed is searching for a pattern. On finding the pattern it's modified and sent on to stdout.
Only print lines that DO NOT have the word Linux in them
Remove all blank lines, as well as those that DO NOT have the word Linux in them
Remove any line that begins or ends with a vowel (a,e,i,o,u).
Search for the word "bazaar", only printing lines containing the word. Ensure that you search for both "Bazaar" and "bazaar".
Remove all non-blank lines from the file.
The splat (*) matches 0, one or more occurrences OF THE PREVIOUS PATTERN.
Supposing we wanted to match Line or Linux or Linus the pattern:
sed '/Lin.*/p' bazaar.txt
|
would match lines containing these words.
The splat says "match 0, one or more of the previous pattern (which was the Full-stop, and the full-stop means one occurrence of any single character)".
Lets looks at another example:
/a*bc[e-g]*[0-9]*/
|
matches:
aaaaabcfgh19919234
bc
abcefg123456789
abc45
aabcggg87310
|
Let's looks at another example:
/.*it.$/
|
matches any number of alphanumeric characters followed by and i followed by a 't' followed by the end-of-line.
Using the file index.html, available.
Match the following RE's
Look for every line beginning with a '<'. Did it give you what you were expecting? Why?
Modify the above RE to give you EVERY line beginning with a '<'. Now is it giving you what you were expecting? If not, have another look at question 1. Linux people may be lazy, but they think a great deal.
I am only interested in the divider HTML code (the code with "<div" in it). Note that although I have asked you for <div, there may be anomalies in it's case. It could be <Div or <DiV, etc. Ensure your solution gets all of them.
Look for all references to QED. Number each line you find.
Show all lines that are headings (H1, H2, H3, etc.). Again case may be an issue.
Let's update our list of patterns:
| character | pattern |
| . | any single character |
| [ ] | a range of characters |
| ^ | start of line (when outside [ ]) |
| ^ | do not (when inside [ ]) |
| $ | end of line |
| * | 0 or more of the previous pattern |
| + | 1 or more of the previous pattern |
| \{n\} | |
| \{n, \}+ | |
| \{n,m\} |
The plus operator will match the preceding pattern 1 or more times. To match the character 'a' or 'b' or 'c', one or more times, we could use:
[abc+]
|
Perhaps we want to match 19?? in the bazaar.txt file (Here we would want to find any year, 1986 or 1999 whichever you would like to find.)
19[0-9+]
|
To match the character a, one or more times, we would use
a+
|
| Note |
|---|---|
Note that in the previous examples, the plus character is not matched, since this ( + ) has special meaning in a RE. If we wanted to search for a plus sign (or any of the RE pattern matching tools) in a pattern, we would need to escape the plus sign. | |
How do we escape characters that are special in RE's? We need to escape them with a backslash ( \ ). Thus to search for the pattern a+ we would use:
a\+
|
Similarly if we wanted to match a splat ( * ), we would have to match it with:
a\*
|
So, the plus is a special character, which matches one or more of THE PREVIOUS PATTERN.
Using {n}, we match exactly that number of the previous expression. If we want to match 'aaaa' then we could use:
a{4}
|
This would match exactly four a's. If we want to match the pattern 1999 in our file bazaar.txt, then we would do:
sed '/19{3}/p' bazaar.txt
|
This should print all lines containing the pattern 1999 in the bazaar.txt file.
You will notice that if we try to do this, it doesn't seem to work. This is because we need to escape the curly braces by preceding each one with a backslash.
If we wanted to match three characters irrespective of what they are (e.g. fox, bat, cat, car)?
sed \%\<[a-z][a-z][a-z]\>%p' /usr/share/dict/words
|
I've alluded to this previously, but now here it is in use. While sed will normally use the / as the pattern delimiter, any character can be used instead of /. This is particularly useful when using sed to modify a PATH. For example: supposing we were wanting to search for the pattern:
/home/hamish/some_where
|
sed could achieve this, but consider how "complex" the RE would be:
'/\/home\/hamish\/some_where/!d'
|
Confusing? Now rather than using the / as the pattern delimiter, we could use a % sign, simplifying the RE to:
%/home/hamish/some_where%!d
|
This will only work however, if we escape the initial %, making our sed statement look like this:
\%/home/hamish/some_where%!d
|
I have used the word encapsulation characters here (\< and \>) to trap ONLY whole words that are ONLY 3 letters in length. Try
sed 's/.../321/g' bazaar.txt
|
versus
sed 's/\<...\>/321/g' bazaar.txt
|
The word encapsulation characters are < and >, but naturally, since these hold special meaning in the shell (and in fact in sed too), we need to escape them, hence the \< and \>.
The second sed should produce closer to what you may have been expecting and would match fox, the, bar, bat, its, joe, etc....
The above RE ( sed \%\<[a-z][a-z][a-z]\>%p' /usr/share/dict/words ) is a little long, so we could shorten it using the splat to:
sed '/\<[a-z]\{3\}\>/p' /usr/share/dict/words
|
(this may be hard to see that you are in fact getting the results you are after. You could, instead, not delete words that are 3 charaters in length by replacing the "p" with a "!d" (don't delete) in the sed expression above:
sed '/\<[a-z]\{3\}\>/!d' /usr/share/dict/words )

sed '/19\{3\}/p' bazaar.txt
|
The command now executes as expected and only one duplicate line is output from the file, that which contains the text 1999. So {n} matches exactly n occurrences of the expression.
If we wanted to match a string with a minimum of 4 a's, up to .... well infinity a's we could use the pattern:
a\{4,\}
|
This regular expression says match no upper limit, but the string must contain at least four a's. Thus it would match four a's, forty a's or even four hundred a's following one another, but it would not match three a's.
Let's now match the letter m at least once and with no upper limit. We would do this by:
sed '/m\{1,\}/p' bazaar.txt
|
If we change the 1 to a 2, our pattern becomes:
sed '/m\{2,\}/p' bazaar.txt
|
This would match only those lines with the words: community, programming etcetera (i.e. any words containing at least two m's).
The following expression would match a minimum of four a's but a maximum of 10 a's in a particular pattern:
a\{4,10\}
|
Let's say we wanted to match any character a minimum of 3 times, but a maximum of 7 times, then we could affect a regular expression like:
.\{3,7\}
|
This allows us a huge degree of flexibility when we start combining these operators.
What does the following RE match?
^[aeEI]\{1,3\}
|
This RE means: "look for any line that starts with any of the characters a,e,E,I a minimum of one time but a maximum of 3 times. Thus it would match any of the following:
aaa
a
aE
e
E
I
|
Would it match abd or adb or azz for that matter, or only lines that start with any of the characters in the RE, followed by up to 2 other characters from the RE?
It would not match the following:
aaEI
EIea
bEaa
IIEEaae
iEE
|
(why?-- you should answer this.)
If you think this is bizarre, hang in there, it gets more bizarre. Let me finish off RE's with two concepts. The first is 'greediness'. RE's are greedy, which means that they will match as much as they possibly can.
Assuming you have an expression:
ham.*
|
This will match as much as it possibly can within that expression. So it would match
ham
|
but if we had:
hammock
|
it will match the entire word hammock, because it tries to grab as much as it possibly can - it's greedy. RE's are greedy and sometimes they'll be matching a lot more than you expect them to match. The closer you can get your RE to the actual thing that you're looking for, the less the greediness will affect your results. Let's look at some examples of that.
The following exercises will show you how sed's greediness affects the output, and how to create RE's that will only give you the results you want.
I have included 3 files, emails{1,2,3}.txt in the examples directory you should have downloaded these previously.
In order to REALLY come to terms with RE's, work through these exercises using these 3 files:
Match the subject lines in these files. Subject lines look as follows:
Subject:List only the 'id' of each message. This can be found with the string 'id', but there is a catch!
What mail clients have people used?
Obtain a listing of all za domains, all com domains, etc in these emails.
Given the following RE's what would they match?
ht\{2\}p:\/\/


ht\{2\}p:\/\{2\}


ht\{2\}p:\/\/w\{3\}.*za$


ht\{2\}p:\/\{2\}.*\/.\{9\}\/
|
| Note |
|---|---|
You will have noticed that in order to understand these, you have to work through them systematically, left to right, understanding each part as you go! | |
Placeholders are a way of keeping the pattern that you've matched.
In your example files, there's a second file called columns.txt. This file has two columns:
name age
|
I want to swap the two columns around so that the file contains the age column on the left, and the name column on the right.
Now, if you start thinking about how to do that, it might become quite a complex thing to achieve (without using tools like awk or perl etc.).
With RE's and sed, it's very simple using placeholders. So let's first try and develop a pattern that matches name and a pattern that matches age. Notice that the two columns in the file are separated by a single space. The expression for the name column would be:
[a-z]*
|
Assuming that no one in our file is 100 years or older we can use the following expression to match the values of the age column:
[0-9]\{1,2\}
|
That should match any age (in the file) because it means match any digit in the range 0-9 a minimum of once but a maximum of twice. So it should match a person whose age is: 1, 9 or 99.
Now the sed expression would then be:
sed '/^[a-z]* [0-9]\{1,2\}$/p'
|
This only searches for lines matching and prints them.
How do I swap the name and the age around? I'm going to enclose the name in round brackets (remember you have to escape round brackets). Similarly I'm going to enclose the age expression in round brackets.
Our sed expression now looks like:
sed 's/^\([a-z]*\) \([0-9]\{1,2\}\)$/\2,\1/' columns.txt
----^__------__^__------------__^-__-___
       1 2   3     4 5 6         7           8 9 10  11

	1 = Caret (start of line)
	2 = Start of placeholder for the name RE
	3 = Name RE
	4 = End placeholder for the name RE
	5 = Space between the name and the age in the file
	6 = Start placeholder for the age RE
	7 = The Age RE
	8 = End placeholder for the age RE
	9 = Dollar (end of line)
	10= Placeholder 2 (the age)
	11= Placeholder 1 (the name)
|
The first set of round brackets contains the 'name' RE, while the second set of round brackets enclose the 'age' RE. By encompassing them in round brackets, I've marked the expressions within placeholders. We could then use \2 to represent the 'age' placeholder, and \1 to represent the 'name' placeholder. Essentially this expression says "search for the name and age, and replace it with the age and then name". Thus we've switched the two columns.
The above final expression looks very complex but I tackled this regular expression in byte-size chunks.
I said let's write a regular expression to match the name. Now let's write a regular expression to match the age. Once I had these two individual expressions, I combined them. When I combined them into a single regular expression I then just included round brackets to create placeholders. Later in sed, we were able to use these placeholders in our search-replace expression. Now try and do that in other operating systems!
Try these:
free | sed '/^Mem/!d'
free | sed '/^Mem/!d';  '/  */,/g'
VAR=`free | sed '/^Mem/!d';  '/  */,/g'`
echo $VAR
|
A final useful trick is that of word boundaries. We've seen them a little earlier, but here is a formal explanation. Suppose we are wanting to search for all words 'the':
sed 's/the/THE/g' bazaar.txt
|
would probably be our first try. Problem is, this will also match (and change) 'there', 'them', 'then', 'therefore', etc. Problem, yes?
Solution? Well, the solution is to bound our word with word boundary markers (the official term is word anchors).
Let's rewrite our pattern with this in mind:
sed 's/\<the\>/THE/g' bazaar.txt
|
This time, we only match the whole word 'the' and not any of the others. So the word anchors will restrict the pattern to complete words and not segments of words.
The following exercises can be used on any of the text files in your directory. See if you can work out what will be matched before using sed to do it for you.
s/the/THE/g
s/\<the\>/THE/g
s/\(.*\)@\(.*\)/\2 user \1/g
s/\([-a-zA-Z0-9\.]*\)@\([-a-zA-Z0-9\.]*\)/\2 .. \1/g
s/\([-a-zA-Z0-9\.]*\)@\([-a-zA-Z0-9\.]*\)/<<<\2>>> .. [[[\1]]]/g
It may be a good place to pause and tell you about the best editor ever written - vi. If you aren't familiar with it, get hold of VIM (the Improved version of vi.)
The translate command is used to translate strings or patterns from one set of characters to another.
For example, supposing we have a whole bunch of lowercase letters in a string, and we want to translate that all to uppercase letters, the simplest way to do that is to use the translate command.
Translate does not take a filename as an argument, it only acts on a stream of characters. Working with the file columns.txt from previously, we may want to translate all the names to uppercase. Previously we had the line:
Hamish 35
|
We now want to translate that to:
HAMISH 35
|
without editing the file. Cat-ting our file (columns.txt) and then piping the output of the cat command to the input of the translate command causing all lowercase names to be translated to uppercase names.
cat columns.txt | tr '[a-z]' '[A-Z]'
|
Remember we have not modified the file columns.txt so how do we save the output? Simple, by redirecting the output of the translate command with '>' to a file called UpCaseColumns.txt with:
cat columns.txt | tr '[a-z]' '[A-Z]' > UpCaseColumns.txt
|
Since the tr command, does not take a filename like sed did, we could have changed the above example to:
tr '[a-z]' '[A-Z]' < columns.txt > UpCaseColumns.txt
|
As you can see the input to the translate command now comes, not from stdin, but rather from columns.txt. So either way we do it, we can achieve what we've set out to do, using tr as part of a stream, or taking the input from the stdin ('<').
We can also use translate in another way: to distinguish between spaces and tabs. Spaces and tabs can be a pain when using scripts to compile system reports. What we need is a way of translating these characters. Now, there are many ways to skin a cat in Linux and shell scripting. I'm going to show you one way, although I'm sure you could now write a sed expression to do the same thing.
Assume that I have a file with a number of columns in it, but I am not sure about the number of spaces or tabs between the different columns, I would need some way of changing these spaces into a single space. Why? Since, having a space (one or more) or a tab (one or more) between the columns will produce significantly different output if we extracted information from the file with a shell script. How do we do convert many spaces or tabs into a single space? Well, translate is our right-hand man (or woman) for this particular task. In order not to waste our time modifying our columns.txt let's work on the free command, which shows you free memory on your system. Type:
free
|
If you look at the output you will see that there's lots of spaces between each one of these fields. How do we reduce multiple spaces between fields to a single space? We can use to tr to squeeze characters (you can squeeze any characters but in this case we want to squeeze a space):
free |tr -s ' '
|
The -s switch tells the translate command to squeeze. (Read the info page on tr to find out all the other switches of tr).
We could squeeze zeroes with:
free |tr -s '0'
|
Which would obviously make zero sense!
Going back to our previous command of squeezing spaces, you'll see immediately that our memory usage table (which is what the free command produces) becomes much more usable because we've removed superfluous spaces.
Perhaps, we want some fields from the output. We could redirect the output of this into a file with:
free |tr -s ' ' > file.txt
|
Traditional systems would have you use a Text editor to cut and paste the fields you are interested in, into a new file. Do we want to do that? Absolutely not! We're lazy, we want to find a better way of doing this.
What I'm interested in, is the line that contains 'Mem'. As part of your project, you should be building a set of scripts to monitor your system. Memory sounds like a good one that you may want to save. Instead of just redirecting the tr command to a file, let's first pass it through sed where we extract only the lines beginning with the word "Mem":
free | tr -s ' ' | sed '/^Mem/!d'
|
This returns only the line that we're interested in. We could run this over and over again, to ensure that the values change.
Let's take this one step further. We're only interested in the second, third and fourth fields of the line (representing total memory, used memory and free memory respectively). How do we retrieve only these fields?
The cut command has the ability to cut out characters or fields. cut uses delimiters.
The cut command uses delimiters to determine where to split fields, so the first thing we need to understand about cut is how it determines what its delimiters are. By default, cut's delimiters are stored in a shell variable called IFS (Input Field Separators).
Typing:
set | grep IFS
|
will show you what the separator characters currently are; at present, IFS is either a tab, or a new line or a space.
Looking at the output of our free command, we successfully separated every field by a space (remember the tr command!)
Similarly, if our delimiter between fields was a comma, we could set the delimiter within cut to be a comma using the -d switch:
cut -d ","
|
The cut command lets one cut on the number of characters or on the number of fields. Since we're only interested in fields 2,3 and 4 of our memory, we can extract these using:
free | tr -s ' ' | sed '/^Mem/!d' | cut -d" " -f2-4
|
Why do you need to set -d " " even when IFS already specifies that a spaces is a IFS ?
If this does not work on your system, then you need to set the IFS variable.
Detour:
Setting shell variables is easy. If you use the bash or the Bourne shell (sh), then:
IFS=" \t\n"
|
In the csh or the ksh, it would be:
setenv IFS=" \t\n"
|
That ends this short detour.
At this point, it would be nice to save the output to a file. So let's append this to a file called mem.stats:
free | tr -s ' ' | sed '/^Mem/!d' | cut -d" " -f2-4 >> mem.stats
|
Every time you run this particular command it should append the output to the mem.stats file.
The -f switch allows us to cut based upon fields. If we were wanting to cut based upon characters (e.g. cut character 6-13 and 15, 17) we would use the -c switch.
To affect the above example:
free | tr -s ' ' | sed '/^Mem/!d' | cut -c6-13,15,17 >> mem.stats
|
1. For the next example I'd like you to make sure that you've logged on as a user (potentially root) on one of your virtual terminals.
How do you get to a virtual terminal? Ctrl-Alt plus F1 or F2 or F3 etcetera.
It should prompt you for a username and a password. Log in as root, or as yourself or as a different user and once you've logged in, switch back to your X terminal with Alt-F7. If you weren't working on X at the beginning of this session, then the Ctrl + Alt + F1 is not necessary. A simple Alt + F2 would open a new terminal, to return to the first terminal press Alt+F1.
2. Run the who command:
who
|
This will tell us who is logged on to the system. We could also run the w command:
w
|
This will not only tell us who is logged on to our system, but what they're doing. Let's use the w command, since we want to save information about what users are doing on our system. We may also want to save information about how long they've been idle and what time they logged on.
3. Find out who is logged on to your system. Pipe the output of the w command into the input of cut. This time however we're not going to use a delimiter to delimit fields but we're going to cut on characters. We could say:
w |cut -c1-8
|
This tells the cut command the first eight characters. Doing this you will see that it cuts up until the first digit of the second. So in my case the time is now
09:57:24
|
and it cuts off to
09:57:2
|
It also cuts off the user. So if you look at this, you're left with USER and all the users currently logged onto your system. And that's cutting exactly 8 characters.
4. To cut characters 4 to 8?
w | cut -c4-8
|
This will produce slightly bizarre-looking output.
So cut cannot only cut fields, it can cut exact characters and ranges of characters. We can cut any number of characters in a line.
Often cutting characters in a line is less than optimal, since you never know how long your usernames might be. Really long usernames would be truncated which clearly would not be acceptable. Cutting on characters is rarely a long-term solution.. It may work because your name is Sam, but not if your name is Jabberwocky!
1. Let's do a final example using cut. Using our password file:
cat /etc/passwd
|
I'd like to know all usernames on the system, and what shell each is using.
The password file has 7 fields separated by a ':'. The first field is the login username, the second is the password which is an x (because it is kept in the shadow password file), the third field is the userid, the fourth is the group id, the fifth field is the comment, the sixth field is the users home directory and the seventh field 7 indicates the shell that the user is using. I'm interested in fields 1 and 7.
2. How would we extract the particular fields? Simple:[6]
cat /etc/passwd |cut -d: -f1,7
|
cut -d  -f1,7
or
cut -d" " -f 1,7
|
If we do this, we should end up with just the usernames and their shells. Isn't that a nifty trick?
3. Let's pipe that output to the sort command, to sort the usernames alphabetically:
cat /etc/passwd | cut -d: -f1,7 | sort
|
So this is a fairly simple way to extract information out of files. The cut command doesn't only work with files, it also works with streams. We could do a listing which that would produce a number of fields. If you recall, we used the tr command earlier to squeeze spaces.
ls -al
|
If you look at this output, you will see lines of fields. Below is a quick summary of these fields and what they refer to.
| field number | indication of |
| 1 | permissions of the file |
| 2 | number of links to the file |
| 3 | user id |
| 4 | group id |
| 5 | size of the file |
| 6 | month the file was modified |
| 7 | day the file was modified |
| 8 | time the file was modified |
| 9 | name of the file |
I'm particularly interested in the size and the name of each file.
1. Let's try and use our cut command in the same way that we used it for the password file:
ls -al |cut -d' ' -f5,8
|
The output is not as expected. Because it is using a space to look for separate fields, and the output contains tabs. This presents us with a bit of a problem.
2. We could try using a \t (tab) for the delimiter instead of a space, however cut only accepts a single character (\t is two characters). An alternative way of inserting a special character like tab is to type Ctrl-v then hit the tab key.
^v + <tab>
|
That would replace the character by a tab.
ls -al | cut -d" " -f5,8
|
That makes the delimiter a tab. But, we still don't get what we want, so let's try squeezing multiple spaces into a single space in this particular output. Thus:
ls -la |tr -s ' '|cut -d' ' -f5,8
|
3. And hopefully that should now produce the output we're after. If it produces the output we're after on your system, then we're ready for lift-off. If it doesn't, then try the command again.
Now what happens if we want to swap the name with the size? I'll leave that as an exercise for you.
Using the tr and the cut commands, perform the following:
Obtain the mount point, the percentage in use and the partition of that mount of you disk drive to produce the following:
/dev/hdb2 80% /homeReplace the spaces in your output above by colons (:)
Remove the /dev/shm line
Keep all output from the running of this command for later use.
As root, make the following change:[7]
chmod o+r /dev/hdaNow, obtain the Model and Serial Number of your hard disk, using the command hdparm.
Obtain the stats (reads and writes etc.) on your drive using the iostat command, keeping the output as a comma separated value format file for later use
Ensure that you have the files telnum.txt and columns.txt in your working directory.
We've done the cut command, there has to be an equivalent command called paste?
paste is a way of pasting two files together provided we have exactly the same number of lines in every file - if not, paste will paste from the top of the file.
How do we check how many lines we have in a file?
wc -l columns.txt telnum.txt
|
Since there are an equal number of lines, we're going to use the paste command to paste the two files together, and save the result into a new file called contact.txt by redirecting the output.
paste columns.txt telnum.txt > contact.txt
|
The paste command is not quite as useful as cut, but it can be used relatively effectively and we'll work with it in some detail later on. Paste does take delimiters too. So for example, we could rewrite the command with:
paste -d';' columns.txt telnum.txt > contact.txt
|
This would paste the two files together using a delimiter of semicolon. It might be worth giving that a bash just to see what the output is.
Now, in my telnum.txt file I have spaces, round brackets and dashes and all sorts of other troublesome characters that might cause us problems later. I'm going to replace all 's('s and 's)'s with nothing, and all spaces with a dash. Thus if I had
(021) 654-1234
|
I want to replace it with
021-654-1234
|
We do this with the following search and replace command:
sed 's/(//g;s/)//g;s/ /-/g' telnum.txt > modtelnum.txt
|
Then produce an updated contact.txt where all the telephone numbers have been standardised.
paste -d';' columns.txt modtelnum.txt > contact.txt
|
If I use the -d';' delimitor, only two letters from the last two names are added, not any other.
If I use it without the -d';' delim. Most of the names are recreated in the new file, though the longer ones are truncated.
Now, all spurious characters have been removed from the file contact.txt.
We are still going to cover the following three commands: uniq, sort and grep. I've left grep right 'till last because it's a very slow "Swiss army knife". Which is why I suggest you know how to get the information you want without using grep. grep should be used as a last resort, because it uses so much system resources.
Imagine your manager wants you to remove all shells from the system that are not being used on the system. The logical place to start looking is the password file, since it will list all the shells that the users on your system needs. Currently on my system I'm using bash. On your system you might be using the same shell, or ksh, or csh or sh.
To determine what shells are used on your system:[8]
cut -d':' -f1,7 /etc/passwd
|
Running this command, we're returned a list of usernames and shells. Let's assume that we're only interested in the unique shells, so we're only going to cut field seven out of the password file.
Using the uniq command, we can remove duplicates, leaving only the unique things in the file.
There's one pre-requisite, and that is that uniq expects a sorted file to do the comparison of duplicated lines. So we must first pipe the output to sort.
cut -d':' -f7 /etc/passwd | sort | uniq
|
This command returns only the unique shells that are currently being used on your system.
Now how did this command work?
First we cut out parts of the /etc/passwd file that we were interested in.
We then grouped all similar shells together using sort.
Finally we grabbed all the unique elements from this output.
The sort command is a little more complex. For the sort purpose of this section, I'd like you to open one terminal in which you can do an info OR man of the sort command and another in which you can run the examples.
I'm going to cover sort in a fairly basic manner. It can get a lot more complex than what we're covering here, but for the most part you're going to use it in a fairly basic manner. If you need to do more with it, then by all means read the info page.
Sort takes a number of command line arguments. First it takes the field that you're sorting on. Fields are counted from 0 upwards. So if we had a line with a number of different fields, separated by spaces:
f1 f2 f3 f4
|
then the fields would be numbered as follows:
0 1 2 3
|
Sort can be called to sort on a particular field(s). sorting on field 0:
sort 0
|
Leaving the 0 off implies that the sort happens on the 0'th (first) field by default.
Previously we did:
cut -d: -f7 /etc/passwd | sort | uniq
|
which is the same as
cut -d: -f7 /etc/passwd | sort -u
|
since sort's -u parameter is equivalent to running the output to the uniq program. This means that we've now cut down on the number of commands that we require.
Remember in the shell, every time we run a command, it has to invoke the ommand, which implies a time delay.
We might say we want to reverse sort using the -r switch.
cut -d: -f7 /etc/passwd |sort -ur
|
or
cut -d: -f7 /etc/passwd |sort -ru
|
This would uniquely sort things and it would reverse the sort. If we wanted to output this to a file, we could redirect it to uniq_shells.txt:
cut -d: -f7 /etc/passwd |sort -ru > uniq_shells.txt
|
We could use the equivalent method of using -o switch which would remove the need for the redirect symbol:
cut -d: -f7 /etc/passwd |sort -ruo uniq_shells.txt
|
Let's work a little bit more with our password file. I'm interested in the UID of all our users. Our password file (fields are separated by colons rather than spaces), can be sorted as follows:
f1        :f2:f3  :f4  :f5: ...:f7
uname :x :uid :gid     :... :/bin/bash
|
I want the username, the userid and the shell (fields 1,3 and 7 from /etc/passwd). So:
cut -d: -f1,3,7 /etc/passwd
|
This output of this cut command should be in the format of:
username:userid:shell
|
How do we sort this by userid? [9]
We want to sort on the userid, which is the second field in our list, but is referred to as field 1 (since the fields in sort start from 0).
cut -d: -f1,3,7 /etc/passwd |sort -t: +1n
|
Sort now includes a switch +1, since we want to sort 'one-field-away' from field 0. We also want to make this a numeric sort (using the n switch) and we are using a colon delimiter.
Another example:
df -k |tr -s ' ' |sort +4n
|
IS DIFFERENT to
df -k |tr -s ' ' |sort +4
|
Here sort is now sorting the 5th field assuming it is an alphanumeric and not a numeric. Here we are sorting on which field? That's right, the percent used field.
How do we skip fields? We use a +1 or a +4 to skip one or four fields respectively. You can combine these switches as we've done (using -t and -n).
On our password example, we may want to reverse sort thereby putting the root user id at the bottom of the sort:
cut -d: -f1,3,7 /etc/passwd |sort -t: +1rn
|
where the -r switch forces a reverse sort.
This is a short summary of some of the options available with the sort command:
| option | action |
| -o | for output to a file (also can be substituted with >) |
| -u | to do unique sorts |
| +t | to specify the delimiter |
| +3 | indicating how many fields we want to skip |
| -n | to do numeric sorts as opposed to alphanumeric sorts |
| -r | to reverse sorts |
There are a lot of other sort switches, and I encourage you to look at the info page for the sort command .
Finally. You will have noticed that Linux allows us to combine switches. So, instead of typing the sort as:
sort -t: +1 -r -n
|
we could do it as
sort -t: +1rn
|
The name of this command, comes from a command in the Unix text editor -ed- that takes the form g/re/p meaning search globally for a regular expression and print lines where instances are found.
This acronym readily describes the default behaviour of the grep command. grep takes a regular expression on the command line, reads standard input or a list of files, and outputs the lines that match the regular expression. (Quoted from the Wikipedia (http://en.wikipedia.org/wiki/Grep).[10]
grep can be used to do a whole host of tricks and magic. We can use it as either a filter or to look inside files. It also uses regular expressions.
Let's start off with using grep to look inside files. If I wanted to determine which users use the bash shell, I could do it the following way:
grep "/bin/bash" /etc/passwd
|
I'm enclosing /bin/bash inside double quotes because I don't want anything to interpret the forward slashes. [11]
We could pipe this grep output to the cut or the sort commands, etcetera.
We can search any file, or group of files looking for various patterns.
Remember that grep is looking for a pattern, so as per our example, it's not looking for a string, it's looking for a pattern beginning with a forward slash ( / ), followed by the letters 'b' i 'n', followed by another forward slash ( / ), etc.
Understand that it's searching for a pattern. Why am I emphasising this?
Primarily, because we could use our pattern matching characteristics. We could say:
grep "[hH][aA][Mm]" /etc/passwd
|
which would match all of the following patterns:
hAM
HaM
HAm
|
I could also:
grep "Linuz" bazaar.txt
|
We could equally have done a
grep "Linu." bazaar.txt
|
or better still
grep '[lL]inu.' bazaar.txt
|
which would've grep'd using a pattern 'l' or 'L', i, 'n', 'u' and then any other character. This would grep both Linux and Linus (or linux or linus).
You can see a similarity starting to appear between using regular expressions in grep and regular expressions in sed. They are all RE's, so there should be no difference!
For example I can combine these patterns now:
grep "[Ll]inu." bazaar.txt
|
What happens if I wanted any 5 characters to follow Linu or linu, then I would use the following:
grep "[Ll]inu.\{5\}" bazaar.txt
|
grep (naturally) has other switches that are useful:
| switch | action |
| -B 5 | display the context - i.e. 5 lines of context before a match |
| -A 3 | display the context - 3 lines of context after a match |
| -v | reverses the pattern |
| -n | label every line |
The following command would grep every line except the lines that have the pattern Linus/linus/Linux/linux etc. and it would label every line because of the -n switch.
grep -vn "[Ll]inu." bazaar.txt
|
If you wanted to grep on a whole stack of files then you could:
grep -n "Linux." *
|
which would show you the filename and the line number of the line that contains the pattern.
So far we have used grep fairly effectively to look inside a file or a series of files. Now we want to use grep as a filter.
The best way to see how this works is to use your messages file (/var/log/messages). This file logs all messages from applications on system. If you don't have access to your messages file, then you need to be logged in as root. In order to affect this particular example, you need to have access to the /var/log/messages file.[12]
Look at the time on your system with the following command:
date
|
Use grep as a filter to extract all messages that occurred during 11 'o clock in the morning. The following pattern should achieve this:
tail -20 /var/log/messages |grep '11:[0-5][0-9]'
|
In this case, we're using grep as a filter, filtering the input that's coming from the tail command and actually reducing the amount of output we receive.
Now clearly, because of the ability to pipe commands, you can use the output of one grep command as input to the next.
So we start off with a huge amount of data, but by piping data through grep we filter out only the information that we want.
To continue our examples, let us count the number of lines that exist in the messages file.
cat /var/log/messages |wc -l
|
Now count the number of messages that occurred at 11 o' clock?
cat /var/log/messages |grep '11:[0-5]\{2\}'
|
Now count the number of messages that occurred at 11 o' clock on 25 November:
cat /var/log/messages |grep '11:[0-5][0-9]' |grep 'Nov 25'
|
You should notice fewer lines displayed as your pattern gets more specific.
We could keep on filtering as many times as we want. What I encourage you to do, is to look for a pattern and, using a pattern, reduce the number of output lines. By reducing output lines to fit your criteria, you can save on time.
We could use grep with ls:
cd /var/log
|
Let's only look for files that are directories:
ls -la |grep '^d'
|
Let's only look for files that are not directories:
ls -la |grep -v '^d'
|
Let's look for files that end in 'log':
ls -la |grep -v '^d' |grep 'log$'
|
You see how we are using grep as a filter for the ls command.
grep is one of the "Swiss army knives" that you just cannot do without. The more we script the more we will use grep and the better we will get at it.
Look at the info pages on grep to find out all the other things that you can do with it.
There are three versions of the grep command:
| type | function |
| grep | basic regular expressions |
| egrep | uses extended regular expressions slowest |
| fgrep | no regular expressions fastest |
If you're using egrep it's the slowest, you can test this using the following:
time egrep "[Ll]inu." bazaar.txt
time grep "[Ll]inu." bazaar.txt
time fgrep "[Ll]inu." bazaar.txt
|
The times should decrement from top to bottom. grep by default isn't very fast, so if you're trying to do the same job that was done with grep and sed, sed would be significantly faster than grep.
I'm not going to cover egrep or fgrep because they work almost identically to grep, the only difference being that you can use extended regular expressions (egrep) or no regular expressions at all (fgrep).
Use fgrep, egrep and grep where you think it appropriate to achieve the following:
Search in the messages file for all log messages that occurred today.
How many times did users attempt to log in but were denied access with "Authentication Failure"
Search in the emails* for lines containing email addresses.
Display a list of subjects in the emails.* text files.
Time the difference between using the egrep vs the fgrep in commands 3 and 4. Rewrite commands 3 and 4 in sed, and time the command. Compare the times to those obtained using the same pattern in egrep and fgrep.
Show 2 lines of context on either side of the lines in question in 3 and 4 above.
Look for the pattern linuxrus in the emails*.txt, irrespective of case!
[4] the d command in sed means delete the line if there is a match
[5] Since the shell is a command interpreter it does not compile the script. Since it is not pre-compiled the shell interprets every command it encounters.
[6] I do not enclose the : in quotes, although this would also work. The reason for enclosing a space (or tab) in quotes is so that you and I could see it. What is more legible?
[7] obviously, if you do not have a hda, you will need to adjust the value to suite your needs!!
[8] Just as a matter of interest, cut also takes a filename on the command line, so it doesn't have to be used as a pipe.
[9] Note that the delimiter switch for the sort command is a t not a d.
[10] This is a cool web site. I found it while looking for Far Side Cartoons on the Internet.
[11] You can grep for any type of shell such as /bin/false, essentially you would be obtaining the lines in the password file without actually opening the file with a text editor like vi.
[12] If you are not logged in as root, and you need to be, type the following command:su - root and enter the root password when prompted. Now you should be able to:
cat /var/log/messages
|
This could be rather long, so instead you could
tail -20 /var/log/messages
|
which would show you only the last 20 lines of the messages file.
Table of Contents
Let's understand a couple of things about shell scripting. Firstly it's almost impossible to write a script top-down, start at one end, finish at the other end - unless of course you are Bill Joy or Linus Torvalds!
The way I like to tackle shell scripting is to take things in byte-size chunks. You will have gathered this from the grep, sed, sort and cut examples. We took things in byte-size chunks.
So when you're writing a script, my advice to you is to start at the command line, refine the sed, RE, grep and sort statements until they do what you want. Then once they are working, insert them into a script.
Refining your script on the command line will reduce the amount of time you spend in debugging the script. If you don't do it this way, you may end up with a script that doesn't work and you'll spend more time trying to debug the script, than actually getting the job done.
The command lines we are working on are getting more complex and they will become even more complex before we're done here.
In the meantime, let's take a simple example. We want to write a script to produce the unique shells. Well, we've done most of the hard work here already, recall
cut -d: -f7 /etc/passwd |sort -u
|
And that produced the output that we were after. How do we put that into a script?
Edit a file:
vi script.sh
|
Insert the command onto the first line and save your file.
Let's understand a couple of things about Linux. Linux doesn't care about extensions, it's not interested in what the extension of this particular file is. My advice however, is for your reference (i.e. for the sake of readability), to append an .sh on the end of every shell script file. That will immediately alert you to the fact that this file is a script without having to perform any operation on the file.[13]
Of course if you don't do that, it doesn't make any difference, it will still be a script. But my convention, (there are as many conventions as there are system administrators and Linux distributions) encourages the .sh on the end of a script file name. This tells me in no certain terms that this is meant to be a script.
At this point we should be able to run that script. So type the following on the command line:
script.sh
|
When you do that, you will notice the following error:
script.sh: Command not found.
|
The reason that the command is not found is that it looks in your search PATH for this "new" command.
Of course your PATH hopefully (if you're a halfway decent system administrator) doesn't have a '.' in it. In other words your PATH doesn't include your current directory.
In order to run this script you need to precede the script by the PATH to the script. Thus:
./script.sh
|
When you do this, it still won't run! Why? You haven't changed the script to be executable. The way that you do this is:
chmod +x script.sh
|
From thereon, the script is interpreted as an executable file and you can rerun that script by using the following command:
./script.sh
|
You have to make every script executable with the chmod command. If you don't change its mode, it won't run. Every time you run it, it will show you a list of unique shells that are being used by your system.
You could give other users access to this script, or you could place this script in relevant home directories so that it could be executed.
Or you could put it into a place on the system that everybody has access to (e.g. /usr/bin).[14]
It's important, now that you're learning to write scripts (which will ultimately take you on to writing programs and ultimately to becoming a fully-fledged open source developer), that you document your scripts well.
Since we're all such good programmers we will definitely want to do this. How? We can put comments in our scripts using a hash (#) to show that a particular line is a comment.
Edit script.sh as follows:
vi script.sh
|
Insert a hash or two at the top of this file and write a comment about what this script does, who wrote it, when you wrote it and when it was last updated.
# Student name - written February 2004.
# A script to produce the unique shells using the /etc/passwd file

cut -d: -f7 /etc/passwd |sort -u


: w script.sh
|
This is the bare minimum comment you should make in a script. Because even if you don't maintain your scripts, there's a good chance that somebody in the future will have to; and comments go a long way to proving that you're a capable coder.
| Note |
|---|---|
It's a vital part of open source - to provide documentation. Comments can appear anywhere in a file, even after a command, to provide further information about what that particular command does. | |
Variables are a way of storing information temporarily. For example I may create a variable called NAME and I assign it a value of "Hamish":[15]
NAME="Hamish"
|
A couple of conventions that we need to follow: variables usually appear in uppercase, for example I have assigned to a variable called 'NAME' the value 'Hamish'. My variable name is in uppercase. There is no white space between the variable name ('NAME') and the equals sign.
Similarly, without any white space enclose the value in double quotes. This process allocates space (memory) within the shell calling the reserved memory 'NAME', and allocates the value 'Hamish' to it.
How do we use variables?
In this case, we will use the echo command to print the output to the screen.
echo "Hello $NAME"
|
which would print:
Hello Hamish
|
to the screen. We could create a file with:
touch $NAME
|
This would create a file called 'Hamish', or else type:
rm $NAME
|
which would remove a file called 'Hamish'. Similarly, we could say:
vi $NAME
|
which would open the file 'Hamish' for editing. In general, we assign a variable with:
NAME=value
|
And we can use the variable in a variety of ways.
Does the variable have to be a single string? No, we could've assigned a variable with:
HELLO="Hello World"
|
Please set this variable from the command line and then test the following :
touch $HELLO
|
List your directory to see what it has produced.
Remove the file using the variable name:
rm $HELLO
|
What happens? Why?
So setting a variable is a case of assigning it using an equals sign.
Using a variable is achieved by preceding the variable name with a dollar sign.
As I indicated, the convention is to keep the variable name uppercase, however we don't necessarily need to adhere to it. My advice is to stick with the convention and keep them uppercase.
So far we've written very simple scripts. Our scripts have entailed simply an echo statement and maybe one other command. In order to achieve a higher degree of complexity, we need to tell the script what shell it's going to run under.
One might find that a little strange because we're already running a shell, so why do we need to tell the script what shell to run as? Well perhaps, even though we're running the bash as our default shell, users of this script may not be running the bash as their default shell. There are a couple of ways of forcing this script to run under the bash shell. One means of running our script using the bash may be:
sh script.sh
|
This would execute the script using the bourne shell (sh). This looks like a lot of work to repeat every time - insisting on the shell at the prompt. So instead, we use a shebang.
A shebang is really just a sequence of two characters - a hash sign followed by an exclamation mark. It looks like this:
#!
|
This is known as the shebang. Comments also start with a hash, but because this particular comment starts at the top of your script, and is followed immediately by a bang (an exclamation mark), it's called the shebang. Directly after the shebang, we tell the script what interpreter it should use.
If we had the following line at the top of our script:
#!/bin/ksh
|
This would run the contents of script.sh using the korn shell. To run the script using the bash we would have:
#!/bin/bash
|
If this was a perl program, we would start the script off with:
#!/usr/local/bin/perl
|
A sed:
#!/bin/sed
|
All subsequent commands would then be treated as if they were sed commands. Or perhaps we want to use awk:
#!/bin/awk
|
This assumes awk lives in our /bin directory. It might live in /usr/bin in which case it would be:
#!/usr/bin/awk
|
So we can include the shebang at the top of every script, to indicate to the script what interpreter this script is intended for.
While we have not included the shebang at the top of scripts written thus far, I'd encourage you to do so for the sake of portability. Meaning that the script will run correctly, wherever it is run.
We've seen a standard way of starting a script (the shebang), now I need to tell you about the standard way of ending a script.
Before we do that, we must understand what exit values are. Every program in Linux that completes successfully will almost always exit with a value of 0 - to indicate that it's completed successfully. If the program exits with anything other than 0, in other words, a number between 1 - 255, this indicates that the program has not completed successfully.
Thus, on termination of every script, we should send an exit status to indicate whether the script has completed successfully or not. Now if your script gets to the end and it does all the commands that it's supposed to do correctly, the exit status should be zero (0). If it terminated abnormally, you should send an exit status of anything but zero. I will therefore end every script with the command:
exit 0
|
Thus, if no error is encountered before the end of the shell, the exit value will be zero.
Exit statuses also come in useful when you're using one script to call another. In order to test whether the previous script completed successfully, we could test the exit status of the script.
This is discussed in more detail later the section called “Exit status of the previous command”
There are some variables that need special attention, namely NULL and unset variables.
For example, if a variable called NAME was assigned with the following:
NAME=""
|
then the variable is set, but has a NULL value. We could have said:
NAME=
|
which too would have meant a NULL value. These are distinctly different from:
NAME=" "
|
A space between quotes is no longer a NULL value. So if you assign:
NAME="hamish"
|
this has a non-NULL value, while if you assign nothing to the NAME variable it's a NULL value. This distinction can sometimes catch you out when you're programming in the shell especially when doing comparisons between values. If the variable NAME were never set, a comparison like:
if [ $NAME = "hamish" ]; then
....
|
would return an error, as the test command requires a variable = value comparison. In the case of the NULL/unset variable it would test:
[ = "hamish" ]
|
which would be an error.
One method of handling NULL values in scripts, is to enclose the value in quotation marks, or surround them with "other characters". To display a NULL value NAME,
echo $NAME
|
would return a blank line. Compare this to:
echo :$NAME:
|
which would return
::
|
since the value is NULL. This way we can clearly see that a NULL value was returned. Another method of checking for NULL values in expressions is as follows:
if [ "${NAME}x" = "x" ]; then
.....
|
Here, if NAME is unset (or NULL), then:
"${NAME}x" would be "x"
|
and the comparison would be TRUE, while if
NAME="hamish"
|
then
"${NAME}x" would be "hamishx"
|
and thus the comparison would be FALSE.
What happens is if the value is not set at all? For example, what occurs if you unset a variable:
unset NAME
|
A similar result to the NULL variable occurs, and we can treat it in the same was as a NULL variable.
In sum then, the unset/NULL variables are very different from a variable that has an empty string as in
VAR=" "
|
Similarly, another question is: When does the shell do the interpretation of a variable?
In the statement:
echo $NAME
|
it does the $NAME variable substitution first before invoking the echo command.
What happens if we typed:
file="*"
ls $file
|
The output is equivalent to saying:
ls *
|
What happened in our example above? The variable file is being interpreted first, it then gets an asterisk (splat) which matches all files in the current directory and lists those files on the command line.
This illustrates that substitution of the variable occurs first, before any further command is executed.
What happens if I want to echo the following string?
hamishW
|
and my name variable NAME is currently set to 'hamish'? Can I do this:
echo $NAMEW
|
What's going to happen here?
The shell attempts to look for a variable NAMEW which clearly does not exist, but there is a variable NAME.
How do we make a distinction between the variable name and anything we want to follow the variable name? The easiest way to do that, is to use the curly brackets:
{}
|
Trying that again, we could write:
echo ${NAME}W
|
and the shell will now interpret the {NAME} as the shell variable and understand that 'W' is not part of the variable name.
In essence:
$NAME
|
is equivalent to
${NAME}
|
They achieve the same purpose, the only distinction between them is if one added a 'W' to the second example, it would not be considered as part of the variable name.
Since we're covering the topic of variables, now is a good time to make a distinction between environment and shell variables. Environment variables are set for every shell, and are generally set at login time. Every subsequent shell that's started from this shell, get a copy of those variables. So in order to make:
NAME="Hamish"
|
an environmental variable, we must export the variable:
export NAME
|
By exporting the variable, it changes it from a shell variable to an environment variable.
What that implies, is that every subsequent shell (from the shell in which we exported the variable) is going to have the variable NAME with a value 'Hamish'. Every time we start a new shell, we're going to have this variable set to this value. It should go on and on like that. By exporting it, that's what we call an environment variable.
If a variable is not exported, it's called a shell variable and shell variables are generally local to the current shell that we're working in.
In other words, if we set a variable:
SURNAME="Whittal"
|
and at the prompt we now say:
bash
|
starting a new shell, then:
echo $SURNAME
|
It will return a blank line. Why is there a blank line? Primarily because that shell variable wasn't exported from the previous shell to the new shell and is thus not an environmental variable. Shell variables are only available in the original shell where we issue the assignment of the variable.
We now have an understanding of variables, how we can set them and, in the next chapter we will look at quoting, specifically how we can run commands and assign the output of those commands to variables.
We've done basic shell scripting, but it would be nice to be able to do some basic arithmetic in the shell. While the shell is able to do basic integer arithmetic, it cannot do floating-point arithmetic. However, there are some ways of getting around this limitation. If we wanted to do floating point arithmetic we can use a utility called:
bc
|
which is a calculator.
We will have a chance to look at this later in the course. If you need to do lots of floating point arithmetic - I think you need to take a step up from this course and do a perl, Java or C course.
Let's concentrate on integer arithmetic.
There are a number of ways of doing integer arithmetic in the shell. The first is to enclose your expression in double round brackets:
$(())
|
Assuming you set a shell variable i:
I=10
|
You could then say:
$((I=I+5))
echo $I
|
It would return:
15
|
Arithmetic operators are as follows:
| Arithmetic operators | action |
| + | addition |
| - | subtraction |
| * | multiplication |
| / | division |
| % | modulus (to obtain the remainder) |
Read the man pages (man 1 bash or info) to find out about others. Within these $(()), you could do:
$((I=(15*I)-26))
|
By enclosing stuff inside round brackets within the arithmetic operator, you can change the precedence. The precedence within the shell is the good, old BODMAS (Brackets, Order, Division, Multiplication, Addition, Subtraction - see http://www.easymaths.com/What_on_earth_is_Bodmas.htm ).
So, the shell does honour the BODMAS rules.
Changing the order of the expression requires brackets.
$((J=I+5))
J=$((I+5))
J=$(( I + 5 ))
$(( J = I + 5 ))
|
all mean the same thing.
However, the following will produce errors due to the spaces surrounding the '=':
J = $(( I + 5 ))
|
We could, for example say:
I=$((k<1000))
|
What would happen here? This function would result in a true(0) or false(1) value for I.
If k<1000 then i=0 (true), but if k>=1000 then i=1 (false).
|
You can do your operations like that, assuming that you have calculated the value of k before this step.
Although we currently do not have sufficient knowledge to perform loops, (we'll see later on how we use loops Chapter 8), I've included a pseudo-code loop here to illustrate how shell arithmetic can be used practically:
COUNT=0
loop until COUNT=10
    COUNT=$((COUNT+1))
done
|
COUNT, the variable, starts at 0, and increments by 1 each time round the loop. On count reaching 10, the loop exits.
Practically let's use the df command to do some examples. We're going to create a script called mydisk.sh.
At the top of your script include the shebang relevant to your shell, and at the end include your exit status.
#!/bin/sh
# This script will squeeze all spaces from the df command.
#
# First set the date and time
DATE=20031127
TIME=09:52

# Now squeeze the spaces from df
df -h|tr -s ' '

# We're done - no errors - exit 0
exit 0
|
Let's work this in sizeable bite-chunks. If you remember:
df -h|tr -s ' '
|
will pipe the diskfree output (size, percentage free and mount points) in human readable form to the translate command which will then squeeze multiple sequential spaces into a single space, giving:
/dev/hda6 3.8G 2.9G 744M 80% /
/dev/hda9 12G 10G 1.1G 90% /mnt
/dev/hda5 3.8G 2.5G 1.0G 70% /debian

df -h | tr -s ' ' | tr ' ' ',' | sed '/^\/dev/!d'; \

/dev/hda6,3.8G,2.9G,744M,80%,/
/dev/hda9,12G,10G,1.1G,90%,/mnt
/dev/hda5,3.8G,2.5G,1.0G,70%,/debian
|
From the output of the df command we are only interested in the partition that the device is on (in this example, da0s1{aeh} - nice to know RE's hey!), the size, the percentage free and the mount point in that order:
mount point,part,size,%free

df -h|tr -s ' '|tr ' ' ','|sed '/^\/dev/!d; \

s%/dev/\(hda[1-9]\+\),\([0-9]\+\.\?[0-9]\?[GMK]\?\),.*%\1;\2%g
-^_____^----^_____^--^_^-----^_^-^_^----_^_____-^-		^^^^^__-^_^
-1-----2----3----4---5-6-----7-8-9-1-----1------1-11111---1-2
-----------------------------------0-----1------2-34567---9-0

1=Start of search using the % not the / since / are in the RE
2=(hda) Start of the group (to match the hdaX on your linux machine)
3=(hda[0-9]). Match the range hda1, hda4, hda12, etc.
- Note hda10 will not be matched here. Why not?
4=Match 0 or more of them (i.e. match hda3 or hda11)
5=Follow the hdaX by a comma
6=Start of the group 12G or 3.8G. Match a 0-9
7=Match 0-9 one or more times
8=Followed by an optional full stop (\.\?)
9=Optional full stop. See 8 above.
10=Followed immediately by an optional number (e.g. the .8 in 3.8)
11=The optional number in 10 above.
12=Followed by a G, K or M for Gigabytes, Kilobytes of Megabytes,
Optionally...
13=End of group to match the 3.8G or the 12G
14=Followed by a comma
15=Followed by anything
16=Zero or more times (for 15 above)
17=End of pattern started in 1
18=First placeholder (the hdaX)
19=Second placeholder (the 3.8G, 12G, etc.)
20=End of RE.

--This command looks like the following when it is printed on one line:--
df -h |tr -s ' '|tr ' ' ','|sed '/^\/dev/!d; s%/dev/\hda/\(hda[1-9]\+\),\([0-9]\+.\?[GMK]\?\),.*%\1;2%g'
|
Phew. I'll leave you to modify the RE to encompass all other fields we need. It's really not that difficult, just a little tricky.
As you remember we must make this script executable before we can run it, so:
chmod +x mydisk.sh
|
Now, let's run the script:
./mydisk.sh
|
Have you got the result we are after?
Of course, we could have achieved the above RE with a cut command, but there are even better ways of skinning this cat. Stay tuned.
Ensure the following for you scripts:
Each script exits with the correct exit value
The script will invoke the right shell, in my case /bin/bash
The scripts are well documented
Wherever possible, use variables.
None of these scripts should be longer than 10 lines (at the outside)
Write a script that will print:
Hello <yourname>
Write a script to show ONLY the uptime of the machine, as well as the number of users currently logged onto the machine. Use the uptime command.
Write a script that will take a variable 'COUNT' and double its value, printing both the original number and the doubled value.
Write a script that will show your processes, their ID and their parent ID's, and what terminal it is owned by, but nothing else. Hint: use the ps -l command.
Write a script to show who is currently logged on, from where, when they logged in and what they are doing. Hint: Use the w command.
[13] of course, you could just as easily have run:
file script
|
[14] Remember that you're looking at a fairly sensitive file, /etc/passwd, so you might not really want your users to gain access to this file, or it's contents
[15] Setting variables in the korn shell is identical to the Bourne and Bourne-Again or BASH shells.
Table of Contents
So far, we've glossed over the use of different types of quotation marks that we have used.
There are three types of quotes:
| Our Term | Real Term | Symbol |
| ticks | single quotes | ' |
| backticks | back quotes | `(usually on the ~ key) |
| quotes | double quotes | " |
What is the purpose of ticks? Ticks don't recognise certain characters in the shell. So if we had set a variable:
NAME="hamish"

echo '$NAME'
|
will produce:
$NAME
|
not the value stored in the variable:
hamish
|
Why? Ticks don't honour special characters such as the dollar sign.
Another example would be that we know "<" means redirect, so if we said:
echo '$NAME<file'
|
We would get back:
$NAME<file
|
Ticks do not honour special characters in the shell. For example, if we want to run a process in the background by putting an ampersand ( & ) on the end:
echo '$NAME<file &'
|
All we're going to get back is:
$NAME<file &
|
You should use quotation marks if you're setting variables.
This time I'm going to set a variable called FULLNAME:
FULLNAME=Hamish Whittal
|
Now if you try the above command, you'll find that it doesn't do quite as expected. It'll produce:
bash: Whittal: command not found
|
And furthermore, if you:
echo :$FULLNAME:
|
You will see that it has set FULLNAME to a NULL value:
::
|
How do we use spaces inside strings? We can tick them. Let's try the same command but enclose our string in ticks:
FULLNAME='Hamish Whittal'
echo $FULLNAME
|
This will now produce the full name:
Hamish Whittal
|
What's interesting about single ticks, is because they don't honour special characters and space is seen as a special character, we could say:
FULLNAME='Hamish       Whittal'
echo $FULLNAME
|
You'll find that it still produces the same output:
Hamish Whittal
|
In the same way, if you wanted to grep for the pattern 'Linus Torvals' from the file bazaar.txt you have to enclose the pattern in ticks otherwise it would be looking for 'Linus' in two files: Torvals and bazaar.txt.[16] Thus:
grep 'Linus Torvals' bazaar.txt
|
Ticks can be used in a number of ways. They can be used to not interpret special characters, they can be used to set environment variables, they can be used in regular expressions and they also honour a new line. If we said:
echo 'Hello
< World'
|
This will produce the following
Hello
World
|
Clearly we can use ticks and quotes interchangeably unless we need to honour special characters in the shell. So let's start again, this time using quotes instead of ticks. I'm going to set the NAME variable again:
NAME="hamish"
echo "$NAME"
|
As expected:
hamish
|
Thus, the main difference between ticks and quotes is that quotes honour special characters. How do we produce the following output with echo and our NAME variable?
Hello. The name in "$NAME" is hamish.
|
We have got a variable NAME that currently holds the value 'hamish'.
If you're using double quotes and you need to use double quotes within a double quoted string, you need to escape the double quotes. You want to print out a '$NAME' and since the $ is a special character, you need to escape the dollar itself. So, the answer is:
echo "Hello. The name in \"\$NAME\" is $NAME".
|
That looks quite complex but it's relatively straightforward. The escape character ( \ ), escapes special characters within this quote. We need double quotes, how do we do that? We escape the double quotes ( \" ). We need a dollar sign, how do we do that? We escape the dollar ( \$ ). Try this now.
So quotes honour things like the backslash, the dollar and the backtick.
If we wanted to, we could append to our previous example:
echo "Hello. The name in \"\$NAME\" is $NAME. Today"s date is: `date`"
|
We would get output similar to the following:
Hello. The name in "$NAME" is hamish. Today"s date is: Sun Nov 30 22:32:38 SAST 2003
|
Now, you'll see that the quotes have honoured the backslash, the dollar and the backtick by executing the date command itself.
So, double quotes are probably the safest thing that you're going to want to use in your script, because they generally honour most of the things that you're expecting them to honour like variable names.
In order to achieve a double quote in the above string, I escaped it with a backslash. In order to achieve a dollar, I escaped it with a backslash.
So any character you need to put in the string, that's a special character, you need to escape. What about putting a backslash in a string? How do you achieve that? For example how would you produce the following string with echo:
the path is \\windoze\myshare
|
Remember, backslash is a special character, it's an escape character. Try:
echo "the path is \\windoze\myshare"
|
You'll end up with:
the path is \windoze\myshare
|
Well, let's try something different. If you wanted to achieve double backslashes, you need to escape the backslash. Instead of having a double backslash, you now need triple backslashes:
echo "the path is \\\windoze\myshare"
|
This is because the first backslash escapes the second backslash, which gives you a backslash, and the backslash that you already have. So you end up with two backslashes.[17]
Some other useful backslash commands are:
| command | action |
| \n | newline |
| \t | tab |
| \b | bell |
If you do a man or info on echo, you will see what these special characters are.
What do the following commands do. Explain why.
echo "Hello $USERNAME"
echo "Hello $USERNAME. \'I am king of this candy pile\'. And "You""
echo 'Hello. My $USERNAME is "$USERNAME". This quoting stuff can get a bit tricky'
echo "Hello. My '$USERNAME' is $USERNAME. This quoting stuff can get a bit tricky"
echo "Hello. My \$USERNAME is $USERNAME. This quoting stuff can get a bit tricky"
echo -e "This is what happens with special characters ( bell for example ) \b\b\b\b". What does the -e do?
echo -e "Name\tSurname\tAge\nHamish\tWhittal\t36\nRiaan\tB\t29\n"
echo "\\$USERNAME\\\home"
echo "\$USERNAME\\\home"
The final set of quotes is what we refer to as the backticks. Backticks are exceptionally useful. We're going to use them repeatedly in our scripting.
The purpose of a backtick is to be able to run a command, and capture the output of that command. Say:
DATE=`date`
|
We're assigning to the variable DATE, the output of the date command. We use backticks to do that.
Now run the following:
echo $DATE
Tue Jan 13 23:35:34 GMT 2004
|
You'll get the date that the system had at the time that you assigned that variable. Notice if you run the echo command again, the value of the DATE variable stays the same.
This is because the variable DATE was set once - when you ran the command inside the backticks.
You would have to re-set the variable in order for the date to be changed.
We can run any number of commands inside backticks. For example, in our date command above, I may only want the hours, the minutes and the seconds, rather than the entire date. How would one do this?
TIME=`date |cut -d' ' -f4`
|
We are setting our delimiter to be a space. Perhaps we want to get snazzier? Of course we want to get snazzier, we're Linux people!!!!
In the next example I will re-set my DATE variable first. What we don't want to do is to run the same command repeatedly to get the same type of information.
DATE=`date`
|
Once we've run the date command, we'll have all the information we need; the date, the time, the time zone and the year.
So instead of running the date command a second time to get the time, we will do the following:
TIME=`echo $DATE | cut -d' ' -f4`
|
Apart from anything else, it makes our script a lot more accurate. If we run the date command twice, there will be a time discrepancy (albeit small) between the first and second time the command was run, resulting in inaccurate output.
To deliver results more accurately, we run the date command once, and operate on the value of the DATE variable.
What if I want the time zone, which is the fifth field in the output of the date command?[18]
ZONE=`echo $DATE|cut -d " " -f5`
|
How many commands can we put in backticks? The answer is: many. Assigned to a variable is not imperative, but it would make no sense if we just put something in backticks without an assignment.
Let's try that: Instead of assigning it to a variable just type:
`echo $DATE|cut -d" " -f5`
|
would produce:
bash: SAST: command not found
|
The output of this command produced the output 'SAST' (South African Standard Time). Output was produced at the command prompt, which tried to run the command SAST, which of course is not a command. So the system returns an error message.
So our backticks can be used very effectively in scripts. In our previous script, called mydisk.sh, we assigned a value to the variable DATE manually. Using backticks, we can now get the script to automatically assign it for us! Equally previously, we could only print the value of the df command, now we can assign values to those variables.
Before we move on from this, there's another construct that's equivalent to the backtick. Often the backticks are difficult to see when you're looking at a script. Thus there's another equivalent construct.
$( )
|
Now, don't get this confused with $(()) which we used in arithmetic expressions. Instead of running:
DATE=`date`
|
we could've used:
DATE=$(date)
|
Obtain the following from the uptime command
NUMUSERS
UPTIME
Looking in the /proc/cpuinfo, set variables for:
MODELNAME
CPUSPEED
CPUCACHE
BOGOMIPS
What do the following commands produce?
echo "Today is the `date +"%j"` of the year"
echo 'Today is the `date +"%j"` of the year'
DT=`date +"%A, %e %B, %Y"`; echo '$DT'
DT=`date +"%A, %e %B, %Y"`; echo "The date today is: \$DT"
DT=`date +"%A, %e %B, %Y"`; echo "The date today is: $DT"
I would personally use the second option, because it is easier to read, and not as confusing.
Earlier we considered shell arithmetic.
$(())
|
but unfortunately some older shells don't support this. We need an alternative for doing arithmetic and this is the expression command - expr.
If we had a variable i set to a value of zero (0):
i=0
|
We want to add 1 to the value of i, we could say:
i=$(expr i+1)
|
expr - an external function - will add 1 to the value of i and assign the new value.
Notice that I'm using single round brackets, not double round brackets, primarily because we are running the external command, expr, in the same way that backticks would do.
We could have used the following command to achieve the same result:
i=`expr i+1`
|
If you don't have double round brackets because you're using an older shell, (which no Linux system will use, but perhaps you are running this course on Solaris or HP/UX where they use the korn shell), then this is the arithmetic construct to use.
There's one final thing that we want to talk about. If you want to store the output of the command:
ls -al
|
Set it to a variable value "files":
files=`ls -al`
|
This then assigns the output of the ls -al to a variable called files. If you now type:
echo $files
|
You would see that this appears to have written all those files, plus all their permissions, everything on a single line.
Well that is not really what echo is doing, all that it has done is not to honour the newline characters. We need to find a combination in our command that assures our results are also formatted correctly and the only way we can preserve the formatting is to use double quotes. Thus if you type:
echo "$files"
|
you would get back your listing the way you expect, the newline characters would be preserved. This can be quite useful.
For example:
diskfree=$(df -h)
echo $diskfree
|
will give you one lone line with all that disk information in it.
Typing:
echo "$diskfree"
|
will ensure that you see what you expect: a tabular format rather than a long line format.
[16] Not including ticks would mean that grep would see two file names after the pattern Linus and would then be looking for the word Linus in the file Torvals and bazaar.txt. There is no file called Torvals on the machine.
[17] When doing the Network Administration course for example, and you may need to map a shared disk. In Windoze we would:
net use Z: \\Windoze\share
|
In Linux, you would need to do:
smbmount /tmp/mymount \\\Windows\\share
|
[18] Notice I used double quotes for my delimiter (the space), I could've equally used ticks if I wanted to.
Table of Contents
It may be necessary, or even more efficient, to be able to specify arguments when executing a shell script from the command line.
For example, if you run the sort command you could send it some arguments:
sort +o -r -n
|
It would be nice to be able to send scripts arguments in a similar fashion.
Example:
If we had a program to look up your favourite restaurants, we might have a big file of restaurant names and telephone numbers. Let's say that we wanted to just extract the one telephone number for a certain restaurant.
Or we might want to also classify the types of restaurants with keywords according to what they are. So lets say our restaurants.txt file contained rows of the following format:
<Type>,<Restaurant>,<Name>,<Tel Number>,<rating>
|
So enter the following data into a file called restaurants.txt:
smart,Parks,6834948,9
italian,Bardellis,6973434,5
steakhouse,Nelsons Eye,6361017,8
steakhouse,Butchers,Grill,6741326,7
smart,Joes,6781234,5
|
| Note |
|---|---|
For the purposes of these exercises, and to make things a little easier for you, the reader, the top restaurant can only have a rating of 9. The worst will have a rating of 0. | |
So, we've got a file that represents our favourite restaurants. It would be nice to have a script to say:
./eatout.sh italian
|
or
./eatout.sh steakhouse
|
This would then take the type of food we want to eat, and it would show us the details for the restaurant(s) that would fit our required description.
What I'm heading towards is writing a script that will take a argument and show us only those restaurants that we're interested in eating at.
How we do we send a script some arguments?
The list of argument or argument buffers provided system wide are numbered from 1 upwards.
The first argument on the command line is seen as the first parameter, the second argument (if we had two arguments) as the second parameter etcetera.
We can have up to 9 arguments on the command line, well that's not quite true, we can have a lot more than 9 arguments but we will see how to deal with more than 9 in a moment.
Within our script we can use a parameter marker and access it with prefacing it with the $ sign, for example, if we run our script using one argument as follows:
./eatout.sh italian

echo $1
|
will output:
italian
|
If we told it to:
echo $2
|
It would echo nothing on the command line because we only called the script with a single argument.
So we've got up to 9 positional arguments that we can use in a script. We've got a special argument $0. We've used this before on the command line, if you:
echo $0
|
It tells you what your current shell is, in my case it's /bin/bash.
Now edit a file called eatout.sh and enter the script as follows:
#!/bin/bash
DATE=$(date +"%d %b %Y %H:%M")
TYPE=$1
echo "Queried on $DATE"
grep $TYPE restaurants.txt |sort -t, +3n
exit 0
|
In order to save the first positional argument, I've saved it to a variable called TYPE. Part of the reason why I've assigned $1 to a variable, is that $1 can then be reset and will loose the contents of $1.
At this point I grep the relevant restaurant type from " restaurants.txt" and sort the output numerically by piping it through the sort command.
Remember that we must make the script executable before we can run it:
chmod +x eatout.sh
./eatout.sh steakhouse
|
The output looks as follows:
riaan@debian:~> ~/ham$ ./eatout.sh steakhouse
Queried on 01 Dec 2003 21:30
steakhouse,Nelsons Eye,6361017,8
steakhouse,Butchers Grill,6741326,7
|
That shows us only the restaurants that we're interested in and it will sort them numerically according to which restaurants we like best (determined from the rating), and which ones we like least.
So we've seen that we can send any number of positional arguments to a script.
As an exercise, show only restaurants where the rating is greater than 5 (we don't want to go to bad restaurants)
./eatout.sh italian 5
|
It should only show italian eating places that have a rating of greater than 5.
Hint, the rating is now stored as a positional parameter and is the second argument this will be positional parameter $2.
See the following exercises where you are going to edit your file to use $2 and look for all the restaurants having a rating of greater than 5. There are many ways to skin this cat, so I'll leave it to you to find just one of these.
Write a script to display only restaurants in the category having a rating greater than 5. Sort the list from the best restaurant to the worst.
Alter your script above to display the output in a nicely formatted way, using the echo commands.
We have up to 9 positional parameters on the command line and in fact we can use more than 9 arguments but we will look at that in some detail shortly.
Using a special variable called $#.
One of the ways we can use this (we'll see when we come to decisions and if-then statements) is to check how many arguments were used to run a script. Let's imagine that we want our script eatout.sh to be executed with at least one argument.
We would include something like:
if $# < 1
echo "Usage: ...."
exit 1
|
in our script.
Why would we exit with a value of 1? Because we didn't execute the script correctly.
We can use a number of positional arguments to print out useful information about how to use our script.
We've got yet another useful construct, $*, which tells us all the positional arguments.
Let's look at an example of this:
#!/bin/bash
DATE=$(date +"%d %b %Y %H:%M")
TYPE=$1
echo "The arguments asked for: $*"
echo "Queried on $DATE"
grep $TYPE restaurants.txt |sort +3n
exit 0
|
If we then ran our script eatout.sh with:
./eatout.sh italian 5
|
We would get the following output:
riaan@debian:~> ~/ham$ ./eatout.sh italian 5
The arguments asked for: italian 5
Queried on 01 Dec 2003 21:36
italian,Bardellis,6973434,5
|
So even if we had 20 positional arguments, it would show us each one of them storing them all in $*.
I said we only have 9 positional parameters, but that's not true, you can have many more than 9. How do we get hold of them?
If we thought of the positional arguments as a list: we've got positional argument 0 which is the name of the shell script or the name of the program, but we never modify that one.
Then we have positional arguments 1 to 9 and we may have additional positional arguments.
To obtain the arguments, we can use the shift command, which will shift arguments to the left. Thus argument 2 would become 1 after a shift, 3 would become 2, 4 would become 3, etc. At the end of the list, 9 would become 8, 10 would become 9, etc.
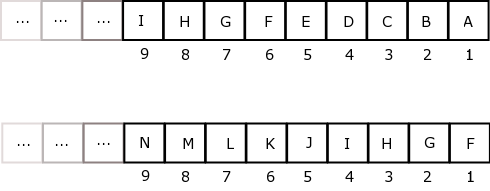
If we said:
shift 5
|
it would shift the first 5 positional arguments off the front, and bring 5 additional arguments from the end.
If you were crazy enough to have more than 9 positional arguments for a script, you could shift repeatedly until you get all the positional arguments. Thus you can shift positional arguments off the command line, which allows you to get hold of additional arguments above the 9 positional parameter limit.
It's a good idea to save your positional arguments so that you can use them at a later stage. You never know when you're going to actually need to use an original argument sent into the script. In the eatout.sh script, I saved the type of restaurant ($1) storing it in the variable TYPE.
Create a script that can take up to 15 arguments. Shift the first 9 from the list and print the remaining arguments using the $* construct.
Write a script to read a person's name, surname and telephone number on the command line and write this to a file for later use, using a comma to separate the firstname, surname and telephone number.
Write a script to swap the name and surname as given on the command line and return to the console.
A final dollar command for now, is $?. $? tells you the exit status of the previous command. So if you ran your eatout.sh script, and as soon as it's finished, you echo $? - assuming that it all ran correctly - you would expect that it would return a 0. Why is that? Because you exited your script with an exit status value of 0.
Let's assume you tried to do something in your script that doesn't work, then you could say:
if $?<>0
echo "Some previous command failed"
|
This test checks whether the previous command ran correctly and, if not (i.e. The output of the previous command was non-zero) a message to that effect is printed to the screen. So 0 is the exit status of the previous command.
If you run a command like:
ping -c1 199.199.199.1
|
Wait for it to complete. And then run:
echo $?
|
you should get a non-zero value. Why? Because the command (ping) never exited properly, and thus a non-zero value is returned. Compare that to the output of:
ping -c1 127.0.0.1
echo $?
|
which should always return a value:
0
|
Why? Because it can ping your local loop-back address. So every command exits with an exit value and you can test the exit value that it exits with, using $?.
Even if you did an:
echo "Hello"
echo $?
|
It would return a value 0, because it was able to print the string 'Hello' to the screen.
We need to be able make decisions on information that we have. Generally this takes the following form:
"if a particular condition occurs,
then we can do this otherwise
(else)
we can do that."
|
So we're going to be talking about the if-then condition. Before we do that, we need to understand the command 'test'.
The test command is really what all decision conditions are based on.
You can do an:
info test
|
to see what information the test gives you.
Let's take a timeout from looking at the test command, to understand what "true" really is, in terms of the shell.
In terms of any programming language one has the boolean operators, true and false.
Depending on the language we are programming in, true and false can have different values. In the shell, being "true" is represented by a 0 (zero) and anything else is false. So the values 1, 25 and 2000 represent the state of being "false".
In a previous chapter we typed:
ping -c1 199.199.199.1
|
which returned a non-null exit value that was displayed with the command
echo $?
|
Let's test a couple of things using the following commands:
who; echo $?
|
produces a 0.
Try:
who |grep root; echo $?
|
Now, try the above command again, only this time:
who |grep root; test $?
|
will test whether the exit value of the grep was 0 (in other words, did it exit correctly? i.e. a 0 exit status would indicate that the user 'root' was logged in) or was the exit value anything other than 0 (did it execute incorrectly, i.e. was the user 'root' not there?).
The different types of tests that we can do are:
a string test
a numeric test
a file test
There are other tests we will discuss later, but let's start with the string test Execute the following on the command line:
NAME="hamish"
test $NAME = hamish
echo $?
|
Now you'll notice a couple of things: the second line has white-space between the variable name, the equals sign and the variable value, since test takes three parameters (the variable name, the test condition and the value that we're testing the variable against).
What output does the above example produce? If NAME was hamish, test returns a 0. If NAME was not hamish, this would've returned a 1.
So I'm going to run that again but I'm going to test it against the value of 'joe' with:
test $NAME = joe
echo $?
|
Since 'joe' is not equal to 'hamish', the above example produces a value of 1. String tests can become tricky. Lets create a variable called 'BLANKS' containing 5 spaces:
BLANKS=" "
|
Now
test $blanks
echo $?
|
What does this produce? A false value of 1, but clearly I shouldn't have got a false value because a false value would've indicated that the variable was not set, and in fact, the variable was set, it has a non-null value.
This time let's try:
test "$blanks"
echo $?
|
and you should see that the value should be true (0). This is a very important thing to bear in mind when doing tests, a good safety net as it were to always enclose your variable in quotes not ticks! If I enclosed the variable in ticks as follows:
test '$blanks'
echo $?
|
this would always produce true. Why is that? Because it's testing whether this is a string.
Since ticks ignore the $, it is always considered to be a string - $blanks. Thus, testing a string will always produce true.
If I enclose the variable in double quotes, test interprets the $blanks to be five spaces, and subsequently tests the five spaces returning a true value.
The test '$blanks' produces TRUE and the test "$blanks" produces TRUE, but for VERY different reasons.
As a precaution then: when you do tests, enclose your variables in double quotes. Saying:
test "$NAME" = "hamish"
|
or
test "$NAME" = hamish
|
will give you the desired output time and again.
Something that's often done in scripts, specifically in configure scripts, is to test whether a variable has been or has not been set. It's often achieved using the following construct:
test "${NAME}x" = x
|
If the variable NAME is not set then the left hand side of the equation will only be equal to an 'x' which is equal to the right hand side and thus the answer of an unset variable would be TRUE.
However if the NAME is set, then I would end up with 'hamishx = x'. Clearly this is going to be FALSE. This is an effective way of testing whether a variable is set or not set.
If you take the time to look at the "configure" scripts for many Open Source packages, (configure scripts are the scripts used to configure the software prior to compilation) they are mostly shell scripts, which run a host of tests, testing whether variables in the configuration files have been set.
There are also a couple of string tests that have special meaning:
| string test | meaning |
| -z | zero-length |
| -n | non-zero length |
so if we said:
blanks="     "
test -z "$blanks"
echo $?
|
We should expect a FALSE (1), since $blanks is not of 0 length. Conversely, if we did a:
test -n "$blanks"
echo $?
|
It would produce a TRUE (0) since $blanks is a non-zero length string.
Those are string type tests, what about numeric tests? Well unfortunately the test comparisons vary for the different types of tests:
| String Test | Numeric Test |
| = | -eq |
| != | -neq |
| <= | -le |
| >= | -ge |
| > | -gt |
| < | -lt |
String tests operate on the ascii values of the string. What about numeric tests?
Set the variable 'x' to have a value of 101.
x=101
|
How would we test the following expression?
$x < 10
|
We could write this as a numeric test in the following manner:
test "$x" -lt 10
echo $?
|
You're going to be returned with a value 1 (FALSE) since 101 is NOT less than 10. Notice the test comparison is a '-lt' and not a '<'.
Similarly for:
test "$x" -lt 102
echo $?
|
This will return a value 0 (TRUE) since 101 < 102.
To find out more on the other numeric test operators:
info test
|
The third type of tests that we want to talk about are tests on files.
For instance: "is this file a regular file?", "is it a directory?", "is a symbolic link?", "is it a hardlink?" So you could say:
test -f file
|
To test whether a file is a normal file. Or if you want to test whether a file is a directory, for example (notice the period ( . ) after the -d test:)
test -d .
|
It should return a value of 0 because '.' represents your current directory which is obviously a directory.
If you say:
test -d .bashrc
|
It should return a 1 (FALSE), because .bashrc is not a directory, it's a file. You might want to test if something is a symbolic link using '-L' et cetera.
Try the exercises to familiarise yourself with other test types.
Set the variables as follows:
NAME="<insert your first name here>"
SURNAME="<insert your surname here>"
AGE=<insert your age>
MARRIED="<insert a 'Y' or a 'N' here>"
Now perform the following tests, indicating (before performing the test) whether the outcome will be TRUE (0) or FALSE(1), or unknown.
test "$NAME" = "joe"
test "$AGE" > "35"
test "SURNAME" -lt "Bloggs"
test '$AGE' -lt 35
test "NAME" = <insert your first name here>
test "35" -gt "$AGE"
Using the files in your directory, perform the following tests, again indicating what the outcome will be:
test -f .
test -e ..
touch somefile; test -s somefile
ln somefile hardlink; test somefile -ef hardlink
test -c /dev/hda
It's probably a good idea right now, to look at what happens if we want to test more than one condition?
We have been testing only one thing at a time, but we might want to write a more complex test such as:
"if this OR that is true"
|
or perhaps
"test if this AND that is true"
|
So we need to look at the logical operators. The logical operators are:
NOT
AND
OR
|
OR (-o)
A or B
T or T = T
T or F = T
F or T = T
F or F = F

A or B
0 or 0 = 0
0 or 1 = 0
1 or 0 = 0
1 or 1 = 1
|
AND (.)
A and B
T and T = T
T and F = F
F and T = F
F and F = F

A and B
0 and 0 = 0
0 and 1 = 1
1 and 0 = 1
1 and 1 = 1
|
NOT (!)
!0 = 1
!1 = 0
|
This can be a little confusing, so let's do some practical examples:
NAME=hamish
test \( "$NAME" = "hamish" \)  -o  \( -n "$NAME" \)
echo $?
|
First '-o' means that the above test will 'OR' the two test results together.
Notice how we are using parentheses to group things, but we have to escape these using a backslash, since the round bracket is significant in the shell.
The example uses a test to see if the NAME variable is equal to "hamish", OR the value held in $NAME is not a "zero length string". As we set the NAME variable to "hamish", the overall result will be true or 0.
What happens if we make:
NAME=riaan
test \( "$NAME" = "hamish" \)  -o  \( -n "$NAME" \)
echo $?
|
Then the first "test expression" is FALSE (1) and the second expression is TRUE (0) and so the overall result is still 0 (TRUE).
Let's now try this by replacing the "test condition" with an 'AND' (- ):
NAME=riaan

test \( "$NAME" = 'hamish' \)  -a  \( -n "$NAME" \)
echo $?
|
This will do a test to determine whether the NAME is set to 'hamish' AND that it is a non-zero length string.
Now NAME is currently set to riaan, so the first expression is FALSE (1) ('riaan' is not equal to 'hamish').
However, since FALSE AND anything (either TRUE or FALSE) ultimately returns FALSE, the result will always be a FALSE (1).
As a result of the above logic, the shell 'short-circuits' the second check and never checks whether $NAME is a non-zero length string. This 'short-circuiting' is a means to faster processing of test, and ultimately faster scripts.
If we were to swap the two expressions around:
test \( -n "$NAME" \) -a \( "$NAME" = 'hamish' \)
|
the first expression is TRUE, so the second expression MUST be tested, resulting in both expressions being tested and a slightly slower script.
Optimising scripts is very important because scripting is an interpreted language and thus significantly slower than a compiled language. An interpreted language needs to interpreted into machine code as every command is executed, resulting a a far slower program. So it's really a good idea to try and optimise your scripts as much as possible.
Assuming we wanted to check that $NAME was NOT a null value:
test \( !-n "$NAME" \) -a \("$NAME" = 'hamish' \)
|
This will test whether NAME is NOT non-zero (double negative), which mean that it is true or 0.
To test if .bashrc is a regular file:
test \( -f .bashrc \)
|
which would return a 0 (TRUE). Conversely:
test \( ! -f .bashrc \)
|
would test to see if .bashrc was NOT a regular file and would produce a FALSE (1) since .bashrc IS a regular file.
Writing test each time seems like a lot of effort. We can actually short circuit the word 'test' by leaving it out, and instead enclosing the test parameters within a set of square brackets. Notice the spaces after the opening and before the closing the square brackets:
[ ! -f .bashrc ]
   -^---------^-
|
This will produce the identical output to:
test \( -f .bashrc \)
|
This is the format that you're probably going to use in most of your testing through out your scripting career.
Similarly we could rewrite:
test \( "$NAME" = 'hamish' \) -a \( -n "$NAME" \)
|
as:
[ \( "$NAME" = 'hamish' \) -a \( -n "$NAME" \) ]
|
Using the following expressions, determine whether the outcome will be TRUE (0) or FALSE (1) or unknown.
First set some variables:
MOVIE="Finding Nemo"
CHILD1="Cara"
CHILD2="Erica"
AGE_CH1=4
AGE_CH2=2
HOME=ZA
|
test \( "$MOVIE" = "Finding NEMO" \) -a \( "$AGE_CH1" -ge 3 \)
test \( ! "$MOVIE" = "Finding Nemo" \) -o \( "$CHILD1" = "Cara" \) -a \( "$AGE_CH1" -eq 4 \)
[ "$HOME" = "US" ] -o [ "$HOME" = "ZA" ]
[ [ "$HOME" = "ZA" ] -a [ "$MOVIE" = "Nemo" ] ] -o [ "$CHILD2" = "Erica" ]
[ "$AGE_CH2" -eq 2 ] -a [ -f .bashrc ] -o [ -r .bashrc ]
Armed with expressions, let's look at our first decision-making process.
Remember in our eatout.sh script, we wanted to test whether the user has started eatout.sh with the correct number of parameters. So let's start by adding that functionality to that script.
How do we add if statements? An if statement has the following form:
if condition
then
	do some operations
fi
|
Now, since I'm lecturing you, I might as well lecture you in good structured programming style.
When you start an 'IF' statement, put the 'THEN' statement on the next line, and make sure that you indent all the commands that you want within the 'THEN', by at least one tab or a couple of spaces. Finally, end your "IF" statement in a nice block format using the 'FI'. It's going to make maintaining your scripts much easier.
In our eatout.sh
if [ "$#" -lt 1 ]
then
	echo "Usage: $0 <parameter>
	echo "where parameter is: italian|thai|smart|steakhouse"
	exit 1
fi
|
If we add this to the top of eatout.sh, our script will stop running if the user does not provide at least one positional parameter, or argument. Furthermore it will echo the usage command to explain how to use the script correctly and to avoid the error message.
Equally, 'IF' has an associated construct, the 'ELSE':
if condition
then
	... <condition was TRUE, do these actions> ...
else
	... <condition was FALSE, do these actions> ...
fi
|
If a user runs the eatout.sh script with a correct parameter, then you can show them your favourite eating places, and if they don't it will exit with a status of 1 as well as a usage summary.
Notice that the condition that I used is a very simple one: I'm checking whether the number of parameters is less than one.
I'll leave it as an exercise for the user to check that the parameter that the user has entered is one of the allowed words (italian/steakhouse/smart).
To give you a hint, you could use:
[ $# -lt 1 -a "$1" = 'italian' or "$1" = 'steakhouse' or ..."
|
So you're to check that the number of parameters is at least one AND the $1 is equal to one of the allowed words. Is there a better way of doing this? There sure is.
What we might want to do is, if the restaurant we choose is a steakhouse, we might want to allow the user to choose between 5 different ways of doing their steak. For that we're going to want to do more than one test:
if $1 steakhouse
then
	... ask how they like their steak done ...
else
	if $1 smart
	then
		...
	else
		if $1 thai
		then
			...
		fi
	fi
fi
|
Note that there have to be matching fi's for every if statement.
As you can see reading this becomes quite difficult due to all the embedded if statements. There is an alternative construct called an elif which replaces the else-if with an elif and this makes the readability easier.
Look below for the syntax:
if $1 steakhouse
then
	...
elif $1 smart
  then
	...
  elif $1 thai
    then
	...
    elif $1 italian
      then
	   ...
      else
	..
fi
|
Note that the final else is tied to the closest if. So in our example, the else statement will only be executed if $1 is NOT an italian resturant.
Is the 'IF' statement the best way of doing things? If you're going to do else if, else if, else if, etc. - then the answer is NO! It's bad programming practice to do this else-if, else-if nonsense. So how do we do things?
Well we've got a 'CASE' statement. The structure of a 'CASE' statement is as follows:
case $1 in
    pattern) ...
    	 ...
    	 ;;
    pattern) ...
    	 ...
    	 ;;
    *) ...
       ...
       ;;
esac
|
This means that we will match $1 to a pattern. The pattern will allow us to execute a series of statements and to finish this pattern we use a double semi-colon. We can then match the next pattern and, if it matches we do another whole series of things, ending with another double semi-colon.
If $1 matches none of the patterns, then it will be caught by the asterisk pattern since an a asterisk matches everything as we've seen in our regular expression and pattern theory.
The case statement makes your code a lot more legible, easier to maintain and allows you to match patterns.
Look at another example:
case $1 in
	[Tt][Hh][Aa][Ii]) ...
		 ...
		 ;;
	Steakhouse) ...
		 ...
		 ;;
	*) echo "Sorry this pattern does not match any restaurant"
	   ...
	   ;;
esac
|
In this CASE statement, the first pattern matches ThAI or thAI or Thai, etc.
There's a better way of making your patterns case-insensitive. You could put the following line at the top of your script which would translate every character in your parameter $1 to uppercase:
RESTURANT_TYPE=(echo $1 |tr '[a-z]' '[A-Z]')
|
This will remove the long complicated pattern:
[Tt][Hh][Aa][Ii])
|
and we could instead just look for the pattern:
THAI
|
Similarly, if the user of our eatout.sh script only wants to type out part of the keyword for example, using:
./eatout.sh steak
|
instead of
./eatout.sh steakhouse
|
or
./eatout.sh meat
|
instead of
./eatout.sh steakhouse
|
These choices can be matched with the following pattern
steak|steakhouse|meat
|
Similarly this pattern
pasta|pizza|italian
|
would match all of the following uses of our script:
eatout.sh pasta
|
and
eatout.sh pizza
|
and
eatout.sh italian
|
So you can match ranges of alternatives separating each with a vertical bar - the pipe character. So the case statement is most certainly the far better way to match alternatives with a script.
Write a script to test whether the free disk space on your largest partition is less than 10%. If it is, print a message to the screen indicating this fact.
Modify your menu.sh written earlier in the course to allow the user to run the menu system with a parameter on the command line, producing output informing the user what option was selected on the command line. Do not use the CASE statement for this example.
Rewrite the exercise in 2 above, this time using the CASE statement. Ensure that the user can use a combination of upper and lowercase charaters in their selection.
Using the uptime from /proc/uptime, write a script which will determine how long your Linux machine has been 'UP', printing the following output to the console accoring to the results:
0 - 1 hour	"Obviously you're new to Linux. What's \
                    all this rebooting your machine nonsense"
1 - 5 hours	"Still a novice I see, but perhaps I could be wrong"
1 - 5 days	"Mmmm. You're getting better at this Linux thing!"
|
What are bugs? None of our scripts are going to have bugs!!!! Of course not! We're far too good at scripting for that. Having said this however, we still need to understand how to debug other people's scripts! How do you debug a script?
There are many techniques to debugging a script, but the place to begin is by adding the -x switch at the top of your script:
#!/bin/bash -x
|
Alternatively you can type the following on the command line:
bash -x eatout.sh
|
This is a very primitive form of debugging so you cannot step though your script line by line. It will produce your whole script output but it should produce it with more information than what you saw before.
Another technique is to place echo statements strategically throughout your script to indicate the values of variables at certain points.
If, for example, a test is performed, then an:
echo $?
|
will show the outcome of the test, prior to performing some condition on this outcome.
Along with echo statements, one can also place read or sleep commands to pause the execution of the script. This will allow one time to read the outcome of a set of commands, before continuing the execution.
Thus a command set as follows:
[ -f somefile ]
echo $?
echo "Hit any key to continue..."
read
|
will pause the script, giving the author time to consider the output from the pervious test.
In the script, we may want to do a null command. There is a special command:
if : 	#This condition will always be true (as : is always true)#
then
	:
else
	:
	:
fi
|
The null command is a colon. We could for example produce a never-ending while loop using nloop by saying:
while :
do		echo "hello $NAME"
done
|
"noop" is always TRUE! Earlier on we tried
`date | cut...`
|
in order to obtain 'SAST' (SA std time) as output. Doing this on the command line, it said:
SAST: command not found
|
Modifying this however to:
: `date |cut...`
|
would have not produced an error, since the colon will always produces TRUE output. The shell thus executes the no-op instead of the output of the date/cut command.
If you said:
if :
then
	...
fi
|
It would always do the THEN part of the IF statement.
You can achieve multiple commands on the same line by using the && and ||. How does this work? By way of example, you could say:
grep italian restaurants.txt || echo "sorry no italians here"
|
What this means is:
"if there are italians inside resturants.txt then return them
	OR [else]
return the string 'sorry, no italians here'"
|
In shell terms, it means:
if the result of the grep command is TRUE (0),
then you  will get the lines from the file resturants.txt containing the word italian
BUT if  there are no lines in the file containing the word italian
(i.e.the outcome of the grep is FALSE (1))
	then print
 'sorry no italians here'
|
As before, this is a shortcut way of doing things. Enclosing this command in parentheses can change the order of execution as in:
\( grep italian restaurants.txt || echo "sorry no italians here" \)
|
which could also allow:
\( cmd1 || cmd2 \) && \( cmd3 && cmd4 \)
|
Here is another example:
echo "Oh, you're looking for italian, here they are: " \
&& grep italian restaurants.txt
|
Echo will always return TRUE(0), so it would print out the echo statement and then the list of italian restaurants, if there are any. Very useful!
Using the || and && constructs, perform the following operations:
If your free memory is less than 50M, issue a warning on the console
If free disk space is less than 10%, issue a warning on the syslog file (HINT: There is an application called logger(1) which will assist with logging to the syslog file)
Using your resturants.txt file, write a condition that will print the italian resturants, or a message indicating there are none in the file. Ensure that you inform the user in the following way:
The <italian> restaurants you might like to eat at are:
		blaah
		blaah
		blaah
or if there are none, then:
The <italian> restaurants you might like to eat at are:
Sorry. We don't have any listings of <italian> resturants.
Replace the <> with the values the user enters on the command line when running the script.
Table of Contents
Looping is an integral part of any programming language, and equally so in the shell.
The shell has three types of loops:
for loops
while loops
until loops
Each loop has a slightly different purpose.
Let's start with the for loop, which has the following syntax:
for variable in list
do
	...
	...
done
|
A more specific example of this case is:
for i in 1 2 3 4
do
	echo ${i}
done
|
If you run the above, you will get four numbers printed to the output:
1
2
3
4
|
So the for loop says:
"for every element in the list (1,2,3,4 in our case) do something (echo $i in our case)"
|
In this example, we are just echoing the output. No rocket science there, but it's a good means of introducing us to for loops.
The lists could be anything, they could say:
for NAME in hamish heidi matthew riaan simone
do
	echo "people involved in this project: "
	echo $NAME
done
|
This would produce:
people involved in this project:
hamish
people involved in this project:
heidi
people involved in this project:
matthew
people involved in this project:
riaan
people involved in this project:
simone
|
You'll notice that the echo commands were printed 5 times, once for every argument in the list. This means that everything enclosed in the DO-DONE block will be executed every time that FOR loops.
Just a quick note, the file command tells us the type of a file. You could say:
file restaurants.txt
|
and hopefully it will return:
restaurants.txt: ASCII text
|
Now, we could equally use a for-loop list in another way - we could say for example:[19]
for files in `ls -1`
do
	echo "file: `file $files`"
done
|
Remember, from earlier in the course, we saw that ls -l or $(ls -1) executes the ls command and produces some output. What this FOR loop is doing, is listing every file in our current directory with the ls -1. For each one listed, it runs the file command on the file.
The output from the above example might look something like:
bash: file: Desktop/: directory: No such file or directory
bash: file: Maildir/: directory: No such file or directory
bash: file: _viminfo: ASCII text: command not found
bash: file: blah.txt: ASCII text: command not found
bash: file: tmp/: directory: No such file or directory
bash: file: urls: ASCII English text: command not found
bash: file: windows.profile/: directory: No such file or directory
bash: file: winscp.RND: data: command not found
|
As long as you provide the "for" loop with a list, it's happy.
Another example of doing a for loop is as follows:
for count in `seq 20`
do
	echo $count
done
|
This will produce a sequence of 20 numbers from 1 through 20.
Do an info on the 'seq' command to find out what else it can do.
Okay, so provided that you supply for with a list, it can cycle through that list and do a command or sequence of commands once for every item on the list.
There's another type of "for" loop, and that's using the for without the 'in' statement.
Here, the for loop uses the arguments supplied on the command line as the list ($1, $2, $3, etc.). Using the general syntax of the "for" loop as follows:
for var
do
	...
	...
done
|
Cycle through the arguments on the command line with the script:
#!/bin/bash
for arg
do
	echo $arg
done
exit 0
|
Make the script executable, and then run it:
chmod +x for.sh

./for.sh one two three four
|
When run, the script will cycle through the "for" loop four (4) times, echoing your parameters one by one. Let's make this for loop a bit snazzier.
We're going to set a variable count at the top of our script to the value 1, which will keep track of the number of parameters:
#!/bin/bash
count=1
for arg
do
	echo "Argument $count is $arg"
	$((count=count+1))
done
exit 0
|
This script will not only count up the number of arguments, but will also print the value of each argument. Save the above script, make it executable and run it. If you're using a shell that does not recognise the line with $(()) in it, then you can use the line:
count=`expr $count + 1`
|
You will notice a couple of things. First-off, although it seems to be incrementing the count it also gives us some errors. Something like:
Argument 1 is one
./for.sh: line 6: 2: command not found
Argument 2 is two
./for.sh: line 6: 3: command not found
Argument 3 is three
./for.sh: line 6: 4: command not found
Argument 4 is four
./for.sh: line 6: 5: command not found
|
The errors stem from line 6, the "$((count=count+1))". This line produces a number, and the command not found is this number (i.e. The shell is looking for the command 2, or 3 or 4, etc.) So, one way of getting around this is to put a noop in front of the line:
#!/bin/bash
count=1
for arg
do
	echo "Argument $count is $arg"
	: $((count=count+1))
done
exit 0
|
This will execute the increment of the count without giving you any sort of error messages.
Running the script will produce:
[riaan@debian] ~$ ./for.sh one two three four
Argument 1 is one
Argument 2 is two
Argument 3 is three
Argument 4 is four
|
Alternatively you could replace line 6 with:
count=$((count+1))
|
This might be a little more intuitive anyway. Any which way you do it, you should end up with the same four lines of output.
A "for" loop without an 'in' allows you to cycle through your arguments irrespective of the number of arguments.
The final permutation of the "for" loop, although not available under all shells, is one based on the "for" loop in C.
An example may be:
for ((i=0; i<=10; i=i+1))	#can replace i=i+1 with i++
do
	echo $i
done
|
This will count from 0 to 10.
Note that the syntax is like this:
for ((start value; comparison; count increment))
|
If we wanted to count down from 10 to 0, we would do the following:
for ((i=10; i>=0; i=i-1))	#can replace i=i-1 with i--
do
	echo $i
done
|
This version of the "for" loop is useful as it allows a means of iterating a defined number of times based upon a counter rather than a list.
Clearly we could have achieve the same thing with:
for i in `seq 10`
do
	echo $i
done
|
| Note |
|---|---|
the seq command would also allow you to count in reverse | |
In summary, there are three means of using the FOR loop:
for i in a list
for a variable without the 'in' part, doing the arguments
for i with a counter
You would generally use for loops when you know the exact number of times that you want your loop to execute. If you don't know how many times you are going to execute the loop, you should use a while or an until loop.
Write a script that will cycle through all files in your current directory, printing the size and the name of each file. Additionally, ensure that each file type is recorded and printed.
Write a script that will count to 30, and on every even number print a message indicating that this is an even number. Print a message indicating odd numbers too.
Write a script to cycle through all arguments on the command line, counting the arguments. Ensure that one of your arguments contains the word 'hamish'. On reaching this argument, ensure that you print the message:
"Hey, hamish is here. How about that!"Modify your menu.sh script to cycle in a loop an infinite number of times, sleeping for a minumum of 20 seconds before re-printing your menu to the console. Note that the original menu.sh script will need to be altered as in the original, a command line was supplied as a choice of which option to choose in the menu.
Write a script that will create a 6x4 HTML table. For this you will need to understand how HTML tables work. See the appendix Appendix Afor references on books/links to teach you the basics of HTML.
Inside each cell, print the row:column numbers.
| 1:1   | 1:2	| 1:3 | 1:4 | 1:5 | 1:6	|
| 2:1	| 2:2	| 2:3 | 2:4 | 2:5 | 2:6	|
| 3:1	| 3:2	| 3:3 | 3:4 | 3:5 | 3:6	|
| 4:1	| 4:2	| 4:3 | 4:4 | 4:5 | 4:6	|
|
A while loop has the following syntax:
while <condition is true>
do
	...
	...
done
|
And the until loop has the following syntax:
until <condition is true>
do
	...
	...
done
|
You should notice the [subtle] difference between these two loops.
The while loop executes ONLY WHILE the condition is TRUE(0), whereas the until loop will continue to execute UNTIL the condition BECOMES TRUE(0).
In other words, the UNTIL loop continues with a FALSE (1) condition, and stops as soon as the condition becomes TRUE(0).
Prior to beginning the UNTIL loop, the condition must be FALSE(1) in order to execute the loop at least once.
Prior coming into the while loop however, the condition must be TRUE(0) in order to execute the block within the while statement at least once.
Let's have a look at some examples. Here you could say:
i=5
while test "$i" -le 10
do
	echo $i
done
|
Or we could rewrite the above example as:
i=5
while [ "$i" -le 10 ]
do
	echo $i
done
|
Since the square brackets are just a synonym for the test command.
Another example:
while [ !-d `ls` ]
do
	echo "file"
done
|
which says:
"while a particular file is not a directory, echo the word 'file'"
So we could do tests like that where we want to test a particular type of file, and we could do all sorts of conditions.
Remember back to the test command, we could combine the tests with (an -a for AND and -o for OR) some other test condition. So we can combine tests together as many as we want.
while [ somecondition ] -a [ anothercondition ] -o [ yetanothercondition ]
do
	something
done
|
We will also look at the while loop again when we do the read command.
The until command is similar to the while command, but remember that the test is reversed.
For example, we might want to see whether somebody is logged in to our systems. Using the who command, create a script called aretheyloggedin.sh:
user=$1
until `who | grep "$user" > /dev/null`
do
	echo "User not logged in"

done
|
This runs the who command piping the output to grep, which searches for a particular user.
We're not interested in the output, so we redirect the output to the Linux black hole (/dev/null).
This script will spew out tonnes of lines with:
User not logged in
|
We therefore might want to include a command to sleep for a bit before doing the check or printing the message again. How do we do that?
Simply add the following line:
sleep 10
|
The script becomes:
#!/bin/bash
user=$1
until who |grep "$user"> /dev/null
do
	echo "User not logged in"
	sleep 10
done
echo "Finally!! $user has entered the OS"
exit 0
|
Until the user logs in, the script will tell you that the user is not logged on. The minute the user logs on, the script will tell you that the user has logged on and the script will then exit.
If we did not want to print anything until the user logged on, we could use the noop in our loop as follows:
#!/bin/bash
user=$1
until who |grep "$user"> /dev/null
do
	:
	sleep 10
done
echo "Finally, $user logged in"
exit 0
|
And so there's a script that will monitor our system regularly to find out whether a particular user has logged in. As soon as they log on, it will inform us.
When you run the script, it will merely sit there -staring blankly at you. In fact, it is performing that loop repeatedly, but there is no output.
We've looked at the three types of loops that you're going to need when programming in the shell: for loops, while loops and until loops.
These should suffice for most scripts, and unless you're writing particularly complex scripts (in which case you should be writing them in perl!) they should serve your (almost) every need.
During execution of the script, we might want to break out of the loop. This time we're going to create a script called html.sh, which is going to produce an html table.
Now an HTML table is built row by row in HTML a table can only built a row at a time. We start by telling the browser that what follows is an HTML table, and every time we start a row we have to enclose the row with a row indicator ( <TR>) and end the row with a row terminator (</TR>) tag.
Each element in the row is enclosed in a table-data tag (<TD>) and terminated in a end-table-data tag (</TD>)
A snippet of how to write a table in HTML (I've set the border of our table to 1):
<TABLE BORDER="1">
<TR><TD>element</TD></TR>
<TR><TD>element</TD></TR>
</TABLE>
|
The easiest way to generate a table of 4 rows, and 3 columns is to use a for loop since we know the exact number of times that we want to execute the loop.
Adding the following to html.sh:
#!/bin/bash
echo "<TABLE BORDER='1'>"
for row in `seq 4`
do
	echo "<TR></TR">
done
echo "</TABLE>"
exit 0
|
should create a table with 4 rows, but no columns (table-data).
As usual make the script executable and run it with the following commands:
chmod +x  html.sh

./html.sh > /tmp/table.html
|
Open your favourite browser (Mozilla, Opera, Galleon, Firebird) and point the browser at this new file by entering the URL:
file:///tmp/table.html
|
You should see a whole lot of nothing happening, because we haven't put any elements in our table.
Let's add some table data, as well as some extra rows.
#!/bin/bash# Start by warning the browser that a table is starting
	echo "<TABLE BORDER='1'>"

# Start the ROWs of the table (4 rows)
	for row in `seq 4`
	do
# Start the row for this iteration
	   echo "<TR>"

# Within each row, we need 3 columns (or table-data)
	   for col in `seq 3`
	   do
#If this row 2, then break out of this inner (column) loop, returning to the next ROW above.
	      if [ $row -eq 2 ]
	      then
	         break;
	      fi
# If this is NOT row 2, then put the cell in here.
	      echo "   <TD>$row,$col</TD>"
	   done
# End this ROW
	   echo "</TR>"
	done#End this table.
	echo "</TABLE>"
	exit 0
|
| Note |
|---|---|
This time, inside each row, we put some data. Previously we placed no data in the rows. Also, notice that when ROW 2 is reached, we "BREAK" out of this inner loop, continuing with the outer loop (i.e. incrementing to the next ROW). | |
If you hold the shift key down and click the reload button of your web browser, you should see now that you have data in the table. Not really that exciting?!
Let's make this a LOT more fun, I have included the script below. Read through it, work out what it does and then saving it in a script called runfun.sh, run it using the following command line:
./runfun.sh > index.html
|
Again, point your browser at the resulting file (index.html) and enjoy.
| Note |
|---|---|
For this to work propperly you will need to make sure that the index.html file is created in the directory where you have the gif gif.tar.gz files stored. | |
#!/bin/bash

ANIM=`ls -1 *.gif`
NUM=`echo "$ANIM" | wc -l`
echo "<TABLE BORDER='1' bgcolor='FFFFFF'>"
for file in `seq 2`
do
   echo "<tr>"
   for row in `seq 3`
   do
      file=`echo "$ANIM" | head -1`

      NUM=$(( NUM - 1 ))

      ANIM=`echo "$ANIM" | tail -$NUM`

      echo "<td>"
# This is probably the only part you may have difficulty understanding. Here we include
# an image in the cell rather than text. For this to work, you will need the couple of GIF
# images packaged with this course.
echo "   <img src=$file alt='Image is: $file'>"
echo "</td>"
done
echo "</tr>"
done
echo "</TABLE>"
|
This should produce a table for us with 3 rows and 3 columns.
So what happens if we wanted to skip column two, in other words, we didn't want any data in column 2? Well we could add the following if-then statement:
if [ "$col" -eq 2 ]
then
    break
fi
|
The break command would break out of the inner loop. So we would find that we don't have any data for column 2, but we do have data for column 1 and 3. You can add an argument to the break command such as:
break 2
|
which would break out of the two inner-most loops.
Thus, break is a way of immediately terminating a loop. A couple of pointers, even if you broke out of the loops, the exit status is still run. All the break statement is doing is exiting out of the inner loop and then out of the outer loop because we did a 'break 2'.
There's nothing wrong with using break as programming practice goes - it's used by C programmers all over the world.
There might also be instances where you have a loop and on a condition you want it to continue. On a condition that we may want to continue the loop without executing the commands that follow the continue statement.
For example:
loop
do
	condition
		continue
	...
	...
done
|
Continue tells the loop to skip any commands found on the lines following the continue beginning again at the top of the loop. This is the opposite of what the break command does, which terminates the loop.
A final word on loops. Suppose we wanted to save the output of the loop to a file, we would do this by redirecting the output to a file at the END of the loop as follows:
for ((i=0;i<10;i++))
do
	echo "Number is now $i"
done > forloop.txt
|
We will see further uses of this when we come to the read command later.
Perhaps we want to take the output of this FOR loop and pipe it into the translate command. We could say:
for ((i=0;i<10;i++))
do
	echo "Number is now $i"
done |tr '[a-z]' '[A-Z]'
|
We could achieve piping and redirection as per all the previous commands we have done:
for ((i=0;i<10;i++))
do
	echo "Number is now $i"
done |tr '[a-z]' '[A-Z]' >forloop.txt
|
Note that the pipe or redirect must appear AFTER the 'done' and not after the 'for'.
Write a script that will loop as many times as there are files in your home directory.
Write an infinite while loop that will terminate on a user logging out.
Write a script that will produce an HTML table of the output of the 'free' command. Save the output to a file mem.html, and using your favourite browser see that the output is working correctly.
Write a script that will print every user that logs onto the system
Writing complex scripts, will require that you provide your scripts with parameters. The more complex the scripts, the more time you will devote in your script merely to handling the parameters.
With our eatout.sh script, we started by being able to give it a single parameter, but after some thought, we may need another, then another, and so on.
./eatout.sh <type>
|
becomes:
./eatout.sh -t <type>
|
then
./eatout.sh -t <type> -r <rating>
|
where
-t for the type of restaurant
and
-r for the rating
|
We may want to use them in any order too:
./eatout.sh -t Italian -r 8
|
or
./eatoutput -r 8 -t italian
|
If you give a moments thought to coding all these options into the shell you will find that things become a lot more complex. In fact, dealing with the arguments could even become more complex than the entire rest of your shell script!
For example, perhaps you had 3 parameters: a, i and r. Looking at the combinations, you could run the script with any of the following:
./eatout.sh -a -i -r <param>

./eatout.sh -ai -r <param>

./eatout.sh -air <param>

./eatout.sh -r <param> -ai
|
You can see that the more parameters we want to put on the command line, the more options we need to deal with.
The shell is clever and it's got a function called getopts, which is used for getting options from the command line. getopts returns a true or a false depending on whether the parameter is supplied on the command line. It's got two additional "appendages": optind and optarg.
How do we use our getopts? Well if we look at our eatout.sh script, we can see that we have two parameters with an argument for each parameter. Using a while loop we need to get every argument on the command line:
while getopts t:r: myoption
|
This will look for any option (beginning with a minus sign). getopts is expecting two options, one beginning with a t, the other beginning with an r. The colon indicates that getopts is expecting an argument for each parameter. In this case we're expecting an argument for both the t and the r parameters.
So now we could include the following loop in our script to handle our options:
while getopts t:r: MYOPTION
do
	case MYOPTION in
		t)	RESTAURANTTYPE=$OPTARG ;;
		r) 	RATING=$$OPTARG ;;
		\?) 	echo "Sorry no such option, please try again"
			exit 1
			;;

done
|
We're telling our script to check the parameters. If the option was a t, then it stores the argument in the RESTAURANTTYPE variable. If the option was an r, then we want to store the argument in the RATING variable. Anything else, getopts will return a question mark. If we were to put a -p on the command line where it shouldn't appear, getops will set MYOPTION to be a question mark, but remember the "?" is a wildcard character so you need to escape it.
Now we've got a very simple way of handling any number of arguments on the command line. OPTIND tells us what index on the command line we're currently handling. It starts at 1, so if we were to run the script with:
./eatout.sh -t italian	-r 5
	     1  2        3 4		#OPTIND number
|
This tells us at what options our indexes are. So what we're going to do is we're going to start building up a nice little menu-system for our users for deciding what restaurants they're going to eat at.
Where they can put a -t for the type of restaurant and a -r for the rating. What we might want to do is we might want to set a rating at the top of our script, so that if the user does not provide a rating, our script will use the default value.
Similarly, we might want to provide a default restaurant type so that if they don't give a type a particular value will be set.
Modify your eatout.sh script to handle the parameters as described above.Modify your eatout.sh script to be able to output the results in HTML format rather than in simple text.
Write a script that will take two optional parameters (a -m and a -d). When run with a -m it should produce memory statistics, while the -d should produce disk space statistics. An additional parameter should be included this time called -h. When called with the -h option, the script should create html output. The -h option should be followed by a file name (index.html or something similar) where the HTML output should be written.
Write a script that will display the gif's in random order in an HTML table. The script should take two optional parameters which will
-r display the GIFs in RANDOM order
-o display the gifs in alphabetic order
-o size display the GIFs in order by size rather than alphabetic.
Table of Contents
Up to this stage, we've created scripts that are run from the command line. What about creating interactive scripts?
Throughout the duration of this chapter we want to modify our eatout.sh script to produce a menu system that would allow users to log on and obtain a list of our favourite restaurants.
With this goal in mind, we need some means of obtaining input from the user without telling them how to run the script from the command line.
For user input we make use of the read command.
The read command is available under all shells - it's a shell built-in command. On a side note, if you want to know whether a command is built-in or not, you can 'type' it as follows:
type read
|
Which should respond with:
read is a shell builtin
|
What about:
type type
|
You will see that this is also a built-in. Try:
type ls
|
which should tell you that ls is a command that has been aliased:
ls is aliased to `ls --color=tty'
|
Back to the read command. If you type the following on the command line:
read X Y
|
You will notice that the shell stares blankly back at you. It's actually waiting for two values for the variables X and Y to be entered by you, so go right ahead and satisfy it!
Type in
12 24
|
You're returned to the prompt, now type:
echo $X $Y
|
and you should see the values that you entered for those variables. If somebody runs our eatout.sh script without any parameters:
./eatout.sh
|
Then we could assume that it is being run in interactive mode. We want to add:
read TYPE RATING
|
to our script, and then perform the rest of our script based on those two parameters.
In our script, we could add:
echo "Oh, you like $TYPE food"
echo "here are the restaurants I rate:"
|
Now if we want to choose restaurants according to a rating we could:
grep "$RATING" restaurants.txt | grep "$TYPE"
|
Clearly this is only going to return the restaurants with the rating you have requested, none that have a higher rating.
This might not be quite what you want.
Instead, you want all restaurants that have got a rating equal to or higher than whatever rating you entered. But for now, let's live with the former - I'll leave the latter to you as an exercise.
Since we now know about CASE statements, we may want to use one here:
read type
for type in ...
do
case type in
	italian|pizza|pasta) 	...
			   	...

	*) echo "Sorry enter a restaurant we like"
done
|
We will spend some time putting this together in our exercises at the end of this chapter.
Okay, so the read command allows us to offer a prompt, but clearly the user doesn't know what is expected of them, unless we tell them. We could achieve this as follows:
echo "Please enter the type and rating of your restaurant choice"
read TYPE RATING
|
At least now the user knows that she must enter a TYPE and a RATING which will make more sense. We've got another option though, namely, the -p flag:
read -p
|
This allows one to include a prompt as can be seen below:
read -p "Enter two numbers (12 3):" X Y
|
This would prompt for two numbers that must be entered.
Notice that read automatically assigns the values to these variables. In our example above, X and Y are the variable names used.
Reading a users name may entail:
read -p "Enter your name" NAME
echo $NAME
|
The echo would print the NAME variable, as it is entered at the prompt
Read can be used in another very useful way: it allows one to read an entire line. Let's say you have a file of restaurants, ratings, etc. as before, and you're wanting to read this entire file in order to swap the rating and the restaurant type. We saw one way to achieve this with sed earlier in the course, but it involved some complex RE's. Let's try another method by using the 'while' loop.
An example of an entry in the file is:
rating,type,restaurant name,telephone number
	5,italian,Butlers,6867171
|
with every field being separated by commas.
Why commas? Suppose I had an entry as follows in my restaurants.txt:
10,smart,Boschendal Restaurant,88616
|
Where the restaurant name has a space within it. As the default field separator is a space, if I didn't use commas as a delimiter, then read would interpret this line incorrectly as it would consider that the above line has 5 fields, rather than 4.
To avoid this potential problem, and allow me to keep 'Boschendal Restaurant' as a space separated field, I have ensured the space-separated fields are now comma separated.
On another note, CSV (comma separated value) files are common ways of transferring data between one spreadsheet and another.[20]
Now, in order to swap the columns, I could use the while and the read together as follows:
IFS=","
while read RATING TYPE PLACE TEL
do
echo "$type,$rating,$place,$tel"
done < restaurants.txt
|
This will repeatedly read in a line of text from the file restaurants.txt, until there are no more lines left, at which point the read will return a FALSE (1).
On reading each line, the fields are automatically placed into the variable names, making swapping them a trivial exercise! No more writing complex RE's, no more fussing about!
One last point. You will notice that prior to starting the while loop, I change the input field separator (IFS) to be a comma. By default, IFS=$' \t\n', a space, a TAB and a NEWLINE.
I need to change this to accommodate my commas in the file, so IFS="," will solve this problem. Without this change, the 'while read ...' will not produce the desired output
Look at the exercises for other ways to employ your read.
Now, back to building our menu system. An example of a menu system may be this pseudo-code:
while read RATING TYPE
do
	case RATING in
		[0-9]: do x,y,z
			;;
		*	: echo "Sorry, please enter a rating between 0 and 9"
			  continue
			;;
	esac
	case TYPE in
		....
		....
		....
	esac
	....
	....
	....
done
|
I've been glibly using the echo command without fully exploring it.
There are in fact, 2 different echo commands; the shell built-in echo and the external program /bin/echo.
If you type:
type echo
|
this is the echo command that you have been using.
echo is a shell builtin
|
There is another on the system. It's /bin/echo and if you type:
/bin/echo --help
|
you'll see that this is a different type of echo command. You could also say:
type /bin/echo
|
to which the shell would respond:
/bin/echo is /bin/echo
|
Obtaining help on the /bin/echo you should see:
Echo the STRING(s) to standard output
|
You can allow echo to print special characters:
| \n | newline |
| \t | tab |
| \c | suppress newline characters |
| \b | the bell |
Another point to note is that the following options are also available for use with the echo command:
| -n | do not print the trailing newline character |
| -e | enable interpretation of these special character sequences |
If you type:
/bin/echo -e "Hello\nWorld"
|
It would output:
Hello
World
|
Note, that it puts the two words on separate lines because of the \n character.
Also, we are forced to use the -e option for echo to enforce the interpretation of the backslash characters.
So let's modify a previous script to use this [other] echo:
while read rating type place tel
do
	/bin/echo -e "$type \t $rating \t $place \t $tel\c"
done < restaurants.txt
|
This would print all your restaurants on a single line because of the \c, while separating each by a TAB (\t).
Okay, so echo is one way of sending output to the screen, and if you do not use the bash builtin, you can use /bin/echo where you've got a couple more options.
You can do an info or man on echo to see what the options are that /bin/echo uses.
Modify your eatout.sh script to accept no parameters. In this event, it should being in an interactive mode, allowing the user to enter their restaurant and rating.
Ensure you do adequate error checking in this script such that if the user enters incorrect ratings or types, you inform them as such and request a new rating, type.
Modify the password file to ensure that when the user "jeeves" logs in, they are presented with the eatout menu system created in 2 above. To achieve this, you will need to create the user jeeves, and modify his shell to reflect your script.
Write a script to create users on your system automatically. The script should read from a file of users that has the following format
<FirstName> <LastName> <PrimaryGroup>
The script should create the username from <LastName> <FirstName> sequence, to create the user called, for example whittal.hamish, if <Whittal> <Hamish> was the input from the file. The GECOS field (the comment field) in the password file should be their full name - i.e. <FirstName> <LastName> (e.g.Hamish Whittal). You may need to test whether the primary group already exists and create it if it does not. This script should illustrate how useful shell scripting really is, and how they can save you oodles of time in the long run!
Echo is one way of dealing without output but in true Linux fashion, there's another way of doing this too:
echo is a little primitive in that in can't do formatting in any [really] nice ways. Perhaps you want to format all your restaurants and you want to put them in columns to make your script look like a professional restaurant directory service.
Printf has come down through the programming ages. It's available in C, Java and other similar languages.
printf takes the following format:
printf(%[flags][width][.precision]type)
|
Note that contents inside [ ] are optional. The types could be any one of the following:
| s | string |
| d | decimal |
| o | octal |
| x | hexadecimal |
| u | unsigned integers |
We not going to use half these types, flags and options, but if you want more information you can look at the printf command in detail using info.
In it's simplest case, we could say:
printf '%s ' Hamish
|
That would print:
Hamish[hamish@defender ~]$
|
| Note |
|---|---|
the "[hamish@defender ~]$" here is merely my prompt. So Hamish is printed, then a space then I'm returned to my prompt i.e. No newline is printed after Hamish. | |
This doesn't look any different to our echo command, but wait, there's more!
Another example:
printf '%.5d" 12
|
This would print:
00012$
|
Basically it's padding the number 12 up to a total of 5 digits. You'll notice that the prompt appeared directly afterwards. When you use printf, you have to explicitly tell it how it must display things. You have to tell it when you want to display a newline, or a TAB or a space, or anything else for that matter.
So we can modify the previous printf command to be:
printf '%.5d\n" 12
|
This would now print a newline character after it has printed the number 12, so that your prompt would appear on the next line. Suddenly, we're starting to see that the echo command, in comparison to printf, is looking like a complete wimp!
Now, you could add a flag on the front of that. I've decided to add a '+' flag.
printf '%+.5d %+.5d %+.3d\n" 9 12 -16
|
we end up with:
+00009 +00012 -016
|
So the '+' modifier tells the shell to precede each one of our numbers either with a '+' if it's a positive number or a '-' if it's negative. The .5 says to ensure that the total width takes up no more than 5 characters (or 3 in the case of '-16'). The number 6 will be padded with four zeroes preceding it. Also, note that each format inside the string relates to a single value outside the format string.
I can foresee we're going to use printf more often than echo! Using strings and preceding the string with a minus sign:
printf "%-10s,%-3s\n" Flying cows
|
That would left justify our text:
Flying ,cows
|
Notice that the , (comma) is between the Flying and the cows. We are padding the Flying to 10 character width, the cows to 3 character width, both left justified.
If we left off the minus sign, it would right justify the text. The 10 says: "set aside a 10 character width string". Notice that 'Flying' is 6 characters in length, there will be an extra four spaces before the c of the cows starts. You will also notice that although I said the width of the second word should be 3 characters in width, the string that we used is longer than 3 characters so it ignores our specification.
If we changed it to:
printf "%10s,%10s\n" Flying cows
|
produces: (I have included underscores on the line below to indicate the 10 character widths)
Flying    ,      cows
----------,----------
|
So let's use this in our restaurant guide by formatting the output in a far more decent way, save this script into a file called formatrestaurants.sh:
IFS=','
while read rating type place tel
do
	printf "%.3d,%-10s,%-20s,%12s\n" $rating $type $place $tel
done <restaurants.txt
|
Notice the formatting of the output. We're making the precision of our rating 3, padding it to the left with zeroes.
We're assuming the longest 'type' of restaurant we have is 'steakhouse' at 10 characters in length. So, we're left justifying the type of restaurant to a width of size 10.
Similarly we are left justifying the restaurant name to a width of 20.
However, our telephone number we are right justifying - by leaving out the minus sign, to a width of 12 characters.
We are separating each field using commas.
The above command will format the output of our restaurants.sh in a really professional looking manner.
Run the script:
chmod +x  formatrestaurants.sh

./formatrestaurants.sh |sort -rn
|
Everything is in nice columns the way we expected it to be.
So if your scripts are going to do lots of output, it's worth using the printf command to format it rather than using the echo command.
Modify your eatout.sh script to format output in a standard way. Ensure that the output is justified as described above.
Write a script that will use the output of the df command and reformat it in a way that makes it easy to read. Output should be as follows:
<Mount Point>\t<% Free Space>\t<% Used Space>\t<Total Space>Ensure that headings appear at the top of your output as illustrated here.
The \t indicate TABs between each of these headings.Ensure that the output of this script, each time it is run, is appended to a log file /tmp/df.output.log
Write a script similar to 2 above this time formatting the output of the memory in a similar manner.
Combine the scripts in 2 and 3 to produce a single script that will do the memory and the disk space on the system at once.
Modify your script above that will allow the user to supply a command line switch as a -h ot -t. The -h should produce the output in HTML format, while the -t should produce the output in text format.
You can, if you complete this timeously, add an additional switch (-d), which will produce the output using the dialog package.
[20] Pipe your restaurant.txt through sed and replace your spaces by commas, so that you end up with a file that looks like mine.
Table of Contents
We're going to have a brief look at the shell and the environment variables that are set by the shell.
We talked a little earlier about the difference between shell and environment variables, where shell variables are not exported as opposed to environment variables, which are.
We talked about starting subshells; shells having subshells (children). When we exit a subshell we return to a parent shell.
To show a list of environment variables, type:
env
|
To show a list of shell variables, type:
set
|
The bash prompt is represented by the shell variable called PS1.
Type:
echo $PS1
|
which displays the following on my system:
\e[31;1m\[[\u@\h \[\e[32;1m\]\w\[\e[31;0m\]]$\[\e[0;0m\]
|
| Note |
|---|---|
if your prompt does not show exactly the same thing as shown here, don't worry. You can set the prompt to anything you like. I just like a colourful one! | |
man bash
|
and search for the word PROMPTING as follows:
/PROMPTING
|
you will find all the settings your PS1 variable can assume.
The PS2 variable is a prompt too, and this is used when you have a run-on line. Try:
echo "Hello

>
|
This is waiting for you to close the double quotes to finish the command.
echo "Hello

> World"

Hello World
|
Then back to your prompt.
Another example:
ls \

>
|
Here list is still waiting for you to complete the command, and your new line will then display the PS2 prompt. Now type -sl, so that it looks like:
ls \
>-al
|
The \ (the line break) allows us to split lines over more than a single line.
These variables (PS1, PS2, etc.) are shell variables, so using the env command will not show them.
set, on the other hand will.
Environmentals variables such as HOME (your home directory), USER (your username), LOGNAME (your login name), MAIL (your mail directory) are set at shell startup time.
Additionally, you have special environment variables such as:
~ and ~-
|
Tilde (~) is your home directory (in my case /home/hamish), so:
cd ~
|
will take you back to your home directory, irrespective of where you currently are on the system.
The ~- will return you to the previous directory you were working in, this would be held by OLDPWD, as set in the environment.
cd ~-
|
source (contrary to the popular belief that this has to do with burgers!) is a way of getting commands to run inyour current shell (without opening a new shell, as would normally happen)
. shellscript
|
Notice there is a whitespace between the fullstop ( . ) and the shellscript script.
As we have covered before I can run this script with:
./shellscript
|
Then the following would happen:
bash (your current shell) would call a script called shellscript
shellscript would start a new shell (as directed by #!/bin/bash inside the script)
the script would run and finally exit.
control would be returned to your original bash shell
If on the other hand we sourced this script using the following command:
. ./shellscript
|
The following would happen:
from your current shell, shellscript would be run. Notice, no starting a new shell.
The script would run to completion.
When the exit 0 is reached in shellscript, your current shell would vanish (if you ran this directly after logging in, you would be returned to the login prompt)
Firstly, why does the sourcing not begin a new shell? This is the point of sourcing.
The commands in shellscript are run from the current shell and the shebang at the beginning of the shell has no effect.
Secondly, why would you be returned to your login prompt?
On reaching the exit 0, the current shell exits, as it must. Since you were not running this script within a subshell, the current shell exits, leaving you at the login prompt.
One of the uses I have for sourcing I got from looking at the startup scripts in Linux. In these scripts, they keep a host of variables in files that can be modified by the user. At the time of running the script, they source these files, and bingo, they have variables set according to the users specifications.
I have included an example of this below:
Edit a file called vars and enter the following to set 4 variables:
NAME=Hamish
SURNAME=Whittal
COMPANY="QED Technologies CC"
TELNUM='0828035533'
|
You might want to set these variables up-front, before you start your script.
Edit a new script and at the start of your new script include the shebang, as normal, but also include the line '. var' as shown below:
#!/bin/bash
. var		#sourcing the variables in the file var.
echo "$NAME $SURNAME was here"
exit 0
|
Now, to get the user to run this with different data in the NAME, SURNAME, etc. fields, they only need modify the 'var' file.
Other uses of sourcing include using it to define a set of reusable functions, then sourcing the functions.sh script inside your shell script:
. functions.sh
|
This can help immensely when writing large, complex shell scripts. More examples of using source will be given once we have discussed using functions.
Change your prompt to read as follows:
[ 21 March: 13:12pm : hamish@defender : /home/hamish/shell_scripting ] $.The prompt will naturally not have the exact date specified here, but the date and time will vary according to your system date. The user name will also vary according to who is currently logged in, and the path will vary depending on the path the user is working in at the time.
Modify your eatout.sh script to obtain the default parameters from a file called restaurant.def. This file should contain two variables, namely RATING and TYPE. Ensure that on running the script, if no parameters are supplied, the default ratings are used. Note: you may have to alter your eatout.sh in more than one way, since in the last exercises, eatout.sh without any parameters ran in interactive mode.
The exec command will replace the parent process by whatever the command is typed.
Try the following:
exec ls -l
|
As you will have noticed, this closes the shell you are currently using. Why?
The exec command terminated the parent process and started (executed) the ls command and the ls command did what it was supposed to do and exited with a zero status, but ls has no parent process to return to, and thereby the shell is shut down.
If for example, we ran our eatout.sh script, but instead of running it as we have previously, we exec'd it, the script would run but would also close our terminal from which we ran the script.
exec eatout.sh
|
This means that when the person finally types exit to exit the menu, they are sent back to the login prompt.
To see this in action, let's consider the following sequence of commands:
pstree -p |less
|
You will notice that "pstree" starts with the init command or the init process. Somewhere further down this 'tree', init starts a shell (bash/ksh/csh) which is then going to run the pstree and the less command.
Now, in order to see exec at work, we need to find out the current process id.
Use:
echo $$
|
to determine this (the ps command would give you the same information).
Now type the pstree command again, producing a diagram of your process tree.
pstree -p | less
|
Search for your process id recorded from the echo above. Once you have located it, quit pstree and type:
exec bash
|
This would replace our current shell (our parent) with a new shell, and thus a new process id (PID).
echo $$
|
You can also look at the pstree again.
By using the exec command, instead of making the new shell's parent your original shell, the new shell will be owned by init.
The shell has two further constructs: round brackets () and curly brackets{}. Round brackets means execute the commands in the round brackets in a NEW subshell.
So if you type:
pwd
|
You'll probably be in your home directory, something similar to:
/home/hamish
|
If you now say:
(cd /bin; pwd)
|
It will say on the command line:
/bin
|
Once this is complete, we type:
pwd
|
We are still in:
/home/hamish
|
Why?
The command executed in a subshell, the cd command happened in the subshell. Once the shell is complete (once the pwd command has been run), control is passed back to the parent shell, which had never left the /home/hamish directory.
Enclosing commands in round brackets will run these commands in a subshell. One of the places this can be used in is in copying the contents of one subdirectory on a partition into a new subdirectory on a different partition:
tar cvf - /oldpart | (cd /newpart; tar xvf - .)
|
The minus signs mean send the output to stdout.
In this example, we create a new tape archive (tar) of our old partition, being sent to stdout instead of a file.
We pipe this standard output to the standard input of the next tar command, but because this is part of a subshell, we can cd to the new directory and untar (extract) the files here instead of /oldpart.
The process would copy the entire contents of /oldpart directory to /newpart, preserving all links, modes, ownerships, everything! Note that the above example is a single command which we can run in the background by appending an ampersand (&) to the end of the command:
(tar cvf - /oldpart | (cd /newpart; tar xvf - .))&
|
Earlier, we were reading from a file using a while loop, but we were forced to change the IFS. At that point, we simply:
IFS=","
while read type, place .....
do
	etcetera....
|
This changed our IFS for the shell too, which is not necessarily a good thing for future commands in that log in session or until IFS is reset again back to a space, tab or <return>.
Now, using the (), we can modify the commands as follows:
( IFS=",";while read type, place .....
	do
	etcetera....
)
|
which would run the entire expression in a subshell and on completion, our IFS would remain unchanged.
The curly brackets {} on the other hand mean "execute the commands within the current shell - do not use a new subshell".
So for example, we could say:
{program1;program2;program3;} 2>/tmp/errors
|
Any errors would go to /tmp/errors. Note that the above command is equivalent to:
program1 2>/tmp/errors
program2 2>/tmp/errors
program3 2>/tmp/errors
|
Where the errors of program2 and program3 are appended to the same place where program1's errors are.
Clearly there is a lot more typing involved in the second option than in the first option.
| Note |
|---|---|
Each single command that you use within the curly brackets must be followed by a semi colon( ; ). | |
So:
{ ls -l; pwd }
|
will produce an error, while
{ls -l; pwd; }
|
will work as desired.
By way of example, assuming we have a script called myscript.sh and we wish to set some environmental variables prior to running the script, we could simply set them and enclose the whole bang shoot in curlies or round brackets. Try:
echo Before subshell: $NAME $COMPANY
(NAME=Hamish COMPANY='QED Technologies CC'; pwd)
echo After subshell: $NAME $COMPANY

echo Before : $NAME $COMPANY
{NAME=Hamish COMPANY='QED Technologies CC'; pwd;}
echo After : $NAME $COMPANY
|
Obviously, in the second instance, the variables NAME and COMPANY will be present AFTER the script has executed, while in the former case, they will not be set.
That would set up those environment variables before the start of that script.
Alternatively, we could source these variables from a file during the script.
Table of Contents
We need to discuss a little more on parameters.
Remember we've seen parameters $0..$9 and $# which is the number of parameters, $? the exit status of the previous command, etc.
What we need to discuss is the nifty ways of manipulating our parameters. For the purposes of this chapter we're going to set a variable called MAGIC:
MAGIC='abracadabra'
|
Check that it is set.
echo "The magic word is $MAGIC"
|
or we could use an equivalent command:
echo "The magic word is ${MAGIC}"
|
This should produce:
The magic word is abracadabra
|
We can also test whether the MAGIC variable is set by:
echo ${MAGIC}X=${MAGIC}
|
If you go a couple of chapters back to your conditional constructs, you'll see that we used this command to check whether the variable MAGIC was set.
The echo produces:
abracadaraX=abracadabra
|
which was FALSE(1).
The shell has other (neater) constructs for doing setting and checking parameters.
${PARAM:-value}
|
This means: if the parameter is UNSET or a NULL value, then substitute the value that has been set previously.
Using MAGIC, we can type:
echo ${MAGIC:-'zingzangzoom'}
|
which should echo:
abracadabra
|
Why?
Since MAGIC is NOT NULL, and NOT UNSET, the variable is used, thus abracadabra.
What happens if we unset the variable to give it a null value?
unset MAGIC
echo ${MAGIC:-'zingzangzoom'}
|
Now echo will print:
zingzangzoom
|
One of the places that system administrators use this is:
${EDITOR:-/bin/vi} somefile
|
If you haven't set your environment variable called EDITOR or it's set to a NULL value, then use the default editor vi to edit the file somefile.
If you have set EDITOR with:
EDITOR=/bin/emacs
|
then you'd use emacs to edit the file somefile.
Notice:
unset $MAGIC
echo ${MAGIC:-'zingzangzoom'}
echo $MAGIC
|
MAGIC is not being set to 'zingzangzoom'. The :- construct is not actually setting the value of MAGIC, it's just testing the value of MAGIC.
How do you set the value of MAGIC? Enter the next construct, which is a similar construct but the minus sign is replaced with the equals sign:
unset $MAGIC
echo ${MAGIC:='zingzangzoom'}
echo $MAGIC
|
If you run the above, you will notice that the variable MAGIC now contains the value 'zingzangzoom'. So this new construct means:
If the variable IS NULL or UNSET, then assign the new value to the variable, otherwise if the variable is already set, don't touch the value.
To satisfy ourselves that this is actually the case, run the following:
MAGIC='abracadabra'
echo ${MAGIC:='zingzangzoom'}
echo $MAGIC
|
which should produce abracadabra.
unset MAGIC
echo ${MAGIC:='zingzangzoom'}
echo $MAGIC
|
Will produce zingzangzoom.
Where would we use this? Again we could use it with our EDITOR environmental variable:
${EDITOR:=/bin/vi}
|
Now if EDITOR was NULL or UNSET, then it would assign the value '/bin/vi' to EDITOR.
However if you had run:
EDITOR=/bin/nano
|
then EDITOR would remain with the value nano.
We've got yet another construct called:
${param:+value}
|
This construct means:
If the parameter is NULL or UNSET, then substitute nothing, otherwise substitute the value.
We might use this as follows:
OPTION=T
echo ${OPTION:+"Option set to T"}
|
Thus if the option is set (to anything actually), then you would see the following output:
Option set to T
|
However if you unset OPTION the output would differ. Type:
unset OPTION
echo ${OPTION:+"Option set to T"}
|
You will get a blank line for the output. Why? Because it says if the option is set then print out the value, otherwise print out nothing.
Please don't become confused that the OPTION being set to 'T' has ANYTHING to do with the output.
For example if I set OPTION to zingzangzoom as follows:
OPTION='zingzangzoom'
echo ${OPTION:+"Option set to T"}
|
the outcome would still be:
Option set to T
|
This construct is simply testing whether the variable has a value i.e. is NOT NULL or UNSET.
These are a couple of the standard constructs.
Let's do some pattern matching parameter substitutions. Again, we set our MAGIC variable:
MAGIC=abracadabra
|
The first of these constructs is:
${variable%pattern}
|
The % symbol matches a pattern from the end of the variable. If we were to run the above construct it will start at the end of our variable MAGIC, searching for the pattern. Thus it will start from the right hand side of the word 'abracadabra'.
What patterns are we meaning?
Well it matches all the pattern syntax that we saw previously. Remember when we discussed wildcards:
| * | any characters (0 or more) |
| ? | any single character |
| [ ] | range of characters |
| [!] | any except those in range |
So, let's try and use this:
echo ${MAGIC%a*a}
|
Now, what the construct matches is the shortest pattern FROM THE END of the variable.
When we match this, an 'a' on the end of the variable, followed by any number of characters ( * ) followed by an 'a': (BUT, the a*a must match the SHORTEST match from the END of the string). Our resulting match:
abra
|
Once the match is removed, we are left with:
abracad
|
Let's try something a little more adventurous. Match the following:
echo ${MAGIC%r*a}
|
Again, the shortest match from the end of the string removes the string 'ra' from the end, leaving us with:
abracadab
|
Aha, but wait, there"s MORE!
The double percentage means match the LONGEST pattern FROM THE END of the variable.
If we tried the previous command using this new construct:
echo ${MAGIC%%r*a}
|
we should end up with:
ab
|
Why is it leaving the ab? Because it's matching the longest match of an 'r', followed by any number of characters ( * ) followed by an 'a', removing the matched pattern, echo'ing the remainder.
So where is this sort of thing used? Well perhaps you've got a long path:
SCRIPT=/home/hamish/scripts/testing/myscript.sh
|
Let's say we want to extract the path but not the script name itself. Then we would type:
THE_PATH=${SCRIPT%/*}
|
This construct would mean: from the end of the string, match the shortest pattern of a forward slash followed immediately by any number of characters, resulting in:
echo $THE_PATH
|
or
/home/hamish/scripts/testing
|
We can use the following construct to match things from the beginning of the variable field.
${variable#pattern}
|
Using our variable MAGIC again, the hash sign ( # ) will match the shortest pattern from the beginning of the variable. Let's try:
echo ${MAGIC#a*b}
|
Since the shortest pattern starting from the beginning of the string, beginning with an 'a', followed by zero or more characters and ending with a 'b' is 'ab', the output will be:
racadabra
|
Conversely if we did:
echo ${MAGIC##a*b}
|
this will remove the longest match from the beginning of the string for an 'a' followed by zero or more characters followed by a 'b', leaving you with:
ra
|
How do we remember these things? Well, the way I remember them is as follows:
The hash is generally used to signify a comment line within a script. A comment should always start at the beginning of the line. So hashes" match from the beginning of the line.
How do we match an end of a line?
Well usually that's a dollar (say in "vi"), and a dollar looks fairly similar to a percentage sign if we've got a warped sense of vision. So % matches the end of the line.
How do you remember shortest and longest?
Well, % means shortest, %% means longest, # means shortest, ## means longest.
How do you write a pattern?
Turn back a good couple of chapters to refresh your memory on writing patterns.
One of the things we wanted to do earlier is to automatically create usernames from the users first name and their surname.
For example, in the file to create users, I have a first name, a surname and the users primary group.
<FirstName> <Surname> <PrimaryGroup>

Hamish 			Whittal 	users
|
I would like to combine the surname and the first three letters of the firstname to create the users username - automatically!
We can use another of these parameter substitution constructs to achieve this:
${variable:OFFSET:LENGTH}
|
where the OFFSET begins at 0 and LENGTH is the number of characters to keep in the total length of the user name.
Assuming I have read the above values into the variables:
FIRSTNAME SURNAME and PGROUP
|
As a result, we could use the following code to resolve our issue:
1.Chop the FIRSTNAME to the first 3 characters using our new construct:
SHORT_FIRST=${FIRSTNAME:0:3}
|
which would leave us with:
SHORT_FIRST=Ham
|
2.Add the SURNAME to the shortened FIRSTNAME:
USERNAME=${SURNAME}${SHORT_FIRST}
|
3.useradd -g ${PGROUP} -c "${FIRSTNAME} ${SURNAME}" -d /home/${USERNAME}
${USERNAME}
|
4.Now set up a script to make that work for every user listed in the userlist.txt file, use a loop construct to ensure that the entire file is read (the file to create users), and BINGO, you have just made your life easier!
Okay, there are a couple more things to discuss here. If we need to find out how long a variable is, we can use the following construct:
${#variable}
|
So if we try:
echo ${#MAGIC}
|
You should get :
11
|
Let's try another example:
NEW_MAGIC=${MAGIC##a*b}
echo ${#NEW_MAGIC}
|
We should end up with a value of:
2
|
Why? Because the pattern matches the 'ra' and the length of 'ra' is two characters.
You can re-assign parameters using the set command. Remember the set command shows us all our shell variables. set can also be used to assign parameters:
set a b c
|
and then
$1 would be equal to a
$2 would be equal to b
$3 would be equal to c
|
Notice that if you do this, you overwrite any of your positional parameters that $1, $2 and $3 may have contained previously.
If you were to create a script called superfluous.sh:
#!/bin/bash
echo Command line positional parameters: $1 $2 $3
set a b c
echo Reset positional parameters: $1 $2 $3
exit 0
|
and run it with:
chmod +x superfluous.sh

./superfluous.sh one two three
|
You will get the output
Command line positional parameters: one two three

Reset positional parameters: a b c
|
The set command, has overwritten your command line positional parameters that you sent from your prompt. It's worth noting that if you need to reset positional parameters then this is the ONLY way to do it.
The final thing in this chapter has got to do with the input field separator (IFS). We've looked at the IFS variable previously, if you type:
set |grep IFS
|
You will see that IFS is probably set to
IFS='\t\n '
|
That means that the IFS is set to a tab, a newline or a space. If you needed to change this to a comma for the duration of a script, you would say:
(IFS=',';script.sh)
|
That would set the IFS to a comma for the duration of that script - notice the round brackets which execute this as a subshell leaving our original IFS untouched.
Changing the IFS will change the field separator for a script or a command, and this is something to be aware of as up to now all the commands that we have used in the entire course use the default IFS. (ls -al will no longer work if you have changed the IFS to be a colon!)
If for example we were parsing our /etc/passwd file, where fields are separated by a colon ( : ) or a newline (\n), then using IFS=':\n' would work for us.
IFS=":\n"
while read username ex uid gid gecos homedir shell
do
	echo $username belongs to the user $gecos
done < /etc/passwd
|
You can also set variables to be read-only, meaning they can't be changed.
readonly MAX=10
|
Set the variable called MAX to the value of 10, then you tried:
MAX=20
|
the shell would give the error:
bash: MAX: readonly variable
|
For the simple reason, that by saying something is readonly, you cannot change it afterwards. The only way to undo the readonly, is to kill the shell.
Once you've made a variable readonly, you can't even unset it
unset variablename
|
is the syntax to unset a variable
unset MAX
|
the shell will give another error:
bash: unset: MAX: cannot unset: readonly variable
|
So readonly is a way to create a readonly variable - no rocket science there.
Set a variable POPPINS, and then perform the following parameter substitutions. Obviously try to get the answers BEFORE heading for you Linux machine.
POPPINS='supercalifragilisticexpialidocious'
echo ${POPPINS:=Mary was here}
echo ${POPPINS%a*}
unset POPPINS; echo ${POPPINS:-JulieAndrews}
POPPINS='supercalifragilisticexpialidocious'; echo ${POPPINS#s??e}
echo ${POPPINS%%f*s}
echo ${POPPINS%c*s}
echo ${POPPINS:6:10}
echo ${#POPPINS}
Table of Contents
Let's start with the eval command. If we type:
ls |wc -l
|
This will pipe your ls output to the word count command. What happens if you say:
PIPE='|'
ls $PIPE wc -l
|
We now have set a variable PIPE to the pipe character.
The command will not execute the way you would expect it to. The first thing that happens, is that the $PIPE is replaced by the pipe character, then the shell will execute the command ls but will then croak, saying there is no such command called '|', or 'wc'.
Why? The shell does the variable expansion first if you remember, then it tries to run the command ls, looking for a file called '|', and one called 'wc'.
Clearly, there are not files by these names in our home directory and so the message "No such file or directory" is returned by the shell.
Somehow we need to be able to re-evaluate this command line after the variable expansion has taken place.
That's not too difficult if we make use of the eval command as follows:
eval ls $PIPE wc -l
|
The eval command re-reads the command line. So once the substitution of the variable has taken place (i.e. $PIPE has been translated into a vertical bar), eval then rereads that command and voila, success!
Let's take a look at another couple of examples:
Let's assume I have the commands, stored in a variable:
cmd='cat file* | sort'
|
Now comes the time I need them, so I try:
$cmd
|
This only half works, but had I done:
eval $cmd
|
It would have worked like a dream, because the eval would have re-evaluated the command line AFTER the variable substitution had been done.
x=100
ptr=x
|
Now, type:
echo \${$ptr}
|
Remember $$ is your process id, so you must enclose $ptr in curly braces. You also need to escape the first dollar, because you want eval to see a literal $. This would produce:
$x
|
But the problem persists; we will end up with $x on the command line. Not quite what we had in mind, so we'd have to:
eval echo \${$ptr}
|
which would give us the desired output:
100
|
We are almost executing a second level of variable substitution and eval is the command that allows us to do that. While this command is used infrequently, you will certainly benefit from knowing it's around when you really need it!
Since Linux is a multitasking operating system, we can run any command in the background at any time.
Let us run the ls command in the background with:
ls &
|
Clearly it's not going to make too much sense as the ls command completes so quickly that putting it in the background will have little effect. Despite this, if we run the command, it prints the job number first with the process id (PID) thereafter.
[riaan@debian] ~$ ls &
[1] 7276
|
Every job in Linux gets a process id (PID).
So let us look at using background processing in a more useful example. We might say:
find / -name "hamish" 2>/dev/null &
|
This would give us a job number and the process id. We could now say:
echo $!
|
That would give us the process id of the most recently run command. So we could save the PID in a variable:
mypid=$!
|
If we decided to kill the process, it's as simple as:
kill -9 $mypid
|
One place that this logic is frequently used is to make a run file. A run file is a file that keeps a copy of a shell scripts PID, and can check against this run-file to determine whether the script has finished.
In other words while your script is running you want to keep a copy of the process id, and as soon as it exits, you will delete the run file.
To illustrate this point:
#!/bin/bash
echo $! > /var/run/myscript.pid
|
keeps a copy of the process id in a file called myscript.pid (in the directory /var/run). At a later stage, if I need to test whether the script is running, or I need to kill it, all I need do is:
kill `cat /var/run/myscript.pid`
|
Another useful place to use the PID of the previous command is if you want to wait for one process to complete before beginning the next.
How do we force the script to wait for a command to complete? A shell built-in command called the wait command allows this:
cmd1
cmd2
wait
...
|
will wait for the command cmd2 to complete before proceeding. More explicitly:
cmd1
CMD1_PID=$!
...
...
wait $CMD1_PID
cmd2
|
This will force the shell for wait for cmd1 to complete before we begin cmd2.
We are able to control the speed (to a limited extent) with which our scripts execute by using the wait command. Consider the code snippet below.
#!/bin/bash
ping -c 10 192.168.0.1 2>/dev/null 1>&2 &
PING_1_PID=$! #gets process id of previous ping
wait $PING_1_PID #wait for the ping process to complete
echo "Ping complete" #inform user
ping -c 10 192.168.0.2 2>/dev/null 1>&2 & #start again ...
|
In line 2, ping will send ten ICMP packets to 192.168.0.1, redirecting both stderr and stdout to /dev/null and running all this in the background.
We store the PID of this ping in a variable PING_1_ID, then telling the script to wait for this process to complete before starting the next process.
If we are running our eatout.sh script interactively, we would not want our users to be able to press CTRL-C to break out of the script and thereby gain access to the shell prompt.
The shell gives us the ability to trap such signals (the CTRL-C).
Before explaining trap, let's take a detour and understand signals.
A signal is the means Linux uses for sending information between processes or between the kernel and a process.
Simply put, it's a way of communicating between disparate daemons or processes on the system - a little like in the days of old, where train drivers used battens to relay signals to the station master. There are many signal types. Try:
kill -l
|
which will list all the signals.
For example, signal 1 is SIGHUP, or signal hangup. The pneumonic (SIGTERM) is another means of referring to the signal number (1). If you send a SIGHUP to a process, it'll hang up the process - notice this does not mean the process will hang.
Often SIGHUP is a way of forcing a process to reread it's configuration files. For example if making changes to the SAMBA configuration file (smb.conf), then sending smbd (the SAMBA daemon/process) a SIGHUP:
kill -SIGHUP smbd
|
or
kill -1 smbd
|
will force SAMBA to reread it's configuration file (smb.conf).
Let's look at some other signals:
SIGTERM (15)
|
This signal indicates to the process that it should terminate. SIGTERM is actually a really nice signal, as it will ask the process to terminate as soon as it possibly can: "Please will you exit now". When sending a SIGTERM, the process will often need to close files, database connections, etc., and for this reason, the process will not die immediately, but exit "as soon as it possibly can".
There's another signal called:
SIGKILL (9)
|
If you send a SIGKILL to a process, it doesn't ask it nicely. It's a little like what Arnie does in the Terminator movies - "Asta-la-vista baby" i.e. Don't wait for ANYTHING, just die right now!
SIGINT (2)
|
Signal interrupt, or SIGINT, is sent if you want to interrupt a program. CTRL-C is a sequence that will interrupt a program using the SIGINT signal.
How do you use these signals?
Well for example, if you have a PID 1512, you could type:
kill -15 1512
|
This translates to killing the process with SIGTERM. The following produce the same result:
kill SIGTERM 1512
|
or
kill -SIGTERM 1512
|
or
kill -TERM 1512
|
Most of the time, I use signal 9 because I'm not a patient man.
In sum, here are the signals you may require most often:
| signal | meaning |
| 0 | NORMAL EXIT status |
| 1 | SIGHUP |
| 15 | SIGTERM |
| 9 | SIGKILL |
| 2 | SIGINT |
That's the end of our detour, so let's look at our trap command.
Trap will allow us to trap some or all of these signals, and perform operations on the trapped signal. Let's begin by trapping the SIGINT signals.
The format of the trap command is as follows:
trap [options] [argument] [Signal specification]
|
The following excerpt [taken from the bash info page] has been summarised here for your information:
trap [-lp] [ARG] [SIGSPEC ...]
|
commands in ARG are to be read and executed when the shell receives signal SIGSPEC. e.g. trap "echo signal INTERRUPT has been trapped" SIGINT
If ARG is absent or equal to '-', all specified signals are reset to the values they had when the shell was started.
e.g.
trap -; exit 0; # at the end of your script.
|
If ARG is the null string, then the signal specified by each SIGSPEC is ignored.
e.g.
trap "" 3 # will ignore SIGQUIT
|
If ARG is not present and '-p' has been supplied, the shell displays the trap commands associated with each SIGSPEC.
trap "echo signal INTERRUPT has been trapped" SIGINT
trap -p
|
If no arguments are supplied, or only '-p' is given, 'trap' prints the list of commands associated with each signal number in a form that may be reused as shell input. e.g. As in the example above.
Each SIGSPEC is either a signal name such as 'SIGINT' (with or without the 'SIG' prefix) or a signal number.
e.g.
trap "echo cleaning up runfile; rm -rf /tmp/runfile.pid" INT
|
If a SIGSPEC is '0' or 'EXIT', ARG is executed when the shell exits.
e.g.
trap "echo cleaning up runfile; rm -rf /tmp/runfile.pid" 0
|
If a SIGSPEC is `DEBUG', the command ARG is executed after every simple command.
e.g.
trap "read" DEBUG
|
will allow you to step through your shell script 1 command at a time. See if you can explain why this would be the case?
If a SIGSPEC is 'ERR', the command ARG is executed whenever a simple command has a non-zero exit status (note: the `ERR' trap is not executed if the failed command is part of an 'until' or 'while' loop, part of an 'if' statement, part of a '&&' or '||' list, or if the command's return status is being inverted using '!'.)
e.g.
trap "echo 'the command produced an error'" ERR
|
The '-l' option causes the shell to print a list of signal names and their corresponding numbers.
Signals ignored upon entry to the shell cannot be trapped or reset.
Trapped signals are reset to their original values in a child process when it is created.
The return status is zero unless a SIGSPEC does not specify a valid signal.
Start by typing this example on the command line:
trap "echo You\'re trying to Control-C me" 2
|
After setting the trap as described above, press Cntrl-C. Now instead of sending a break to the terminal, a message is printed saying:
You're trying to Ctrl-C me
|
I could've said:
trap "echo HELP\! HELP\! Somebody PLEASE HELP. She\'s trying to kill me" 2 1
|
This will trap both of the SIGINT(2) and the SIGHUP(1) signals.
Then when I try:
kill -1 $$
|
It echoes the statement and does not perform the kill.
In many of my scripts, I trap the signals 0,1 and 2. At the top of my script I add:
trap "rm -f /tmp/tmpfiles" 0 1 2
|
If the script completes normally, or if the user terminates it, it will clean up all the temporary files that I might have used during the running of the script.
What if we want to ignore a trap completely?
Trap : 2 # perform a null-op on signal INT
|
or
trap "" 2 # perform nothing on SIGINT
|
or
trap 2 # reset the SIGINT trap
|
We can use traps in our eatout.sh script, since we certainly don't want anyone on the system to kill the menu system while a user is busy planning their busy weekend gastronomic tour or Cape Town!
At the top of our eatout.sh script we could trap the KILL and TERM signals:
trap "You can't kill me" 9 15
|
Now, while running your eatout.sh script in interactive mode, try to kill the process from another virtual terminal session with:
kill -9 eatout.sh
|
Ensure that the user is unable to break the eatout.sh script from running with the break command.
When your script exits, send a message to all users logged onto the system. Hint: see the man page for wall(1).
Set a trap in your eatout.sh script that will allow you, the wizz shell programmer to step through your script one command at a time.
Ensure that, on login to a new terminal, the SIGSTOP signal is trapped and a message printed accordingly. How would you test this?
We looked at input-output redirection earlier in this course. Remember we had:
| file descriptor 0 | stdin |
| file descriptor 1 | stdout |
| file descriptor 2 | stderr |
We were restricted to only these 3 file descriptors (FD)?
No, any process can have up to 9 file descriptors, we have only discussed 3 thus far. By default though every terminal that is created, is created with the above three file descriptors.
Firstly let us establish which terminal we are currently logged on to:
tty
|
The output may be one of those described below:
/dev/pts/1 # a pseudo-terminal if you're using X11
|
or
/dev/ttyx # where x is a number between 1 and 6 (usually)
# if you're on a console
|
Now run:
lsof -a -p $$ -d0,1,2
|
This shows a list of open files for this PID (remember $$ was the current PID).
Read the man pages for lsof if you need more information about this command.
If you run the above command, since all terminals are opened with the above three file descriptors you should see our three file descriptors. All three of them should be pointing to the same place, my terminal.
The output generated by these commands is shown below (of course you will see slightly different output to mine):
$ps
PID TTY TIME CMD
1585 pts/1 00:00:00 bash
$echo $$
1585
$tty
/dev/pts/1
$lsof -a -p $$ -d0,1,2
COMMAND PID USER FD TYPE DEVICE SIZE NODE NAME
bash 1585 hamish 0u CHR 136,1 3 /dev/pts/1
bash 1585 hamish 1u CHR 136,1 3 /dev/pts/1
bash 1585 hamish 2u CHR 136,1 3 /dev/pts/1
$
|
The need for extra file descriptors is based upon the need to be able to redirect output or input on a semi-permanent basis. We need to have a way of creating additional file descriptors. Say for example we wanted all our scripts to log output to particular log file then we would have the following (or something similar) in a script:
#!/bin/bash
LOGFILE=/var/log/script.log
cmd1 >$LOGFILE
cmd2 >$LOGFILE
|
This is not a very appealing solution.
Another way of achieving this is by creating a new file descriptor or alternatively assign our existing stdout file descriptor to a logfile (the latter option is illustrated below).
Re-assigning an existing file descriptor using the exec command:
1 #!/bin/bash LOGFILE=/var/log/script.log exec 1>$LOGFILE 5 cmd1 cmd2
You will notice that line 3 redirects stdout to $LOGFILE, so that lines 4 and 5 need not redirect their output explicitly.
Now every command that we run after that ensures that its output is directed to LOGFILE, which is used as the new standard output.
Try this on your command line as follows:
exec 1>script.log
|
Remember you have to have write permissions to be able to write to a system file such as /var/log, so here we are just writing the log file in our current directory.
We've now redirected any output from the console (or terminal) to script.log. Well that's fair enough, but how to test it? On the command line, type:
ls
|
What happens? You DON'T get the listing you were expecting! Type:
pwd
|
and it doesn't show you the working directory either. The command seems to complete, but nothing seems to be happening - or at least we can't see if anything is happening. What's actually happening is that the output of these commands is going to our script.log file as we set it up to do.
Try a:
lsof -a -p $$ -d0,1,2
|
Again the output is sent to script.log. Well, surely we can just cat the log file:
cat script.log
|
What happens? Well the same thing that happens when you type pwd, ls or lsof - nothing (or you may even get an error). The question is how to get back your stdout? Well the answer is YOU CAN'T!
You see, before re-assiging stdout, you didn't save your initial standard output file descriptor. So in some ways - you've actually lost your stdout. The only way to get your standard output back is to kill the shell using:
exit
|
or press Ctrl-D to exit your shell. This will then reset stdout, but it will also kill the shell. That's pretty extreme and a tad useless!
What we want is a better way of doing this, so instead of just redirecting my stdout, I'm going to save my stdout file descriptor to a new file descriptor.
Look at the following:
exec 3>&1 # create a new FD, 3, and point it to the
# same place FD 1 is pointed
exec 1>script.log # Now, redirect FD 1 to point to the
# log file.
cmd1 # Execute commands, their stdout going
# to script.log
cmd2 # Execute commands, their stdout going
# to script.log
exec 1>&3 # Reset FD 1 to point to the same
# place as FD 3
cat script.log # Aaah, that's better.
lsof -a -p $$ -d0,1,2,3 # check that we now have 4 FD associated
# with this PID
|
You will notice that we now have four file descriptors (0,1,2 and 3), which are all pointing to the same node name.
With exec, we are able to create up to 9 new file descriptors, but we should save our existing file descriptors if we wish to return them to their previous state afterwards.
Let's try to reassign FD 3 to the file riaan.log
exec 3>riaan.log
lsof -a -p $$ -d0,1,2,3
COMMAND PID USER FD TYPE DEVICE SIZE NODE NAME
bash 3443 riaan 0u CHR 136,35 37 /dev/pts/35
bash 3443 riaan 1u CHR 136,35 37 /dev/pts/35
bash 3443 riaan 2u CHR 136,35 37 /dev/pts/35
bash 3443 riaan 3u REG 3,1 0 86956 /home/riaan/ShellScripts/riaan.log
|
Now you should see something different because the node name has been updated to point to riaan.log for file descriptor 3.
Remember, that this redirection of file descriptors is only valid for this shell, not for child processes.[21]
We are able to create up to 9 file descriptors per process and we are able to save our existing file descriptors in order that we can restore them later. We can close a file descriptor with:
exec 3>&-
|
To check that file descriptor 3 has in fact closed, run:
lsof -a -p $$ -d0,1,2,3
|
and you will only see file descriptors 0,1 and 2.
Manipulating the file descriptors can be used to great effect in our scripts, because instead of having to redirect every command to a log file, we can now just redirect stdout:
#!/bin/bash
LOGFILE=~/script.log
exec 3>&1 #save FD1
exec 1>$LOGFILE #stdout going to $LOGFILE
ls -alh /usr/share #do a command
pwd # and another command
who am i # at least now I know ;-)
echo "Finished" >&3 # This now goes to stdout
echo "Now I'm writing to the log file again"
exec 1>&3 #Reset FD1
exec 3>&- #Close FD3
|
This will then echo "Finished" to the console, because we've saved stdout file descriptor in file descriptor 3.
Redirecting the input would work in a similar fashion:
exec 4<&0
exec <restaurants.txt
while read rating type place tel
do
echo $type,$rating,$place,$tel
done
|
That would then take all our input from the file restaurants.txt.
Modify your eatout script in such a manner that any errors produced by the script will be redirected to a file called eatout.err in your home directory.
Allow the user to select from the menu in eatout.sh, but ensure that their keystrokes are recorded in a file called eatout.log
Write a script that should take two arguments, an input file (-i infile) and an output file (-o outfile). Using file descriptor redirection, the script should convert all data from the input file (infile) to uppercase and write the uppercased file to the output file (outfile). Ensure that your script does all necessary error checking, that it cannot be 'broken out of', killed, etc. and that all user options are adequately checked to ensure they conform to that required. Ensure that exit status' are supplied if errors are detected. An example of the command line is given below:
upcase.sh -i bazaar.txt -o BAZAAR.TXT
This is a good time to put together all these things you have learned en-route. It is always a good idea to complete the script with comments on what it is doing, to give a usage message to the user if they use a -h or -help option, and to make the script almost self explanatory. Don't be sloppy because you will regret it when the script needs to be maintained.
Here Documents is a way of including, in your shell script, snippets of text verbatim. For example, if I needed to write a paragraph:
echo "paragraph start"
echo "..."
echo "..."
echo "paragraph end"
|
or
echo "paragraph start
...
...
paragraph end"
|
| Note |
|---|---|
These are different methods of producing the same output. | |
However, notice that this could become rather problematic with repetitive echo commands, or if the text has lots of special characters.
cat << END-OF-INPUT
...
...
...
END-OF-INPUT
|
'END-OF-INPUT' is just a string denoting the end of the text in this here document. The document reads until "here" and in this case here = 'END-OF-INPUT'. It could've been called anything as long as it is a matching 'tag' to signal the end of the input.
Let's try this on the command line. Type:
cat << EOF
This is the first line of our HERE document.
An the second. What happened to $USER
OK. Enough is enough.
Bye.
EOF
|
This is used extensively in shell archives (shar). In shar's the contents of the shell are the contents of the script itself.
We might want to count the number of lines in a here document:
wc -l << EOF
...
...
EOF
|
This would count the number of lines typed on the command line. So here documents are very useful and can be used to do many things. Create a script 'mailmsg.sh' with the contents:
mail -s "An Automated message from $USER" $1 << EOT
This is a
mail message
done!
EOT
|
Now run it:
mailmsg.sh hamish
|
I use this extensively in my shell scripts. We're going to modify oureatout.sh to produce some convenient message at the start of our script:
#!/bin/ksh
trap "Can't do that" 2
if [ $# -lt 1 ]
then
cat <<END-OF-TEXT
This is a simple lookup program
for good (and bad) restaurants
in Cape Town.
Usage: eatout.sh [-x] [-h] [-r rating] [-t type]
-x will produce text output
-h will produce HTML output viewable in a web browser
-r specifies the rating. We suggest only using >5!
-t specify the type of resturant (italian, smart, steakhouse, etc.)
END-OF-TEXT
...
exit 0
|
That would print out a little banner at the beginning of the script if the user does not call it with the correct parameters.
You can also use here documents to create vi documents, automated ftp sessions. In fact they are a very useful construct. We could:
USER=hamish
cat << EOT
echo $USER
pwd
hostname
EOT
|
Seeing the contents of each one of these is a command, it's going to echo each of these commands as part of the here document. The here document was able to interpret the $USER, I could redirect those commands and say:
USER=hamish
cat << EOT >out.sh
echo $USER
pwd
hostname
EOT
chmod +x out.sh
./out.sh
|
So our script created a new script called out.sh, changed it's mode and executed it.
Here's an example of using a HERE document to vi a file.[22]
#!/bin/bash
TARGETFILE=$1
# Insert 2 lines in file, then save.
#--------Begin here document-----------#
vi $TARGETFILE <<x23LimitStringx23
i
This is line 1 of the example file.
This is line 2 of the example file.
^[
ZZ
x23LimitStringx23
#----------End here document-----------#
# Note that ^[ above is a literal escape
# typed by Control-V <Esc>.
# Bram Moolenaar (the author of vim) points out that this may not
# work with 'vim', because of possible problems with terminal interaction.
|
Remember, our earlier HTML script? We could create the HTML table using a here document rather than echo'ing it:
cat << TABLE
<TABLE BORDER="1">
<TR>
<TD>$value1</TD>
<TD>$value2</TD>
</TR>
</TABLE> TABLE
|
So here Documents can be used for a variety of things including SHAR, simplifying your text output or automating ftp logins and file transfers.
Amongst other things. I encourage you to attempt the exercises as well as modifying your existing scripts, to see how you can achieve the same output using here documents rather than the echo command.
Write a script that will itself create a script, which will automatically logout users who have been idle for longer than 15 minutes. Hint: Consult the example above.
Using HERE documents, write a script that will generate a table 3x2 in size. Ensure that each block contains a picture or animated gif. There are a couple of gifs provided with this course. Alternatively, you can download your own. I found those from
Modify your eatout.sh script to include a usage section. Give the user the option of using a -? as a means of printing the usage information.
Any good programming language is going to give the ability to segment our code into manageable bite-size chunks.
The shell gives us this functionality in the form of functions. The syntax of a function is:
function name()
{
}
|
The word 'function' is optional, and the function will work equally well without it. Inside the function can be any command that you have thus far used in your shell scripts.
Below, I create a function within our shell called lscd. As you can see from this script, it will mount a cdrom, list it's contents, unmount it and finally eject it. In order to run this function, you will require a cdrom disk.
Pop it into your cdrom drive and then run the function lscd on the command line. We've created a new 'command'.
This lscd command is now like any other command on our system except it is a function. This function will only exist for the duration of this shell. So if you exit this shell, then your function is gone.
function lscd()
{
mount /dev/cdrom
ls -l /dev/cdrom
umount /dev/cdrom
eject /dev/cdrom
}
|
Now we saw the idea of sourcing scripts earlier on, but we can create a file called functions.sh and inside the file we can include all our functions.
We should not put need to put an 'exit 0' in any of them. Why? Since these are not scripts, they are only functions, an exit 0 will exit the current shell, which if sourced from the command line, closes your terminal.
Remember too that the functions within functions.sh need not be related in ANY way.[23]
Once we have our functions within the functions.sh file, we simply source the file each time we need a function defined there:
. functions.sh
|
Functions are quite simple; that's all there is to them.
How about passing parameters to a function? Well, perhaps we want to pass a parameter into the function. Our parameters become $1, $2 et cetera, the same way they were in the shell.
Let's look at an example of this usage:
function lscd()
{
DEVICE=$1
mount $DEVICE
ls -l $DEVICE
umount $DEVICE
eject $DEVICE
}
|
So we could test the functionality of this script with any of the statements below:
lscd /dev/cdrom
lscd /dev/fd0
lscd /dev/sda1
|
Parameters in a function and parameters to a script are identical in how we can use them. We can shift them, set them, assign them to variables, etc. In fact, everything we could do with a scripts parameters on the command line we can do within a function.
This provides us with some useful abilities in terms of segmenting our code thus creating code that is easily maintainable.
Remember that if we include an exit status at the end of our function, then we will exit out of our current shell, so don't do it!
We'll discuss the return built-in shortly.
Once we've actually created our function, how do we unset it or uncreate it or remove it?
Well, we could either exit out of our shell or we could unset it, for example:
unset lscd
|
The final thing about functions is that often we need to know what the exit status of the function was. In other words, did it complete successfully or did it fail? What was the exit status? While we can't use an 'exit', we can use a 'return'. The same rules apply as before.
A return value of 0 means that the function completed correctly. A non-zero return value means the function did not complete correctly. Given our lscd function, we now want to run the following on the command line:
lscd /dev/cdrom
echo $?
|
Recall that $? will show the exit status of the previous command, which happens to be lscd in our case. Because we return a value of 0 from lscd, the exit status from lscd is 0. It's a good idea to have a return value to every function, just as it is a good idea to have exit status to every script.
I will rewrite my lscd function as follows:
function lscd()
{
mount /dev/cdrom
ls -l /dev/cdrom
umount /dev/cdrom
eject /dev/cdrom
return 0
}
|
With your newfound knowledge of functions, write the following scripts.
Modify your script from earlier, which showed the disk space and memory in HTML format. Only this time, ensure that each of these tasks are separated into individual functions.
Write a function that may be used on the command line, which will show your hardware address, IP address and default gateway on your machine.
I often need to change between a DHCP and a static address, and this provides a source of stress for me as each time I need to modify the files, restart the network, etc. Write a function that I can run on the command line that will prompt me for all the manner of my network configuration. It should ask whether we require DHCP / static addressing and if static is selected, it should require us to enter the IP address, the netmask, the default gateway and the DNS server(s). Ensure that the function will restart the necessary services once we have chosen our method of network settings.
For this sequence, you will need to obtain some knowledge on a very useful graphing program called gnuplot. Although it might look difficult, once you have the hang of it, it can do some really nice graphs, and of course make you look like a genius.
Write a function that will ping up to 4 hosts a maximum of 10 times per hosts and plot the response times on a graph. Ensure that this graph is available from a web-page called index.html
[21] you can check that this is the case by starting another bash, and running the lsof command for this new process. Exiting from this bash will return you to your original file descriptors
[22] Thanks to Mendel Cooper - The advanced bash shell scripting guide (http://www.tldp.org/) for this excellent example of using a here document
[23] Using functions is is how RedHat, SuSE and other Linux vendors implement their rc scripts to start and stop services.
Visit the w3.org website to access some excellent and technically correct tutorials on how to create HTML code. The specific URL is http://www.w3.org/MarkUp/#tutorials
dialog is a program that will allow you do draw text boxes on the screen in a prittier manner than a simple ascii-art drawing. It uses the ncurses library to achieve this. Before proceeding with this short one-page tutorial, ensure that you have dialog installed on you system. Refer to earlier in the notes if you cannot install some software on you machine, or alternately, do the System Administrators course.
Try this for instance:
dialog --infobox "Installing Windows 95, please wait..." 3 50
|
Dialog can take many different parameters. So, adding a background title is easy.
dialog \
--backtitle "Welcome to Windows 95" \
--infobox "Formatting your hard disk .... please wait" 3 80
|
Add this to the above line, and it might be worth putting it into a simple script. Let's call the script setup.exe (just for fun).
U=`echo $USER|tr '[a-z]' '[A-Z]'`; \
OS=`echo $OSTYPE|tr '[a-z]' '[A-Z]' \
`; dialog --sleep 5 --title "Welcome back $U, \
we've you been?" \
--backtitle "Windows 95 copying...." \
--infobox "Erasing $OSTYPE" 3 40
|
As you can see, we're combining a number of options into a single dialog string. In this way, we can get it to do a number of things at once.
Enough tricks. Now, what about a menu? Simple enough:
dialog --menu "Hamish's simple menu system" 10 35 3 \
"Option 1" "Slurp seafood" \
"Option 2" "Quaff a steak" \
"Option 3" "Sluk a salamander"
|
You will notice that the options are names. If I wanted them to be numbers, that would be as simple as:
dialog --menu "Hamish's simple menu system" 10 35 3 \
"1" "Slurp seafood" \
"2" "Quaff a steak" \
"3" "Sluk a salamander"
|
Output from the dialog option goes to standard error, so catching that should be a matter of:
dialog --menu "Hamish's simple menu system" 10 35 3 \
"1" "Slurp seafood" \
"2" "Quaff a steak" \
"3" "Sluk a salamander" 2> /tmp/option
|
Once we have the option, we can operate on it as we would have in any other shell script:
retval=$?
choice=`cat /tmp/option`
case $retval in
0)
echo "'$choice' chosen.";;
1)
echo "Cancel pressed.";;
255)
echo "ESC pressed.";;
esac
|
There are a myriad of other things you can do with dialog. Consult the manual page for dialog(1), as well as the many examples in the docs directory where all documentation for available packages are stored on your system.
Symbols
- #!/bin/awk
- shebang, Shebang or hashpling #!
- #!/bin/bash
- shebang, Shebang or hashpling #!
- #!/bin/ksh
- shebang, Shebang or hashpling #!
- #!/bin/sed
- shebang, Shebang or hashpling #!
- #!/usr/local/bin/perl
- shebang, Shebang or hashpling #!
- #variable, #variable
- $, Square brackets ( [ ] ), the caret ( ^ ) and the dollar ( $ )
- $?
- exit status of previous command, Exit status of the previous command
- $PS1, The shell environmental variables pertaining to scripting
- $PS2, The shell environmental variables pertaining to scripting
- &
- running commands in background, Running commands in the background using &
- &&, The || and && commands
- ( )
- execution with round brackets, Execution with Round brackets
- *
- ., Returning to file commands
- .., Returning to file commands
- /bin/echo -e, The echo command
- /bin/echo -n, The echo command
- /dev/null, stderr
- /etc/bashrc, What is the login shell?
- /etc/profile, What is the login shell?
- >>, Appending to a file
- [ ], Square brackets ( [ ] ), the caret ( ^ ) and the dollar ( $ )
- ^, Square brackets ( [ ] ), the caret ( ^ ) and the dollar ( $ )
- ^$, Square brackets ( [ ] ), the caret ( ^ ) and the dollar ( $ )
- { }
- execute with curly brackets, Execution with Curly brackets
- ||, The || and && commands
- ~-
- previous directory, The shell environmental variables pertaining to scripting
- ~/.bash_profile, What is the login shell?
- ~/.bashrc, What is the login shell?
A
- AND, Logical Operators
- arithmetic
- shell, Arithmetic in the shell
- awk, Introduction
B
- backticks
- bashrc, What is the login shell?
- bc
- calculator, command line, Arithmetic in the shell
- BODMAS rules, Arithmetic in the shell
- break, The break and continue commands
C
- case, The "case" statement, getopts Using arguments and parameters , The read command
- cd, Command Interpreter
- chmod, Running a Shell Script, Detour: File Extension labels
- comma seperated values
- CSV, The read command
- comments
- conditions
- shell, Conditions in the shell
- continue, The break and continue commands
- cp, Returning to file commands
- cshrc, What is the login shell?
- cut, The cut command
- /etc/passwd, Second Example in stages:
- cut -d, The cut command
D
- date, The "date" command
- date +%H, The "date" command
- date =%M, The "date" command
- debugging scripts, Debugging your scripts
- df, System Commands
- df -h, Adage 1.2, The df and du commands
- df -hT, The df and du commands
- dialog, An introduction to dialog
- dialog --backtitle, An introduction to dialog
- dialog --infobox, An introduction to dialog
- dialog --menu, An introduction to dialog
- double quotes, Double Quotes
- du, System Commands
- du -s, The df and du commands
E
- echo, The 'echo' command
- egrep, grep, egrep and fgrep
- elif, The "elif" statement
- END-OF-INPUT, Here documents
- env
- Enviromental variables, The shell environmental variables pertaining to scripting
- enviroment variables, Single Quotes or "ticks"
- enviromental variables, Environmental vs shell variables
- esac, The "case" statement
- eval command, The eval command
- exec, File descriptors re-visited
- exit status, Exit
- expr
- expression command, Shell Arithmetic's with expr and back quotes
F
- false, What is "true" and "false"
- fdisk, System Commands, the fdisk command
- fgrep, grep, egrep and fgrep
- file descriptors, File descriptors re-visited
- file test, File test
- test, Different types of tests
- find, stderr, Introduction
- for loop, Introduction
- free, Adage 1.2, System Commands, The free command
- functions, Functions
G
- getopts, getopts Using arguments and parameters
- grep, Unamed Pipes, Introduction, The grep command, grep, egrep and fgrep
- tail -20 /var/log, The grep command
H
- hashpling
- here documents, Here documents
- HISTSIZE
- shell variable, What is the login shell?
- HOME
- shell variable, What is the login shell?
- HOSTNAME
- shell variable, What is the login shell?
I
- info, Introduction to info, man and the whatis database, info pages
- info coreutils, info pages
- info mv, info pages
- input field seperator (IFS)
- shell variables, Allows for variables to be set
- iostat, System Commands, the iostat command
K
- kill, Signals
- kshrc, What is the login shell?
L
- less, Man Pages
- logical operators, Logical Operators
- login shell, Introduction
- loops, Introduction
- ls, File Commands
- lsof, File descriptors re-visited
M
- makewhatis -u -w
- updating whatis database, The whatis Database
- man, Introduction to info, man and the whatis database, Man Pages, The whatis Database
- Mark Nudelman, Man Pages
- more, Man Pages
- mv, Returning to file commands, Command Interpreter
N
- nl, Returning to file commands
- non-login shell, Introduction
- noop, The NULL command
- NOT, Logical Operators
- NULL
- command, The NULL command
- null variable, Null and unset variables
- numeric test, Numeric Tests
- test, Different types of tests
O
P
- paste, The paste command
- PATH, Detour: File Extension labels
- perl, Introduction
- PID
- Process ID, File descriptors re-visited
- placeholders, Placeholders and word boundaries
- plus (+) operator, The plus operator ( + )
- positional parameters
- postional parameters, Positional Parameters 0 and 1 through 9
- postional variables, Introduction
- presenting output
- /bin/echo, The echo command
- echo, The echo command
- printf, The printf command
- printf, The printf command
- pseudo terminals, The who command
- pstree, the exec command
- pts/.., The who command
- pwd, Command Interpreter
Q
- quotation
- shell, Introduction
- quotes
R
- rc0, rc1, rc2, etc., What is the login shell?
- read command, The read command
- readonly variables, Setting variables as "readonly"
- regular expressions, Introduction
S
- sed, Introduction, The fullstop, Returning from detour to our discussion on curly braces …
- pipes, Using sed and pipes
- printing matching patterns, Square brackets ( [ ] ), the caret ( ^ ) and the dollar ( $ )
- sed syntax, Let's explore "sed" syntax
- set
- re-assigning variables, Re-assigning parameters with set
- shebang
- shell archives
- shar, Here documents
- shell variables, Environmental vs shell variables
- shift command, Using the "shift" command - for more than 9 positional parameters
- SIGHUP, Signals
- SIGINT, Signals
- SIGKILL, Signals
- signals, Traps and signals
- SIGSPEC, Traps
- SIGTERM, Signals
- Single Quotes, Single Quotes or "ticks"
- sleep, while and until loops
- sort, Introduction
- source command, The Source command
- stderr, stdin, stdout, stderr, stderr
- stdin, stdin, stdout, stderr
- stdout, stdin, stdout, stderr, stdout
- stream editor, Let's explore "sed" syntax
- string test
- test, Different types of tests
T
- tar, Execution with Round brackets
- test
- while, while and until loops
- test command, The test command
- ticks, Single Quotes or "ticks"
- time, Using sed and pipes
- touch, Let's do some more examples using the pattern matching wildcards.
- tr, The tr command
- free, The tr command
- translate command, The tr command
- trapped signals, Traps
- traps, Traps and signals, Traps
- true, What is "true" and "false"
U
- Unamed pipes, Unamed Pipes
- uniq, The uniq command
- sort, The uniq command
- unset
- variables, Null and unset variables
- until loop, Introduction, while and until loops
- USERNAME
- shell variable, What is the login shell?
V
- variables, Variables
- vmstat, System Commands
W
- w, The w Command, First Example in stages:
- wc, Returning to file commands
- wc -l, Returning to file commands
- whatis, Introduction to info, man and the whatis database, The whatis Database
- while loop, Introduction, while and until loops
- who, The who command, First Example in stages:
- who -H, The who command
- who -u, The who command
- wildcards, Wildcards
- word boundaries, Placeholders and word boundaries