| Chapter 2. Installation and Bootup | ||
|---|---|---|

|
 |
|
| Chapter 2. Installation and Bootup | ||
|---|---|---|
|
|
|
|
Table of Contents
In this course we are going to go through a complete installation of Debian Linux. You will require at least the first Debian installation CD to do a Debian installation.
Only the first CD is required to turn your computer into a fully working Linux system, although there are lots of useful packages on the other 7 (!) CDs.
You should consult the Debian web site[1] for a list of places where you can get your hands on a copy.
This document covers Debian version 3.0r2, but is applicable to most other versions.
You will need to configure your system's CMOS to tell it that you wish to boot off the CD-ROM drive.
Before attempting the installation make an inventory of the hardware components of your machine. Although the Debian installation system will attempt to automatically detect your hardware, it may not always be successful. Probably the most important pieces of information to record are the IRQ and IO addresses for your ISA/EISA cards, if you have any.
If you're going to be doing the installation onto a machine, which already contains data, and you wish to preserve this data then make a backup!
Debian requires that there be some unused partition space on which it can be installed. Please note that this is not the same as having free space on your C: drive (assuming you're running DOS or Windows).
A typical desktop Debian installation requires about 600MB of disk space, but this can obviously change depending on what additional software you intend to install, as well as the amount of data that you are going to be storing.
It is highly recommended that you also review the installation documentation available on the Debian CDs, as this will cover specific configuration problems in depth, as well as last minute "gotchas" that might have crept into the release.
Debian Linux is a community driven operating system like most open source projects. A way to get the most out of using the software is to become involved with the community. If you're running a Debian system, it is definitely recommended that you subscribe to some of the Debian mailing lists, you can subscribe to these mailing lists on this page
As someone looking after a Debian system, you should at least subscribe to "announce" and "security announce" mailing lists. These are low volume, but they will keep you up to date with what's happening with the Debian project, and, very importantly, about any security related information that becomes available.
During an installation of any operating system, it's a good idea to note down what it is you've done and what choices you've made, and possibly even your reasons. This can prove invaluable when reviewing a system, and especially if you have to re-install it due to a system failure!
Some of the other obvious things that you should do prior to an installation are to make an inventory of the hardware that the system contains, and then to check up online whether or not that specific hardware combination is supported by the operating system and applications that you are going to be installing.
Once you've booted off the installation CD, your screen should appear as follows:
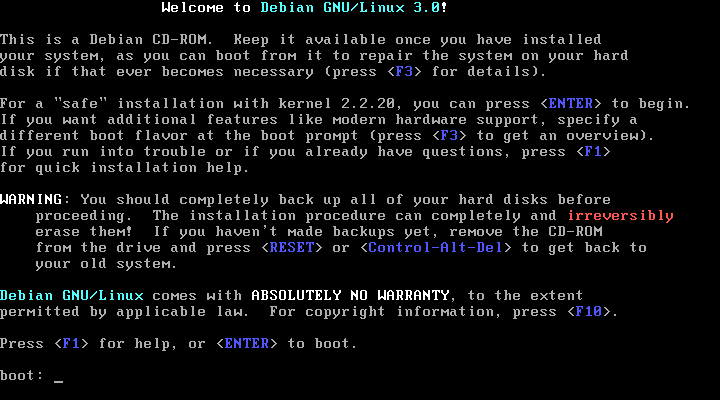
Note that it is important to read and note everything that is displayed during the installation. If you skim over something, you may miss a critical piece of information and end up having to start the installation from scratch again!
Once you've read what's on the screen, feel free to use the function keys to investigate the other screens. Once you're ready to begin press Enter.
You should notice a lot of text scroll off the screen. Don't worry if it goes past too quickly for you to read, we can come back to it later.
If all goes well while booting off the CD, you should be presented with the following screen:
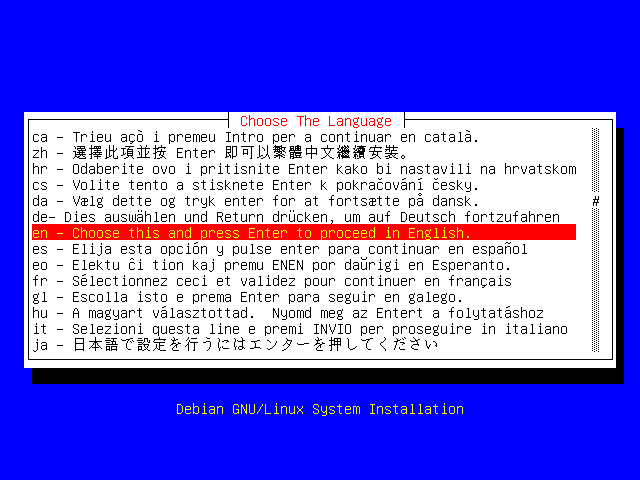
The application that is now running is called "dbootstrap"; it is responsible for the installation and initial configuration of the system.
You can use the following keys to navigate in dbootstrap:
Table 2.1. Navigation Keys(dbootstrap)
| right arrow, or Tab | move forward between buttons and selections |
| left arrow, or Shift-Tab | move backward between buttons and selections |
| Up/Down arrow | highlight items within a scroll list |
| Spacebar | select an item, such as a check box |
| Enter | activate current choice |
| Alt-F1 | view dbootstrap screen |
| Alt-F2 | view virtual console |
| Alt-F3 | view error messages |
| Alt-F4 | package unpacking and setup messages |
Now that you know how to find your way around, use the arrow keys to move the selection bar (the yellow text on a red background) down to your preferred language choice (probably "en"). Once your choice is highlighted, as in the screenshot, press the Enter key.
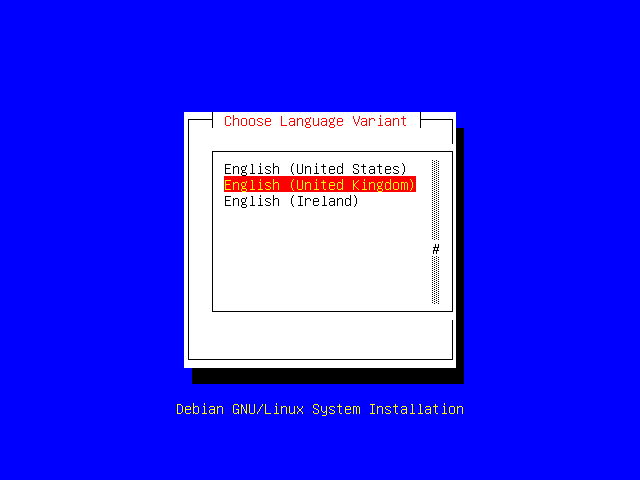
You may be prompted to further refine your choice, as below:
Once you've done that successfully, you will be presented with the "Release Notes" display:
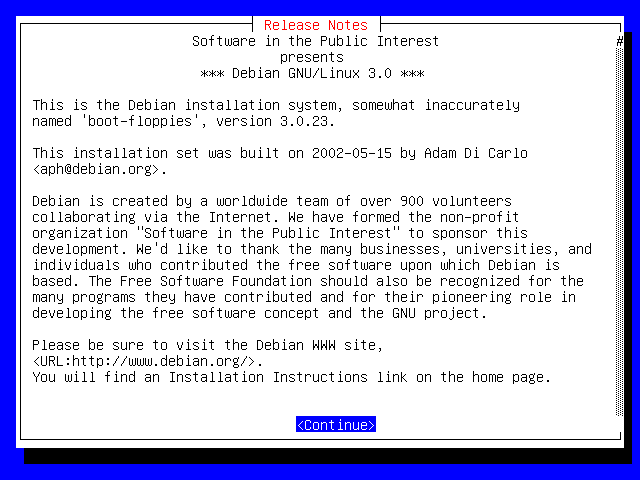
Once you've read this, press Enter again to continue.
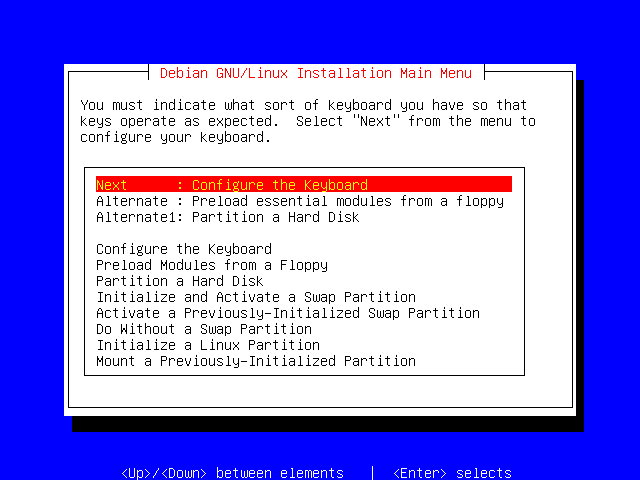
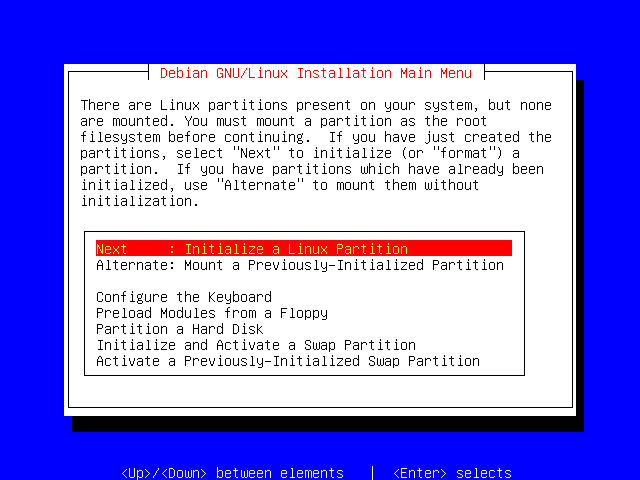
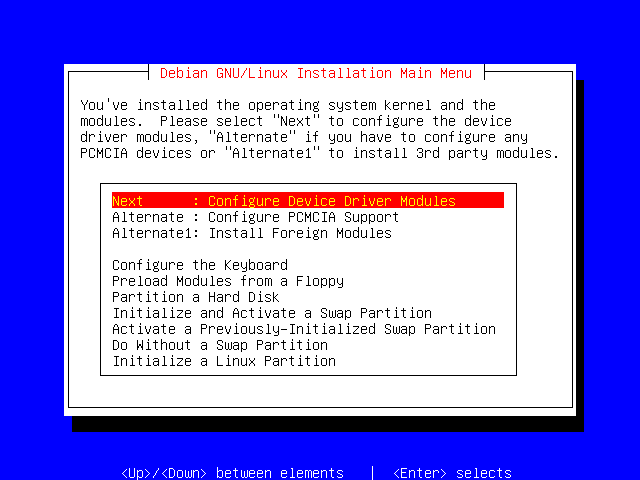
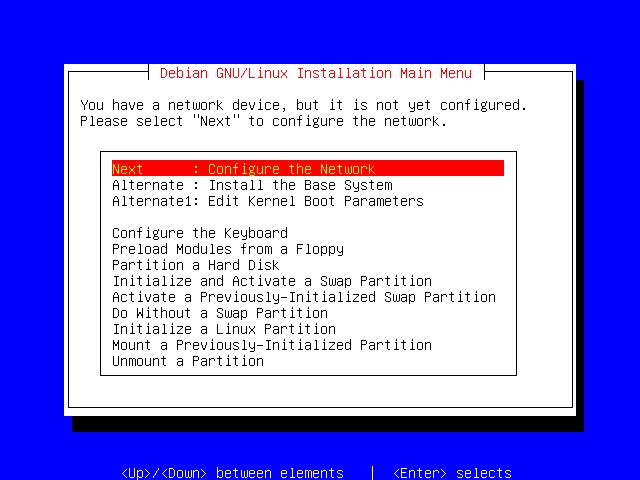
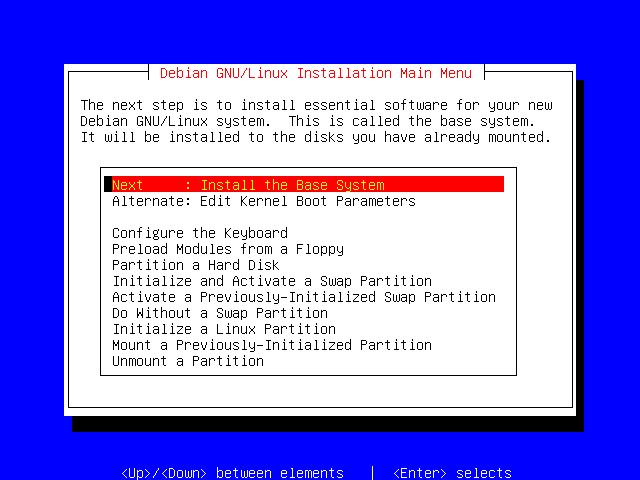
From here, you can jump to most parts of the installation. For the purposes of a standard installation though, you should simply concentrate on the top grouped choices; in this case Next, "Alternate" and "Alternate1".
The Next choice is the next logical step in the installation procedure, and is usually always the one you will want. The "Alternate" options allow you to chose an alternative installation path. This is sometimes useful if you want to skip a section which doesn't make sense for your particular installation.
Make sure that the highlight bar is on "Next: Configure the Keyboard", and then press the Enter key.

Select your keyboard type, and then press Enter. If you're not sure which keyboard you have, then go with the default "qwerty/us" selection.
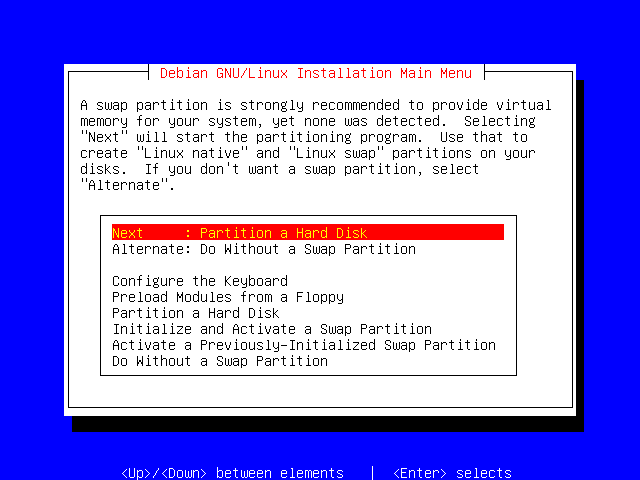
Debian needs at least one partition in order to run. However, you can also create a swap partition.
A swap partition allows the operating system to treat some of the disk space as "virtual memory". If your system has less than 16MB of RAM, then you will have to create a swap partition in order for the system to work. If you have more RAM than that, then a swap partition is not required, but is still recommended.
Generally, the cost of RAM is a lot higher than the cost of disk space. For this reason, it is often useful to be able to use part of the hard disk as if it were memory. This is what a swap partition allows the operating system to do. The kernel will be able to "swap" current unneeded data out of RAM and write it to the swap partition on the disk. When the data is needed by the kernel again, it will be read off the disk, and placed back into RAM.
The benefit is that you get away with not having to have the full amount of physical RAM required to run a specific application. One important point to remember though is that accessing the hard drive is a lot slower than accessing RAM, and so you will incur a speed penalty.
A good rule of thumb is to have the amount of swap that you have equal to twice the amount of RAM that you have, but no more than 1GB. Obviously, this might vary depending on what you're wanting to use the system for.
In our example, we're going to create a 64MB swap partition.
Select "Partition hard disk" and then press Enter.
You will then be prompted to select which hard disk you wish to partition:
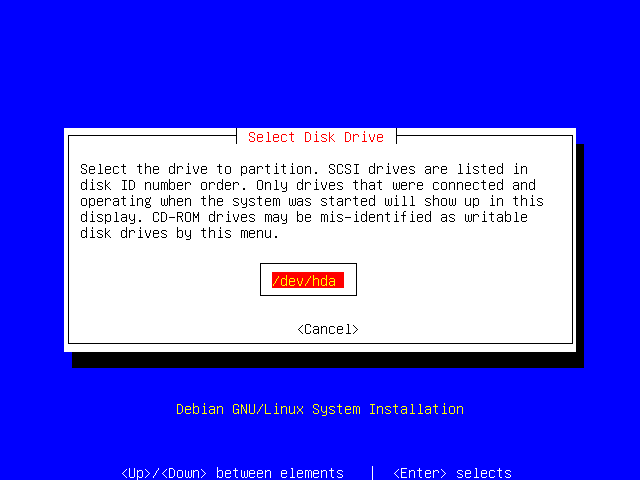
The Linux kernel assigns short names to the storage devices that it finds on your system. It's important to know what naming scheme it uses, so that you can correctly chose which disks to partition:
Table 2.2. Disk Device Names
| device | description |
| hda | primary master IDE hard disk |
| hdb | primary slave IDE hard disk |
| hdc | secondary master IDE hard disk |
| hdd | secondary slave IDE hard disk |
| sd0 | first SCSI hard disk |
| xda | first XT disk |
| fd0 | first floppy drive |
| scd0 | first SCSI CD-ROM |
In our example, there is only one drive installed in the system; a primary master IDE drive (hda).
Press Enter to select this drive, and continue.
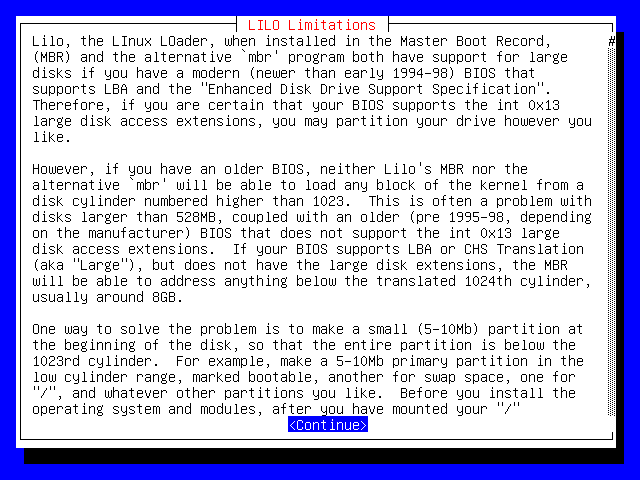
If you have a large HDD, but an old machine, you may encounter problems booting a Linux system. Please read the notes on this screen carefully. If your machine is from 1998 or later, then you shouldn't be affected by this problem. Press Enter to continue.
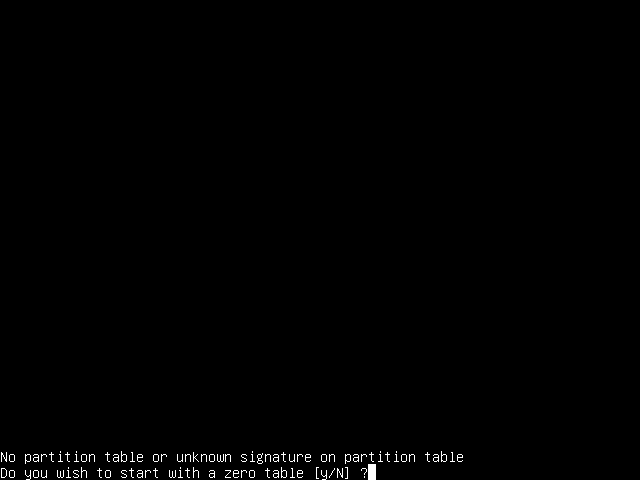
The dbootstrap application has now launched another application called "cfdisk". This is the actual tool that you will use to partition your hard drive. If you are installing onto a new disk, you will be presented with a prompt as above. Simply press "Y" and then Enter to continue.
You will then be presented with the cfdisk main screen, which should look like this:
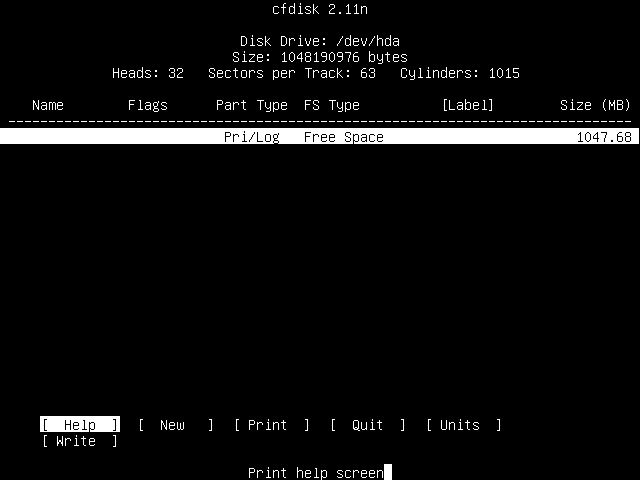
You can use the following keys to navigate around cfdisk:
Table 2.3. Navigation Keys in cfdisk
| left/right arrow keys | move menu selection highlight |
| Up/Down arrow keys | move partition selection highlight |
| Enter | select current menu and partition options |
The first thing you should do is press Enter and read through the help section to familiarize yourself with its contents.
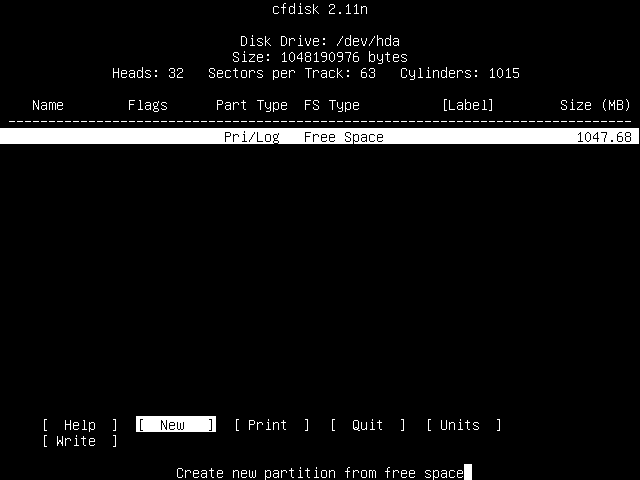
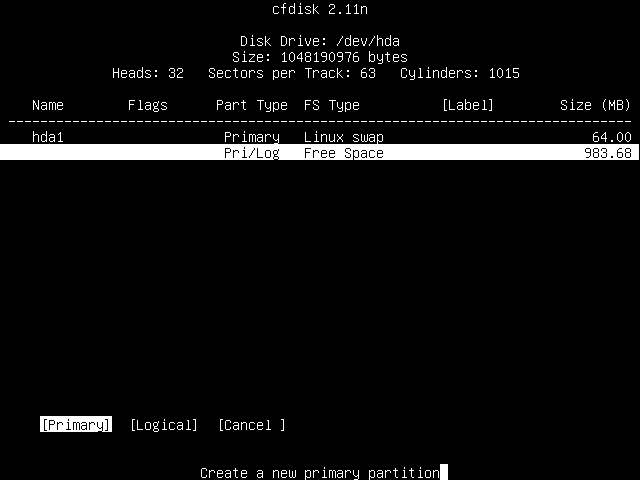
Once you have read the help section return to the main screen, press the right arrow key to highlight the "New" menu option, and then press Enter.
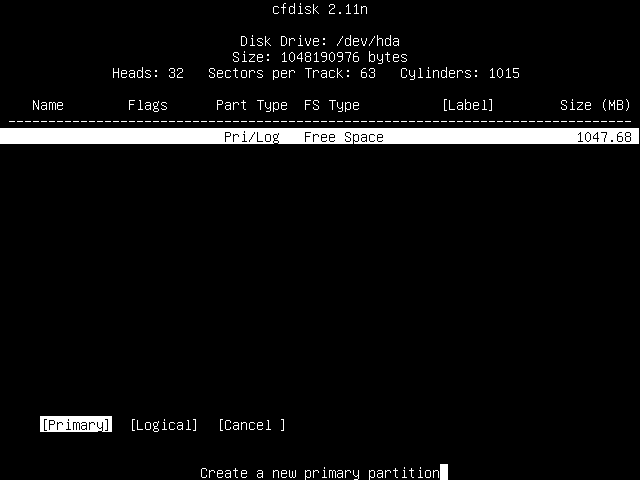
You will then be prompted to chose which type of partition you wish to create; either a primary one or a logical one. Unless you already have four primary partitions on your system, select "primary" and press Enter.
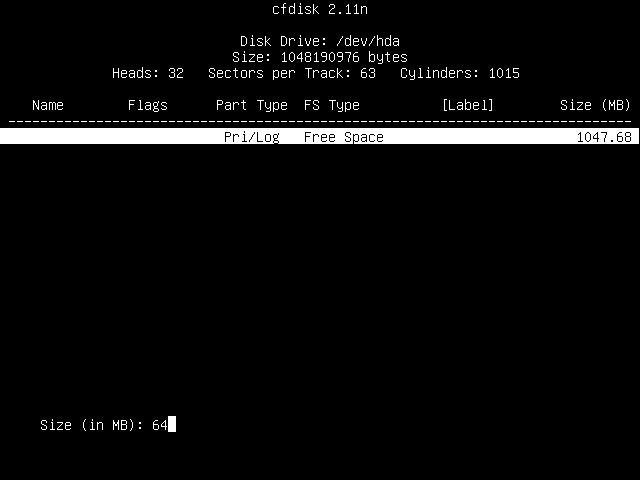
You will then be prompted for the size of the partition, given in MB.
We will create a 64MB sized one, so type "64" and press Enter.
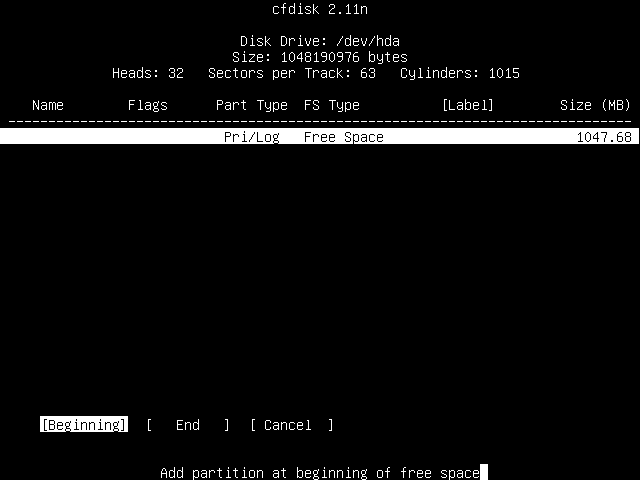
Now you can choose whether you wish to add this partition to the beginning of your free space, or to the end. Select "Beginning" and press Enter.
You screen should now look something like this:
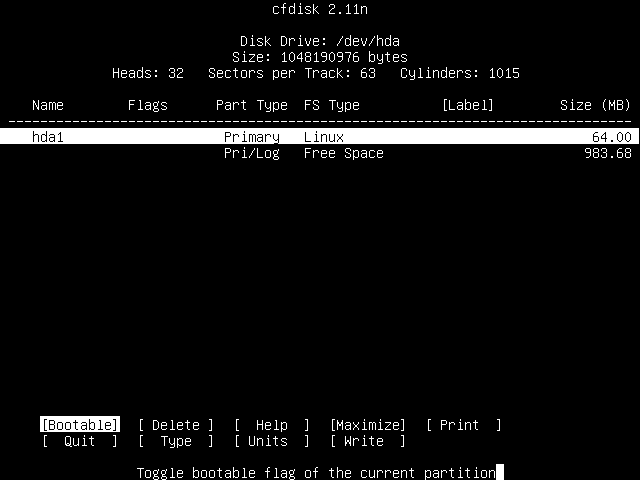
You'll see that the partition you've just created is now displayed. It's called "hda1". As mentioned previously "hda" is your primary master IDE drive; the "1" signifies that it is the first partition.
You'll see that it's also a "Primary" partition, that it's a "Linux" filesystem type and that it's 64MB in size.
You'll also see that we still have some free space left, 983.68MB worth in the screenshot.
However, we don't want this to be a "Linuxv" partition, we want it to be a "Linux swap" partition. Use the right arrow key to move the cursor all the way from "Bootable" over to "Type", and then press Enter.

You'll be presented with two pages worth of partition types, and their associated partition type numbers.
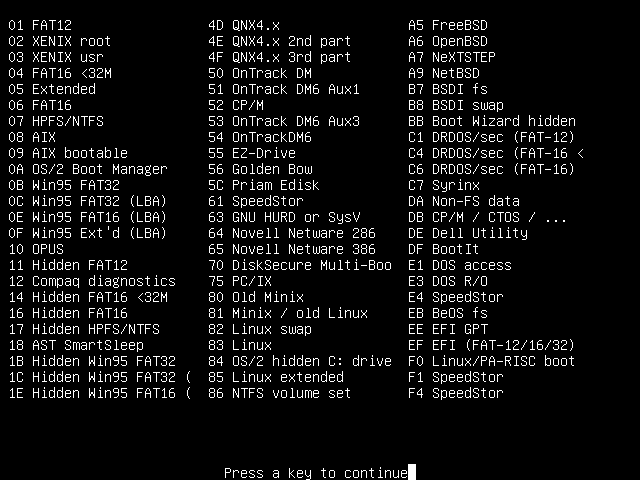
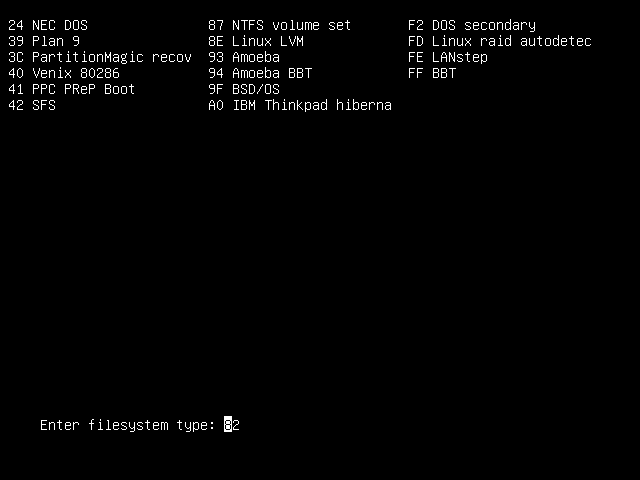
At the end of that, you'll be prompted to enter the number of the partition type that you want.
The two numbers that you'll be most interested in remembering are:
82 - Linux swap 83 - Linux |
The rest might be useful if you're having to recover your partition table at some point in time, but they're not necessary for a standard Linux installation.
Enter the number "82" (for "Linux swap") and press Enter.
You should now see that the main screen has been updated to reflect your choice, and that the FS Type for hda1 is set to "Linux swap".

Now we want to create another partition out of the remaining free space. Press the down arrow key to move the highlight bar onto the "Free Space" section, and then press the right arrow key to select "New".

Press Enter, and you should be presented with the now familiar menu asking you to select between creating a Primary or a Logical partition. Just press Enter again to select Primary.
As before, you'll be prompted to select the size of the partition. Just hit Enter to select the default, which is to use all the available free space.
Since this is the partition you'll be wanting to boot from, press the Enter key again to toggle the partition's "Bootable" flag. This tells your computer than that partition can be booted from. The main screen should now look something like this:
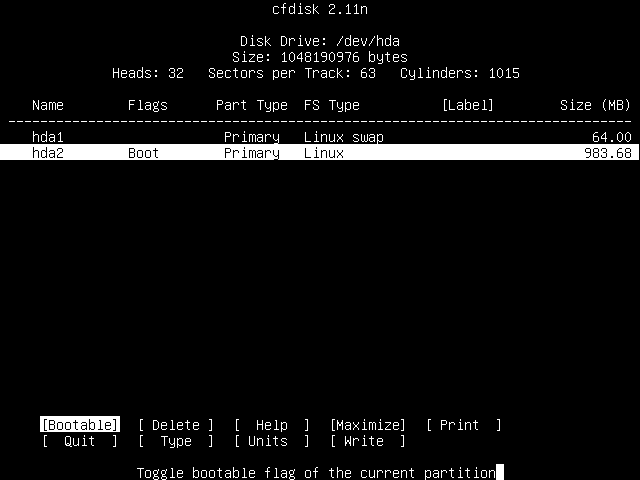
You can see that you now have two partitions; "hda1" is the previously created Linux swap partition, while "hda2" is your newly created Linux partition. You'll note that the "hda2" partition has its "Boot" flag enabled.
Phew! Now we can finally write this partition table to the hard drive.
Use the right arrow key to move the highlight over to the Write option, and press Enter.
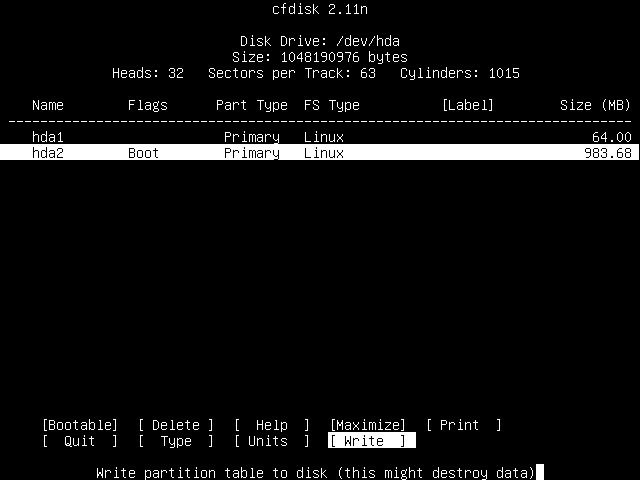
You will be prompted as to whether you do indeed wish to perform this operation:
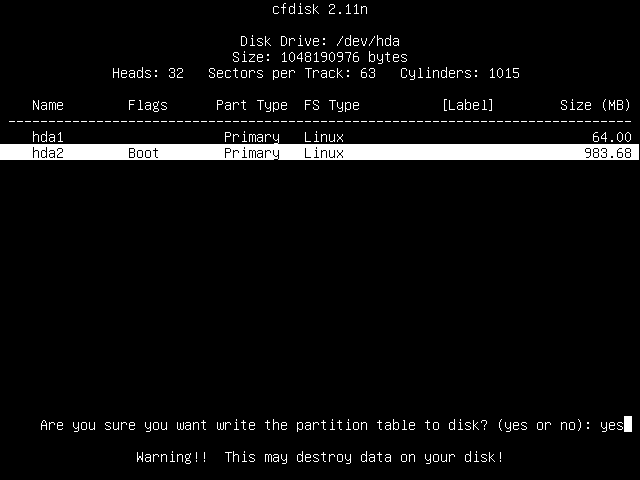
Type out the full word "yes" if you are sure that you are happy with this.
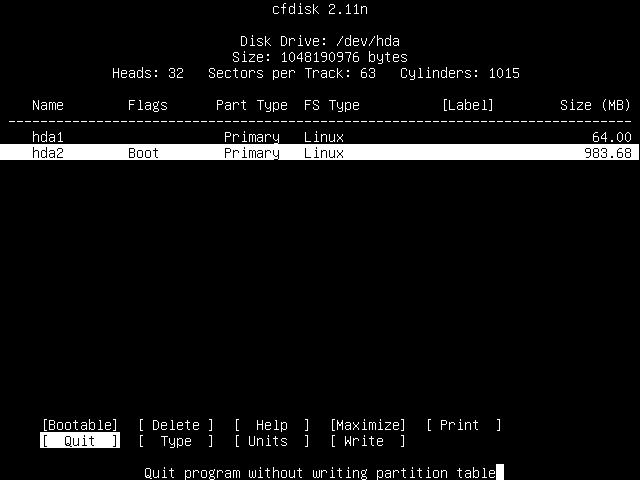
Once the partition table has been written out successfully, you can move the highlight over to Quit using the arrow keys, and then press Enter.
You have now completed the hardest part of the installation and the rest is relatively easy from here.
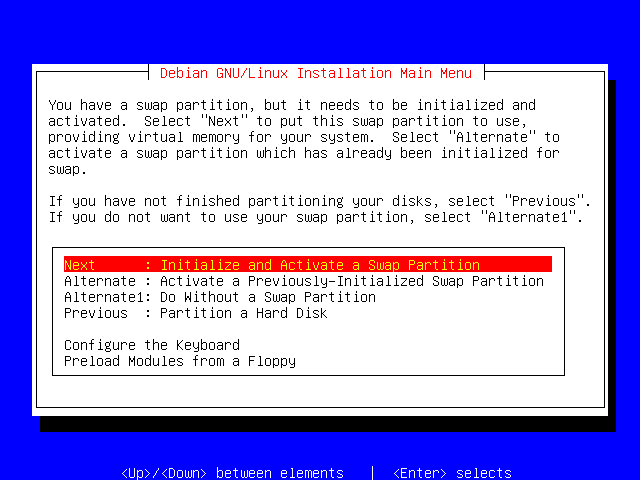
As the display tells you, you've created a swap partition, but you haven't initialized and activated it yet. Press Enter to opt to do this now.
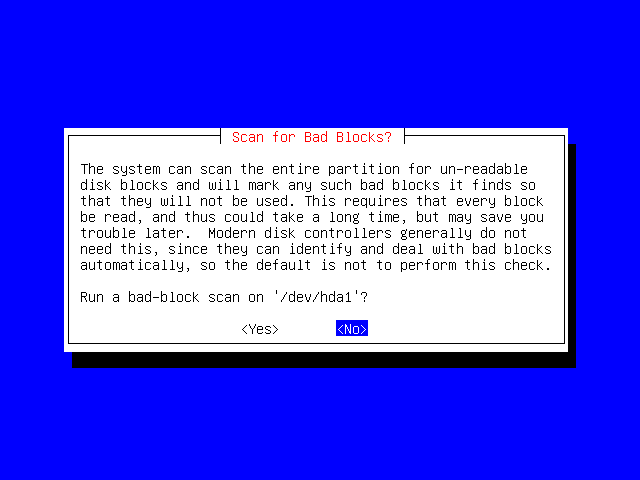
As explained in the write-up on dbootstrap, you can skip this step if you have a relatively modern HDD, as it is able to handle bad blocks on its own.
Select No and press Enter to continue.
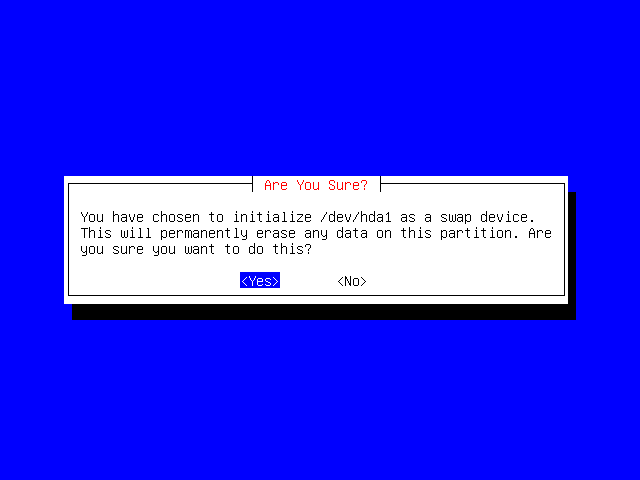
Last chance! Are you sure that this is the correct partition (hda1 in our example)? Once you select Yes and press Enter, any information stored on that part of the disk will now be overwritten.
Now your system has that disk space available as virtual memory. This is very useful if you're installing on a machine with a small amount of RAM, as dbootstrap can now make use of this resource.
Now we need to Initialize ("format" in DOS parlance) your Linux partition, and then mount it so that we can access it to install Debian onto it.
Press Enter to begin this process now.
Depending on the size of your partition, and the speed of your system and drive, this may take a few moments.
The root ("/") is the base of your filesystem; for our example installation, we will only have this single partition. You may wish to make use of a more complicated layout if you have special needs.
For example, if you have a Samba file server sharing user's home directories, you might well want to have the system ("/", /usr, etc.) on a separate disk to your data (/home). This will allow you to upgrade your system without interfering with the user data, and, likewise, allow you to expand the amount of data storage space easily, without having to re-install the system from scratch.
However, a single filesystem is usually sufficient for a workstation or similar installation.
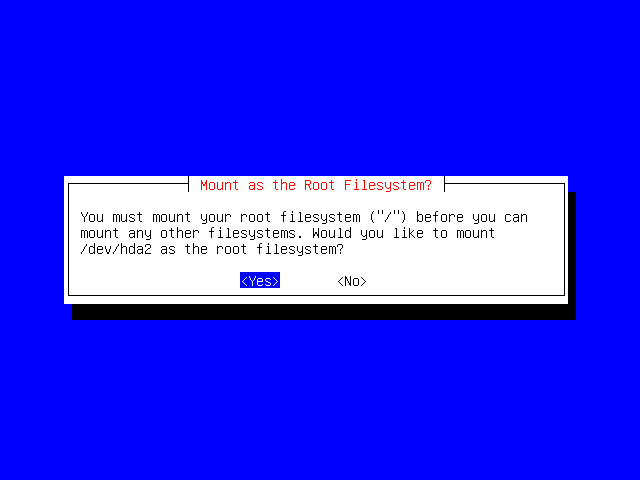
Select Yes to mount the root filesystem onto our hda2 device.
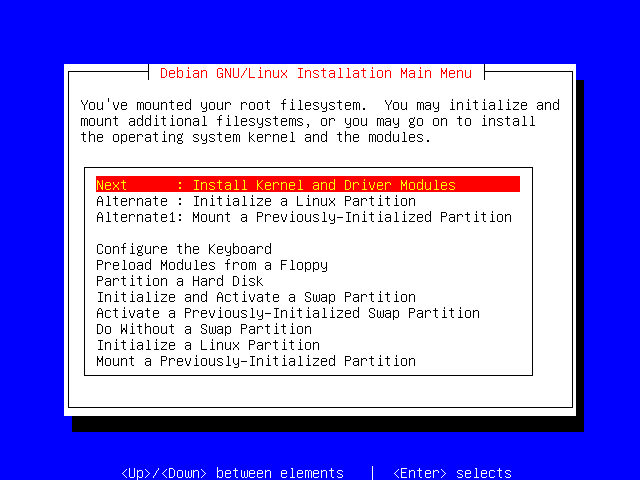
Now that you have mounted your root filesystem, you may choose to mount additional filesystems, or continue on and install the Linux kernel and driver modules.
For our example, as we only have one partition, we chose to do the later.
You might want to mount additional filesystems to install additional software, or if you are attempting to use the installation program to rescue or upgrade your system.
Press Enter.
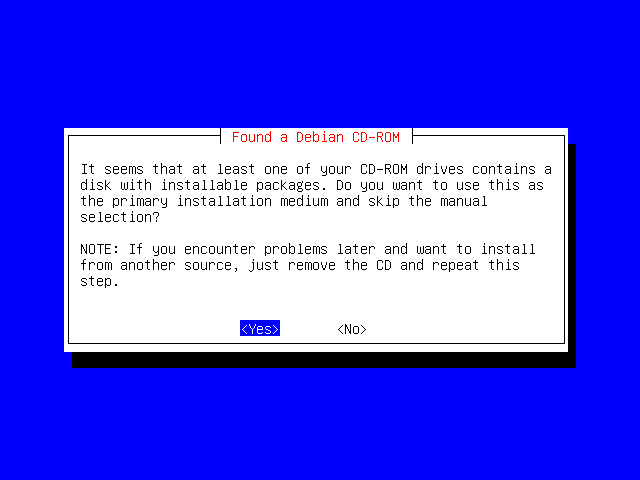
The installation program has detected your Debian CD-ROM and is asking whether or not you wish to install the packages from it.
Alternatives would be to install packages from another source, such as over the network or from another hard disk in the system.
We want to use the CD though, so just select Yes and press Enter.
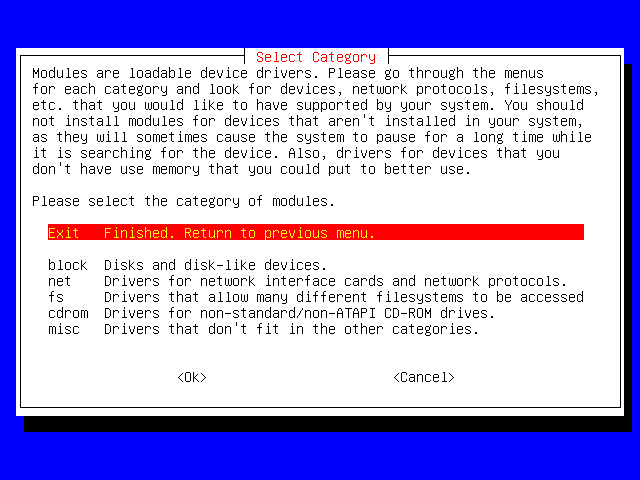
This section lets you configure which Linux kernel modules, or device drivers, you wish to use. This is useful if you have a network card which is not automatically detected, or, if you're installing on a laptop, if you have any ACACIA devices which you wish to use.
Select Next and press Enter.
If you have a supported PCI network card, support for it will already exist in the Linux kernel, so you won't have to select a kernel module for it. However, if you have one of the older ISA/EISA network cards, (e.g. an NE2000 compatible one), then you may well have to select a driver for it.
![[Tip]](../images/admon/tip.png) |
Tip |
|---|---|
|
One handy way of doing this is seeing what settings the hardware is detected as having by other operating systems. |
|
If Linux has detected a network card, or if you have selected a network card module, you will be presented with the option of configuring it.
If you don't have a network card, or if you do but don't wish to configure it, you can skip ahead to the next section, otherwise press Enter to begin the configuration.
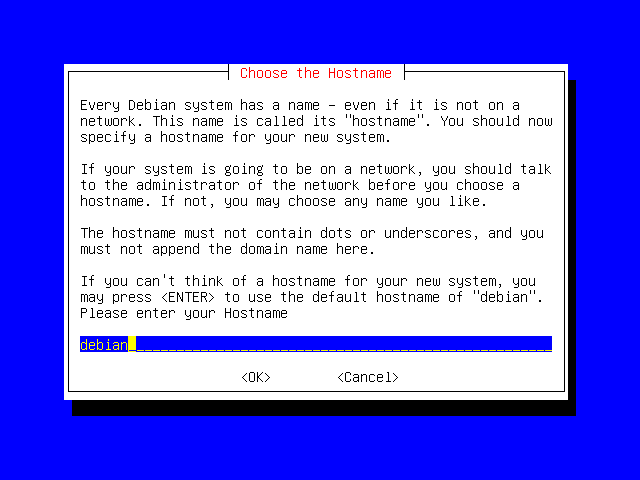
You'll be prompted for a name for your machine; you can call it whatever you like, as long as the name conforms to the rules mentioned on the screen. The default name is "debian", so we'll just stick with that.
Press Enter to continue.
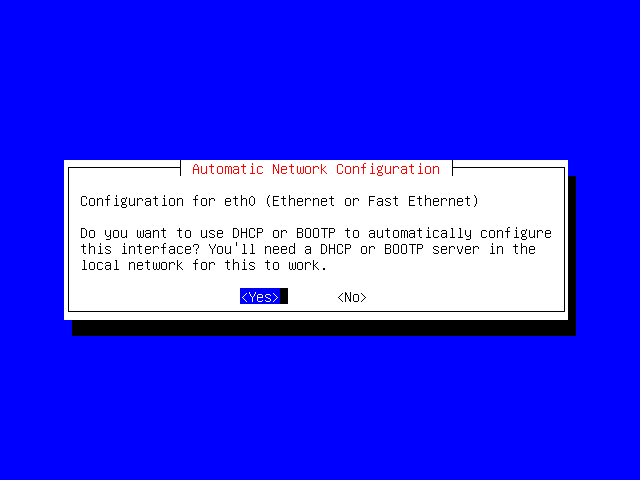
Here you'll have to know a little bit about your network. If you're putting your machine on a live network, and you know that your network has a DHCP server, then you can tell Debian to behave as a DHCP client. This is useful as it will automatically configure your network settings for you.
However, if your machine isn't on a network, or your network doesn't support DHCP, then you'll have to do it manually. For this example, we'll do it manually.
Use the arrow keys to select No, and then press Enter.
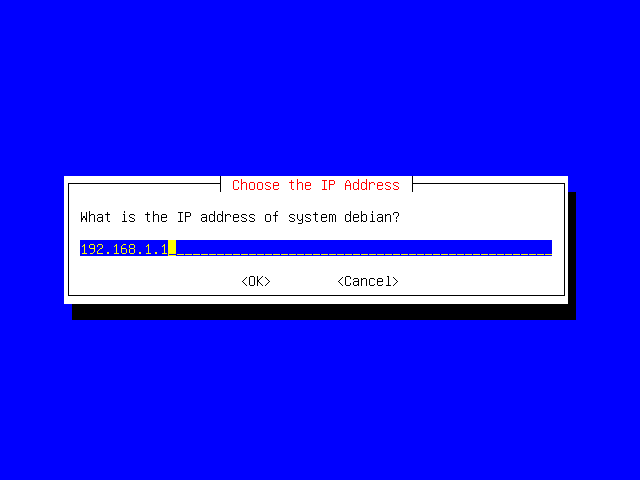
You'll need to provide an IP address here; the default is "192.168.1.1", which is a private IP address. We'll use this one for our example, but you may need to specify a real one depending on your own network configuration.
This step will install the "base system", or, put another way, just enough to get your system up and functioning.
Press Enter to continue.
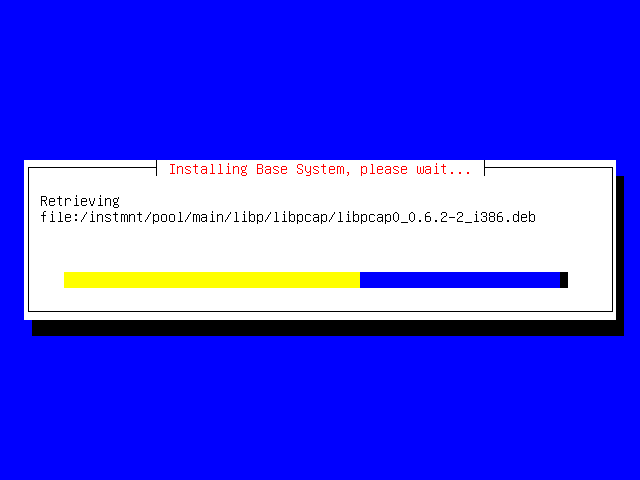
This step will take awhile, as it will have to copy a large number of files off the CD-ROM, extract them and install them on your Linux partition.
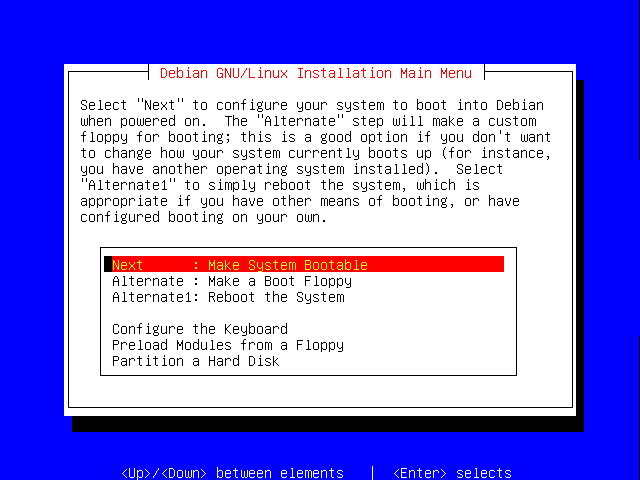
Once the installation has finished, you'll be asked whether you wish to make the system bootable.
Press Enter to continue with this step.
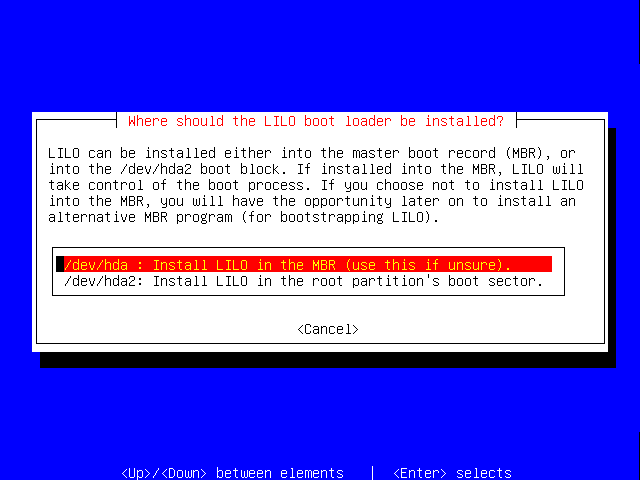
For our example installation, we'll install the LILO boot loader in the MBR (Master Boot Record) of the hard drive. If you were installing onto a disk which already had a boot loader, you might opt to instead install LILO in the root partition (hda2, remember?) instead.
![[Note]](../images/admon/note.png) |
Note |
|---|---|
|
The space on your hard disk can be partitioned into a maximum of four (4) "primary partitions". Sometimes, your configuration requires that you have more than 4 partitions available. To address this problem, you can convert one of the 4 primary partitions into an "extended partition", within which you can create "logical partitions", which allows you to have more than 4 partitions on a single disk. Each partition can hold a different operating system, or your operating system may be spread over several partitions, each acting as a different drive letter (Windows) or mount point (Linux). |
|
Press Enter to install LILO in the MBR.
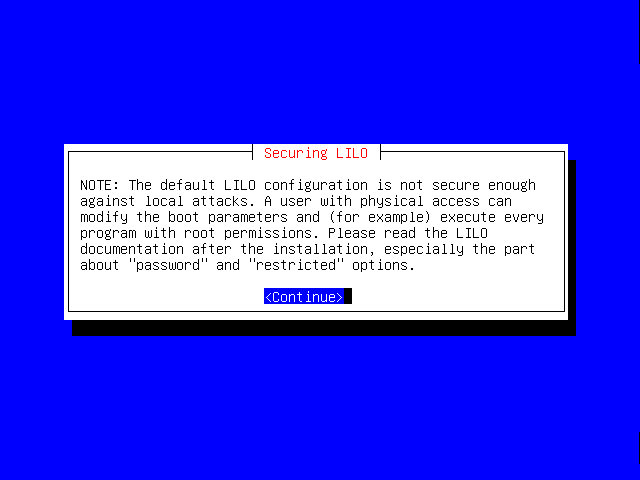
If you're interested in keeping your machine secure from physical access, you should read this notice carefully.
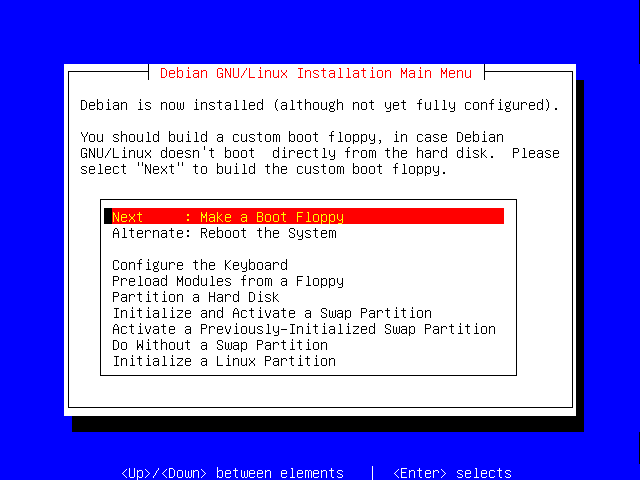
It's recommended that you make a boot floppy, it is a very useful troubleshooting tool; you could use the floppy disk to boot your Debian system if it has problems booting from the hard drive as an example.
Press Enter.
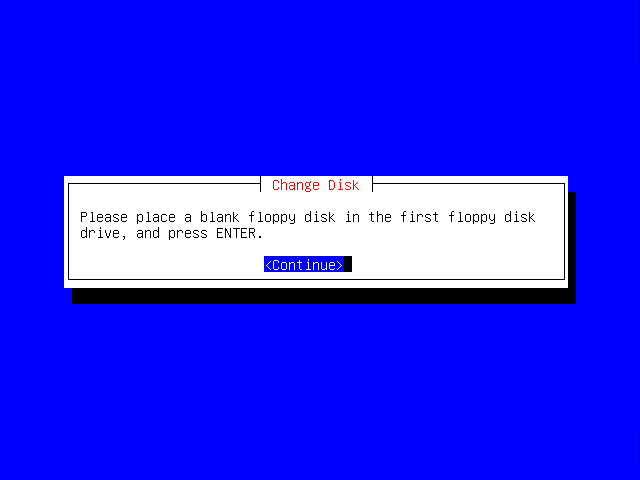
Now insert a blank floppy disk, and hit Enter again.
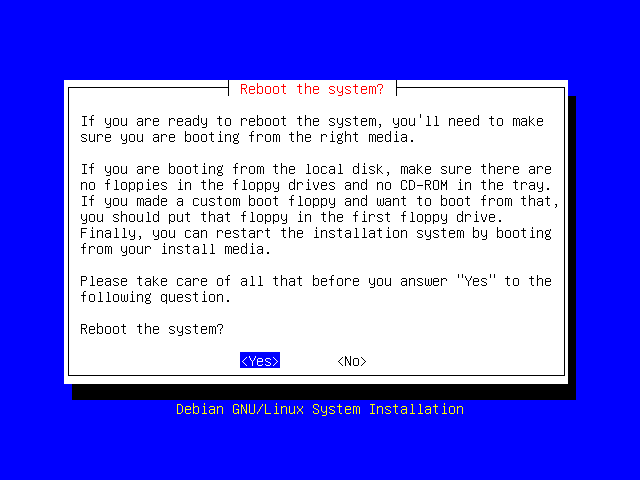
Once you've made a boot floppy, you're ready to reboot the system and see if it works. Make sure that you remove the floppy that you have made as well as the installation CD.
Once that's all done, press Enter to reboot.
Your system should then reboot, and you will hopefully be presented with a screen which looks like this:
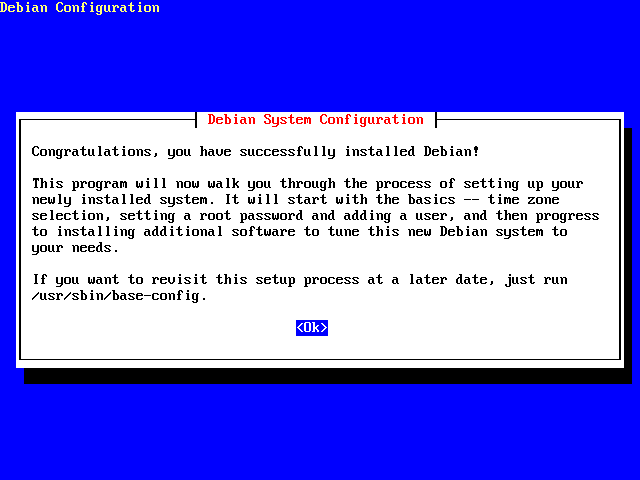
Congratulations!
If you aren't presented with the "Congratulations" screen when you reboot, then something unfortunately must have gone wrong. The first thing I would suggest is attempting to boot off the boot floppy that you made earlier.
Some systems have problems with the LILO boot loader on the hard disk.
|
|
 |
|
| Keeping a record of your system |  |
Post-installation configuration |