| Post-installation configuration | ||
|---|---|---|

|
Chapter 2. Installation and Bootup |  |
| Post-installation configuration | ||
|---|---|---|
|
|
Chapter 2. Installation and Bootup | |
Once you've successfully booted your system for the first time, Debian will ask you several questions to configure the packages that you have installed. You can revisit this process at any time by issuing the /usr/sbin/base-config command as root.
You will be asked whether you wish to set your hardware clock to GMT. As noted on the screen, if you are only running one operating system on your machine, then this setting is usually fine. However, if you are using a multi-boot system, you may wish to leave the hardware clock set at local time.
You will then be asked to select your time zone.
You can use the "arrow keys" and the Enter key to make your selections.
You will be prompted about whether or not to enable MD5 passwords. If this is going to be a stand-alone system, then MD5 passwords should work fine. If you are going to be integrating this system into an already existing network of Unix machines, you may wish to use the older DES encryption method. Again, make your selection with the "arrow keys" and then the Enter key.
The differences between MD5 and DES password encryption is covered in the Fundamentals section.
You should always enable shadow passwords unless you have a very good reason for doing otherwise. Not using shadow passwords leaves your system very vulnerable to local attacks.
You need to set a password for the "root" or administrator account. Read the instructions on the screen carefully and chose a password.
You'll be prompted to enter the password twice to verify that you didn't make any typos.
![[Note]](../images/admon/note.png) |
Note |
|---|---|
|
Choose a really good password for the root user? Remember that a person having access to the root account would have full permissions on the system. |
|
It's usually always a good idea to create a normal user account. For our example, we'll create one called "student", but you can choose whatever your preferred username is.
Again, choose a good password for your normal user account.
If you're not installing on a laptop, Debian will detect this and ask if you wish to remove the ACACIA packages. This is safe to do, unless you know you'll be wanting ACACIA support for something.
If you have a modem connected to your machine, and want to enable your Debian system to use it to connect to the Internet, then select Yes.
If you don't have a modem, or don't wish to connect to the Internet via PPP (perhaps you have a network card), then you can select No.
If you selected Yes, you'll be taken through the PPP Configuration Utility. You'll need to know your dial-up number, username and password. Your ISP should be able to provide you with these.
APT is part of the Debian package management system.
You need to tell APT where it can obtain Debian packages from. If you have a permanent Internet connection, then it's usually a good idea to select a local Debian mirror to obtain packages from. If you don't have an Internet connection, then you can tell Debian to obtain its packages from CD-ROM instead.
APT is clever enough to be able to handle multiple CDs, so you could load all 7 official CD images into its database if necessary.
Since we've just installed off CD-ROM, this is probably the easiest way to continue, so insert the CD and then just select "cdrom" and press Enter.
APT will then prompt you for further CDs. If you have them, then feel free to load them in. Otherwise, select No and press Enter.
APT will then prompt you to select any additional package sources.
Select No and press Enter.
You'll also be asked if you wish to track security updates from the official Debian security site. If you have a connection to the Internet, this option is definitely recommended.
You can get back to this section after you've finished your installation by running the apt-setup command.
You'll be asked if you wish to use "tasksel" (task select), which will allow you to tailor your system to perform specific tasks by installing the correct packages.
Select Yes and press Enter.
You can use the Up/Down arrow keys to scroll through the list of "tasks" in tasksel, and you can use the left/right arrow keys to select either the selection screen, the Finish, Task info or Help buttons.
While the selection screen is active, you can use either the Spacebar or Enter key to toggle which options you wish to install.
For a first time desktop installation, it is recommended that you select the "X window system" and "desktop environment" options.
Once you've toggle what you want, you can select the Finish button and hit Enter.
You'll now be prompted about whether you wish to use dselect. This is similar tool to "tasksel", but allows your more control over what software packages you're going to install. You can safely skip this step for now though.
Select No and press Enter.
You will then be presented with a long list of packages that are now going to be installed, as well as the summary on the disk space that will be required to perform this operation. You can select Y and Enter to continue, or N and Enter if you wish to abort the installation.
APT will then proceed to load the packages that it requires from the various sources that you'd told it about previously. If you told it to load packages off the CD-ROM, it will prompt you to make sure that the relevant CD is inserted, and to then press Enter.
Do this now.
You may receive an error message about the "binutils" package and a "Kernel link failure". You can just press Enter and safely ignore the message, as it is only pertinent if you are performing an upgrade of your system, rather than an installation.
You will be notified that the statd daemon uses tcpwrappers. Again, just hit Enter.
You will be prompted about whether to allow only SSH protocol 2.
Again, just hit Enter to select Yes.
You will also be notified about OpenSSH's privilege separation, and be given the option of installing ssh-keysign with the SUID bit set.
You can hit Enter through these two options.
You will also be prompted about whether you wish to run the OpenSSH server. If you intend to remotely access this machine, then you should enable the server. Otherwise, you can leave this off.
Enable this if you have a PostScript printer. Most modern printers are.
You will also be prompted for your default paper size.
You should enable TrueType fonts for Mozilla. It looks prettier.
You can leave the "tsp wrapper" set to "none".
You should opt to have your X server wrapper managed by "debconf".
You should opt to have your X server configuration file managed by "debconf".
You'll need to select which X server you wish to use, based on your video card. Select "vesa" if you're unsure. Don't worry, you can always come back here and try later.
You can opt to use the kernel framebuffer device interface.
For a beginner, it's easiest to use the Simple option to configure your X Windows System.
Select your monitor size, resolution and color depth.
You should now see quite a few lines of text scrolling up your display. These are the individual packages being unpacked and installed on your system.
Once this has been done, the newly installed packages will be configured. Some of this configuration will require your input.
You'll be asked which dictionaries you wish to use, select either 1 or 2, and then press Enter.
You'll be asked if you wish to erase and previously downloaded .deb files. You can just press Enter here.
The default MTA[2] that comes with Debian is Exim. You'll be prompted to let Debian know what sort of mail system configuration your environment uses.
You can safely choose "4) Local delivery only".
Provide your normal user account as the address which should receive postmaster-mail.
You should, finally, be presented with a "Have fun!" screen.
Well done, your Debian system is up and running and ready to use!
Now you should be ready to finally log in! You should make your initial login with the normal user account that you created earlier.
Once you've logged in under your normal user account, you can then use the "su" (substitute user) command to become the super user, also called the "root user", if you are going to be performing any administration tasks.
Linux baloo.zoo.org.za 2.2.20-idepci #1 Sat Apr 20 12:45:19 EST 2002 i686 unknown

Most of the programs included with the Debian GNU/Linux system are
freely redistributable; the exact distribution terms for each program
are described in the individual files in /usr/share/doc/*/copyright

Debian GNU/Linux comes with ABSOLUTELY NO WARRANTY, to the extent
permitted by applicable law.

student@debian:~$ su
Password:
debian:/home/student#
|
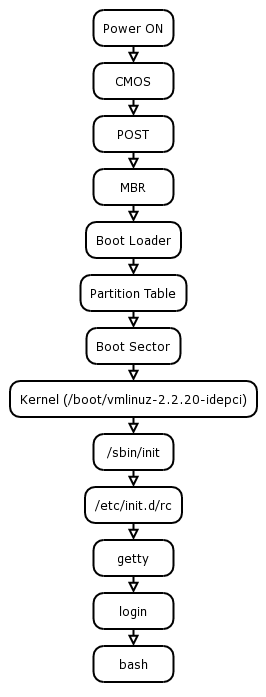
This chapter will describe the steps that your machine takes from the time that it is turned on up until your operating system is fully loaded.
|
Note |
|---|---|
|
This only covers the sequence of events on x86 (Intel 80x86 or compatible). If you are using a Sparc or Alpha architecture machine, the process will be similar, but not identical. |
|
When you start your machine, it goes through a process known as "bootstrapping", or "booting".
Simply put, your computer doesn't know what to do when you turn it on, so it has to go and fetch some instructions from somewhere. It will initially start the BIOS[3] off your machines CMOS[4] chip.
As the name implies, the BIOS can handle very simple read and write procedures on your machine, usually the system's hard drive.
Before the BIOS does anything else, it will initiate what is known as POST[5]. These are a series of very simple tests to check that the hardware connected to the system (such as RAM, hard drives, video) are functional.
If you system fails POST, it will emit a series of beeps. You can usually look up the meaning of these beeps in your motherboard's manual.
Once POST has been passed, the CMOS will then examine the first sector of your hard disk for the Master Boot Record (MBR), which will contain a boot loader. If it cannot find the MBR, or cannot find a boot loader, the CMOS will halt with an error.
Remember that the space on your hard disk can be partitioned into a maximum of four (4) "primary partitions". Sometimes, your configuration requires that you have more than 4 partitions available. To address this problem, you can convert one of the 4 primary partitions into an "extended partition", within which you can create "logical partitions", which allows you to have more than 4 partitions on a single disk.
Each partition can hold a different operating system, or your operating system may be spread over several partitions, each acting as a different drive letter (Windows) or mount point (Linux).
Once the boot loader has been loaded off the MBR, it will take over control of the machine.
The boot loader may have been configured to boot a single operating system, or it may provide the user with a choice of operating systems to choose from. Such functionality is available from the *Li*nux Boot *Lo*ader, LILO.
Once the boot loader knows which partition you want to boot, it will examine the first sector of that partition, also known as the boot sector, for the boot program. If you're booting Linux, this will also be LILO.
Once the boot program has been loaded, it will be able to examine the Linux filesystem and be able to load the Linux kernel into memory and execute it. It will also be able to pass instructions on to the Linux kernel.
The Linux kernel will then proceed to probe the hardware in the machine based on the setting the kernel was compiled with. These will include the device drivers, which enable to kernel to read from the hard disk.
The default instruction will be for the kernel to load up the "init" process.
The init process is known as the parent of all processes and is generally stored in the /sbin directory.
The kernel will tell "init" what "runlevel" to start the system at. Runlevel 2 is the default runlevel for Debian.
The runlevels, and what happens at each level, are configured in the /etc/inittab file.
Table 2.4. Runlevels
| Runlevel | action |
| 0 | halt the system |
| 1 | single user or maintenance mode |
| 2-5 | multi-user mode |
| 6 | reboot |
The init process will then call a shell script called "rc"[6], with the runlevel as its parameter, which will then start up various system services, based on the runlevel that init was given.
The "rc" script will examine the following directory[7]:
/etc/rc#.d/
Where the "#" is replaced by the current runlevel. For a machine, which is booting normally, this would be runlevel 2, so rc would be examining the contents of:
/etc/rc2.d/
In that directory are a collection of scripts.
What is important is their names and the first letter of the name must be a capital "K" (short for kill, used when shutting down the system) or a capital "S" (short for start, used when booting up the system).
Anything else is ignored.
debian:~# ls /etc/rc2.d/
S10sysklogd  S19nfs-common  S20lpd
S20ssh  S89cron S99rmnologin
S11klogd     S20exim        S20makedev
S20xfs  S99gdm S99xdm
S14ppp       S20inetd       S20nfs-kernel-server
S89atd  S99kdm
|
The "rc" script will call all "K" scripts with the "stop" parameter, this instructing those processes to stop. It will then call all "S" scripts with the "start" parameter, instructing those processes to start up.
The second and third characters of the script names are usually numbers. Since "rc" executes the scripts in order, you can use this number to determine the order in which processes are started and stopped.
This is useful for doing things like making sure that the network is up and configured before starting your web server, etc.
One of the rc2.d scripts will examine a file called "fstab" (short for file system table) in your /etc directory. This file lists all the filesystems that you want your system to mount at boot time.
The script will then examine this file, and mount the filesystems if appropriate.
debian:~# cat /etc/fstab
# /etc/fstab: static file system information.
#
# <file system> <mount point>   <type>  <options>	 <dump>  <pass>
/dev/hdb2       /               ext2    errors=remount-ro       0       1
/dev/hdb1       none            swap    sw                      0       0
proc            /proc           proc    defaults                0       0
/dev/fd0        /floppy         auto    user,noauto             0       0
/dev/cdrom      /cdrom          iso9660 ro,user,noauto          0       0
|
The "file system" column contains the device, or special name in the case of proc, for the file system.
The "mount point" specifies where that file system will be mounted.
The "type" column indicates what type of file system it is. The standard type under Debian Linux is "ext2".
The "options" column specifies any special options that are to be used for this filesystem.
ro = read only
noauto = don't mount at boot time
The "dump" number indicates the level the drive should be dumped, or backed up at. A level 0 means a full backup, while higher numbers mean incremental backups.
The "pass" number indicates the order that the file systems should be checked with "fsck" when the system boots. The root ("/") file system should always be checked first, and so should have a pass number of 1. A pass number of "0" means that the file system won't be checked with "fsck"
Obviously, some of the files may exist in more than one rc#.d directory. So, in order to ease administration (imagine having to make a change in a file common to all run levels), and to save space, the actual scripts live in the /etc/init.d/ directory, and are then symlinked into their relevant /etc/rc#.d directories.
debian:~# ls -la /etc/rc2.d
total 8
drwxr-xr-x    2 root  root  4096 Mar 12 08:46 .
drwxr-xr-x   59 root  root  4096 Mar 12 09:08 ..
lrwxrwxrwx    1 root  root  18 Mar 12  2004
	S10sysklogd -> ../init.d/sysklogd
lrwxrwxrwx    1 root  root  15 Mar 12  2004
	S11klogd -> ../init.d/klogd
lrwxrwxrwx    1 root  root  13 Mar 12  2004
	S14ppp -> ../init.d/ppp
lrwxrwxrwx    1 root  root  20 Mar 12 08:44
	S19nfs-common -> ../init.d/nfs-common
lrwxrwxrwx    1 root  root  14 Mar 12  2004
	S20exim -> ../init.d/exim
lrwxrwxrwx    1 root  root  15 Mar 12  2004
	S20inetd -> ../init.d/inetd
lrwxrwxrwx    1 root  root  13 Mar 12 08:44
	S20lpd -> ../init.d/lpd
lrwxrwxrwx    1 root  root  17 Mar 12  2004
	S20makedev -> ../init.d/makedev
lrwxrwxrwx    1 root  root  27 Mar 12 08:44
	S20nfs-kernel-server -> ../init.d/nfs-kernel-server
lrwxrwxrwx    1 root  root  13 Mar 12 08:44
	S20ssh -> ../init.d/ssh
lrwxrwxrwx    1 root  root  13 Mar 12 08:46
	S20xfs -> ../init.d/xfs
lrwxrwxrwx    1 root  root  13 Mar 12  2004
	S89atd -> ../init.d/atd
lrwxrwxrwx    1 root  root  14 Mar 12  2004
	S89cron -> ../init.d/cron
lrwxrwxrwx    1 root  root  13 Mar 12 08:45
	S99gdm -> ../init.d/gdm
lrwxrwxrwx    1 root  root  13 Mar 12 08:46
	S99kdm -> ../init.d/kdm
lrwxrwxrwx    1 root  root  19 Mar 12  2004
	S99rmnologin -> ../init.d/rmnologin
lrwxrwxrwx    1 root  root  13 Mar 12 08:46
	S99xdm -> ../init.d/xdm
|
Once the system has reached the state required by the contents of the rc#.d directory, the user will be presented with a login screen.
The text-based login screen is an application called "getty", which displays the contents of /etc/issue, which is a file that usually holds the name of the operating system, as well as the terminal name.
Debian GNU/Linux 3.0 baloo.zoo.org.za
baloo.zoo.org.za login: root
|
One you provide your username, the getty process then spawns another process called "login".
This asks you for your password, and then checks your answer against the contents of /etc/passwd, or equivalent authentication mechanism.
If the match succeeds, the login program displays the contents of the /etc/motd file, and then replaces itself (using the exec( ) system call) with a copy of your shell, running under your user id.
Password:
Last login: Wed Mar 24 10:02:19 2004 on tty2
Linux baloo.zoo.org.za 2.2.20-idepci #1 Sat Apr 20 12:45:19 EST 2002 i686
unknown

Most of the programs included with the Debian GNU/Linux system are
freely redistributable; the exact distribution terms for each program
are described in the individual files in /usr/share/doc/*/copyright

Debian GNU/Linux comes with ABSOLUTELY NO WARRANTY, to the extent
permitted by applicable law.
|
Your shell will then process the /etc/profile file, and, if your shell is bash, the /etc/bashrc and $HOME/.bash_login files.
debian:~# pstree
init-+-atd
���� |-bash---pstree
���� |-cron
���� |-5*[getty]
���� |-inetd
���� |-keventd
���� |-kflushd
���� |-klogd
���� |-kswapd
���� |-kupdate
���� |-lpd
���� |-sshd---sshd---bash---top
���� `-syslogd
|
The Message of the Day (/etc/motd) file is useful for system announcements that you want your users to see when they log in. This could be something like your company policy on the use of the computing facilities, to a "Joke of the Day".
You can use the "shutdown" command to gracefully shut the system down.
SYNTAX:
shutdown [ -r | -h ] time [ message ]
|
The "-r" flag tells the system that you wish to reboot once everything's been shut down. The "-h" flag instead tells the system that you wish to simply halt it. Once a system is halted, you will have to power it off and then on again manually.
If you don't specify either of these flags, the system will be brought down into maintenance, or single user mode.
The "time" parameter specifies when the shutdown is to take place. This can be specified either in HH:MM format (i.e., 01:00 means shut down at 1AM), or in "+minutes", where minutes is the number of minutes from the time the command is issued until the shutdown process begins. You can also specify "now" to shut down the system immediately.
The "message" options specifies an optional message which will be broadcast to all shell users currently logged onto the system.
Shutdown the system now, for a reboot:
debian:~# shutdown -r now

Broadcast message from root (pts/0) (Sat Mar 20 03:34:37 2004):

The system is going down for reboot NOW!
|
You can use the "shutdown" and "reboot" commands to gracefully shutdown the
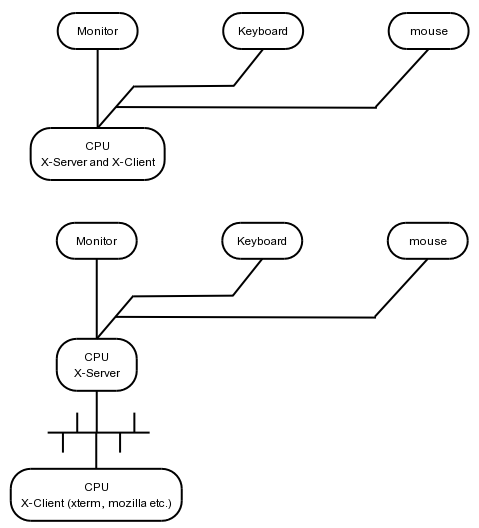
The standard graphical user interface (GUI) that comes with Debian is called XFree86. This is a free implementation of the X Windows System (X11R6), written for the x86 architecture.
The X Windows System uses the client/server architecture. The server runs on the machine which has the video display hardware, while the clients run can run on the same machine, or on a remote system.
This means that your X Windows server must know how to handle your video display hardware.
Your X Windows clients are your graphical applications; examples include "xterm", "mozilla" and "openoffice".
In addition, you usually need a system to manage to each of the "windows" that your applications generate. This system is called your "window manager". It is responsible for putting borders around your application windows, and allowing you to perform actions such altering the size (know as "geometry" in X11 parlance) and location of the window on the screen.
Some of the popular window managers include "fluxbox", "fvwm" and "afterstep".
In addition to window managers, you also get "integrated desktop environments". These are a collection of applications, usually including a menu system, a window manager and a graphical file manager that supports drag'drop between the various desktop elements.
Examples of popular desktop environments include KDE, Gnome and XFCE.
You can find a good summary of available window managers and desktop environments here
There are two ways of allowing access to your X Windows system.
You can make use of the startx command from a local console, after you've logged in.
Alternatively, you can configure an X Windows Display Manager. The default display manager that comes with XFree86 is called plain "XDM".
There is a KDE specific one called "KDM" and a Gnome specific one called "GDM"; the KDE and GNOME Display Managers, respectively.
All three of these applications provide a graphical login screen, and can be accessed either via the local console, or via the network by means of the XDMCP protocol.
You can use the following command under Debian to configure XFree86 (as root):
dpkg-reconfigure xserver-xfree86
This will take you through the same configuration procedure as when you first installed it earlier (see the section called “Configuring X Windows”).
The default Debian installation uses the Linux Boot Loader (LILO), and it performs perfectly for simple boot configurations. However, a lot of people find the GRand Unified Bootloader (GRUB) easier to use and more powerful and thus better suited for their needs.
Switching from LILO to GRUB on Debian is a relatively easy process.
First, you'll need to install the GRUB package:
debian:~# apt-get install grub
Reading Package Lists... Done
Building Dependency Tree... Done
The following NEW packages will be installed:
  grub
0 packages upgraded, 1 newly installed, 0 to remove and 2  not upgraded.
Need to get 0B/247kB of archives. After unpacking 504Kb will be used.
Media Change: Please insert the disc labeled 'Debian GNU/Linux 3.0 r2 _Woody_
- Official i386 Binary-1 (20031201)' in the drive '/cdrom/'
and press enter

Selecting previously deselected package grub.
(Reading database ... 9857 files and directories currently installed.)
Unpacking grub (from .../g/grub/grub_0.91-2_i386.deb) ...
Setting up grub (0.91-2) ...
|
Once that's done, you'll need to install the boot loader code on the device that you boot from.
In our example system, that's the second IDE drive on the system ("/dev/hdb"), so the command you would issue would be:
debian:~# grub-install /dev/hdb
Installation finished. No error reported.
This is the contents of the device map /boot/grub/device.map.
Check if this is correct or not. If any of the lines is incorrect,
fix it and re-run the script `grub-install'.

(fd0)   /dev/fd0
(hd0)   /dev/hda
(hd1)   /dev/hdb
|
Once that's done, you'll need to run the update-grub command, which is Debian specific, and which will generate a GRUB menu configuration file for you, called /boot/grub/menu.lst.
debian:~# update-grub
Searching for GRUB installation directory ... found: /boot/grub .
Testing for an existing GRUB menu.list file...

Could not find /boot/grub/menu.lst file. Would you like one generated
for you? (y/N) y
Updating /boot/grub/menu.lst ... done


Please note that configuration parameters for GRUB are stored in
/boot/grub/menu.lst . You must edit this file in order to set the
options which GRUB passes to the kernel, as well as the drive which
GRUB looks in to for the kernel.

Everything on the line after "kopt=" is passed to the kernel
as parameters, and "groot=" must be set to the partition
(in GRUB terms, such as "(hd0,0)") which GRUB will load the
kernel from.

After you have edited /boot/grub/menu.lst , please re-run
'update-grub'.
|
As the instructions tell you, you will need to edit the "kopt" and "groot" parameters in that file. You should use "vi" to do this:
debian:~# vi /boot/grub/menu.lst
|
(hd0,0) refers to the first hard disk's first partition
(hd1,0) refers to the second hard disk's first partition
(hd1,1) refers to the second hard disk's second partition
etc.
|
Once you've edited the menu.lst file to your satisfaction, you will need to re-run the update-grub command:
debian:~# update-grub
Searching for GRUB installation directory ... found: /boot/grub .
Testing for an existing GRUB menu.list file... found: /boot/grub/menu.lst .
Updating /boot/grub/menu.lst ... done
|
Now reboot, and see if it has worked!
debian:~# shutdown -r now
|
Unlike the RPM package management system which RedHat Linux uses, Debian's packages files have a .deb extension.
Debian uses three different, but related, sets of tools to manage its packages: dpkg, dselect and apt.
The dpkg command is the most analogous to RPM's "rpm" command; it allows you to add and remove packages, and to query currently installed packages, check their integrity and dependencies.
dpkg --list
debian:~# dpkg --list
Desired=Unknown/Install/Remove/Purge/Hold
| Status=Not/Installed/Config-files/Unpacked/Failed-config/Half-installed
|/ Err?=(none)/Hold/Reinst-required/X=both-problems (Status,Err: uppercase=bad)
||/ Name           Version        Description
+++-======================================
ii  aalib1         1.4p5-13       ascii art library
ii  abiword        1.0.2+cvs.2002 Dummy package providing abiword
ii  abiword-common 1.0.2+cvs.2002 WYSIWYG word processor
ii  abiword-gtk    1.0.2+cvs.2002 WYSIWYG word processor based on GTK
ii  adduser        3.47           Add and remove users and groups
ii  apt            0.5.4          Advanced front-end for dpkg
ii  apt-utils      0.5.4          APT utility programs
ii  ark            2.2.2-9        An archiver for KDE
ii  asclock-themes 2.0.12-5       Theme files for ASclock, a clock applet
ii  at             3.1.8-11       Delayed job execution and batch processing
ii  base-config    1.33.18        Debian base configuration package
ii  base-files     3.0.2          Debian base system miscellaneous files
ii  base-passwd    3.4.1          Debian Base System Password/Group Files
[ ... ]
ii  xlibs          4.1.0-16woody1 X Window System client libraries
ii  xnest          4.1.0-16woody1 nested X server
ii  xprt           4.1.0-16woody1 X print server
ii  xserver-common 4.1.0-16woody1 files and utilities common to all X servers
ii  xserver-xfree8 4.1.0-16woody1 the XFree86 X server
ii  xspecs         4.1.0-16woody1 X protocol, extension, and library technical
ii  xterm          4.1.0-16woody1 X terminal emulator
ii  xutils         4.1.0-16woody1 X Window System utility programs
ii  xvfb           4.1.0-16woody1 virtual framebuffer X server
ii  zlib1g         1.1.4-1.0woody compression library - runtime
|
We'll install the "bsdgames" package.
debian:~# mount /cdrom
debian:~# dpkg --info /cdrom/pool/main/b/bsdgames/bsdgames_2.13-7_i386.deb
 new debian package, version 2.0.
 size 791782 bytes: control archive= 6220 bytes.
     841 bytes,    20 lines      control
   10117 bytes,   158 lines      md5sums
    1791 bytes,    56 lines   *  postinst             #!/bin/sh
     969 bytes,    32 lines   *  postrm               #!/bin/sh
    1580 bytes,    55 lines   *  preinst              #!/bin/sh
     198 bytes,     7 lines   *  prerm                #!/bin/sh
 Package: bsdgames
 Version: 2.13-7
 Section: games
 Priority: optional
 Architecture: i386
 Depends: libc6 (>= 2.2.4-4), libncurses5 (>= 5.2.20020112a-1),
 wenglish | wordlist
 Suggests: wenglish
 Conflicts: bsdgames-nonfree (<< 2.5), suidmanager (<< 0.50)
 Replaces: bsdgames-nonfree (<< 2.5)
 Installed-Size: 2064
 Maintainer: Joey Hess <joeyh@debian.org>
 Description: collection of text games from BSD systems
  This is a collection of some of the text-based games and amusements that have
  been enjoyed for decades on unix systems.
  .
  Includes these programs: adventure, arithmetic, atc, backgammon, battlestar,
  bcd, boggle, caesar, canfield, countmail, cribbage, fish, gomoku, hangman,
  hunt, mille, monop, morse, number, pig, phantasia, pom, ppt, primes, quiz,
  random, rain, robots, sail, snake, tetris, trek, wargames, worm, worms,
  wump, wtf
debian:~# dpkg --install /cdrom/pool/main/b/bsdgames/bsdgames_2.13-7_i386.deb
Selecting previously deselected package bsdgames.
(Reading database ... 36337 files and directories currently installed.)
Unpacking bsdgames (from .../bsdgames_2.13-7_i386.deb) ...
Setting up bsdgames (2.13-7) ...

debian:~# _
|
dpkg --listfiles package
Let's list all the files which we've just installed that were part of the "bsdgames" package.
debian:~# dpkg --listfiles bsdgames
/.
/usr
/usr/share
/usr/share/doc
/usr/share/doc/bsdgames
/usr/share/doc/bsdgames/BUGS.atc
/usr/share/doc/bsdgames/ChangeLog.gz
/usr/share/doc/bsdgames/README.linux.hunt
/usr/share/doc/bsdgames/README.phantasia
/usr/share/doc/bsdgames/README.boggle
/usr/share/doc/bsdgames/README.linux.boggle
/usr/share/doc/bsdgames/TODO.gz
/usr/share/doc/bsdgames/ChangeLog.0
/usr/share/doc/bsdgames/trek.me.gz
[ ... ]
/var/games
/var/games/bsdgames
/var/games/bsdgames/phantasia
/var/games/bsdgames/sail
/usr/share/doc/bsdgames/NEWS.gz
/usr/share/man/man6/teachgammon.6.gz
/usr/share/man/man6/rot13.6.gz
/usr/share/man/man6/morse.6.gz
/usr/share/man/man6/ppt.
|
dpkg --search filename
debian:~# dpkg --search /usr/games/wtf
bsdgames: /usr/games/wtf
|
This is useful if you're going to be upgrading a package and want to preserve its existing configuration information.
dpkg --purge package
debian:~# dpkg --purge bsdgames
(Reading database ... 36513 files and directories currently installed.)
Removing bsdgames ...
dpkg - warning: while removing bsdgames, directory
`/var/games/bsdgames/phantasia' not empty so not removed.
dpkg - warning: while removing bsdgames, directory
`/var/games/bsdgames' not empty so not removed.
dpkg - warning: while removing bsdgames, directory
`/var/games' not empty so not removed.
Purging configuration files for bsdgames ...
|
You'll notice the warnings about "/var/games" not being empty, but if you check now, you'll see that the directory has indeed been deleted:
debian:~# ls /var/games
ls: /var/games: No such file or directory
|
This is because the directory was removed as part of the "purging configuration files" step.
You should consult the dpkg(8) manual page for further information about this command.
The dselect command is a frontend to the dpkg command and APT system, and lets you access all its functions through a text based menu system.
The APT (Advanced Package Tool) system is probably one of the reasons that Debian has gained such popularity as a Linux distribution.
Unlike dpkg and dselect, APT is able to handle dependencies and makes upgrading the software on your system very easy.
APT maintains a listing of packages and their locations.
You can use the apt-cdrom command to add a CD to the current listing. So, for example, you could insert the second Debian CD, and add the packages on it to the list of the ones available:
debian:~# apt-cdrom add
Using CD-ROM mount point /cdrom/
Unmounting CD-ROM
Please insert a Disc in the drive and press enter
Mounting CD-ROM
Identifying.. [580650a473d808bc27074b25dff224f7-2]
Scanning Disc for index files..  Found 4 package indexes and 0 source
indexes.
This Disc is called:
 'Debian GNU/Linux 3.0 r2 _Woody_ - Official i386 Binary-1 (20031201)'
Reading Package Indexes... Done
Wrote 1167 records.
Writing new source list
Source List entries for this Disc are:
deb cdrom:[Debian GNU/Linux 3.0 r2 _Woody_ - Official i386 Binary-1 (20031201)]
/ unstable contrib main non-US/contrib non-US/main
Repeat this process for the rest of the CDs in your set.
debian:~#
|
You can likewise use the apt-ftp command to add a remote FTP archive to your list of package sources.
To actually download and/or install packages, you can use the apt-get command, which takes the following parameters as commands:
Table 2.5. apt-get commands
| Update | Retrieve new lists of packages |
| Upgrade | Perform an upgrade |
| Install | Install new packages |
| Remove | Remove packages |
| Check | Verify that there are no broken dependencies |
So, to install the "bsdgames" package, we would run:
debian:~# apt-get install bsdgames
Reading Package Lists... Done
Building Dependency Tree... Done
The following NEW packages will be installed:
  bsdgames
0 packages upgraded, 1 newly installed, 0 to remove and 0 not upgraded.
Need to get 0B/792kB of archives. After unpacking 2114Kb will be used.
Media Change: Please insert the disc labeled 'Debian GNU/Linux 3.0
r2 _Woody_ - Official i386 Binary-1 (20031201)' in the drive
'/cdrom/' and press enter

Selecting previously deselected package bsdgames.
(Reading database ... 36340 files and directories currently installed.)
Unpacking bsdgames (from .../bsdgames_2.13-7_i386.deb) ...
Setting up bsdgames (2.13-7) ...

debian:~# _
|
As you can see, APT is clever enough to know which CD the package is on, and will prompt you for the correct media when you ask it to install something.
You can also use the apt-setup command to configure the list of sources for packages.
RPM, a cyclic acronym for RPM Package Management, forms the base of the RedHat Linux package management system, as well as several other distributions. Although it is not used for the base package management system in Debian Linux, you can still make use of it if required.
RPM packages are given a ".rpm" extension, but otherwise follow a naming scheme very similar to .deb packages. Although the package files are in a different format, the same basic operations are common to the different package management systems:
List installed packages:
rpm -qa
Information about a .rpm file:
rpm -qi package.rpm
Install a .rpm file:
rpm -U package.rpm
List files installed by a specific package:
rpm -ql package
Find out which package a specific file belongs to:
rpm -qf filename
Uninstall an installed package:
rpm -e package
Debian makes it very easy to upgrade your kernel by using kernel packages.
We're going to attempt something more challenging though, and try to build a kernel of our own.
We are currently running Linux 2.2.20:
debian:~# uname -a
Linux debian 2.2.20-idepci #1 Sat Apr 20 12:45:19 EST 2002 i686 unknown
|
We're going to upgrade to Linux 2.4.18, so we need to install the following packages:
ncurses-dev
kernel-package
kernel-source-2.4.18
fakeroot
debian:~# apt-get install kernel-package kernel-source-2.4.18 ncurses-dev
Reading Package Lists... Done
Building Dependency Tree... Done
The following NEW packages will be installed:
  kernel-package kernel-source-2.4.18
0 packages upgraded, 2 newly installed, 0 to remove and 0  not upgraded.
Need to get 0B/24.1MB of archives. After unpacking 24.9MB will be used.
Media Change: Please insert the disc labeled 'Debian GNU/Linux
3.0 r2 _Woody_ - Official i386 Binary-1 (20031201)' in the drive
'/cdrom/' and press enter

Selecting previously deselected package kernel-package.
(Reading database ... 36515 files and directories currently installed.)
Unpacking kernel-package (from .../kernel-package_7.107_all.deb) ...
Selecting previously deselected package kernel-source-2.4.18.
Unpacking kernel-source-2.4.18
(from .../kernel-source-2.4.18_2.4.18-13_all.deb) ...
Selecting previously deselected package libncurses5-dev.
Unpacking libncurses5-dev
(from .../libncurses5-dev_5.2.20020112a-7_i386.deb) ...

Setting up kernel-package (7.107) ...

Setting up kernel-source-2.4.18 (2.4.18-13) ...

Setting up libncurses5-dev (5.2.20020112a-7) ...

debian:~# _
|
Now change into your staging area (/usr/local/src is a good place), and extract the kernel source into that directory:
debian:~# cd /usr/local/src/
debian:/usr/local/src# tar -xjf /usr/src/kernel-source-2.4.18.tar.bz2
debian:/usr/local/src# cd kernel-source-2.4.18/
debian:/usr/local/src/kernel-source-2.4.18# _
|
Now you can run make xmenuconfig if you want to use the X configuration interface; alternatively you can run make menuconfig to use the text based interface. The make command looks for a Makefile (often called Makefile, or makefile), which you can think of as a recipe in order to be able to build something. You can optionally tell make what it is that you want to build, and make will inspect the relevant section in the Makefile to ascertain:
the ingredients, or dependencies - what is required to make what is requested and
the instructions - how to take the dependencies and turn them into the requested target
debian:/usr/local/src/kernel-source-2.4.18# make menuconfig
|
Peruse the menu, and make your selections. Once that's done, Exit and Save your kernel configuration file.
Saving your kernel configuration...

*** End of Linux kernel configuration.
*** Check the top-level Makefile for additional configuration.
*** Next, you must run 'make dep'.

debian:/usr/local/src/kernel-source-2.4.18# _
|
Clean the source tree and reset the kernel-package parameters:
debian:/usr/local/src/kernel-source-2.4.18# make-kpkg clean
|
Compile the kernel:
debian:/usr/local/src/kernel-source-2.4.18# fakeroot make-kpkg /
/--revision=tsf.1.0 kernel_image
|
This command will build a kernel package which we can then install later. You can make the revision anything you want, although it's probably a good idea to give it a meaningful name so that you know what it is.
This can take a long time; probably best to go and take a break and come back and see if it's finished later.
[ ... ]
make[2]: Leaving directory `/usr/local/src/kernel-source-2.4.18'
rm -f stamp-build
touch stamp-image
make[1]: Leaving directory `/usr/local/src/kernel-source-2.4.18'
debian:/usr/local/src/kernel-source-2.4.18# _
|
Once it's finished, you'll be able to simply install the new package, and have your kernel upgraded:
debian:/usr/local/src/kernel-source-2.4.18# dpkg --install/
/  ../kernel-image-2.4.18_tsf.1.0_i386.deb
|
The package installation procedure will offer to make a boot floppy with your new kernel, as the original installation did with the original kernel. Again, it's suggested that you make one.
The package installation will also install a new MBR for you, if it is needed.
Now reboot, and see if your new kernel works!
As mentioned previously, there are two methods for starting XFree86:
You can use the startx command to start up the X11 server and client system from the console. X Windows sessions started via this method will consult the .xinitrc file in the user's home directory for commands to execute when starting their session.
You can use the X Display Manager, or equivalent, to provide a GUI login screen on the console. Using the XDMCP (XDM control protocol), it is also possible to make this login screen available to remote systems over the network.
X Windows sessions started via this method will consult the .xsession file in the user's home directory for commands to execute when logging in.
KDE is a very complex arrangement of different packages. However, you can use apt to easily install them all:
debian:~# apt-get install kde*
|
Once apt has installed the packages, you can use the following command to start up your X session with the KDE desktop environment:
student@debian:~$ startkde
|
Debian will also default to now starting up the KDM graphical login interface at startup time.
Like KDE, Gnome is also composed of several different packages, and can be easily installed via apt:
debian:~# apt-get install gnome*
|
As with KDE, the GDM graphical login interface will be enabled at bootup. If you already have installed KDE, you will be prompted to select with interface you wish to use.
Although not covered in detail in this course, it is possible to install Debian directly from the network, using only a small bootable image. You can find more information on this installation method here: http://www.debian.org/CD/netinst/
It is also possible to automate your Debian Linux installations. This might be useful in a Linux lab or Linux cluster installation. The current method of doing this is known as FAI (Fully Automatic Installation), and you can obtain more information about it here:http://www.informatik.uni-koeln.de/fai/
You should also consult the Linux Documentation Projects notes on performing network installations: http://www.tldp.org/HOWTO/Network-Install-HOWTO.html
[2] Mail Transfer Agent
[3] Basic Input/Output System
[4] Complementary Metal Oxide Semiconductor
[5] Power-On Self-Test
[6] The name "rc" is short for "run commands", and originates from a script creation utility called "runcom", which was present in Cray's predecessor to both Multics and Unix.
[7] The ".d" in the directory name indicates that, historically, this used to be a single file, but was then later split into several smaller files, all of which are now present in this directory.
|
|
 |
|
| Chapter 2. Installation and Bootup |  |
Chapter 3. File Types and File Systems |